Facebook is a powerful tool that can help your business reach its target audience. With it, you can build brand awareness, sell your product, and generate leads by running a campaign through Facebook Ad Manager. Once set up, you will be able to segment Facebook users by interest, demographics, behaviors, and more to reach an audience that would find your business the most valuable to them!
Below, we will walk you through all the steps needed to create an ad account for your business through Facebook Ad Manager.
Things you’ll need:
Facebook Business Manager is a website owned by Facebook where businesses can manage their Facebook and Instagram advertising activities and business assets. What’s great about Facebook Business Manager is that it allows you to keep your business activities separate from your personal activities.
Some of those business assets we’ll touch base on in this guide are:
Learn how to craft posts that perform well on Facebook, download our free checklist!
The first thing we’re going to do is navigate to Facebook Business Manager. The URL is business.facebook.com. Once you’re there you’ll want to select the button on the top right of the page that says ‘CREATE ACCOUNT.’
From there you will be asked to log Into Facebook to continue. You’ll want to make sure that you log in using the email address you use to get onto your personal Facebook account.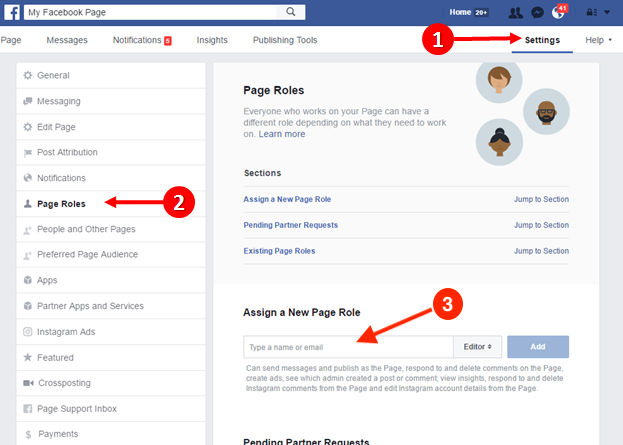
If you’re concerned about privacy or other coworkers viewing your page there’s no need to worry! This will only be used to verify who you are and as login credentials to get into Facebook Business Manager in the future.
Once logged in to your personal Facebook account, select the ‘CREATE ACCOUNT’ button again on business.facebook.com.
From here you’ll be prompted to fill out your:
Once you’ve submitted you’ll receive a message letting you know the account was created! From here, you’ll need to log into your work email address and confirm access.
In your work email inbox, locate the email in your inbox titled, ‘Confirm your business email’ from [email protected]. From here you’ll want to select the ‘Confirm Now’ button.
Confirming your email address will redirect you to the Facebook Business Manager settings page (business.facebook.com/settings). You’ve now created a Facebook Business Account for your business!
You can now control the users, pages, and assets related to your business. We’ll go over these items in the next few steps to make sure your account is set up properly.
From the settings page (business.facebook.com/settings) you can now grant access to other employees and partners who will need to access the account.
You can do this by going to the Users tab, selecting People, and inviting them by finding them by name, ID, or email address in the search bar. From there you’ll want to grant them the appropriate level access and send them the invite. Information on Facebook Business Manager roles can be found here.
We recommend adding a second admin right away at the very least. This should be a trusted employee who can control the account in the event you are unavailable. When inviting this person, you’ll want to grant them admin-level access. We recommend this because it means that if you were to accidentally lock yourself out of the account or remove yourself from the account, you know there is someone else who can re-grant you access. It happens more often than you might think!
The next step is to link your business's Facebook Page to your business manager account. To do this you’ll want to locate ‘Pages’ under the accounts tab, select ‘add’ and then click ‘add a page’.
If you control your Business's Facebook page, your business's Facebook Page may already be displaying under this tab. If it is, you can move on to the next step.
If not, no worries! You will need to be an admin of your Business's Facebook page to link it to the business manager account.
To check if you’re an admin, you can log into your Facebook account, go to your business's Facebook page by clicking ‘pages’, go to the settings tab, and check under ‘page roles’. If you don’t have admin access to the page you will need to contact one of the admins so they can grant you this access from this page.
Improve your organic reach on Facebook, download our free pre-publishing checklist!
Once admin access is confirmed, you can simply plug the URL of your business’s Facebook page into the field on the ‘add a Facebook Page’ pop-up.
If your business has an Instagram Account, you also have the option to run ads on Instagram and promote your page on that platform. You can connect your Instagram account under the ‘Instagram Accounts’ tab. You’ll simply need to log in to connect there.
The next thing we’ll need to do is add a payment method. We’re going to set this up to be the payment method that will be charged when your business is running an advertisement. This payment method can always be changed, and if you don’t have this information available you can skip this step for now and come back to it when it’s time to run an ad.
You can add a payment method by scrolling down on the left-hand navigation bar to the ‘Payment Methods’ tab.
Select ‘Add Payment Method’ and fill out the Credit/Debit card information you would like to use for your advertising.
We’re now ready to create an ad account for your business. This will be where you will be able to set up and run advertisements on Facebook and Instagram.
Navigate to the ‘Ad Accounts’ tab, select the blue ‘Add’ button, and click ‘Create a New Ad Account’. From the drop down menu select ‘Create a new ad account’.
Simply name your ad account, select your business page, enter your time zone, currency, and the payment method.
Earlier we linked the business's Facebook page and created a Payment method, so those should appear as options for you to choose here.
Once you’ve filled out the necessary information, you can select ‘Create Ad Account’!
Next, you’ll want to select which users you want to add to this ad account and assign them access levels. There are several options to choose from. You can find out more about ad account roles here.
We recommend providing Ad Account Admin level access to the employee you provided admin access to earlier.
Congratulations, you’re now all set up to run ads for your business on Facebook!
To access the Ads Manager where you will be able to create and run advertising campaigns for your business, select the square icon on the top left of the screen and click ‘Ads Manager’.
There’s a lot of factors that go into creating an effective social media marketing and advertising strategy. From reaching your desired target audience, to grasping your SMART social media marketing goals, your business will need to know to better aid in branding yourself.
Does your social strategy need a boost? Partnering with marketing specialists can help! At Pepperland, we specialize in inbound and content marketing and can help your business grow exponentially through our expertise and resources. Contact us today to find out how we can help achieve your goals.
The Beginner's Guide to Facebook Advertising
Chapter 1
Writing by Massimo Chieruzzi
In our first chapter on Facebook advertising, we’ll talk about setting up your Facebook Business Manager account and Facebook Ads Manager account.
In this chapter, we will also be covering
By the end of this chapter, you should have everything set up and ready to start making Facebook ads to market your products or services.
Business Manager is a tool designed to be your primary hub on Facebook to manage all of your Facebook Pages and ad accounts.
With Business Manager, you can:
To open a Facebook Business Manager account, you first need to sign up for a personal Facebook account.
Source
After that, fill in the details in the pop-up window and press Submit.
Source
Before you can create a campaign, your Business Manager must manage at least one Facebook Page.
To add a Facebook Page to your Business Manager, go to the Business Manager homepage, click More Tools on the sidebar and select Business Settings.
Source
Click Pages under Accounts, then select Add.
You can pick one of three options:
Pick whichever applies to you and follow the prompts, and your Facebook Page should be added to your Business Manager.
Lastly, you’ll want to create or add a Facebook Ad account that will be associated with your Business Account.
Start at the Business Settings screen of your Business Manager. Click Ad Accounts under the Accounts section of the sidebar.
Click the blue Add button.
From the drop-down menu, you can choose Add an Ad Account (an existing account you’ve already opened), Request Access to an Ad Account or Create a New Ad Account.
Choose the best option for your situation and follow the prompts.
Before we move on from setting up your Business Manager, it’s important to assign roles in your Business Manager account. Users can take on one of two main roles: Admin and Employee.
Here’s a quick overview of these two roles and the permissions they have:
There are also different roles for Facebook ad accounts you can manage and edit in the Business Manager.
With your roles all set up, you’re nearly ready to start advertising.
It’s time to add your payment method so you can move forward with creating a Facebook ad campaign.
Head to the Payment Settings page by clicking Ad Account Settings and selecting Payment Settings from the sidebar.
Source
On this page, you can:

To add a new payment method to your ad account:
Source
As you start advertising more and more, we suggest that you add a secondary payment method. This prevents Facebook from stopping all of your campaigns should your primary card expire, reach the monthly limit or be blocked for whatever other reason.
If you need additional help, here’s a Facebook guide that explains what payment options are available in which countries.
Editing your payment optionsIf you want to make changes to your Facebook advertising payments, you can do it on the same page by clicking the three dots beside your payment option and selecting Edit.
Source
If you have entered multiple payment options, you can choose your primary from this screen as well.
You cannot delete your primary source, so you’ll need to make another option for your primary source before removing your current primary payment method.
Understanding billingBilling on Facebook is determined by how you choose to pay for your ads. The many payment options are divided into two camps:
Manual payments are essentially pay-as-you-go and are relatively easy to understand, as you are billed every day for whatever you spend that day on ads.
Automatic payments are slightly more complicated.
With automatic payments, you can expect a bill from Facebook on two occasions:
The billing threshold amount varies based on your billing history.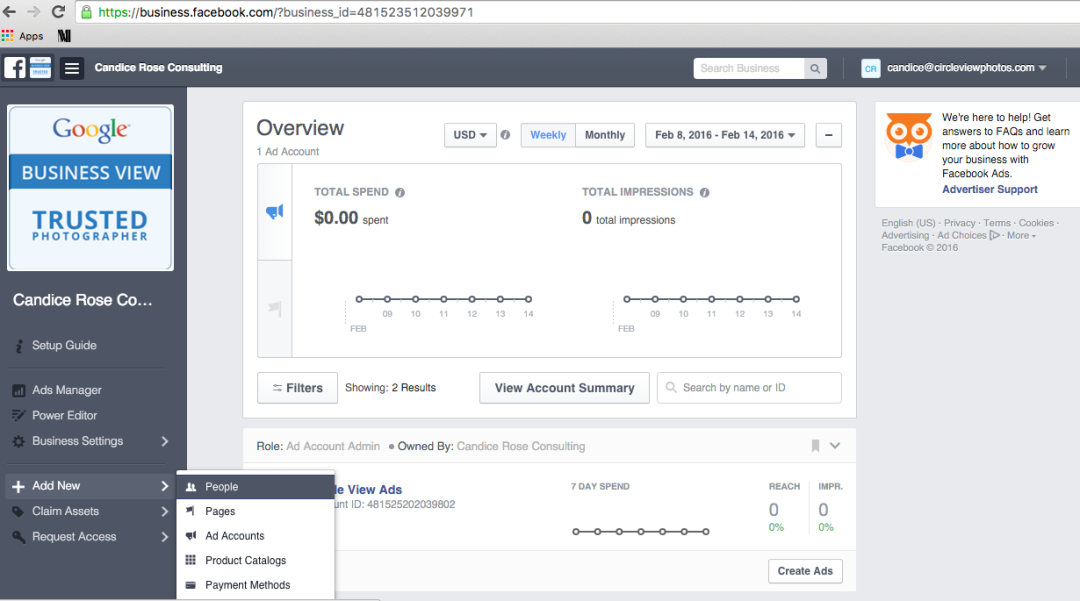 When you start, this threshold will be pretty low (usually $25), and you’ll be billed every time you spend $25 in Facebook Ads. As you keep spending and your payments are correctly processed, your threshold will be automatically increased.
If you still have a balance at the end of the month, but your billing threshold has not been met, you will be billed for that amount to clear your balance for the start of the month.
Setting up the account spending limitYou can control your total ad costs by setting an ad account spending limit. Your ads will pause when you reach the limit you’ve set and won’t run again until you increase or remove that limit.
You can add an account spending limit by clicking the 3-dot icon beside Account Spending Limit.
Fill in how much you want your spending limited to and click Save.
Ad account spending limits are especially useful when working with agencies when you want to be sure your consultant or agency won’t be able to spend more than you’ve planned across all of your campaigns. Don’t set it too low, or you’ll have to update it often. Remember that each time the limit is reached, all of your accounts will be paused for at least 15 minutes.
Whether you like it or not, your Facebook Advertising account will have some limits. It’s better to get to know them from the beginning.
Here are the limits of Facebook Ads Manager:
Once you reach any of these limits, all you’ll have to do is delete old campaigns and their ads to make room for new ones.
Facebook notifications are an excellent way to stay in touch with your campaigns. However, they can also flood your inbox quickly, so you may want to change the frequency of email notifications you receive from Facebook to fit your needs.
Source
Set up your notifications so that you’ll get the most important notifications via email, while the others can just be Facebook notifications that will appear when you log in to your Business Manager. That way, you’ll never miss anything when it comes to your Facebook ads.
Once you have been creating ads for a while, you may wish to collaborate with another person, such as a freelancer, an ad agency or an employee. This is where roles come into play. If you want to add new users and admins to your Facebook advertising account, navigate to the Ad Accounts tab in the Ad Account Settings page.
Source
Click Add People, and then fill in the name of the person you want to add and the role they will be assigned.
Source
With your team members all here, you’re set to get started with Facebook ads.
Your Facebook ad account is finally ready and waiting for you to set up those first campaigns!
Proceed to Chapter 2 to learn how to set up your first Facebook advertising campaign in the Facebook Ads Manager.
Start Index Chapter 2Step 3. Specify business information
After clicking “Get Started” , a context menu will appear where you will need to specify the name of the business page and the field of activity, for example, retail, auto sales, online store, real estate, law, web design, restaurant or other. Just enter the keywords that characterize your business in the "Category" field, and the system will display the available options.
Next, fields for entering the address and phone number will appear. The address entered in this step will be displayed on the business page profile as a map with a marker in the center. If you do not want this, then the address can be hidden from page visitors by checking the box next to "Don't show my address ...". At the same time, the system will save it and will use it to determine the time zone and the target region for displaying ads. Specify the address with the phone and press "Continue".
Step 4. Upload the logo (avatar)
In a new window, the system will prompt you to download the logo (avatar) for the business page profile from your hard drive. This should be a square image with some kind of picture or photo in the center that users will see as a circle, not a square. Optimizing an image on Facebook will not work, it must be done in advance using Canva, Crello or other similar services.
Step 5. Loading the cover of page
After the avatar, you also need to upload a cover image (displayed at the top right in the business page profile). This should be a photo, picture, map or video that will be displayed on the screens of computers and laptops with dimensions of 820×312 pixels, smartphones - 640×360 pixels.
After uploading the cover, the business page will open, where you will see that the cover space is empty. To fix this, click "Add a Cover" and then "Choose From Photos" or whatever.
In the new window, double-click the right button to select the desired image.
Step 6. Set up Ads account
Your business page has been created and you now have a Facebook Ads account. Next, you need to make sure that the settings are correct and link the payment instrument to it. To do this, go to Ads Manager by clicking "Create" and then "Ad".
In a new tab, click on the "Ads Manager" icon at the top left of the screen and then "Settings".
In the window that opens, there will be data on your advertising account, including its ID, which can later be used to launch advertising campaigns, link new users to it, and more.
Check that all information about your ad account is correct. If necessary, change the time zone and currency. But note that any change will automatically create a new ad account (with new ID). The old one will also be visible to you, but it will be suspended, as well as all advertising campaigns launched from it.
If you plan to work in a team, you can add a new member by clicking on the "Add People" icon. In the box, you need to specify the Facebook user ID and indicate its role: administrator, advertiser, or analyst.
Administrators will have access to almost everything :

Advertisers will only have access to two features:
The analyst will have access to only one function :
To link a payment method to an advertising account, go to section "Payment Settings" and click on the "Add Payment Method" icon.
In the window that opens, select your preferred payment method and enter payment details. It is important that you have at least a few dollars in your bank card or digital account.
You now have a Facebook ad account ready to use to promote your business on the world's largest social network.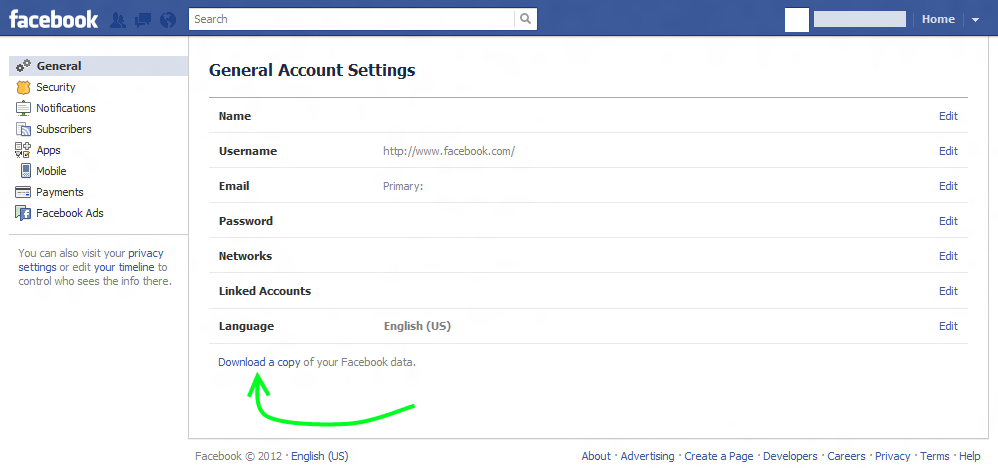 If you plan to use multiple ad accounts or need to create an account for a client, read the next section.
Now we will tell you how to create a new advertising account using Business Manager (BM) - a tool for managing all business processes on this platform, including the promotion of other campaigns (users).
Step 1. Create an account in BM
If you already have a Facebook Business Manager account, open it and proceed to the second step. If there is no account in Business Manager, you need to create one. To do this, click on the "CREATE ACCOUNT" icon in the upper right corner of the screen and follow the instructions.
In a new window you will be asked to name your account in Facebook Business Manager, to enter your first and last name, as well as your business email address.
Next, you need to enter your business data: location, phone number and website.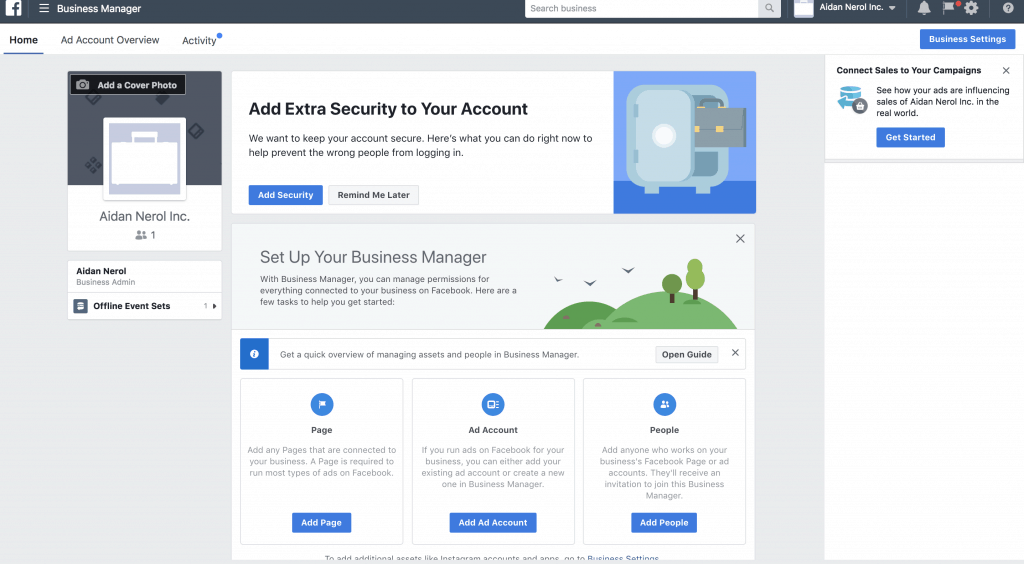 All fields are required, except for the second address.
Step 2. Create a new ad account
Once you open Facebook Business Manager, you must click on the "Business Setting" icon at the top right of the screen.
Next, go to the "Ad Accounts" section and click "+ Add". A context menu will open where you need to select "Create a New Ad Account".
Enter a name for your new ad account and specify your time zone and currency. Please note that the currency must match the currency of the payment method you choose later to activate your ad account. Whereas the choice of time zone will affect when the system will show your ad to users.
Next, you'll be asked if you're creating an ad account for your business or someone else's. Choose the option you want and click "Create".
Step 3: Add yourself as an Administrator
Next, you need to specify who will have access to the created account and in what role.
After entering these details, a Facebook ad account will be created and you will see the following notification.
To quickly go to the next step, click on "Payment Methods" in the text of the message.
Step 4. Add a payment method to activate your account
In the "Payments" section, click on the "+Add" icon.
A window will open where you need to select a payment method and enter payment details. This is an important point that affects what type of account will be created: with manual or automatic payment, that is, prepaid or postpaid. This will be discussed in more detail in the next section.
Please note that the advertising account will be activated only after the successful connection of the payment instrument, which you should be notified about. Sometimes at this stage the system freezes for a long time. In this case, simply reload the web page, return to the "Ad Accounts" tab, and if everything is fine, you will see the activated account.
When you attach the payment tool to your ad account or create your first ad on Facebook, you also decide how the payment will be made:
Automatic postpaid . You link a bank card or a PayPal fiat money account to your Ads account and run ads without any advance payment. As soon as your debt exceeds a certain threshold (billing threshold), the system will write off the debt from your account on a bank card or PayPal. If the debt for displaying ads does not exceed such a threshold, then the money is debited on a certain date of each month. The threshold for spending funds and the number for debiting them can be set in the settings.
Consider examples:
 On the first day, you spent $20. The money was not taken from the card. On the second day, you spent another 20, and the system immediately deducted them from your card. If there is no money on the card, the advertising campaign stops.
 Manual payments (prepayment) . First, you make a deposit to your Facebook ad account and only then launch the campaign. Ad impressions will go on as long as there is money in your account. You won't have a billing threshold, but you will be able to set a threshold for ad spend per day.
Consider an example:

How to choose a payment method . If you are interested in manual payment, then you can see which instruments with this payment mechanism are available in your country by following this link. Select the country and see the table.
All other available payment instruments will use automatic postpay. You can see their entire list at this link.
Categories
Yaroslav Kyshko
July 9 | 2019
Yaroslav Kyshko
July 9 | 2019
Recently, Facebook has become a powerful tool for advertisers, which allows you to very accurately find your audience, as well as quickly communicate with them.
In order to create an advertising account on this network and run ads on Facebook and Instagram, it is enough to have a Facebook account and follow a few simple steps.
Step 1
In the top menu bar, select Facebook Ads.
Step 2
At this point, Facebook will show you a set of non-discrimination policy rules that you need to accept.
From time to time, Facebook revises its rules and informs the advertiser.
After accepting the rules, you are redirected to the page with the creation of an advertising campaign.
Step 3
Initially, you need to select the goal of the advertising campaign.
Step 4
After selecting the goal, you will be able to set up your ad account.
Step 5
Specify the country, currency, and time zone in the ad account settings.
After the account settings, the ad group settings become available.
Step 6
Initially, in the group settings, you should choose where exactly the advertisement will lead. An ad can lead to a website, app, Facebook Messenger, or WhatsApp.
In audiences, you should specify the interests of your target audience, as well as their location and age.
In placements, you need to choose exactly where your ad will be shown. By default, "Automatic placements" is selected, which means that the ad will be shown in all available display locations.
When choosing this item, please note that each location has its own requirements. Therefore, campaigns should be broken down by placement.
The budget should also be set.
At this point there is also a finer setting - setting the cost per click. But it is not mandatory, and initially an advertising campaign should be launched without it.
Step 7
After setting up the ad group, setting up ads becomes available.
Ad setup consists of: format setup, media object setup, and link setup.
In media objects, you can choose what exactly the advertisement will contain: an image or a video/slide show.
The "Links" section contains the text of the advertisement, title and site URL. Also, you can create a button with a call to action.
Step 8
After creating an advertisement, you need to specify the details of the bank card from which the funds spent on advertising will be debited.
After entering the data, 1$ will be withdrawn from the card, and after a while, the money will be returned to the card again. This is done to confirm the intention to advertise on Facebook.
After clicking on the "Continue" button, the created campaign will be sent for moderation, and after it has passed, the advertising campaign will become active.
Business Manager is a free tool from Facebook that extends the functionality of a standard advertising account. Business Manager allows you to manage multiple ad pages, add different payment methods, and connect other people to manage ad pages.
To create a Business Manager account, go to the website and click on the "Create Account" button. After that, you should fill in the standard fields for the name of the advertising account, as well as the email address.
After that, fill in your contact details.
On the main Business Manager setup page, select the "Add ad account" option.
A new tab will provide different options for adding an ad account. This is the transfer of your old account, the creation of a new one and the addition of an advertising account of another person.
When creating a new advertising account, the standard data is filled in: name, time zone and currency.
After filling in the data, the created advertising account will appear on the main page.
When you go to the advertising account, you can see that the advertising account has the following structure: