All about EXIF data, reverse image search
You have a photo, but you have no idea where it was taken. Is there any way you find where a picture was taken?
While there’s no 100% guarantee you’ll ever figure it out, there are a few things you can try to suss out the origins of your mystery snap.
Table of Contents
Also, be sure to check out our YouTube channel where we posted a short video that goes through some of the stuff we talk about in this article.
EXIF Data Is Always The First StopEXIF data is a form of metadata that can be found in some JPEG and TIFF images. If the camera which took the picture has a GPS unit, then it will tag the image with the GPS coordinates of where the image was taken as part of that EXIF data.
Armed with these coordinates, all you have to do is put them into Google Maps, which will of course tell you where the photographer was standing when the photo was taken.
If that sounds too easy, that’s because it is. You’ll often find that a given image has no EXIF data at all. Despite the fact that smartphones are the most common source of photos and all have GPS sensors in them, popular services such as Facebook and Twitter strip EXIF data from images specifically to prevent privacy violations. So if your image is sourced from them this is going to be a dead end.
Incidentally, check out our article on how to remove EXIF data yourself, which also happens to show you how to view that data in the process. Alternatively, you can use an online EXIF viewer.
Search GPS Coordinates On Google Map/Street ViewWhile finding the GPS coordinates is easy enough, you need to plug them into a map system in order to find the exact location. The good news is that Google Maps actually supports raw GPS coordinates.
Google has excellent instructions on how to do it, what format it should be in and how the method varies from one platform to the next. Just remember that GPS coordinates are not precise, at least not on civilian systems. So it may be out by a few meters.
So, if possible, activate Street View for the location in question and then look around to see if you can find the same spot the picture was taken from. Of course, if the location is indoors or somewhere that the Street View team can’t reach, this won’t help much.
Reverse Image Search Can Give You ContextThere are various reverse image search services on the internet that use various fancy ways to find where on the net the source image can be found. That doesn’t necessarily tell you directly where the photo was taken, but if you are lucky it will lead you to additional information about the image.
For example, you may find tags, captions or contact information for those who run a site. Those data sources can then solve the mystery of where the photo was taken. Maybe.
If you’re looking for good tools to find where a picture was taken like this, we suggest either Google or TinEye.
Reverse image search doesn’t always do a good job, but that doesn’t mean all hope is lost when trying to find the original source of an image. Look at your image and try to come up with search terms that describe it.
Then put these terms into Google and switch over to the image results section. If you’re lucky then you’ll get your original image in the results, given that it’s on the web in the first place.
If you don’t strike gold right away, get imaginative with your keywords and try different iterations. Sometimes the keywords that get you to the image you wanted may be a little left of field.
Check For Landmarks Or Other CluesIf the above methods don’t get you any closer to finding where a picture was taken, it might be time to put your serious detective hat on. Look carefully at the image for things that tie it to a specific time and place. By looking at clothing, objects, fashion and other relevant details of the image.
Look up these individual items on Google to learn where they come from or any other information that could help pin a photo’s origin. You can also use this method to get additional keywords for the previous method. At the very least this bit of basic sleuthing can narrow down the location to a specific country, region or city. Brand names, for example, can be very specific to particular places.
Ask The Internet For HelpIf you’ve exhausted the easier methods of figuring out where a photo comes from, then there’s no shame in asking other people for help. Twitter, Facebook, forums and other places where people gather online.
Of course, you can’t just shout into the ether and hope someone gets back to you. The content of your image and your reasons for wanting the location will determine where you go for help. For example, if you know that an image was taken in Japan, but not where in Japan it was taken, you may post a question in a group that specialized in Japanese geography or tourism.
If you have a photo of an event or, for example, a band, you’ll want to post a question in a fan group. Basically, as for help among people who are likely to know the answer.
Elementary, My Dear Watson?Finding the origin of a photo and determining where it was taken can be quick and easy or an exercise in extreme frustration. This means that at some point in your hunt you’ll have to think carefully how important it is to solve the puzzle.
If it’s just a matter of casual curiosity then it’s hardly worth scouring the internet for an answer. If however it’s really important, then the most important tip we can give you is to be patient. While you may not find the answers today, the web is always in flux. Information is being added all the time, so even if the photo is obscure or seemingly a total mystery, if you keep checking every now and then, the truth may finally be revealed.
';document.getElementsByClassName("post-ad-top")[0]. outerHTML='';tocEl.outerHTML=tocHTML+newHTML;}}catch(e){console.log(e)}
Sydney Butler is a social scientist and technology fanatic who tries to understand how people and technology coexist. He has two decades of experience as a freelance computer technician and more than a decade as a technologies researcher and instructor. Sydney has been a professional technology writer for more than five years and covers topics such as VR, Gaming, Cyber security and Transhumanism. Read Sydney's Full Bio
Subscribe on YouTube!
Did you enjoy this tip? If so, check out our very own YouTube channel where we cover Windows, Mac, software, and apps, and have a bunch of troubleshooting tips and how-to videos. Click the button below to subscribe!
Subscribe
Are you looking for some handy methods to help you find someone’s Instagram location? Don’t worry, since Instagram offers multiple built-in location features that enable us to track the locations through Instagram. And do you know the best part about it? It’s for free!
In today’s article, we will discuss how to track someone’s location on Instagram in 3 different ways. So, keep connected with us till the end, and let’s get started!
Table of Contents
In order to track location from Instagram posts:
A couple of pitfalls of this method:
Let’s head over to the following method – an effective one!
Many third-party websites offer tracking tools for Instagram and other social media platforms. To track accurate location on Instagram, just scroll down and follow these steps:

IP loggers can be another great step for you to track the locations of anyone on Instagram. Here we have dropped some easy and quick steps for you to follow:

So, these are some quick ways that you can follow to track anyone’s location on Instagram. Personally, we prefer the third method. Yeah, it’s a bit lengthy one but the most convenient at the same time.
Yes, it is possible that anyone can see where you were when you captured your images. But in that case, your location should be accurate. If not, they will need to find some third-party websites and trackers to track you on Instagram.
No, DMs can’t be tracked since people can’t access the IP address of your device but only get the IP addresses of Instagram servers. However, if someone sends you a link and you open it, then there’s a chance that they can track your Instagram Dm because your device will access the link and not Instagram.
Geotagging or Geotagging ( Geotagging ) is the process of adding "geographic metadata information", that is, data about your location (latitude, longitude, etc.), in our case, on images, photographs, images taken with our mobile phone. As a result, special software will be able to read the metadata to determine the location where any of our pictures were taken.
On IOS phones (such as the iphone ) you can turn on "Geolocation" so that when you take a photo, the Geotag metadata will be added to the photo automatically. You can do this on an iPhone by going to Settings -> Privacy -> Geolocation . On this page, you can enable or disable Geolocation , including for individual applications.
To take a photo, make sure Geolocation is enabled for the camera and every application using the camera, including Instagram .
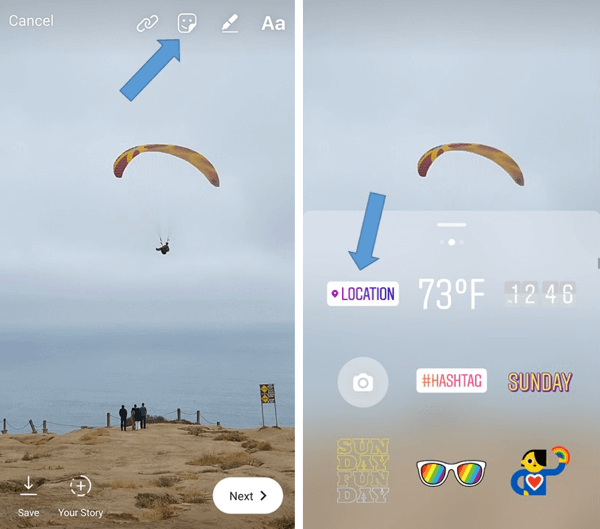
Enable Geolocation or Geotagging for Instagram.
Enable Geolocation for the camera app.
If you post a photo on Instagram from a location that has already been geotagged, the app will automatically give you several options for the location name to choose from. Be careful, they are not always accurate, but you can enter the name of the Geolocation or place in Instagram yourself.
Sometimes we forget to set the Geolocation location when posting a photo, resulting in an empty space above our Instagram photo.
But don't be sad! We can fix it!
Luckily, you can add, edit, or delete location information after you've already posted a photo, it's pretty easy to do, just follow these steps:
 When you find a suitable name for a place, click on it.
Useful applications » Download and install GPS navigator
Updated: 06/04/2021, author - Ilya
Ilya is the editor-in-chief of the site softdroid.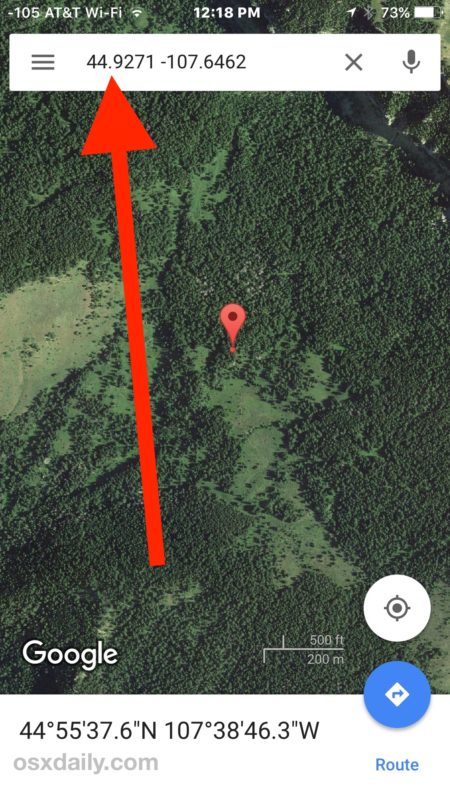 net. He is the author of several hundred guides and articles on Android setup. For about 15 years he has been repairing equipment and solving technical problems for iOS and Android. I dealt with almost all more or less popular brands of mobile smartphones and tablets Samsung, HTC, Xiaomi, etc. I use iPhone 12 and Samsung Galaxy S21 with the latest firmware version for testing.
Author information
Mobile devices, iPhone and Android, save location information when taking pictures with the camera. The picture has a so-called. EXIF information, where the desired coordinates are located.
In this article we will talk about how to find out the coordinates, find out the place where the photo was taken, how to manage gps settings and, if necessary, disable this setting, which obviously calls into question privacy.
Article navigation :
Information about the shooting coordinates is embedded in the so-called metadata that is present in most photos. In order to read the metadata, you need to look into the properties of the file you are interested in.
Instructions for Windows 7 - 10:
Instruction for Mac OS:
If you are dealing with a HEIC file, you will need a converter program to convert it to JPG and then open the photo on your computer. How to do this, read the practical guide: Converting HEIC to JPG
ExifTool - the program is available for Mac and Windows, you can use it for free. Works with most popular formats, including photos and videos, extracts gps data from EXIF. There are a dozen other useful features, but it makes no sense to talk about them in the context of the article.
ExifTool is a mobile application for Android. Uses the same Perl library of the same name as the above program. From EXIF, you can extract GPS coordinates recorded by digital cameras or phone cameras, if the coordinate recording function was activated at the time of shooting.
https://www.metadata2go.com/ - a free online service for getting all the metadata embedded in a photo. The functions are the same as for programs installed on a phone or PC. Works like this:
EXIF - properties of a media file, which include various useful information such as camera or mobile device model, shooting parameters (shutter speed, aperture, ISO), geolocation and other characteristics.
The fact is that when saving the photo multiple times, the location data could disappear from the final file. This happens when the converter does not store coordinate data or the user has deliberately disabled the ability to store additional metadata in the program where the photo was saved. In particular, such editing of EXIT information is possible in Photoshop, Lightroom, or any image viewer. Online services also prefer to automatically delete sensitive information in both copies of originals and sketches.
Let's say you have longitude and latitude specified in the photo coordinates. How can you find the location on the map?
 You can also specify the coordinate numbers through a search on the Google Maps service - the exact location where the survey was made will be displayed.
 On the one hand, coordinates are a handy thing not only to get information about the place where the picture was taken, but also to organize photos into categories. PC programs such as Lightroom allow you to do this automatically.
Of course, you can disable the saving of coordinates in the image at any time. This is done primarily for security purposes: in fact, anyone can find out where and when you were by looking at the properties of the photo taken on the camera. So, let's figure out how to disable location properties.
On iPhone:
In this way, the phone's camera will not be able to access the GPS settings and will not be able to manage the location properties.