Füge Instagram zu einer Facebook-Seite hinzu, um Instagram-Werbeanzeigen zu veröffentlichen, in deinem Feed zu posten und im Content-Studio von Mailchimp auf deine Instagram-Bilder zuzugreifen.
In diesem Artikel erfährst du, wie du deiner Facebook-Seite Instagram hinzufügen kannst.
So fügst du deiner Facebook-Seite einen Instagram-Account hinzu:
Die Seite wird aktualisiert und zeigt die Details deines Instagram Business-Kontos an.
Nachdem du deinen Instagram-Account zu deiner Facebook-Seite hinzugefügt und in ein Business-Konto umgewandelt hast, verbindest du dein Facebook-Konto mit Mailchimp, um Instagram-Werbekampagnen zu erstellen, in deinem Feed zu posten und im Content-Studio auf Instagram-Bilder zuzugreifen.
Verbinden oder Trennen der Facebook-Integration
Eine Facebook- oder Instagram-Ad mit Mailchimp erstellen
Das Content Studio verwenden
Einen Social-Media-Beitrag erstellen
Automatisch posten auf Instagram
Technischer Support
Ja
Nein
Super! Kannst du uns ein bisschen mehr zu deinen heutigen Erfahrungen sagen? Das Gesuchte war leicht zu finden.
Ich konnte problemlos einen Hilfeartikel überfliegen, um die benötigten Informationen zu finden.
Die Hilfeartikel sind einfach zu lesen.
Die Hilfeartikel haben mir geholfen, mein Problem zu lösen.
Mailchimp ist einfach zu verwenden.
Ich liebe Mailchimp!
Sonstiges.
Bitte entschuldige, dass wir dir nicht besser helfen konnten. Kannst du uns etwas zu deinen heutigen Erfahrungen sagen?Die Hilfeartikel ergeben keinen Sinn.
Ich wünschte, es gäbe ein Video, in dem die Vorgehensweise gezeigt wird.
Was ich in Mailchimp machen möchte, funktioniert nicht so, wie es sollte.
Das Gesuchte war schwer zu finden.
Ich habe gar nicht gefunden, wonach ich gesucht habe.
Ich benötige den Support, um mein Problem (z. B. ein Account- oder Abrechnungsproblem) zu lösen.
Sonstiges.
Wie können wir unsere Website weiter verbessern?
Instagram and Facebook can be like two arms of the same social media creature in your life: the former can be the repository for all the images that define your life with little bits of text added for context, while the latter is your life's ongoing conversation with images to add some color.
Adding your Instagram link to your Facebook bio can also help you get more viewings on your snaps, potentially helping your potential side career as an influencer.
Here's how to add an Instagram link to your Facebook bio section.
To start, you'll want to find and copy your Instagram URL. Afterward, do the following:
1. Log into your Facebook account on a PC or Mac.
2. Click on your profile image at the top of the screen.
3. Click the "About" under your cover photo and then "Contact and Basic Info" on the left-hand menu.
Click "About" then "Contact and Basic Info.” Stephanie Lin/Business Insider4. Under WEBSITES AND SOCIAL LINKS, click "+ Add a website."
5. Make sure to select Instagram from the dropdown menu for a list of social media platforms (though the default should be Instagram already). Copy and paste in your Instagram URL, then hit "Save Changes."
Paste your Instagram link. Steven John/Business Insider
 And that's it – now when someone clicks on your FB page's "About" section, that handy link to Instagram is ready and waiting.
Steven John
Freelance Writer
Steven John is a freelance writer living near New York City by way of 12 years in Los Angeles, four in Boston, and the first 18 near DC. When not writing or spending time with his wife and kids, he can occasionally be found climbing mountains. His writing is spread across the web, and his books can be found at www.stevenjohnbooks.com.
Read moreRead less
Insider Inc. receives a commission when you buy through our links.
Linking an Instagram account gives you access to statistics and advertising, and also eliminates problems with authorization on Instagram if you forgot your login or password. You can link one Facebook profile to your Instagram account.
Our products help you optimize your social media experience
Learn more
and improve your accounts
with deep analytics
accounts using deep analytics
Very often users confuse linking an Instagram account to a personal Facebook page and a business page. Linking to a personal Facebook page only allows you to share posts from Instagram. Thus, Facebook can be linked to Instagram through the phone in the Instagram application, the "linked accounts" section.
If the purpose of the link is to access statistics or run ads, then the Instagram account must be linked to a business page on Facebook.
A business page is a page that represents your company or brand on Facebook. With it, you can run advertising campaigns on Facebook and Instagram. To create a business page, go to your personal Facebook page and click on the dot icon in the top right menu. Then select "Page".
Name the business page, select a category, and create a description. Then click "Create Page" - "Save". Optionally, add a cover image, an action button, and set a unique URL. If you need a business page on Facebook solely to run ads on Instagram, secure your profile and add it to LiveDune tracking, you can skip this.
If you want to link a client or company account, first check if you are the administrator of the Facebook business page to which you want to link your Instagram account, otherwise it will not work. To do this, click on the icon with dots in the upper left menu - “Pages” and check if there is a page in the list in which you want to link your Instagram account. If the required page does not exist, request access from the owner (client/manager).
On a Facebook business page that you have access to (or that you created yourself), in the left side menu, go to "Settings" - "Instagram". Click "Connect Instagram" and enter the username and password from your Instagram account.
If you had a personal account type, follow the prompts and switch to a professional account type (we recommend "Business" so as not to limit yourself in processing Direct messages). Next, confirm the link by re-entering the password from your Instagram account and refresh the page. Binding completed.
After connecting a Facebook business page to an Instagram account:
Administrators, editors, moderators and advertisers can create Instagram ads using Facebook and manage Instagram comments from the page. Ads created on Facebook will also appear on your Instagram account.
Administrators, editors and moderators of the page can read all comments and messages in Direct on Instagram and reply to them on Facebook.
Page admins and editors can share content from an Instagram account to a Facebook page and vice versa.
Administrators and editors can sync page contacts on Facebook and in a business account on Instagram.
You can change or create a new Facebook page on Instagram. To do this, log into your account, click Edit . Next select Page in section Public company information and select the page you want to connect to or create a new one. If the Page you want isn't in the section, check to see if you've been assigned as an administrator for the Page.
Business accounts that for one reason or another have been banned, blocked or closed often need to unlink an Instagram profile from Facebook. Or you need to link another Facebook profile to your Instagram account. Therefore, you need to untie the one that is.
How to unlink an Instagram business account from Facebook
Go to the settings of the Facebook page to which the Instagram account is linked, open the Instagram section. At the bottom of the page that opens, find the button with the function to disable your Instagram account. Click Disconnect .
After you confirm your actions, linking your account to Facebook will be disabled.
By disabling linking your Instagram account to Facebook, cross-posting of publications from Instagram to Facebook, as well as the ability to run ads, will be disabled.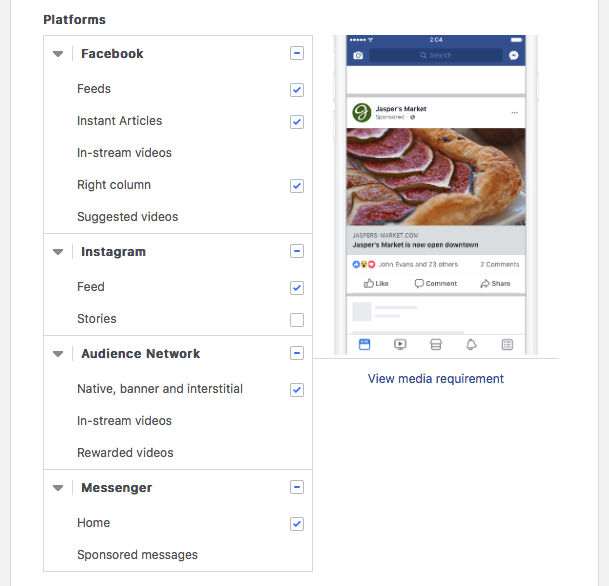 In addition, it will be more difficult for you to restore your Instagram account if you forget your username or password.
Only important news in the monthly newsletter
By clicking on the button, you agree to the processing of personal data.
What's new in SMM?
Subscribe now and get an Instagram account audit guide
Popular articles
≈ 10 min to read comments on social networks, when the only thing you want to do is delete a bad comment, block it, calculate the client by IP and arrange a duel with him.
#instagram 08/30/2019
How to connect Shopping Tags Instagram in Russia
What is this feature and how to bypass the restriction on its connection in Russia.
#instagram 08/23/2019
How to increase your reach with alt text on Instagram
Let's talk about alt text on Instagram and how to use it to increase your reach.
01/11/2022
How to add music to Instagram stories
Three ways to add music to stories: using a sticker in the Instagram app, third-party apps, and smartphone screen recording.
LiveDune marketing products - 7 days free
Our products help you optimize your social media experience and improve your accounts with the help of deep analytics
Analyze your own and others' accounts by 50+ metrics in 6 social networks.
Account statistics
Message processing optimization: operators, statistics, tags, etc.
Direct Instagram
Automatic reports for 6 social networks. Upload to PDF, Excel, Google Slides.
Reports
Monitoring the progress of KPI for Instagram accounts.
Audit of Instagram accounts with clear conclusions and advice.
Express audit
We will help you to select "pure" bloggers for effective cooperation.
Checking bloggers
“Hello. I can't link my Instagram account to Facebook. Help!"
This is how more than half of the letters coming to our Service and addressed to SMM specialists begin. The combination of Instagram and Facebook is the No. 1 problem among those who promote on Instagram, because without this connection it is impossible to launch targeted advertising, and therefore, a full-fledged business promotion on the social network.
At first glance, everything is simple: to link accounts, you need to spend literally 5 minutes of time. But when it comes to practice, a whole bunch of difficulties come up, and sometimes they simply cannot be solved by an outside specialist. Most often, these difficulties arise due to the fact that initially the algorithm of actions was performed incorrectly.
So, do you want to learn how to correctly link Instagram and Facebook on your own? So that there are no problems with accessing and launching ads? Then this article is for you. It contains all the pain and all the experience of our SMMs. Believe me, they cry every time they receive requests for help with a bunch of accounts...
Since Instagram must be linked to Facebook, you must first register on Facebook.
And don't laugh at this part of the article! The more we work, the more we understand that many users register accounts on social networks at random, and as a result, they cannot regain access to them later. And then because of this, the difficulties grow like a snowball.
So what needs to be done:
Go to Facebook using the link https://ru-ru.facebook.com/ and click on the "Create an account" button.
Enter your first name, last name, date of birth, gender.
Important! We indicate the real data, which, in which case, you can confirm with a document: a passport, driving license or anything. The fact is that a huge number of new accounts are created on Facebook every day, some of them are spam. In order to monitor and remove these spam accounts, the FB system checks all newcomers very carefully. If she has even the slightest suspicion that your new account was created for the purpose of spam, that it does NOT belong to a real person, they will immediately block it.
We link our page to a phone number.
Important! The system, as it were, offers a choice: link an account to a phone or email. We always choose a phone, it is more reliable and safe. In addition, this is another signal for the system that you are a real person, and not a spam page. Only indicate the number to which you have access and to which you can get a security code to enter. Later, you can also tie up the mail, you even need it. So you will have double page protection.
Create a password.
Important! The password must be made up of numbers and letters, but such that you remember it. If you are not sure of your memory, it is better to write it down. Do you laugh and consider this an extra precaution? Do you know how many clients we had who linked their Instagram to Facebook, and then could not get into FB to set up ads because they forgot their account password? More than I would like.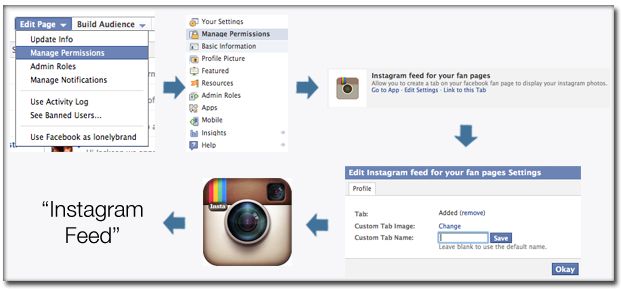 .. :((
Fill in personal data on the created page.
Important! We do it to the maximum: a real photo on the avatar, the school and university where you studied, city of residence, marital status, place of work. It would not be superfluous to add a dozen (real) friends, publish a couple of posts in your feed, subscribe to some pages, even if you do not plan to constantly use Facebook. We do this for the same purpose that real FI was indicated during registration: so that your new account is not blocked for suspicions of spam. Our task is to show the Facebook system by all available means that this is the page of a real, living person.
In general, everything. Once again, we draw your attention: do not neglect the security rules (linking to a phone number, a good password written on a piece of paper), as well as indicating real data. This will save you from blocking and the problems associated with recovering your account if it is still blocked. If you already have a Facebook account, check that it fulfills all the above points.
By the way, similar security rules apply to an Instagram account, whether it is personal or transferred to a business. It must be associated with a real phone number to which you have access, ideally with the same one that your FB account is linked to. And don't forget to come up with (and write down) a strong password, but it's better not to duplicate it from Facebook, but to make it unique.
At this stage, you need to understand the terms to avoid confusion. Facebook has:
Personal account: page of a real person linked to his phone number and email. To enter a personal account, a person uses this same number or mail, as well as a password that he came up with. Here, for example, is the personal account on FB of our executive director:
Business page: official representation of your company or project on Facebook. An analogue of the VKontakte community. This is how the 1PS.RU business page looks like, by the way, it is available at https://www.facebook.com/1psru/:
Absolutely any Facebook user can create a business page, and this is what you will need to do in order to set up a connection with Instagram, since an Instagram account must be associated with a FB business page, and not with a personal account.
Important! This must be done in person, from your personal account, which you have already created. In this case, you will have maximum access to the business page and be listed as its owner. If the SMM manager you are working with offers to create a business page from his personal account or from some other account in general, DO NOT AGREE IN ANY WAY! You must have access, and then the SMM manager can be given administrator rights for work, but more on that later.
The specialist may also offer to log into your personal account and create a business page from it. Not a very good idea for two reasons. Firstly, if you have personal correspondence, personal data and other information not for public access in your account, the SMM will have access to it when he logs in. Secondly, and this is much more important, when users from different IP addresses enter one personal Facebook account, this is a signal for the social network system that the page is either trying to be hacked or has already been hacked, and it is used for fraudulent activities. And this means what? That's right, blocking! Therefore, we are not lazy, we create a business page ourselves, with our own hands, since it is quite simple.
So what to do:
On the main FB page, click on the plus sign, select the "Create page" option.
Fill in the page name.
Important! The name can then be difficult to change, so it's better to immediately set an adequate variant. The ideal formula for the name of a business page: brand + thematic key indicating the nature of the activity + geography of work. For example, "Papa Johns - pizza delivery in Moscow", "Pretty Woman - an online store for women's clothing", "Golden Key Family Restaurant, Yekaterinburg". If you are not sure whether you have come up with a good name, consult a specialist.
Specify the category.
The category describes the general direction of your company, here Facebook will offer options - you just need to choose the most suitable one.
This is the most necessary minimum for creation. As soon as you fill in the specified items, the system will allow you to click on the "Create Page" button:
But the work does not end there. New business pages are scrutinized just as thoroughly as new personal accounts. If you do not want your business page to be blocked, it must be filled with information. You can do it yourself, or finally appoint your SMM manager as an administrator and assign a task to him.
How to share admin rights to a business page:
Click on the "Add" button.
After that, the person you want to appoint as an administrator will be sent an invitation. He must confirm it, then the user will have access to the page and be able to complete its design.
By the way, about the design. What needs to be done so that the newly created business page is not blocked:

And here we link the company's business page on Facebook with the company's Instagram account. Let's see in detail how this is done.
We again need the "Page Management" → "Settings" section, only now the Instagram tab. Here we click on the "Connect account" button, and then enter the login and password from your Instagram account. Everything. :) From the Facebook side, the process is completed.
It is better for you, the owner of the business page, to do this manipulation, because sometimes third-party users, even if they are administrators of the business page, get errors. If everything was done correctly, there should be this picture:
Next, you need to confirm the link from Instagram. To do this, we enter the social network application on a mobile device, open the account that we linked. Click on the "Edit Profile" button.
Important! All further instructions are relevant only if your Instagram account has been converted to business. How this is done is described here. If everything is OK with this, we move on.
In the field "Public information about the company" there is an item "Page". In theory, the name of your business page should be indicated there. Like this:
If you see this picture, congratulations! You are lucky. :) For setting up, you had enough actions from FB. Now your social networks are correctly connected to each other.
If the title is listed, but there is also an orange "Verify" button, just click on it and follow all the steps that Instagram asks. This will complete the setup and correctly link FB and Instagram.
If the name is not specified, and instead the text is "Connect or create", you have to tinker a little more:
Click on the text "Connect or create".
Select the "Link an existing page" option in the window that opens.
We select from the list of business pages to which you have administrator or owner access, the one that you created for your company. If you have only one page managed on Facebook, you will only see it in the list. I note that sometimes at this stage there are glitches and the list of pages is not displayed. Do not despair and update the section until it appears.
We confirm the connection of accounts and rejoice.
Done! You are wonderful! The connection is now set up at both ends. You can safely launch targeted advertising. By the way, catch the instructions for setting it up.
If it still didn't work out, you can feel a little sad, cry and... try everything from the beginning. :)
Seriously, no kidding. If at any of the steps described there are difficulties, the best solution is to roll everything back to the beginning and do it all over again. Again, if you have no problems accessing your personal FB account, if you correctly created the company's business page there, and if you did everything in the order described in this article - 90% that you will successfully set up a connection between Instagram and Facebook. We leave 10% for social media glitches, which, alas, happen quite often. If you encounter glitches, you should wait a day or two, and then try again.
That, perhaps, is all. At this stage, we should have offered to use the services of our SMM specialists who will set up the connection for you, but this will not happen. At the beginning of the article, I already mentioned the dangers of logging into personal accounts from another IP, and without logging into accounts it is impossible to set up a connection.
But there is a way out: a video consultation with a 1PS SMM specialist. If you can’t figure it out yourself, we are ready to call you via Zoom or Skype and do everything together according to the instructions. You will click with the mouse, but our employee will tell you where to click so that everything works out. You can apply for a video consultation here.
However, we do not give guarantees that everything will work out successfully, especially if you do not remember the password to your personal FB account or do not know who is the owner of the business page that is now linked to your Instagram. I'm afraid that in this case nothing will help you, only creating new profiles, pages and accounts and linking them correctly from scratch.