You can easily organize your photos into albums on your Facebook profile — and delete them when you no longer need or want them.
On your desktop, you can delete your albums either on the main albums page or by clicking and opening the individual album's details. On the Facebook mobile app, the process looks slightly different.
It's worth noting, however, that you can also choose to make any album visible to "Only me," which will hide the album from your friends. This is found under the "Edit" option near the "Delete" button.
Here's how to do both.
1. Open Facebook on your Mac or PC.
2. Click on your profile name, either on the left hand side under the Facebook logo or to the right of the search bar. Either option will bring you to your profile page.
3. Click on the "Photos" tab, located directly under your cover photo. You can also access your photos by scrolling down and selecting it from the left hand menu.
4. Click on "Albums" at the top of the page.
Find your photo albums. Marissa Perino/Business Insider
 5. Scroll down and locate the album that you wish to delete.
6. Click the three dots in the bottom-right corner of the album cover.
7. A pop-up will appear. Click "Delete album." You could otherwise click "Edit" to switch the album to "Only me."
Delete your album. Marissa Perino/Business Insider8.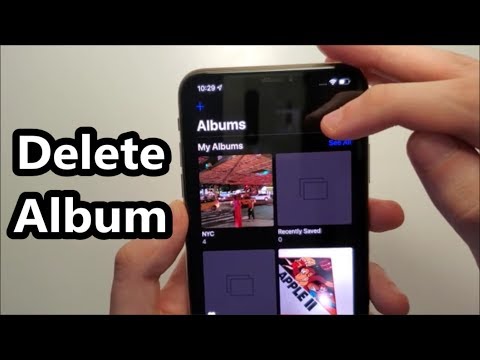 You can also click on the album cover photo to open the album. From there, click the gear icon in the right hand corner. The same pop-up will appear, click "Delete album."
1. Open the Facebook app on your iPhone or Android.
2. Tap on the three lines in the bottom-right corner of your screen.
3. Tap on your name above "View your profile" at the top of the list.
4. Scroll down to find the "Photos" button. Tap to open.
Find the "Photos" button. Marissa Perino/Business Insider5. Tap the "Albums" tab at the top.
6. Scroll down to find the album that you wish to delete.
7. Tap to open the album.
8. Tap the three dots in the top-right corner of the album's cover photo.
Click the three dots. Marissa Perino/Business Insider9. This will open the album's details. You can switch its settings so only you can see it or choose to delete the album altogether. Tap the red "Delete Album" button at the button to complete the process.
Tap "Delete Album." Marissa Perino/Business InsiderMarissa Perino
Marissa Perino is a former editorial intern covering executive lifestyle. She previously worked at Cold Lips in London and Creative Nonfiction in Pittsburgh. She studied journalism and communications at the University of Pittsburgh, along with creative writing. Find her on Twitter: @mlperino.
Read moreRead less
Insider Inc. receives a commission when you buy through our links.
You can share a post on Facebook as a picture, text, or video. Videos are especially great when you want to go live on Facebook, stress a point, or share a guide on doing something. Once you share a video, people can interact with it on the platform.
When you no longer wish the video to be available, you can consider deleting the video from Facebook.
This guide offers a step-by-step guide on how to delete videos on Facebook. We will cover the steps of achieving that on your Facebook app and the desktop Facebook version. Furthermore, we will discuss questions users have regarding deleting Facebook videos.
Table of Contents
The answer depends on your intentions.
If you uploaded a video by mistake or the video no longer serves a purpose, you can decide to delete the video. Besides, if you feel you no longer want to be associated with a video you shared as a post earlier, you can delete it from your profile.
So, it all depends on what you want to achieve by deleting the video.
Note that you can only delete a video you uploaded on your account. If you are involved in another video, you must ask the person owning the account to delete it.
There are two options for deleting Facebook videos. You can use your mobile Facebook app or the desktop Facebook version.
Follow the steps in the methods below.
The steps below will work in deleting Facebook videos on Android or iPhone:
Your Facebook video is now deleted. Repeat the same steps if you need to delete more videos.
If using a PC or Mac, you can open the Facebook desktop app or access it from a browser, then proceed with the steps below:
Your video will get removed from your account.
Deleting Facebook videos is not a difficult task.
This guide has presented all the steps you should follow on Android, iPhone, or desktop to delete videos on your Facebook profile easily.
When you delete a video on Facebook, the video gets deleted on the particular post that you shared it with. It will get removed from your Facebook album, and there is no way of recovering the deleted video. Anyone viewing a post associated with the video will get a message telling them it is no longer available.
Whether using an iOS or Android phone, deleting your Facebook videos is easy. Access your Facebook account, open the menu, and tap on your photos. Under your Facebook albums, all your videos will appear. Tap on the video you want to delete, and once the video plays, tap the three dots at the top and click the “delete” option. A confirmation prompt will appear, and you must confirm by clicking the “delete” button.
Some albums (such as Profile Photos) cannot be deleted, but you can delete photos from these albums. Deleting an album also removes the photos from the album. You will not be able to recover a deleted album.
To delete album :
To transfer a photo or video to another album, go to Facebook from a computer (laptop). Currently, on mobile devices, you cannot transfer photos or videos from one album to another.
To transfer photos or videos from one album to another:
If there is a (first time) photo (or video) on your profile feed that you want to move to another album:
Note : You cannot move photos that are in background photo album or profile .
You can only add items to albums that you have created, and collaborative albums in which you are a collaborator of . Live videos cannot be added to an album.
To add a photo or video to an album:
Album privacy settings control who can see your post. To change a post's privacy settings, first change the album's privacy settings. You can add a photo to an album after it has been published.
Note : A maximum of 1000 photos can be added to one album.
You can get a link to share your photos and albums with people who don't use Facebook.
To get a link to the album:
To get a link to a specific photo:
Copy the link to send it to your friends who don't use Facebook. Remember that every person who receives the link will have access to the contents of the album.
Note : You can only share links to pictures you add yourself and from albums you create. You cannot post links to automatically generated albums (e.g. profile photos, phone photos).
To save the photo on your computer:
To create a Shared Album:
When collaborators are assigned to a shared album, they can add photos and videos, tag photos, edit the album, and add new collaborators. Collaborators can only edit and delete uploaded photos. The owner of the album can delete photos of other collaborators. If a collaborator is removed, they will have the option to remove photos added to the collaborative album from the level of their activity diary.
To leave a shared album you have been added to:
Viewing a shared album may become unavailable. It depends on its privacy settings. Photos or videos you've posted in a shared album will remain there when you leave the album. After you leave a shared album, you will no longer be able to remove photos and videos from it.
Only the person who created the shared album can configure its privacy settings. To set the privacy settings for the shared album you are creating:
Remember that if you tag someone in a photo, it will be available to the tagged person and their friends.
You can only remove collaborators from a shared album that you have created. To remove a member from a shared album:
Removed collaborators will not be able to add photos and videos to the shared album. Depending on the privacy settings of a shared album, remote collaborators may not be able to access the contents of the shared album.
To change the privacy settings for published photo albums:
Only the person who created the album can change the privacy settings.
You can change the privacy settings for individual images in most albums, including Profile Photos and Cover Photos, but not all albums support this feature.
To set the privacy for the selected photo:

Please note that some photos, such as the current profile photo and the home page background image, all have a public status.
Scroll through the videos uploaded to your Facebook page , you notice that the person who runs the page with you has uploaded a video in the last few days that has received a lot of negative comments. After a brief comparison, they mutually agreed to remove the video in question. However, unfortunately, all his attempts to succeed in this intention did not give the desired result, and now he no longer knows where to turn his head. For this reason, he did a little research on the Internet and settled right on this guide of mine. Well, let me tell you that you have come to the right place at the right time.
Actually, in today's tutorial, I will explain how to delete facebook video by showing you the detailed procedure to follow with your mobile phone, tablet and PC. In addition to showing you how to remove a video previously uploaded to a Facebook page, I will also show you how to remove a video from your personal profile and interest groups. If you can't wait to get more information, don't wait and dive straight into the topic.
Courage: Sit back, take five minutes of free time and read the following paragraphs carefully. Determine the cancellation solution you are interested in and I assure you that by following the instructions I am about to give you, you will be able to delete all the videos you want from Facebook in a very short time. It only remains for me to wish you good reading and good luck with everything!
Index
If your intention is to remove video from Facebook and the movie in question was uploaded to página , it will be helpful to know that you can continue to cancel it using the Facebook device app. Android e iOS as coming from PC. In both cases, the procedure is simple and takes a few seconds.
To continue deleting a video from a Facebook page using a mobile phone or tablet, launch the official app of a well-known social network and, if you have not already done so, log in to your account by entering the data in the fields Phone or email address es Password and pressing the button Login . If you have problems, my guide on how to login to facebook may be helpful.
Now if you have Android device , press the ☰ button in the top right corner, select Facebook page of your interest and scroll down on the newly opened page until you find the section Video . Then press preview image one of the displayed videos, to access the list of all videos on the page, find the one you want to delete, tap the corresponding icon three points and select article delete in the menu that appears.
If, on the other hand, use iPhone o un iPad , press the ☰ button in the lower right corner, tap name from your Facebook page and on the new screen that appears, select the tab Video . So click on the voice All videos To see the full list of movies uploaded to the page, tap preview image the video you want to delete, click three points select the article delete from the menu that appears, and confirm your intention by clicking the button. Delete message .
If you prefer to use your computer to delete a video uploaded to a Facebook page you manage, connected to the main page of the social network, enter your data in the fields Email or phone es Password and press the button Login to login to your account. After that, click on the icon down arrow , select your page from the menu that appears and on the newly opened page, click on the element Video is present in the left sidebar.
Then find the video you are interested in, click on your preview image click on the icon three points is present under the player, select the item delete from the menu that appears and confirm your intention by clicking the button. delete .
Alternatively, if you are going to delete multiple videos at the same time, go to the Video section on your Facebook page, find the All videos field and click the Video library button. On the new page that opens, check the box next to the video you want to delete, click on the element behavior and select the option delete from the menu that appears. press the button delete And that's it.
Do you need to remove a video from your Facebook profile ? In this case, all you have to do is access it, find the video section, select the video you're interested in, and proceed to cancel it.
To continue from a mobile phone or tablet, then launch the Facebook app, press the and button and press your own. name up left. On the new screen that appears, tap option photo scroll right in the menu where item photo options appears and select tab album , then play album video and move on preview image of video you want to delete.
Now click on the three-dot icon (top left on Android, below the movie on iPhone), select Delete Video, and confirm the movie deletion by clicking the Delete button.
Fix error D3DERR_NOTAVAILABLE 0x8876086A
On the other hand, from a PC, to delete the video you uploaded to your Facebook profile connected to your account, click on your name in the upper right corner, select the option Other and select the article Video in the appeared menu. On the page that opens, click on the entry Your videos , find the movie you want to delete, hover over it with the mouse preview image and click on the icon pencil , then select the option Delete video from the menu that opens and press the button confirmation to confirm your intention.
Either press the ▶ to button to start playing the movie, press the i icon three points is present under the player, select the item delete and press the button delete to confirm that you want to delete the video in question.
If, on the other hand, you want to delete the video you are tagged in, you should know that this is not possible, since only the user who uploaded it can delete it. However, in addition to asking you to remove the person, you can also untag and remove the video from your profile. If yes, click entry Video where are you in section Video , hover your mouse over the movie you are interested in, click on the icon pencil and select the voice Remove shortcut from the menu that appears.
If you uploaded a video to a Facebook group but now want to repeat your steps, or if a member of a group you manage posted a video that you create that doesn't match the group theme, you should know that this is possible . delete video from Facebook group from both mobile phones and tablets and PC.
In the first case, launch the social network application, press the ☰ button, select the item Groups and on the new screen that is displayed, press the name of your interest group.
Now, if you have a device equipped with Android , select the photo option, find the video you are interested in, and tap preview image , then press the icon three points select article delete and confirm your intention by pressing the button delete .
En iPhone o iPad instead touch the item Album present under the group name and select the option Video . After identifying the movie you want to delete, touch it preview image click on the icon three points and select article delete in the menu that appears.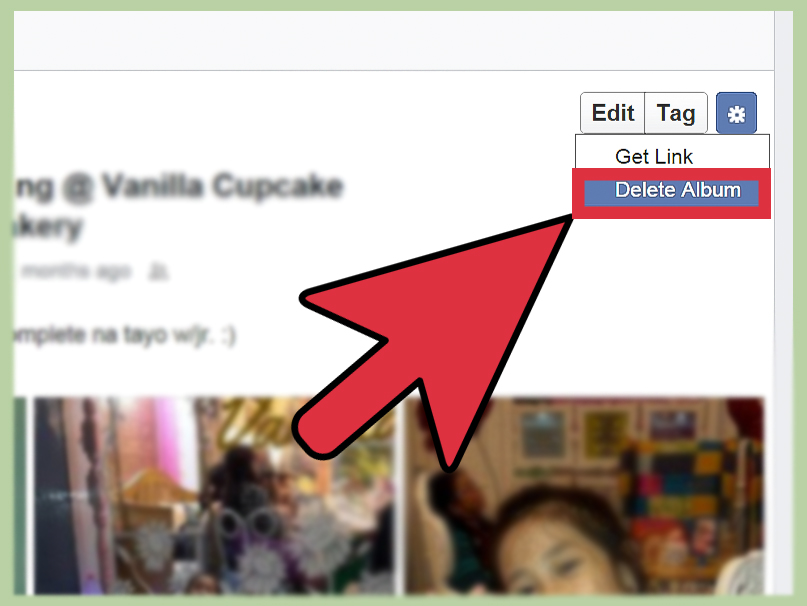 To proceed with the cancellation, press the button delete And that's it.
To delete a video from a Facebook group from a PC, instead, by connecting to the main page of the social network, log into your account and click on the item Groups on the left sidebar. Then select the group you are interested in, click on the article Video and on the new opened page, find the movie you want to delete and click on it preview image .
On the newly opened page, click the icon three points select the article delete and confirm the cancellation by clicking the button delete . It will be helpful to know that this procedure is only valid if you are the administrator of the specified group or if the video you are about to delete was uploaded by you. Otherwise you won't be able to delete the movie, just report it by clicking on the option Leave a review about this video .