What I'll Learn
Do you love aesthetic Instagram feed and want yours to give the same appeal? Well, the initial step is to delete Instagram posts and archive the unwanted ones!
Instagram is one of the fastest-growing social media apps with roughly 1 billion active users around the globe. In line with its reputation for being a popular and demanding app, Instagram is a platform for people to share photos and videos that the public can interact with and engage with.
If you are an active user of this immensely growing app, you can simply get enticed to post every detail of your routine on Instagram. Whether it’s food that you eat, places you visit, friends get together, or even daily small mundane habits. We all can relate to sharing every bit of our lives on Instagram.
However, sharing all these influences about what your life revolves around, your Instagram feed gets disorganized. Some content gets expired, and some do not remain up to date. In that situation, archiving and deleting Instagram posts is a good way at your disposal to organize your content and remove what you don’t need on your account anymore.
In this write-up, we have managed to provide you with a step-by-step process on how to delete Instagram posts or archive them to bless your timeline with the desired appeal.
Instagram offers a lot of useful features, and a few of them might look similar to you, but they function differently. The best example can be the most trendy Instagram delete and archive feature. When you no longer want a post on your feed, either you can delete those non-evergreen posts or achieve them from your Instagram account. They seem quite similar -no difference at all, but both the options offer user control to different extents.
The archive feature was first introduced in 2017 that enables you to hide unwanted content from your feed without having to vanish it permanently. The Instagram archive allows you to remove such posts from the timeline and public view and save them in a folder that only you can access—leading to the advantage that you can bring back your archived posts whenever you want -No data restoring issues anymore!
Whereas the Instagram delete option permanently deletes your post. By deleting Instagram posts, all the associated data such as likes, comments, impressions, and engagement vanishes along with it. The post is entirely and permanently removed hence, cannot be restored.
What happens when you delete a post? Where do archived Instagram posts go? Where to find your archived and deleted photos on Instagram?… All confusion is Instagram log-in to be solved right now!
When you hit the delete button on an Instagram post, you lose that content and can’t repost unless you have a saved copy somewhere else. Once a post is deleted, all the engagement, including likes and comments, will go away with that post.
With the archive option, things are quite different. Your archived posts automatically move in the safe folder, and your caption lies and comments on that particular post remain unchanged. No more worries if you have accidentally archived an Instagram post, as you can restore it anytime. Bingo!
Now that we have taken you out of the dilemma of what happens when you archive and delete posts on Instagram, let’s dive straight into the easy process of how to delete an Instagram post and archive it to view later?
Complete Guide to Delete Instagram PostsShare
How to Delete Instagram Post?If you use Instagram to showcase your interesting life, you might have some old, unnecessary, and candid photos and videos that irk you now. Or, if you own an Instagram business account for commercial purposes, you might want to remove an Instagram post of a sale that is not valid anymore. This is when the delete option comes to save the day. With the Instagram delete option, you can delete any post you want in a glimpse.
Following are the six easy steps to help you delete Instagram posts effortlessly.
Step 1: Open the Instagram app on your Android or IOS
Step 2: Navigate to your profile and open the profile icon on the bottom right corner
Step 3: Select the photo or video you want to remove and open it
Step 4: Click on the three dots “…’ on the top right corner
Step 5: A pop-up menu will appear with many options. Tap on delete
Step 6: Another pop-up will appear. Click delete to confirm the removal of your post.
Remember, once you click the delete button, you will lose that post permanently.
How to Delete All Instagram Posts at Once?Removing an Instagram post one by one may seem to be a time-consuming task. Deleting all Instagram photos and videos in one go is an easier option. Unfortunately, Instagram doesn’t have any feature as such that allows you to mass delete posts.
Not to worry about as we still have a fire tip for you that you bring convenience your way—mass cleaning! For this, you have to use a third-party source—an application called Insta clean.
Here is a step-by-step process to use the InstaClean app.
Step 1: Open your Instagram account
Step 2: Enable InstaClean to have access to your Instagram account.
Step 3: Click on the media button that appears at the bottom-right corner of the screen.
Step 4: Select all the photos you like to delete.
Step 5: Hit the trash can button at the top-right corner of the screen.
Step 6: Select Delete.
IOS users can download Cleaner available at the IOS app store.
How to Delete Instagram Posts on PC?You might have noticed that when you open Instagram in a browser, there is no option to archive or delete Instagram posts on a computer, pc, or laptop. But we’ve got a trick that will allow you to do that. Follow these steps to unlock this feature on your PC:
Step 1: Browse the Instagram web, log in to your account, and open your profile page.
Step 2: Right-Click to enable more options, then select inspect
Step 3: The developer console will be opened on the side of the browser
Step 4: Click on toggle device toolbar
Step 5: Go to settings in the drop-down and select any device you like
Step 6: Refresh the Instagram profile page and click the feed icon to switch
Step 7: Click on the three-dot option on a post and press delete.
This trick works on all browsers like Chrome, Firefox, Microsoft Edge, etc., that support the developer console.
How to Restore a Deleted Instagram Post?Well, we’re about to answer one of the most confusing questions on your mind, if not on the planet!
You might be wondering if you can restore a deleted Instagram post. The answer is No! once deleted, any post can not be restored. However, there is a way to avoid such situations by enabling the original post feature in Instagram settings. This feature automatically saves all your photos and stories that you post on your account in the phone gallery.
Here is how to enable Original Post in your Instagram account
Step 1: Go to your IG profile
Step 2: Click three horizontal lines at the top
Step 3: Go to Settings > Account > Click on “Original post”
Another way to find deleted photos is in your phone gallery. Photos and videos get saved in folders named recently deleted photos and vanished after 30 days.
Share
How to Archive Instagram Posts?Archiving posts on Instagram is such a practical feature to control your feed outlay without losing any content. This is as easy as walking through the same simple process we have mentioned above for deleting Instagram posts.
Here are those simple steps for your ease:
Step 1: Open your Instagram account on the mobile app
Step 2: Select the post you want to archive
Step 3: Click the three dots “…” at the top right corner. A menu would appear on the screen.
Step 4: Press the archive option this time instead of delete.
And voila! That post will get removed from the feed and saved in a private folder that is accessible to you only.
How to Archive all Instagram Posts?You don’t have the option to mass archive the Instagram posts, but with the help of a third-party source, you can do that. You need an app to record your option that will auto-repeat it.
“Click Assistant – Auto Clicker” is the most popular app for android devices to help mass archive Instagram posts. First, download and install Auto Clicker on your android devices then:
Step 1: Open the Auto Clicker
Step 2: Nothing fancy, just press “Start Service”
Step 3: Open the Instagram app on your phone
Step 4: Now select the circle tool from the toolbar, be careful as every action will be recorded after this
Step 5: Select the posting form where you want to start
Step 6: Repeat the process mentioned above to archive a post
Step 7: Finally, hit the play option!
This app will repeat the same process with another post on your account unless you press the stop button option.
For iPhone users “Web Macro Bot: Record and Replay” application is available on the IOS app store.
There is a different way to archive because the above-mentioned trick doesn’t allow you to archive Instagram posts on a web browser as well. To perform an archive on anthem InstagramPC, you’ll have to use an emulator system that allows the same experience on a PC or laptop as on mobile.
Step 1: Download emulator system, and launch it
Step 2: Install Instagram on emulator system
Step 3: Follow the same steps that are mentioned for archiving posts on Instagram using a mobile.
How to Unarchive an Instagram Post?You can’t restore deleted posts, but you might ask what happens when you archive an Instagram Post? or How to undo an archive on Instagram? You can simply find the archive posts in a private safe folder on your Instagram account.
Follow the step-by-step process to free the post from the dungeons of the archive.
Step 1: Open the account page on the Instagram app. Tap the profile icon at the bottom right-hand corner.
Step 2: Click three horizontal lines to open up a menu on the screen.
Step 3: Tap on a circle that looks like a clock at the top, switch from archive stories to post by drop-down option.
Step 4: Tap to open the photo or video you want to restore. Open an additional option by taping on three-dot at the top right corner.
Step 5: Select “show on profile” to unarchive and move it to the main profile.
Your post will be back on the feed for the world to see.
On Android, the archive icon is right next to the three-bar menu. On the iPhone, it’s available on the left side of the screen.
Is it Possible to Delete Instagram Posts From Your Instagram Archive?What happens if you accidentally archive an Instagram post instead of deleting it. Don’t be propelled! You can always remove that post by unarchiving or permanently deleting it from the archive section. If you want to unarchive a post, you look for the solution we’ve given above. While for deleting a post from the archive section, you need to follow these steps:
Step 1: Open the Archive folder
Step 2: Click on top hand corner
Step 3: The menu will appear that allows you to edit or delete it
Step 4: Delete it forever by clicking “Delete.”
Yes! As simple as pie. However, if you accidentally delete a post, there is no way back.
Share
Stories are more functional because you can save them on your phone or highlight, edit them, or share them as posts on your Instagram feed. Now, what if you want to delete or archive stories? No problem! You can do that as well.
All you have to do is:
By doing so, your stories will automatically be removed and saved in the archive folder after 24 hours.
Think twice before you go ahead to delete any post that you regret later. It’s always better to archive than deleting Instagram posts if you feel like removing them from the timeline. Even when you have the option to archive it later, the thing is that the post you archive will appear in chronological order, not as a new post, so people might not notice it even after you undo the archived post.
ConclusionInstagram, the immensely growing social media app, has changed so much in competition to share the best and aesthetic-looking posts. All because of its user-friendly experience and algorithm. Gone are the days when you could capture photos with not-so-good angles and upload your unfiltered life without thinking twice. But now, things have changed drastically. The best way to make your Instagram feed look appealing is to do a general cleanup of your feed. For this purpose, we have defined an easy process to solve your quest on how to delete Instagram posts, photos, and videos and archive them to see later.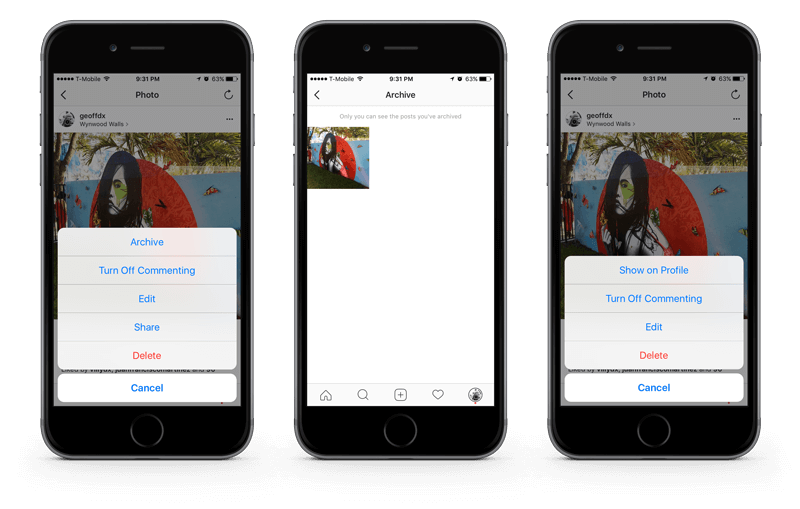
How To Lock Your Facebook Profile [via Mobile & Desktop]
How To Make A Post Shareable On Facebook?
How To Remove Shortcuts From Google Homepage?
How To See Twitter Join Date?
How To Hide Your Snapchat Score?
The ability to archive posts on Instagram is a handy tool, as it hides posts from your feed without deleting them. When a post is archived, the likes and comments are preserved should you want to revisit it later or even unarchive it.
Maybe you've had an Instagram account for over a decade and want to declutter your feed from the overfiltered, low-res snapshots — or you've pivoted to using your account for business and want to hide more personal posts.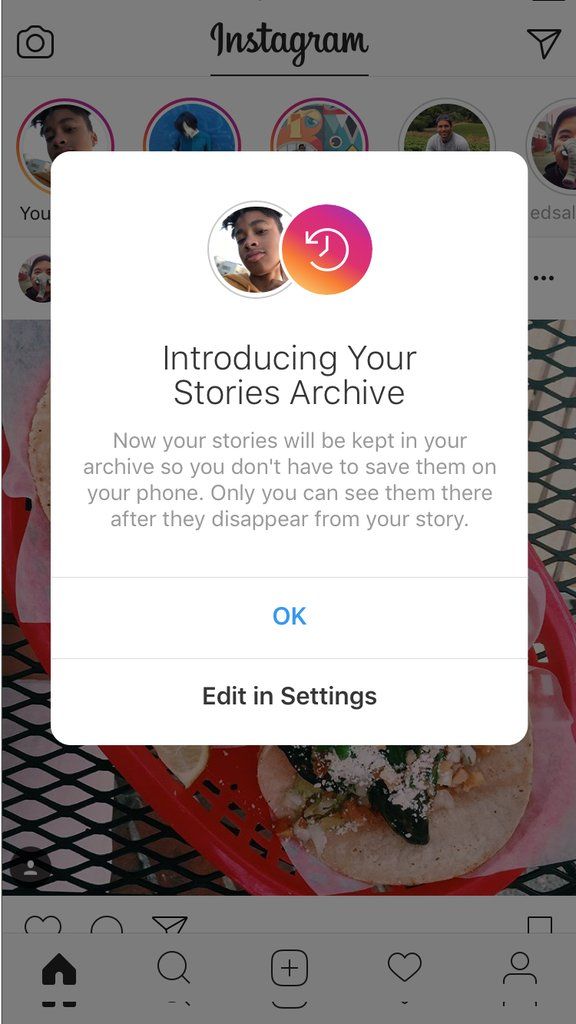
Unarchiving an Instagram post can be done in a few simple steps, which we've outlined below.
1. Open the Instagram app.
2. Navigate to your profile page by tapping your profile icon on the bottom-right.
3. Tap the three lines icon on the top-right of the screen, then tap Archive.
Access profile settings and more by tapping the menu icon. Abigail Abesamis Demarest4. Under Posts archive, tap to open the post you want to unarchive.
5. Tap the three dots icon on the top-right of the post, then Show on profile.
Use the same method to archive an Instagram post. Abigail Abesamis DemarestAbigail Abesamis Demarest
Abigail Abesamis Demarest is a contributing writer for Insider based in New York. She loves a good glazed donut and nerdy deep dives into the science of food and how it's made.
Read moreRead less
It is possible to delete an Instagram Story after the author has published it to the public: for friends or for all page visitors. Stories can be removed from drafts or archived, depending on when they were posted. Like placement, removal takes no more than a couple of minutes.
Content
To delete a Stories on Instagram, the user needs to make sure that it has been posted correctly.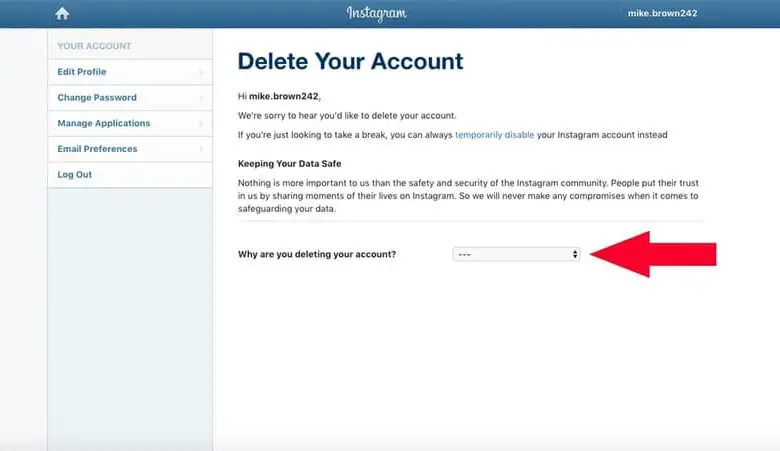 That is, the record is fully loaded and there are no problems when trying to watch it again.
Delete regular Instagram Story:
Expert opinion
Maria
An expert on customization and new features on Instagram.
Ask a question
If you remove Stories, it will not be saved in the Archive. The user will have only one way how to restore in the future - through the saved files on the smartphone.
If the picture was taken directly on Instagram itself, then before deleting it, you need to select the function: “Save” or create a screenshot of the image. So the author will not lose the created materials, and regarding the video, you will have to download or make sure in advance that the “Keep copies on the device” function is enabled.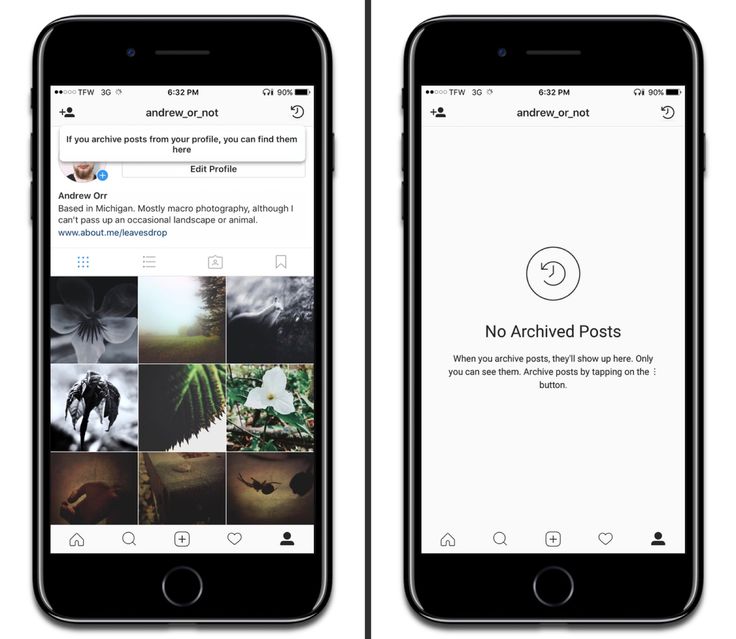
Removing Stories from the PC version is as simple as removing it from the mobile version. The difference is that the entry will not appear in the Feed and in order to view it, you need to go to the tab: "My Profile".
How to remove from the computer:
Next, the profile owner needs to refresh the page so that the icon about the recently published Story disappears.
Stories will be removed from both mobile and desktop versions. Therefore, it will be possible to look at it again only in the tab: “Recently deleted”.
Find content that has been recently deleted:

You can only return the History that was deleted no more than 30 days ago.
An unloaded Story is one that has not been permanently added to the social network. The cause can be both a sudden failure and problems with connecting to the network. The profile owner must first check the operation of the Internet, and then proceed with deletion.
How to delete an unloaded Instagram Story:
If the re-posting did not help, then the author has only one option - turn off the Internet and try to clear the list of publications again.
How to remove unadded Stories:

The last option is to clear the application cache and data. If the smartphone memory is filled with unnecessary and temporary files, then it will not work to add any entry correctly.
Expert opinion
Maria
Expert on customization and new features on Instagram.
Ask a question
You won't be able to remove all Stories at once: Instagram simply doesn't provide such a function. The page owner has only one option : gradually delete each page.
In addition to being shared, Stories are also stored in the Archive.
Therefore, if you need to remove previous publications:
And do the same with subsequent posts. It will not work to delete everything at once, and the Archive is available only from the mobile version.
If the author needs to remove multiple consecutive entries:
Even if the author posted a video clip that is divided into separate parts, it will not be possible to remove all the recordings at once.
Featured contains posts that the author has marked as "important". And if the page owner wants to remove one or more entries, it is enough for him to remove the selection from them. The post will remain in the Archive, from where it can be removed at any time.
How to edit Instagram Stories:
Delete the second option:

You can mark one or more entries that have been added to the "Pinned". If you delete an entire selection of Topical, then all collected publications will remain in the Archive, but will no longer be in the collection. You can find them only by the dates when the entry was added.
Drafts on Instagram are posts that have been saved for later posting on a social network. That is, the author temporarily suspended editing, or postponed the post in order to post at a certain time.
How to create a Draft:
Expert opinion
Maria
An expert on customization and new features on Instagram.
Ask a question
Please note that drafts are automatically deleted after 7 days.
To view and publish a draft:
But this section stores content until the account owner deletes the temporary files or reinstalls the application altogether. That is, they depend on the application cache, data storage on the device itself.
The reasons why you can’t delete photos from Stories on Instagram are:

If when going to section : "Stories" the user sees a notification: "Failed to download", then the problem is in the updates or lack of network connectivity. In this case, you need to go to a Wi-Fi hotspot or mobile data and perform a power on-off cycle.
Another method : go to the smartphone settings and delete the cache. You can do this on a per-application basis, or select a shared folder. When deleting the cache, drafts will be deleted not only on Instagram, but also on other social networks where there is such a function.
Often this error occurs if the picture was taken not through the History, but is in the Gallery. When downloading materials that are stored in the device's memory, the screen may either: “Loading is not possible” or “black screen”.
How to solve the error:

It happens that the problem with placing a media file is related to the operation of the account. Even if the page owner posts from another device, a dark screen appears instead of a snapshot. In this case, you need to temporarily disable the page and try to publish the photo again in 1-2 days.
Users also report a bug related to posting videos : those that are less than 3 seconds long are posted.
The author can try one way to restore activity : Through filming in the Stories themselves.
Deleted Stories are stored in account settings. With the latest update, a feature has been added that temporarily stores junk files. But the profile owner can disable it if it is not needed.
How to get back a deleted picture:
Or, another option is to look in the Device Gallery.
If the owner has enabled the creation of copies or does not delete files from the internal storage, the copy should be saved there. This applies to both posted Stories and publications
Instagram* allows you to save not only stories, but also posts. But how do you unzip a post? We understand in a series of short instructions.
Post archiving is a useful tool that allows you to save posts, live broadcasts and stories in a separate section. Only the owner of the account can see it, the content in the archive is not available for viewing by other users of the social network.
In everyday life, the function is useful if you need to remove irrelevant posts, which for some reason it is a pity to delete permanently. Commercial accounts can use the tool more broadly. For example, as part of an advertising campaign, they can temporarily hide all publications in order to post one big post with a promotion. It attracts attention, conveys a sense of scale and creates intrigue.
What about stories? They are automatically saved to archives, from where it is convenient to pull them out later to save to your phone, repost or send to highlights. For more information on how albums work in general, read the separate article “How to add and change Instagram Highlights*”.
How to work with archives and restore posts - we will tell further in small and visual instructions.
When archiving, the post will be saved with all comments, hashtags, marks and publication date. It will be hidden from your feed and the feed of other users, only you will see it in a special section.
How to send a post to the archive:
The application interface on iPhone and Android is the same, so this instruction (and all subsequent ones) is relevant for any phone.
The social network automatically sends stories to the archive 24 hours after publication. But if they are not displayed in the "Archive" section, then saving must be re-enabled. There are two ways: through the settings and while browsing.
Enable saving stories through the settings:
Enable saving stories through the view menu:

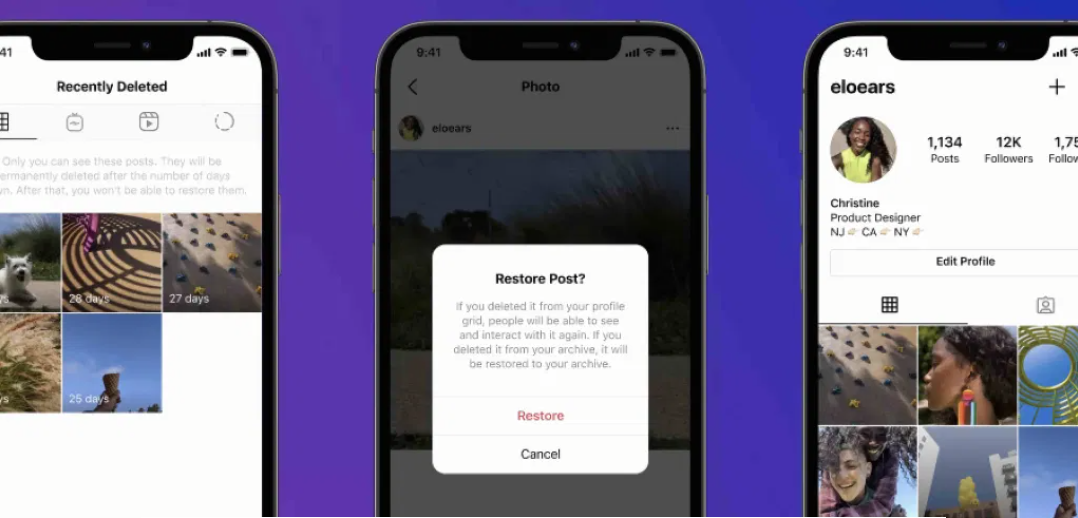
Recently, deleted posts are stored for 30 days, during which time they can be pulled back. But for this you will need to verify your identity using a special code that will be sent to your email.
How to get back a deleted post on Instagram *:

After unzipping, the post will return to the feed with all the comments and with the same publication date as it was. It will take the place in the feed where it was previously, i.e. it will not be re-published. As I said above, the social network does not delete posts - it rather hides them in the archive with a further opportunity to return everything as it was.
How to restore photos from the archive on Instagram *:

You can also remove a post from the archive on Instagram* by clicking "Delete". Then the post will go to the trash, where it will be stored for 30 calendar days. See above for instructions on returning posts.
How to return a post from the archive on Instagram *There are more opportunities for unarchiving stories: you can re-publish as a repost, send to a post, save to Actual or upload to your phone in the gallery.
How to download stories from the archive:
For more information on how to download stories, see the guide “How to download stories from Instagram*”.
How to add a story from the archive to the Feature:
How to send stories to a post:
How to get stories from the archive on Instagram * and publish again:

Is it possible to return photos to Instagram* from a computer? Unfortunately, the social network site does not have a menu with archives of publications. Therefore, even if you switch to mobile layout, you will not be able to access the archives. Of course, you can install an Android emulator on your computer, download the application from Google Play and go into it, but it seems easier to use the phone.
On the other hand, posting from a computer is often convenient, especially if you have to type a lot of text on the keyboard and regularly make interactive stories. These opportunities are provided by the delayed posting service SMMplanner - where you can also put many posts and stories into postponement at once, which frees up a lot of time.