How to create whatsapp chatbot using python
Build a WhatsApp Chatbot With Python
building chatbot it’s very easy with Ultramsg API, you can build a customer service chatbot and best ai chatbot Through simple steps using the Python language.
Chatbot Opportunities and tasks of the WhatsApp bot
- The output of the command list .
- The output of the server time of the bot running on .
- Sending image to phone number or group .
- Sending audio file .
- Sending ppt audio recording .
- Sending Video File.
- Sending contact .
Step 1 : install flask
we need to deploy the server using the FLASK framework.
The FLASK allows to conveniently respond to incoming requests and process them.
pip install flaskStep 2 : install ngrok
for local development purposes, a tunneling service is required. This example uses ngrok , You can download ngrok from here.
Step 3 : Create new flask app
We will create the file: app. py And we write the following code inside it
from flask import Flask, request, jsonify from ultrabot import ultraChatBot import json app = Flask(__name__) @app.route('/', methods=['POST']) def home(): if request.method == 'POST': bot = ultraChatBot(request.json) return bot.Processingـincomingـmessages() if(__name__) == '__main__': app.run()Step 4 : Incoming message processing
We will create the file: ultrabot.py And we write the following code inside it
import json import requests import datetime class ultraChatBot(): def __init__(self, json): self.json = json self.dict_messages = json['data'] self.ultraAPIUrl = 'https://api.ultramsg.com/{{instance_id}}/' self.token = '{{token}}' def send_requests(self, type, data): url = f"{self.ultraAPIUrl}{type}?token={self.token}" headers = {'Content-type': 'application/json'} answer = requests. post(url, data=json.dumps(data), headers=headers) return answer.json() def send_message(self, chatID, text): data = {"to" : chatID, "body" : text} answer = self.send_requests('messages/chat', data) return answer def send_image(self, chatID): data = {"to" : chatID, "image" : "https://file-example.s3-accelerate.amazonaws.com/images/test.jpeg"} answer = self.send_requests('messages/image', data) return answer def send_video(self, chatID): data = {"to" : chatID, "video" : "https://file-example.s3-accelerate.amazonaws.com/video/test.mp4"} answer = self.send_requests('messages/video', data) return answer def send_audio(self, chatID): data = {"to" : chatID, "audio" : "https://file-example.s3-accelerate.amazonaws.com/audio/2.mp3"} answer = self.send_requests('messages/audio', data) return answer def send_voice(self, chatID): data = {"to" : chatID, "audio" : "https://file-example.
 s3-accelerate.amazonaws.com/voice/oog_example.ogg"} answer = self.send_requests('messages/voice', data) return answer def send_contact(self, chatID): data = {"to" : chatID, "contact" : "[email protected]"} answer = self.send_requests('messages/contact', data) return answer def time(self, chatID): t = datetime.datetime.now() time = t.strftime('%Y-%m-%d %H:%M:%S') return self.send_message(chatID, time) def welcome(self,chatID, noWelcome = False): welcome_string = '' if (noWelcome == False): welcome_string = "Hi , welcome to WhatsApp chatbot using Python\n" else: welcome_string = """wrong command Please type one of these commands: *hi* : Saluting *time* : show server time *image* : I will send you a picture *video* : I will send you a Video *audio* : I will send you a audio file *voice* : I will send you a ppt audio recording *contact* : I will send you a contact """ return self.
 send_message(chatID, welcome_string) def Processingـincomingـmessages(self): if self.dict_messages != []: message =self.dict_messages text = message['body'].split() if not message['fromMe']: chatID = message['from'] if text[0].lower() == 'hi': return self.welcome(chatID) elif text[0].lower() == 'time': return self.time(chatID) elif text[0].lower() == 'image': return self.send_image(chatID) elif text[0].lower() == 'video': return self.send_video(chatID) elif text[0].lower() == 'audio': return self.send_audio(chatID) elif text[0].lower() == 'voice': return self.send_voice(chatID) elif text[0].lower() == 'contact': return self.send_contact(chatID) else: return self.
 welcome(chatID, True) else: return 'NoCommand'
Step 5 : start WhatsApp Chatbot project
Run FLASK server
flask runRun ngrok
Run ngrok For Windows :
ngrok http 5000Run ngrok For Mac :
./ngrok http 5000Step 6 : Set URL Webhook in Instance settings
After run ngrok , you should see a for example :
https://7647-115-83-121-164.ngrok.iopaste your URL in Instance settings ، As the following picture :
Chatbot Functions used in the code
send_message
Used to send WhatsApp text messages
def send_message(self, chatID, text): data = {"to" : chatID, "body" : text} answer = self.send_requests('messages/chat', data) return answer- ChatID – ID of the chat where the message should be sent for him, e.
 g [email protected] .
 - Text – Text of the message .
time
Sends the current server time.
def time(self, chatID): t = datetime.datetime.now() time = t.strftime('%Y-%m-%d %H:%M:%S') return self.send_message(chatID, time)- ChatID – ID of the chat where the message should be sent for him, e.g [email protected] .
send_image
Send an image to phone number or group
def send_image(self, chatID): data = {"to" : chatID, "image" : "https://file-example.s3-accelerate.amazonaws.com/images/test.jpeg"} answer = self.send_requests('messages/image', data) return answersend_video
Send a Video to phone number or group
def send_video(self, chatID): data = {"to" : chatID, "video" : "https://file-example.s3-accelerate.amazonaws.com/video/test. mp4"} answer = self.send_requests('messages/video', data) return answer
send_audio
Send an audio file to the phone number or group
def send_audio(self, chatID): data = {"to" : chatID, "audio" : "https://file-example.s3-accelerate.amazonaws.com/audio/2.mp3"} answer = self.send_requests('messages/audio', data) return answersend_voice
Send a ppt audio recording to the phone number or group
def send_voice(self, chatID): data = {"to" : chatID, "audio" : "https://file-example.s3-accelerate.amazonaws.com/voice/oog_example.ogg"} answer = self.send_requests('messages/voice', data) return answersend_contact
Sending one contact or contact list to phone number or group
def send_contact(self, chatID): data = {"to" : chatID, "contact" : "[email protected]"} answer = self. send_requests('messages/contact', data) return answer
Processingـincomingـmessages
def Processingـincomingـmessages(self): if self.dict_messages != []: message =self.dict_messages text = message['body'].split() if not message['fromMe']: chatID = message['from'] if text[0].lower() == 'hi': return self.welcome(chatID) elif text[0].lower() == 'time': return self.time(chatID) elif text[0].lower() == 'image': return self.send_image(chatID) elif text[0].lower() == 'video': return self.send_video(chatID) elif text[0].lower() == 'audio': return self.send_audio(chatID) elif text[0].lower() == 'voice': return self.send_voice(chatID) elif text[0].lower() == 'contact': return self.send_contact(chatID) else: return self.welcome(chatID, True) else: return 'NoCommand'You can see the previous steps in this video :
Useful Links
- All the code is available on GitHub.
- send WhatsApp API messages using Python .
- how to set WebHooks using Ultramsg Platform
- how to Receive WhatsApp messages using python and webhook .
Building WhatsApp bot on Python
A WhatsApp bot is application software that is able to carry on communication with humans in a spoken or written manner. And today we are going to learn how we can create a WhatsApp bot using python. First, let’s see the requirements for building the WhatsApp bot using python language.
System Requirements:- A Twilio account and a smartphone with an active phone number and WhatsApp installed.
- Must have Python 3.9 or newer installed in the system.
- Flask: We will be using a flask to create a web application that responds to incoming WhatsApp messages with it.

- ngrok: Ngrok will help us to connect the Flask application running on your system to a public URL that Twilio can connect to. This is necessary for the development version of the chatbot because your computer is likely behind a router or firewall, so it isn’t directly reachable on the Internet.
Getting Started
Step 1: Set up the Twilio account using the Twilio WhatsApp API.
Go to this link and click on signup and start building button and fill in your details and verify your email ID and mobile number.
Sign up
After login, select the Develop option from the left menu and then further select the Messaging subject then select the Try it out option, and in the last click on Send a WhatsApp message. This will open up a new webpage for setting up the WhatsApp Sandbox.
Setup Whatsapp messaging
Step 2: Configure the Twilio WhatsApp Sandbox by sending a message to this WhatsApp number with the secret unique security code as shown in the below images:
Send the code as below format to the following number: +14155238886
secret code : join <secret-code>
Setup Sandbox
Now, send the secret code to the above WhatsApp message and you will receive a confirmation message as below:
Confirmation message
Step 3: Open up the terminal and run the following command to create a directory for the bot, to create a virtual environment for python, to install all the necessary packages.
- To create the directory and navigate to that directory:
mkdir geeks-bot && cd geeks-bot
- To create and activate the python virtual environment:
python3 -m venv geek-bot-env && source geek-bot-env/bin/activate
- To install Twilio, flask and requests:
pip3 install twilio flask requests
Here are the above commands in just one line :
mkdir geek-bot && cd geek-bot && python3 -m venv geek-bot-env && source geek-bot-env/bin/activate && pip3 install twilio flask requests
Output:
Setting up folder structure
Creating a Flask Chatbot Service for running the bot locally:
Step 1: Import the necessary files needed to run this flask app.
Python3
|
Step 2: Receiving message entered by the user and sending the response. We can access the user response that is coming in the payload of the POST request with a key of ’Body’.
Python3
|
To send messages/respond to the user, we are going to use MessagingResponse() function from Twilio.
Python3
|
Step 3: So now we will build the chatbot logic, we are going to ask the user to enter a topic that he/she want to learn then we send the message to the bot, and the bot will search the query and respond with the most relevant article from geeksforgeeks to the user.
Python3
|
Here, in this function, using user_msg will receive the user response/query. Then we are using google search to fetch the first 5 links from the Google search with the user query and storing them into a list called result. After that, are simply sending the first 5 links to the user using the Twilio messaging service.
To run the bot will follow these steps:
Firstly, run the above script using the following command:
python3 main2.py
Output:
Running the bot script
Secondly, open up another terminal window and run the following command to start the ngrok server.
ngrok http 5000
Output:
And third and last step we have to do is to set up the forwarding URL in the WhatsApp Sandbox Settings. Navigate to the following link and paste the forwarding URL in the selected location and click on save.
Link: https://www.twilio.com/console/sms/whatsapp/sandbox
Setup URL in Twilio
Below is the full implementation:
Here, we have imported all the necessary libraries that we’re going to use during the execution of the chatbot then we are creating a function called a bot, where we are going to implement our chatbot logic. In the bot function, firstly, we are fetching the response made by the user using WhatsApp and saving it into a variable called user_msg. After that we have created an object of MessagingResponse(), we need that for sending the reply to the user using WhatsApp. We are appending user query with the word “geeksforgeeks.org” because we have made this bot with respect to a user who might have the study-related queries and he/she can ask any doubt related to studies. After that, we have created a list called result where we are going to save the URLs that we have to send to the user. We are using the google search library for googling purposes. Using for loop, we are fetching the first 5 article links and saving them into the result. Using response.message() function we are simply sending the result back to the user through WhatsApp.
Python3
|
Output:
Whatsapp bot in Python: how to create a chat bot
The Whatsapp bot created in Python is distinguished by responding to certain commands that come in the form of standard messages followed by an automatic response. Wide functionality allows you to significantly simplify the work in the messenger. To guarantee stable operation, it is important to ensure continuous access to the Internet and smartphone, and it should not be applied to Whatsapp Web.
Contents
- Preparation for writing a bot
- Initialization of the class Bota
- Development of the Bot functionality on Python
- Sending Requests
- Posts
- Geo function
- Group function
- Processing user requests
Preparing to write a bot
Initially, you need to associate WhatsApp with an existing script in order to verify the work while writing the code. The sequence of actions includes:
- Go to the developer's personal account on the server.
- QR code is being scanned.
- Next starts WhatsApp on the portable device.
- Go to the section for making settings.
- WhatsApp Web is selected and the QR code is rescanned.
In order for the server to automatically start calling the script during new messengers, you need to specify a WebHook URL.
Please note that WebHook URL is a link to which received information about notifications and messages will be sent later. Therefore, users will need a server to accept the information, otherwise the bot will not work smoothly. Experts recommend the Flask microframework, which guarantees maximum comfort.
Initialization of the bot class
The procedure requires the creation of the “wabot.py” file, after which the class description for the bot being developed is carried out. The programmer must remember to import the library information.
Please note that the json library provides for the processing of the format of the same name. Used to access the site's API. It contains a description of the constructor class, which will take over the reception of json with comprehensive information about incoming messages. To understand what the receiving json will look like:
- Go to the testing section.
- Initiate analysis of generated requests.

- Test Webhook.
Additionally, the parameter class attribute must be assigned. At the same time, Dict_messages is a dictionary that includes information from notifications in json format. To explore the structure, you need to navigate to the WebHook Inspection category. Later, testing is launched and a message with any content is sent to the mobile application. The display automatically shows an alert.
Development of bot functionality in Python
Development of functionality for the Whatsapp chat bot is not difficult. In this case, you need to know the features and follow a clear sequence of actions.
Sending requests
In order to function effectively, making requests to the API is an integral part. When creating an option, you need to use the following values:
- send_requests - accepts several values: method and data;
- method allows you to find out which ChatAPI variant is required to be called;
- data displays the required information to send.

Please note that data is a dictionary from which json is generated and then transmitted using Post to the server. At this stage, the following sequence of actions is required:
- Create an API query string.
- This is followed by the header Contet-Type.
- Application/Json replacement in progress. This is due to the fact that the bot regularly performs the transfer of personal information with the appropriate format.
- Next, a full-fledged request is formed using requests.post for this.
- Sending requests.post to the api server in use.
Note that the response option from the server is returned in the generated json format.
Sending messages
To create an option to send a messenger, you need to use several parameters:
- send_message - initiates the acceptance of several values;
- chatId - Id of the chat, in which it becomes necessary to send instant messengers in the future;
- text – notification content.
The next steps are:
- Create a data dictionary that includes a chatid to accept text notifications.
- The next step is to transfer the information to the developed script that was developed earlier.
- At the final stage, to initiate sending notifications to the Chat Api, the sendMessage option should be used. For this reason, it is required to pass in options as the data value. Do NOT forget to return the server response.
When creating a script, it is recommended to show maximum responsibility, otherwise the risk of errors increases.
Greeting
Using the function involves using the “hi” command of the bot followed by entering a non-existent request, in particular:
- chatId – Id of the chat where the notification is planned to be sent;
- noWelcome is a Boolean variable that can be used to clearly define the further content of the message in the chat.
Finally, we will create a string with a notification, starting from a variable, and then passing the send_message option as the content of the message.
Output chatId
To enable the option, def show_chat_id is required. To return, return self.send_message is entered.
Time output
The function in question is created according to a clear sequence of actions, in particular:
def time(self, chatId): send_message
Please note that no changes are required.
Function me
A feature is the output of information on behalf of a specific user on a generated command. Activated as follows:
def me(self, chatId, name):
return self.send_message(chatId, name)
The command is standard and cannot be changed.
File function
The feature of this option is sending a file in the approved format directly to the dialog:
- chatId – Id of the chat to which you want to send a text notification;
- format - the format in which notifications are planned to be sent. Please note that the transmitted data is stored on the server.
As a result, a dictionary is formed that includes all the necessary keys in the required format. Further sequence implies checking for the presence of a certain format in which the information was transmitted by the interlocutor. If it exists, a request for data transfer is generated:
- chatId – Id of the chat to which information is being transferred;
- Body – notification transmission channel used;
- Filename - format name;
- Caption – the content of the transmitted notification.
An error in the command makes it impossible to activate the function.
Function ptt
Formation of a voice notification with subsequent transmission to the interlocutor of interest is carried out as follows:
- Specify the dialog in which information is required to be transmitted.
- Enter a link to the hosted audio format.
- Formation of a request to api. This uses a variant of the sendAudio command.
Test can be done if desired.
Geo function
Sending data by the user using the developed script is performed by the generated command. The instruction includes:
- Enter the dialogue of interest in which the message is sent.
- Enter specified coordinates.
- Default personal address display.
When the dictionary is formed, it is enough to initiate a request to the API using a specific sendLocation method.
Function group
Provides for the formation of a community with personal presence and a bot. The command displays information about who exactly initiated the sending of the message. The body in question displays information regarding the user's mobile phone number, with only additional character content. During team formation, the following information is used:
- name of the conference upon completion of the formation;
- mobile phone numbers of active participants.
 It is allowed to transfer the generated array;
 - the content of the notification to be sent first to the community.
To create and activate a request, the function command of the same name is used.
Processing user requests
The available functionality of the developed bot was described above. At the final stage, users will have to ensure error-free and at the same time stable operation of the intellect. Thanks to an integrated approach, there is a chance to organize a clear interaction with potential customers / consumers. Therefore, an additional option is required.
Please note that the function is activated regularly if it is necessary to receive comprehensive information in the webhook. The sequence of actions implies:
- The developer needs to return to the previously formed team, which includes alert dictionaries that were received as a result of communication with interlocutors. Performing validation provides the ability to filter out information that was not included in the notifications. This is due to the fact that the script has the ability to receive a request from users without messages.
- In practice, the user may receive several notifications in one generated request, so the script must be able to distinguish between them. Therefore, it is required to initiate enumeration of dictionaries, which may include dict_messages.
- After directly entering the activated loop, it is required to declare the variable "text". Beneath it is an exhaustive list of slots that can be included in the notification. Therefore, it is required to re-initiate the call to the library in order to fully examine the contents of the alert.
- The next step checks to see if it's from real users and not spam.
 Therefore, it becomes necessary to use the false and true functions. Please note that in the absence of a check, there is a probability of exit not infinity with the ensuing negative consequences.
 - As a result, the developer automatically receives a link to the location of the community and the direct data library. To avoid erroneous checks, it is enough to use the data comparison function. Please note that upon completion of the verification procedure, it is enough to initiate a call to the option that was previously considered with the function of entering the address of the group location.
Immediately after that, users can start testing the script and then connect to a personal registered account in the WhatsApp application.
WhatsApp chat bot. The Complete Guide - Marketing on vc.ru
5373 views
Companies use chatbots in Meta* Messenger, but what about WhatsApp bots? They are the next big trend in messengers and can help businesses.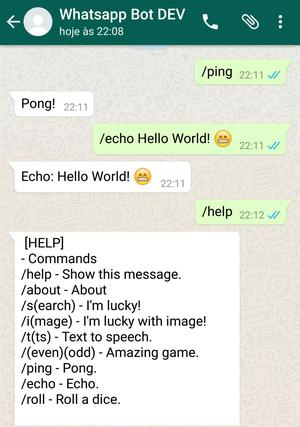 In the next guide, we will explain what chatbots are and how easy it is to create your own!
Did you know that WhatsApp has 175 million messages every day? Even if companies had to process a small fraction of the 0.0001 percent of these messages, you would still receive 175 messages per day. If you want to give each client that attention and solve their problems quickly, you need to process a lot of requests, questions, requests and complaints. And this is where the WhatsApp bot comes to the rescue!
An automated tool can help improve customer service and improve business in many other ways. Next, we will explain what WhatsApp chatbots are, what bots can do for a company, how you can set them up for your business (easy!), and how other organizations are already using them successfully.
WhatsApp chatbots, WhatsApp bot, messenger bot or just a bot: what's the difference?!
You may have come across all these terms before and wondered, "What do they mean and what's the difference?" Let's start with the basics! Chatbot is a general term, bot is short for chatbot. A messenger bot is a specialized chatbot for messengers such as Telegram or iMessage, while a WhatsApp chatbot is a bot specially designed for the popular green messenger Meta.
So all terms describe chatbots or a specialized version of chatbots, but then: what is a chatbot?
Wikipedia defines a chatbot as follows:
“A chatterbot, chatbot or short bot is a text-based dialogue system that allows you to chat with a technical system. It has one text input and one output area through which you can communicate in natural language with the system behind it.”
Thus, a chatbot is a computer program that provides interaction between people and technology. Initially, chatbots are only meant for text communication, as you can see from the above definition. Nowadays, with more advanced technology, there are voice bots like Alexa or Siri. Accordingly, people distinguish between chatbots (for text) and voice bots (for spoken language), but often the original word "chatbot" is still used as an umbrella term for both.
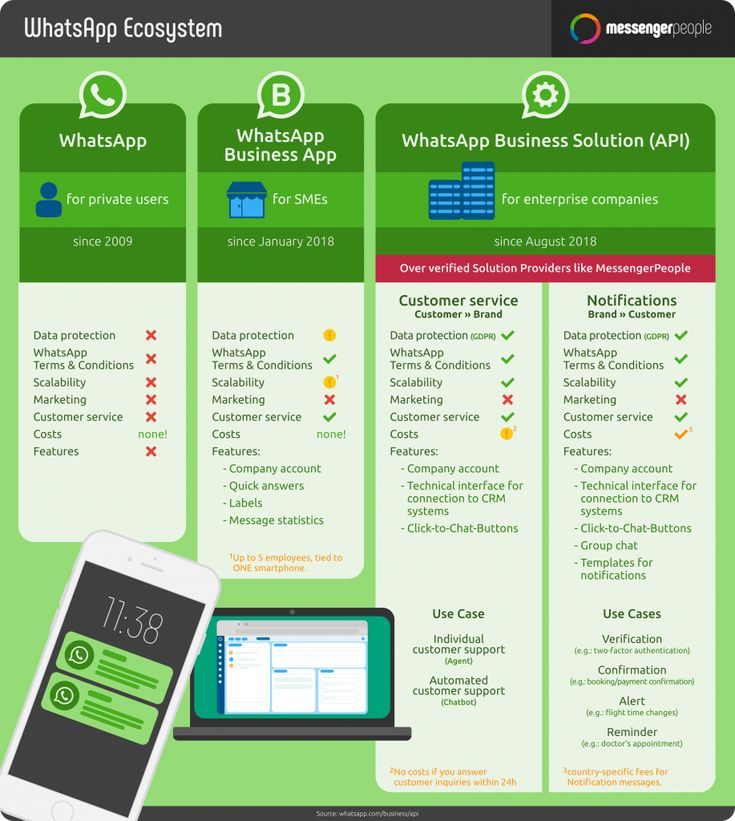
Why should businesses use WhatsApp?
When companies started using text chatbots, most people first encountered them on Facebook, Meta's Messenger. In the meantime, however, chatbots have expanded into other communication platforms and messengers. Since WhatsApp is one of the most popular instant messengers in the world, companies have started to implement WhatsApp chatbots to improve communication with customers.
Why WhatsApp? Because now it is one of the most popular instant messengers in the world! Around the world, people send more than 100 billion messages in the messenger every day. If companies want to connect with their customers, they need to meet them on their favorite communication channel. And often it's whatsapp! Companies use the messenger for the following reasons:
- Number of users: WhatsApp has more than two billion users worldwide, so even if you don't use WhatsApp, your customers are sure to use it!
- Target group: In addition to young people, more than two thirds of people over 65 also use instant messengers.

- Efficiency: Your company can respond to customer inquiries 60% faster on average than by phone or email using WhatsApp.
- Popularity: Companies use channels such as telephone, email, and SMS to communicate with customers. But 61% of customers today want to communicate with them on instant messengers like WhatsApp.
- Acceptance: Nearly 50% of customers want to communicate with businesses via WhatsApp. Over 65 percent of online shoppers want services and advice through WhatsApp!
- Costs: When communicating with customers via WhatsApp, you will not need to spend money on expensive call centers and old CRM systems!
What are the benefits of WhatsApp Chatbot?
There are several ways that a WhatsApp bot can help your business.
Chatbots are very helpful in customer service,…
Clear benefit: You can automate customer service. Think about the common questions your support team receives every day. When will my package arrive? How can I check the status of my delivery? What forms of payment do you offer?
These questions keep your agents busy, but they end up answering the same questions over and over again. It is tedious, requires long customer waits, and takes time from agents to resolve more complex customer issues. This is the opposite of efficiency. With a WhatsApp chatbot, many of these frequently asked questions can be answered a lot faster - with the help of a bot. In a sense, bots can act as a gateway to incoming customer requests.
The bot reduces the workload of the customer service team, helps customers make decisions much faster, and frees up time to solve complex customer problems. With the help of WhatsApp chatbots, a company can become 80% more efficient. In the end, you save time and money, and customers and employees become happier.
... but they can do much more!
However, the WhatsApp bot can do much more for you:
- Provide 24/7 customer service (bots don't sleep or get sick).

- Improve customer satisfaction (they get help faster).
- Guide customers more effectively through sales funnels.
- Bots can be designed to have personalized conversations with your customers, increasing customer engagement.
- Secure customer communications (end-to-end encrypted and GDPR compliant!)
- Improved user interface. There has been criticism that WhatsApp bots don't have buttons like the chatbots in Meta's Messenger. WhatsApp Business API now also includes clickable buttons for more convenience.
A WhatsApp bot can offer your business, your employees and your customers many benefits. However, before you deploy your chatbot, there are a few things you should consider.
How to develop the right WhatsApp chatbot for your business?
Essentially, a WhatsApp bot will help you achieve your goals. So, the first step to building a chatbot for your business is to define those goals.
- Write down the steps how a chatbot will help you achieve your business goals!
- WHERE and HOW WHO should talk about WHAT: create a mini-checklist for your expectations from the chatbot!
- You don't need artificial intelligence to build a chatbot, you just need a good idea!
Many of the tasks businesses want to automate can be done with a chatbot builder, so there's no need to make your bot more complex than it needs to be. However, for more complex business decisions, there are also easy ways to develop AI-based bots!
Six things to consider when building a chatbot
Your business goals are only the first part of the equation for building a successful WhatsApp bot. The other half is to think about the best bot for your customers. After all, they are the ones who will be interacting with the bot, so you need to make sure that the interaction between the human and the bot is as smooth as possible. Ask yourself the following questions:
- What is the purpose of a (marketing) chatbot?
- What tone should my chatbot have?
- What should the chatbot talk about?
- Would I like to offer guided or free dialogue?
- How to create a chatbot dialog?
- How do I respond to questions that the chatbot cannot answer?
Once you have answered the basic questions about your bot, you are ready to create your own WhatsApp bot.
Creating a WhatsApp bot: what to consider?
Companies need simple chatbots in messengers. Your WhatsApp chatbot should be able to answer frequently asked questions. However, it is equally important to make sure that the bot is able to redirect the client to a person at the right time, especially for more complex or individual issues.
❗ Note. As part of the October 2020 WhatsApp Business API updates, WhatsApp announced that companies must enable human customer transfer using WhatsApp bots. You can do this by sending a message to a person in a chat, providing a phone number or email address, contacting web support, or filling out a form.
When creating a chatbot, it is important to consider the following aspects in order to ultimately optimize customer service:
Conversation automation
Dialogue is the core of the chatbot. A connection is established between users' questions and the corresponding answers of the Chatbot. Example: Who are you? - I'm a smart bot!
Predefined themes
Themes give the bot context. Thus, the bot can give different answers to the same question depending on the topic. Example: Topic "Frequently Asked Questions" and Topic "Products".
Variables
Variables allow your chatbot to receive previously defined data from its interlocutor. This data can then be used for personalization or targeting. Example: name, age, place of residence, etc.
Integration
Data models are tables with additional data. The bot can access this data during the conversation. Example: product catalog, opening hours, quiz questions, and so on.
Analysis
It is important that you regularly analyze the performance and development of your messenger bot. Use the received data to optimize the bot. Example: What are the most common unanswered questions? What questions does the bot answer most often?
💡 Tip: Learn how to create a chatbot with our chatbot builder in no time and no programming knowledge.
WhatsApp bots and new interactive buttons
Until recently, only numbers, letters, or hashtags were used to enable users to interact with chatbots on WhatsApp. The company-client relationship has now been updated: WhatsApp Business API Buttons. These interactive buttons allow users to decide what they want to do next much faster.
Buttons make it easier for the user to respond to bot input. You can create buttons for WhatsApp, Messenger from Meta, Telegram, Vkontakte, Viber.

 twiml.messaging_response
  message()
 org"
org" message(result)
 values.get(
 message(f


