Telegram Channels are vital tools for broadcasting messages to a theoretically unlimited audience. As for Telegram Groups (supporting communities of up to 200,000 and counting), they serve a similar function only that member can interact directly with each other among other things.
Telegram Channels and Groups by themselves can be a lot of work to manage. Unless you don’t intend to keep your followers for long, you need fresh content regularly streaming in. Some channels opt for forwarding content from other channels and Groups on top of creating periodical original content. As you can imagine, this is quite the labor of love. The smart move is to create your own Telegram bot to automate the process.
Advertisement - Continue reading below
Creating a Telegram bot doesn’t require a degree in robotics or some such. Any couch potato can have a bot up and running in under 10 minutes or so. You don’t require any coding experience, even. I kid you not.
In this post, we will show you how to create a Telegram bot to autopost articles of interest from Twitter, YouTube, VK and RSS feed with your legion of subscribers/members. By all accounts, this beats having to manually share this content.
Voila! One down, two to go!
Read more:
Advertisement - Continue reading below
As Telegram loves to say, BotFather is the one bot to rule them all. That’s where to start when creating new bots and manage existing bots. So then, that’s our next stop.
Now that we have a functional bot, we will use another bot to streamline the process. @Chatfuel_bot is a popular choice, but I have a personal favorite, @Manybot. Manybot will be the link between your Channel and the bot you created. In order to autopost content from your RSS feed, Twitter and YouTube, follow these steps:
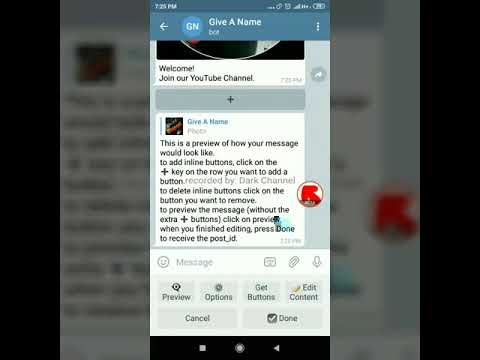
You will be sent to your newly created bot. From here you can send new posts to subscribers, deploy custom commands and form replies and all that. But let’s keep it simple for now. Head over to Settings at the bottom. You will see the following: Channels/Autoposting/Timezone/Cancel.
Oops! We will hit a snag at this point. So let’s backtrack and go back to our Channel. We will set our bot as an Admin. To do this, we navigate to Channel settings, and then Administrators. We will then add our bot as Admin. Now to continue…
Very good Androids and especially to the people who are Telegram users, and in this new practical video tutorial I am going to teach you how to create welcome messages in Telegram groups in a very, very simple way. (Fully automated welcome messages and goodbye messages).
I have decided to create this practical video tutorial due to all the requests received via Telegram, YouTube comments and other social networks in which many users have strongly asked me to do a tutorial to welcome new users who join a Telegram group.
Table of Contents
The process is as simple as add this bot: Welcome bot as administrator of our group or groups . Just copy this alias @ jh0ker_welcomebot and add it as one more user in your group.
Then you go to the group members option hold down on Welcome Bot and add it as its administrator.
Subscribe to our Youtube channel
Once this is done, All you have to do is give it the administration permissions to delete messages and invite with a link. With these two permissions, the bot will be ready to start doing its work.
Once I enter our group and with the Welcome Bot already placed as its administrator, the only thing that will be left for you is configure the welcome message and goodbye message with the / welcome and / goodbye commands.
You have to take into account that you have to respect the syntax of the command Just as it tells us when we start the Welcome Bot for the first time.
With the command / welcome plus the message we want and adding $ username We will personally welcome new members by calling them by their own name.
The same will happen with the command / goodbye plus goodbye message plus $ username.
In the screenshot that I have left you a little above you can see the complete list of bot commands, a bot very, very simple to use and a very good solution for those users who do not want major complications with the welcome or farewell of the new members of groups on Telegram.
It cannot be easier. If you have any questions, I advise you to take a look at the attached video that I have left at the beginning of this post, a video recorded in vertical format so that you can see it from your mobile in full screen and see what I do as I do. you were doing your in your terminal.
Telegram
Developer: Telegram FZ-LLC
Price: Free
Telegram X
Developer: Telegram FZ-LLC
Price: Free
More Messenger
Developer: raphalian
Price: Free
BGram
Developer: biftor
Price: Free
The content of the article adheres to our principles of editorial ethics. To report an error click here!.
Chatbot is an automated multifunctional assistant that can show information to subscribers and collect information on demand according to pre-prepared scenarios.
Follow the step-by-step instructions to create your first Telegram messenger chatbot or connect an existing one to the SendPulse service for further customization.
If you already have a bot, skip the first step and go straight to the second.
Open the Telegram messenger, log in to your account or create a new one.
Step 1. Enter @BotFather in the search box and select a bot.
The official Telegram bot will have a blue confirmation sign next to the name in the form of a checkmark.
Step 2. Click "Run" to activate the BotFather bot.
In response, you will receive a list of commands for managing bots.
Step 3. Select or type and send the command /newbot .
Step 4. Give the bot a name - clients will see this name when communicating with the bot. And the nickname of the bot - you can use it to find the bot in Telegram. The nickname must be unique, not repeat the existing ones in the database, and end with the word "bot".
After you select a suitable name, the bot will be created. You will receive a message with a link to the bot t.me/ , recommendations for setting up an avatar, a description of the bot, and a list of commands for setting up the bot.
You will need a token to connect the bot to SendPulse. Copy the value of the token and go to the last point.
Step 1. Go to the @BotFather bot and enter the command /token .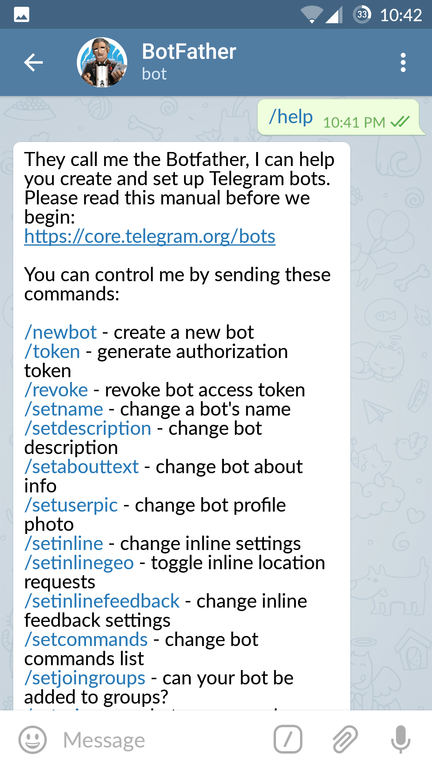
You will see buttons with created bots.
Step 2. Select the bot you want to connect.
Copy the value of the token.
Go to the Chatbots section of your SendPulse account. If you did not have connected channels before, click on the "Connect Channels" button.
If you have already connected bots, go to the "Manage Bots" section and click "Add Bot". You can also select "Connect" next to the desired channel.
In the "Telegram" section, enter the access key - the token received in the created bot. Click Connect.
Click the "Subscribe to bot" button. This way you can test every message and thread and send them to yourself before implementation.
You will be redirected to the "Telegram" application, click on the "Start" button and you will subscribe to your bot.
After successfully connecting the chatbot, you will receive a welcome chain, the bot will appear in your list of bots, and you can start creating welcome and trigger chains, mass mailings.
Subscribers are not automatically imported. After connecting, you will be able to collect an audience using the subscription widget or by sharing a link to the t.me/
Connect Telegram chatbot
Updated: 09.08.2022
Bots are special Telegram accounts created to automatically process and send messages. Users can interact with bots using messages sent through regular or group chats. Bot logic is controlled by HTTPS requests to our Bot API.
Here are some examples of how bots are used:
 Bot can be programmed for anything. Unless they can wash the dishes.
 As mentioned earlier, robots are special accounts that do not require a phone number when created. In fact, these accounts play the role of an interface to your service that runs on a remote server.
The most interesting thing about robots is that you don't need to learn low-level methods of working with MTProto and encryption to create them - communication with the robot is organized using the usual HTTPS interface with simplified Telegram API methods. We called it Bot API.
NoteWe also recommend that you read the detailed description of the Bot API.
There is a... Bot for this. Just email the user @BotFather and follow their instructions. Once you have created a bot and received your authorization key (token), go to the Bot API documentation section to start configuring your bot.

t.me/ or search by username. Telegram bots have many unique features, such as customized keyboards, additional interfaces for default commands, external linking, and special privacy modes for groups.
Users can communicate with your bot directly from the message input field - from any chat or group. To do this, you just need to type your bot's username and search query. After receiving a request, the bot can return any results. As soon as the user clicks on one of them, he will immediately go to the chat. In this way, you can request content from the bot in chats, groups, or channels.
Read more about inline mode on the blog »
Bots allow users to play HTML5 games in groups or private chats. The Telegram gaming platform will help to compile a table of records and notify users about rating changes.
Games have HTML5 under the hood, so you can create games of any complexity. At the moment, the Telegram team has created several demo games:
More about games in Telegram »
One of the most unusual Bot API features is custom keyboards . When the server sends a response, it is possible to send a command to display a special keyboard with predefined response options (see ReplyKeyboardMarkup). The Telegram client, upon receiving the message, will display your keyboard to the user. Pressing the key will immediately send the corresponding command to the server. Thus, the interaction of the robot with the user can be greatly simplified. Currently, emoji and text can be used to display on the key. Here are some examples of such keyboards:
For more information, see the description of the sendMessage method.
Commands are a more flexible way to communicate with the bot. The following syntax is recommended:
/command [optional] [argument]
The command must begin with a forward slash "/" and cannot be longer than 32 characters. Commands can consist of letters of the Latin alphabet, numbers and underscores. A few examples:
/get_messages_stats /set_timer 10min Alarm! /get_timezone London, UK
Messages starting with a slash will always be delivered to the bot (just like replying to bot messages and @mentions in chat). Telegram apps will be:
If there are several bots in the group, you can add the bot name after the command to avoid collisions in common commands:
/start@TriviaBot /start@ApocalypseBot
This happens automatically if you select a command from the list of available commands.
To make it easier for users to work with bots, we ask all developers to implement support for a few simple commands. In the Telegram application interface there will be shortcuts (quick links) for these commands.
When trying to start communication with the robot, the user will see a button START . Links Help and Settings will also be available on the bot profile page.
Bots are often added to groups to receive various information - news, notifications, etc. However, when adding a bot, you probably asked yourself: “What if this little asshole forwards all group correspondence somewhere “to the left”?” That is why robots have privacy modes .
A robot with privacy enabled will not receive all messages, but only messages that meet these conditions:
This is good in every way: first, some people will sleep soundly (in their tinfoil hats) without fear of being bugged. Secondly, the privacy mode saves developers from having to process hundreds of unnecessary messages from group chats.
Privacy mode is enabled by default in all bots. It can be turned off - then the bot will start receiving all messages, just like a regular user. All participants in the conference can see the current status of the privacy mode in the list of group members.
We recommend disabling privacy mode only when absolutely necessary. In the vast majority of cases, requesting a forced reply to a bot message will be sufficient.
Bots have an external binding mechanism that allows you to pass additional parameters at startup. For example, to transfer the user's authorization token in order to connect his account with some external service.
Each robot has a link with which you can start a dialogue with it - https://t.me/ . You can add parameters * start or startgroup to this link with a value up to 64 characters. Example:
https://t.me/triviabot?startgroup=test
Valid characters are A-Z , a-z , 0-9 , _ and - . We recommend using base64url to encode parameters.
Following the link with the parameter start will start a chat with the bot, while the START button will be displayed in the text input field. When clicking on the link with parameter startgroup , the user will be prompted to add the bot to one of the available groups. As soon as the user confirms his action (presses the START button or selects a group), the bot will receive a message in the following format:
/start PAYLOAD
In PAYLOAD will be parameter value start or startgroup which was passed in the reference.
Suppose the site example.com wants to send notifications to the user using a Telegram bot. Below is a description of the sequence of actions to implement sending notifications to a user with ID 123 .
$memcache_key = 'TESTKEY' 123 with key $memcache_key to Memcache for 3600 seconds (one hour) https://t.me/ExampleComBot?start=TESTKEY /start .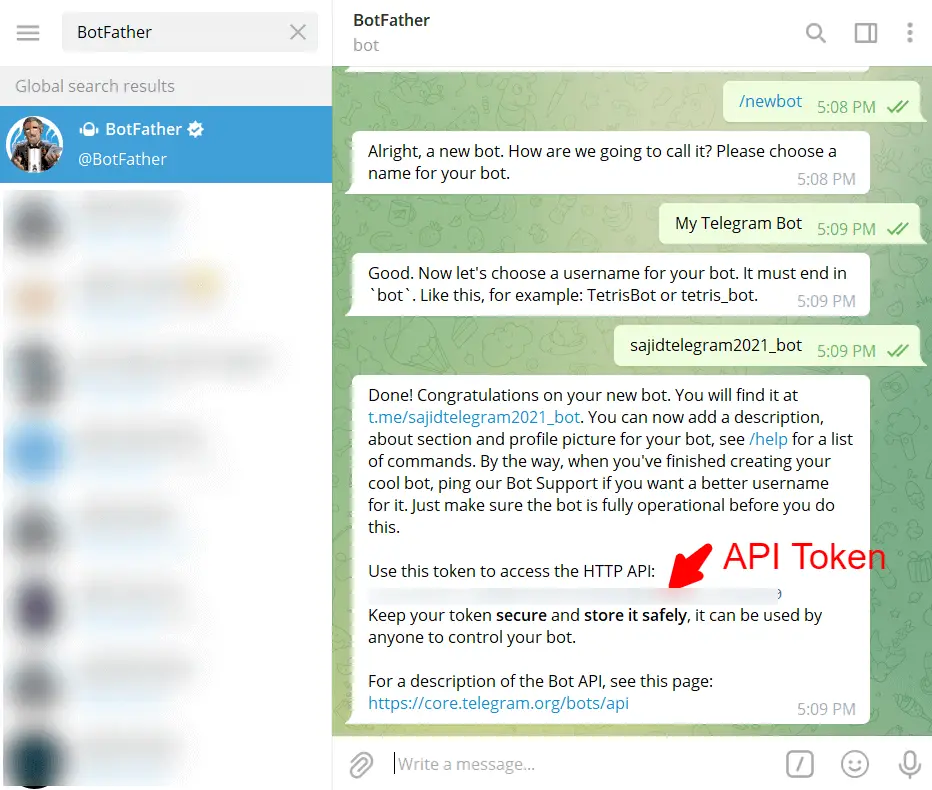 If the key exists, write the chat_id passed to the webhook to
 telegram_chat_id for user 123 . Delete the key from Memcache. 123 , we first check telegram_chat_id . If it exists, we use the sendMessage method to send a message to the user. BotFather - one bot to rule them all. With it, the settings of existing bots are changed and new ones are created.
Write the command /newbot to create a new robot. BotFather will ask you for the name of the new bot and offer to come up with a username.
Name (name) will be displayed in contacts and chats.
Username is a short name in Latin that is used for bot mentions and in profile links in telegram.me. Username must consist of Latin letters, underscores and numbers and be from 5 to 32 characters long. Also, the username must end with "bot", for example: "tetris_bot" or "TetrisBot".
The key (token) is a character set of the form 110201543:AAHdqTcvCh2vGWJxfSeofSAs0K5PALDsaw , which is needed to receive and send messages using the Bot API.
If you have lost or lost access to the token, send the command /token to generate a new one.