Luke Mead
Social Media
In this tutorial, I show you how to create a Photo Album for your Facebook Page.
This tutorial isn’t for people creating albums for their personal Facebook account.
There are many reasons that you might want to create a photo album on Facebook.
The most obvious one is you want to show off lots of photos, without posting them individually.
Doing this is an excellent way of promoting your business, by subtitling showing off your products, services & events.
This is a really super simple tutorial, I recommend doing this on your desktop computer, because it’s just a bit easier.
Before we go any further, it’s important to check that you have permission to post on your Facebook Page.
Learn about Facebook Page permission’s here.
Head to your Facebook Page.
Head to the photo area on your Facebook Page, this can sometimes be hidden behind the more button.
Now you should be able to create your photo album.
Firstly give it a name, then all that you have to do is select & upload all the photos that you want inside the album.
This is a really handy Facebook tip for organising your photos on your Page.
If you need more help with creating a photo album, I recorded this video.
Luke Mead
Hello! I’m Luke, and thanks for being here, I really appreciate the support.
A little bit about me:
I am a digital marketer by trade, but love the outdoors & travel.
I’ve actually got a few little projects I work on.
IPM Media & Luke Mead Marketing are my main “marketingcentric” educational platforms.
But I also run Luke Mead 4x4, where I explore all things outdoors.
Keep in touch:
I recommend you email me at [email protected] if you want to get in touch with me!
Follow me on Instagram!
Connect with me on LinkedIn!
How to Crop Images in Preview on Mac
Partner with us - enquire now.
We’re a no bullshit marketing blog.
Meet Stella SEO, a free digital tool that lets you audit, report & track your SEO.
Analysing IPM Media’s SEO using Stella.
Optimise your eCommerce SEO with 5 Practical Tips
I hope you enjoy reading our blog posts. If you want DCP to build you an awesome website, click here.
13-05-2017
Back
In this video tutorial, I will show you how to create a photo album on your Facebook business page.
Facebook photo album feature is a great way for you to showcase your work. At DCP we use Facebook photo album features create galleries of example work completed by our talented web designers and developers. For example, we may create a photo album that contains logo designs.
This is a great way for us to showcase our skills and knowledge. Creating a Facebook photo album is very simple and requires only a few steps to complete. So if you have a Facebook business page want to showcase your work then why not use a photo album.
You can also use a photo album to display images from an event or even show progress during the project such as a building or painting and decorating job. Set up your Facebook business page today and take advantage of free social media marketing.
Why not check out some of our other free business video tutorials here: https://www.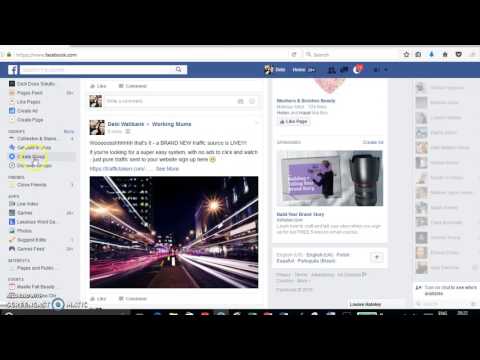 dcpweb.co.uk/blog/type/2/videos
Subscribe to DCP YouTube for more Facebook video tutorials.
# Facebook photo album
# Photo album Facebook business page
# Facebook business page photo album tutorial
Facebook business video tutorial by: DCP Web Designers in London
Thank you for contacting us.
We will reply to you in next 2 working days.
09-07-2018
How to find new customers using social media demographics
Choosing the correct social media networks can be the difference between success and failure. Social media can be split into different demographics (age groups) and selecting the right social media accounts for marketing your business can improve your conversion rates.
13-05-2017
How to create a photo album on your facebook business page
In this video tutorial, I will show you how to create a photo album on your Facebook business page. Facebook photo album feature is a great way for you to showcase your work. At DCP we use Facebook photo album features create galleries of example work completed by our talented web designers and developers. For example, we may create a photo album which contains logo designs.
24-01-2014
How to create a Facebok business page - October 2013 update
Have you just started a new business or you have got an existing business and want to create a professional Facebook business page but simply don’t know where to start? Well, you’re in luck as I have created this article which will give you a step-by-step guide on how to create a Facebook business page for your business. Facebook fact: Over 100 million users worldwide.
19-11-2019
How to Post to Instagram TV from PC
In this video tutorial, I will show you how to Post to Instagram TV from PC using Facebook Creator Studio on your Desktop Computer. You can use prerecorded content and share on IGTV without using a mobile phone! This greatly speeds up the posting on Instagram TV.
To post a photo to Facebook from a phone, the user needs to give the application access to the internal storage. Through a smartphone, you can create separate albums, upload pictures to History and Chronicle.
Table of Contents
The profile owner can upload videos to Facebook using "Albums" or publications. In the second case, the entries will be added a separate section: "Downloaded from the phone." Photo albums can be edited, moved pictures, add privacy options and captions.
How to upload a picture from a smartphone:

The photo will be seen by subscribers and page visitors. An author can specify privacy settings before posting to the public.
The maximum number of photo cards that can be added to an entry is 80 and after the first ten they will be published as a separate album. In addition to photos, short videos are added to publications, lasting no more than two minutes.
Up to ten photos can be added to choose their display format: tile or single view. There is also editing of each card separately, if you select the "List" format.
On the PC version, you have access to uploading photos to the Tape: up to 80 photos and with an additional description. When creating a text publication, a function will appear below: “Attach a photo”, clicking on which will open the storage locations of media files on the computer.
Adding photos to communities should be considered separately:
After uploading one snapshot, a new tab will appear in the toolbar: "Media Files". Through it, you can view a list of previously uploaded photos, videos.
There are separate rules for pictures added by subscribers:
Any downloaded content will be available on the tab: "Media Files". Posts can be moved between albums as an editor or administrator.
To separately add a photo on Facebook to a group or personal page, you need to create a photo album. In this way, editing is available, organizing files that are uploaded to the profile.
How to make an album from the mobile version:
Next, to fill the photo album: open it - click on the button: "Upload photos". In albums, there is editing of the description of the entire collection, deletion. If you hold down on the picture, you can move among other files.
Make from the computer version:
In the same section, the user can upload pictures and videos separately. To do this: go to the tab: "Photo" and select: "Add photo". The picture will be loaded outside the album if the author does not specify its path.
There are standard problems why pictures may not be uploaded to a social network. The main reason is non-compliance with technical requirements.
Rules for posting pictures on Facebook:
Disallowed according to usage policy:
If the picture has not been blocked by the administration, you can file a complaint against it.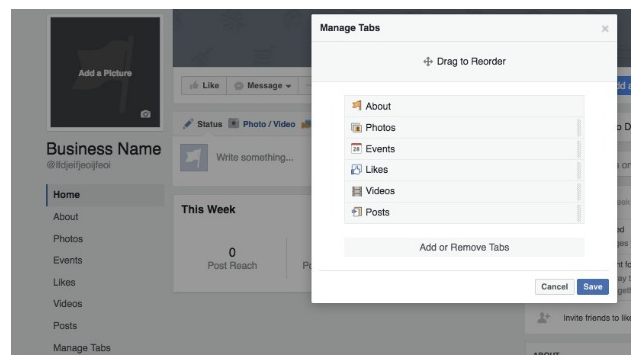 For example, if a picture appeared in some community without the consent of the author. You need to go to the image and select in the additional menu: "Send a complaint", select the reason and send.
There are technical problems, why the photo is not added to Facebook. The list of main problems includes:
For example, if you upload up to twenty identical photos to a profile or group within a period of up to 5 minutes, the system will send a notification: “You often send posts. ” The placement limit works if the user performs a series of similar actions in a short time.
If there are no problems with the Internet speed, but the pictures are still being processed, restart the application. Or go to the Play Market, AppStore to install the update. In case of a repeated error, you need to use a different type of connection, check access to the cache memory.
The last problem users face is the lack of permissions. In this case, go to the smartphone settings and select: "Applications". The details will tell you which areas Facebook has access to.
Some albums (such as Profile Photos) cannot be deleted, but you can delete photos from these albums. Deleting an album also removes the photos from the album. You will not be able to recover a deleted album.
To delete album :
To transfer a photo or video to another album, go to Facebook from a computer (laptop). Currently, on mobile devices, you cannot transfer photos or videos from one album to another.
To transfer photos or videos from one album to another:

If there is a (first time) photo (or video) on your profile feed that you want to move to another album:
Note : You cannot move photos that are in background photo album or profile .
You can only add items to albums that you have created, and collaborative albums in which you are a collaborator of . Live videos cannot be added to an album.
To add a photo or video to an album:
Album privacy settings control who can see your post. To change a post's privacy settings, first change the album's privacy settings. You can add a photo to an album after it has been published.
Note : A maximum of 1000 photos can be added to one album.
You can get a link to share your photos and albums with people who don't use Facebook.
To get a link to the album:

To get a link to a specific photo:
Copy the link to send it to your friends who don't use Facebook. Remember that every person who receives the link will have access to the contents of the album.
Note : You can only share links to pictures you add yourself and from albums you create. You cannot post links to automatically generated albums (e.g. profile photos, phone photos).
To save the photo on your computer:

To create a Shared Album:
When collaborators are assigned to a shared album, they can add photos and videos, tag photos, edit the album, and add new collaborators. Collaborators can only edit and delete uploaded photos. The owner of the album can delete photos of other collaborators. If a collaborator is removed, they will have the option to remove photos added to the collaborative album from the level of their activity diary.
To leave a shared album you've been added to:
Viewing a shared album may become unavailable. It depends on its privacy settings. Photos or videos you've posted in a shared album will remain there when you leave the album. After you leave a shared album, you will no longer be able to remove photos and videos from it.
Only the person who created the shared album can configure its privacy settings. To set the privacy settings for the shared album you are creating:
Remember that if you tag someone in a photo, it will be available to the tagged person and their friends.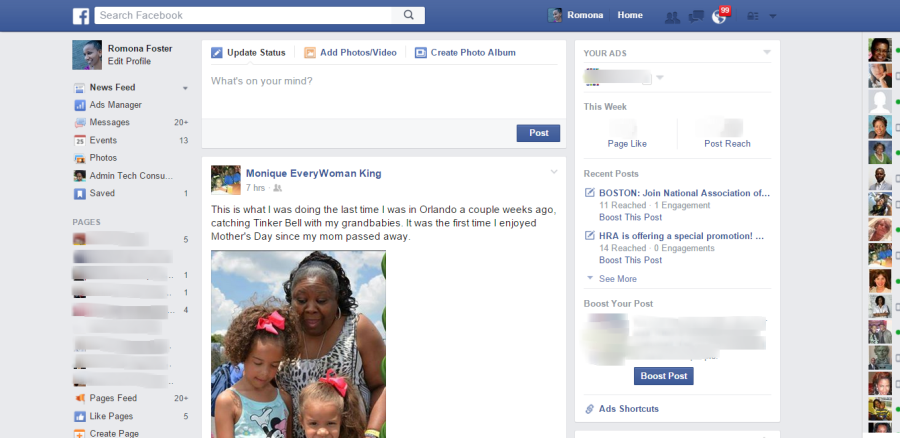
You can only remove collaborators from a shared album that you have created. To remove a member from a shared album:
Removed collaborators will not be able to add photos and videos to the shared album. Depending on the privacy settings of a shared album, remote collaborators may not be able to access the contents of the shared album.
To change the privacy settings for published photo albums: