By Alvin Wanjala
Add several photos to a single Instagram Story update with these methods.
Instagram's Stories feature makes it easy to share what's happening in your day. The best thing about Instagram stories is there's no pressure to post the perfect picture or video.
Plus, you can post a single picture or combine several images into a photo collage before sharing. Making a photo collage saves your followers time as they don't have to go through dozens of separate Stories.
In this article, we'll show you how to put multiple pictures on your Instagram Story. Let's dive in.
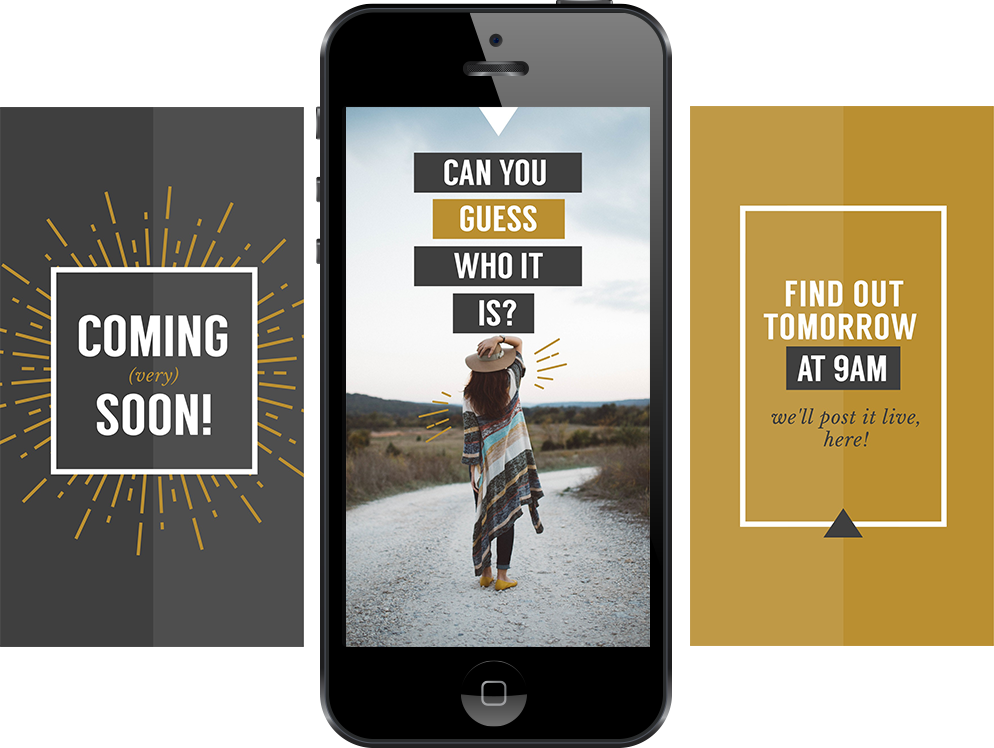
There are three ways to make a photo collage to share on your Instagram Story. You can create an Instagram Story collage by using stickers, layout mode, or third-party collage creation apps.
We'll go through each method in detail. Let's start with the first one, using stickers.
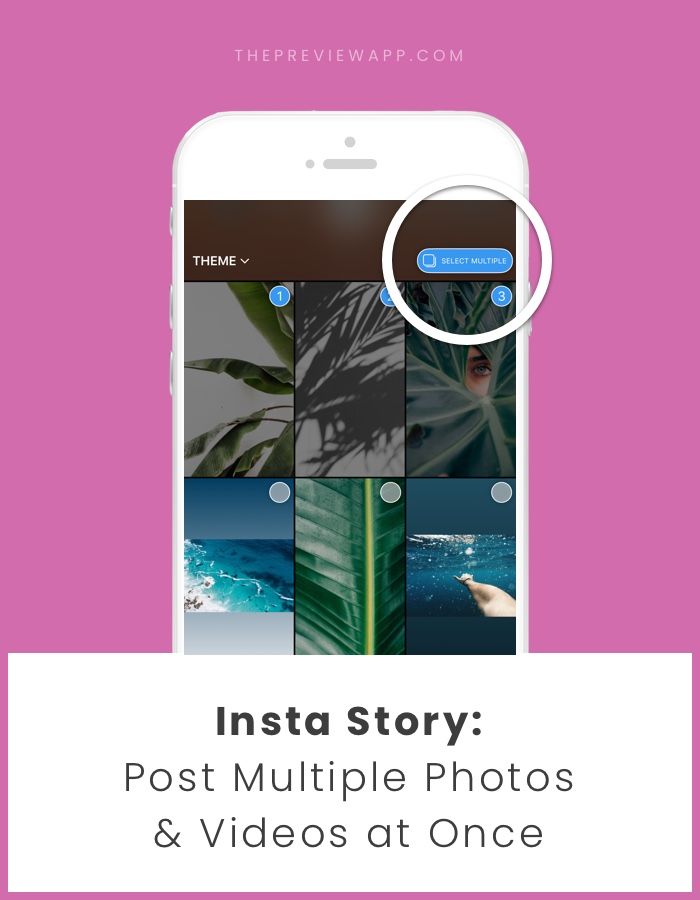
This is the easiest method to make a photo collage to add to your Instagram Stories. The only downside is this method only works on iOS at the time of writing in September 2021. Follow these steps to create your collage:
3 Images
2 Images
If you use an Android phone, use the rest of the remaining two methods to make a collage.
Layout mode is another feature that you can use to create a collage. Like using stickers, you also don't need to download an additional app to create a collage.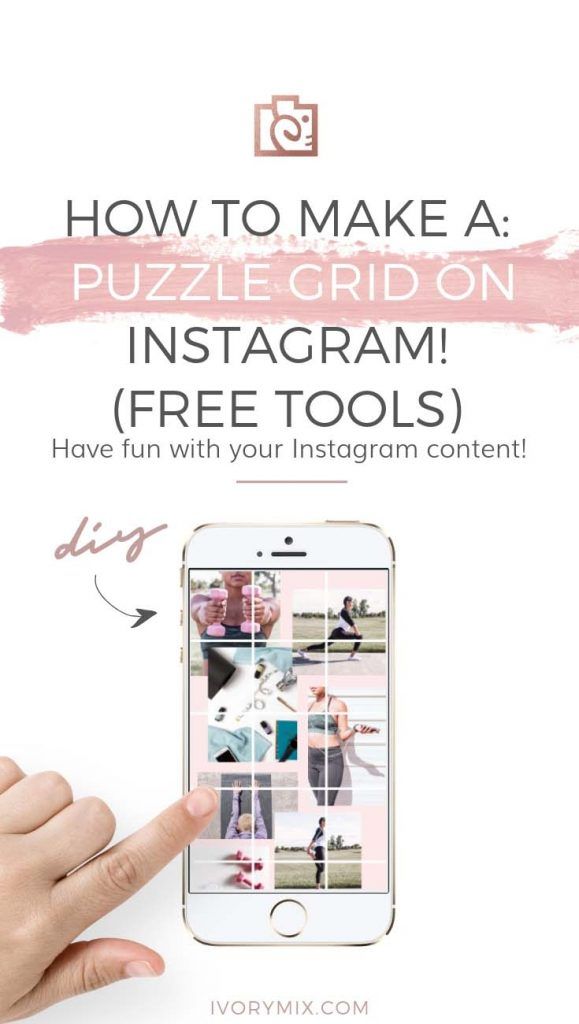 The best thing is the method works across Android and iOS.
Here's how you can create your collage using Instagram's Layout mode:
3 Images
That's how you make a collage using Instagram's layout mode Stories. The third and final way to create a collage is by using third-party apps.
Related: How to Share Tweets to Your Instagram Story Without Screenshotting
There are lots of third-party apps that you can use to create a photo collage. The best thing about third-party apps is their versatility. These apps offer so many extra features that you may otherwise not find baked inside Instagram.
But, you should only go for them if you don't mind an extra download.
We have summarized some of the best photo collage apps for Android and iOS to save you precious time digging through hundreds of options.
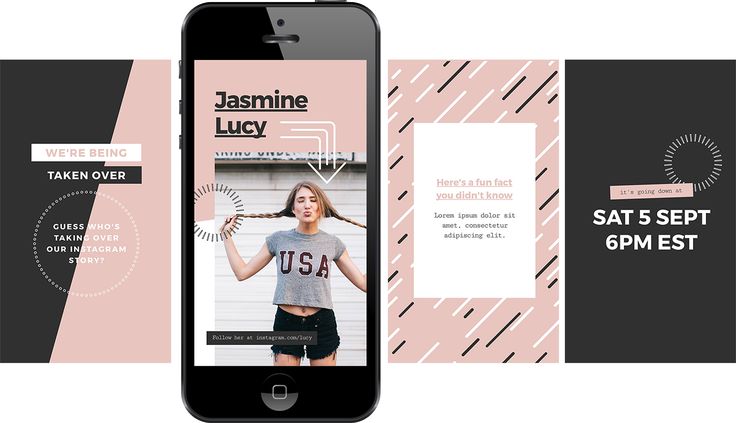
We've all seen Instagram Story updates that are just too many to go through. The ones you start to watch and get bored on the way. Use collages to avoid such scenarios by sharing more than just a single photo per Instagram Story update.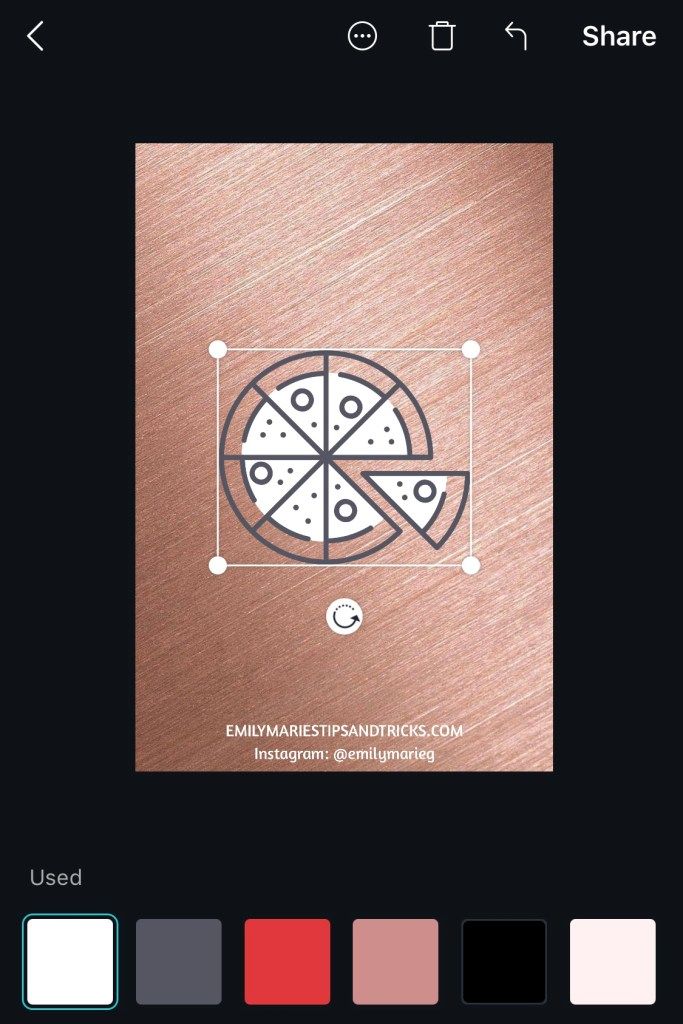 We've listed three different ways to create a collage. There's no excuse.
Sharing photo collages on your Instagram is just one way, however. There are more ways to spice up your Instagram experience.
Instagram is the number one website for creating and sharing photos. You can put together some great pictures if you know how to use the available effects. Today, you’ll see how to make cool photo collages on Instagram. The process is straightforward and only takes several minutes. Let’s get started!
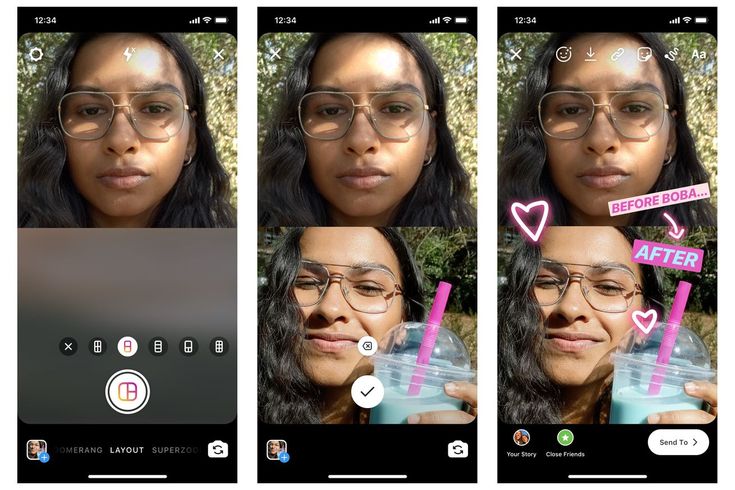
The “Stickers” feature on Instagram is perhaps the best method to create a collage if you want total control over its appearance. Stickers can be a combination of images, photos, or pre-included graphics.
When you go into “Your Story” and choose the “Stickers” option, you can pick and customize your background and select or create images for the collage. The main advantage of this method is that there are no restrictions on the number of photos/images/stickers you can have in your collage. Rotate them, resize them, move them, and overlap them to your heart’s content. You can make some cool collages!
If desired, you can edit your background in the first steps to make it pop!
The Instagram Layout option is a feature that allows you to create images using various layouts and features, notably the collage feature. However, you get restricted to specific collage layouts that limit the number of photos you can use, such as a 2×2, 4×4, 3×3, or 1×3 configuration. Furthermore, the feature does not allow images to get placed in random sections or overlap. Using the Instagram Layout option is perhaps the easiest of the collage options, but it has its limits. Here’s how to create an Instagram collage Story using the Layout option.
 ”
”When using Instagram Stories to make a collage on Android or iPhone, you can specify the source of the image. Not only can you add some pictures and screenshots from your image gallery, but you can also choose photos from WeChat, Downloads, Facebook, and other folders that contain images you created. You can download images from an online cloud service and use them in your Instagram collage to go one step further.
Instagram has only so many editing features you can use to create your Stories. So if you want to come up with something unique, you’ll need help from third-party apps with additional effects and options. Here are some of the most popular image editing apps you can use.
The A Design Kit is a popular app that can help you breathe some life into your Instagram Stories. You can find dozens of stickers, backgrounds, brushes, textures, colors, and other tools you can use to make your photos stand out. The effects will make your stories colorful, and you can add your personal touch to make your collages instantly recognizable.
The Adobe Spark Post app is among the best options for absolute beginners. The app has several thousands of templates you can use for Instagram Stories. It also offers millions of stock photos, fonts, filters, and other valuable resources.
Mojo will provide you with the tools you need to create a unique Instagram Story. Use animated templates to make a more significant impact and impress your followers and clients. You can customize them to your liking by adding effects, animations, colors, cropping, etc.
The app allows you to use animated templates for both videos and photos. Use your creativity to develop fantastic Instagram Stories that will engage your existing followers and draw in new ones.
It would be best if you put extra effort into creating Instagram Stories to engage your followers effectively. Most stories created with Instagram look very similar, so users scroll through them. If you add some extra effects to your story, more people will want to see it. Do you have any experience or questions with creating collages or other engaging effects on Instagram stories? Let us know in the comments below
Every day your advertisement fights for the attention of the audience with hundreds of banners. An error in creating a layout threatens to drain the advertising budget and lack of sales. Employees of the MAER marketing department, using examples, analyze how a layout should be in order to attract the attention of the target audience and not remain in the zone of banner blindness.
9852 views
What are layouts
There are two main platforms for displaying ads on Instagram: the post feed and stories.
The dimensions of the layouts must meet the requirements of the sites: for the feed - the aspect ratio of the banner is 1:1 or 4:5, for stories - 9:16.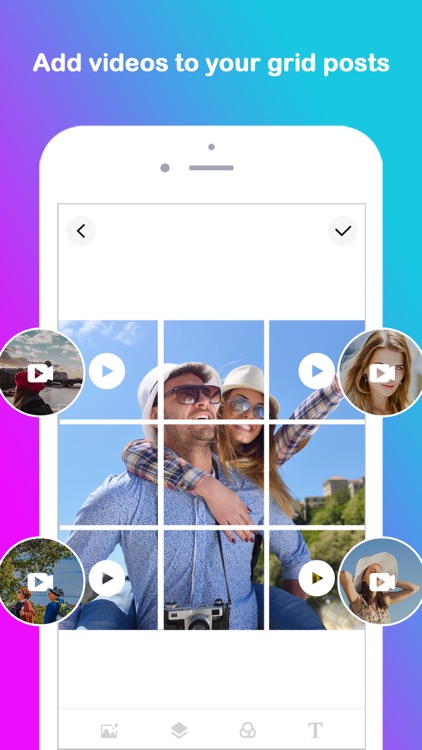
Before you create an advertising banner layout, determine what goal you are pursuing: to collect leads, contacts, lead to a subscription or to a purchase. Based on the goal, think over the concept, advertising, visual design and offer (proposal). What to look for when creating a layout, we analyze further.
Visual
1. Attractive picture
The first thing that catches the audience is the picture. To collect traffic and attract leads, design your layout according to the “stop traffic” principle. Every day a person interacts with a huge amount of content, and he develops the so-called "banner blindness". He automatically flips through the same type of advertising, without delving into the essence.
Your task is to create a creative where the user stops scrolling and asks himself the question: “What is this?” If a person has such a question, he will take a closer look at the picture, read the text and, possibly, follow the link.
Sometimes it's appropriate to use annoying, weird or even "trash" ads. Yes, it happens that it works better than the one that you just like. If the user is annoyed by something, then the effect “What is this?” already reached.
When developing a layout, you cannot adhere to the criteria "like" - "dislike", "beautiful" - "ugly". Often even targetologists cannot say in advance which creative will “shoot”. It is necessary to test creatives and analyze the results. Study the reaction of the audience and see where you hit the target.
2. Correct associations
Create a clear message in your creative so that the audience immediately understands what to associate your business with. For example, if you are advertising a restaurant, the mockup might include a high-quality photo of the interior or appetizing food.
3. Relevance to the target audience
This is necessary so that there are not only views and clicks, but also sales.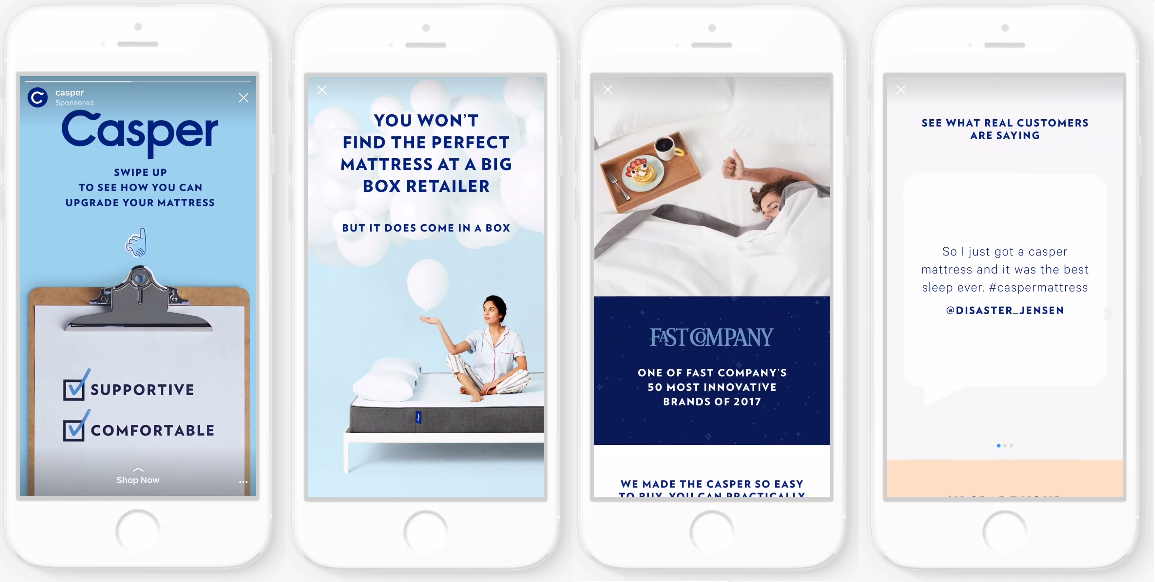 Imagine that you own a women's clothing store. The layout shows a sexy girl in a skimpy outfit and an indistinct offer. It is likely that men who are attracted to the girl’s appearance will click on the creative more. And this is not your target audience. The bottom line is that there are clicks on the banner, but there are no purchases.
4. Trends
Be careful with trends and hype. Trends tend to come and go. This is a temporary phenomenon. Yesterday the screaming cat was popular, today - "The Squid Game".
The danger of using trending "chips" is that they attract the attention of the audience for a short time. When everyone uses them, they become ineffective - people get tired and stop paying attention to them.
In addition, not all popular memes and hype topics will suit your business. The main thing is to introduce trend elements consciously and be able to stop in time.
5. Readable text
The number of characters is not important. The main thing is that the user does not strain to read what is written. And for stories, it is important that the entire text can be read in a short time. The slide is shown for 15 seconds, and not all users will pinch the screen with their finger to finish reading your offer.
Be careful with the choice of font so that the reader's eyes are not dazzled and out of focus.
Offer (offer)
Must:
1. Don't talk only about yourself
Do not write in the offer the words: “we want”, “we can”, “we will do”, “we will show”, “we will teach”. It should be clear from the offer that a person can solve his problem with the help of your product or service, and why he needs to do it with you.
If you create a creative just to “light up” your brand, this is image advertising. This is more suitable for well-known brands. If you don’t have a name for the audience yet, it’s better to run both product and image advertising in parallel.
What can work for recognition:
Famous brands: “just add water” - Invite, “you deserve it” (affordable luxury) - L’Oréal, holiday and fun - Coca-Cola.
2. Do not abuse discounts
Advertising a sale is a good move only if you want to sell an illiquid product or attract an audience to a one-time promotion.
In targeted advertising, discounts work, but keep in mind that an audience that buys from you for the first time and at a discount is unlikely to buy at full price. Most often, such an audience cannot be motivated to repeat purchases at the full price. This means that you will lose profit.
3. Don't write a price without deciding on the objectives of the advertisement
If your task is to bring as many people interested in the product into the sales funnel as possible, and your sales managers know how to work with the “expensive” objection, make an “upsell” and bring the client to a higher check, then it’s better not to write the price in the offer . So managers will have the opportunity to work out objections with each client and increase the margin of the transaction.
If the task is to get target customers who are willing to pay a specific price, then you can and even need to indicate the cost in order to “cut off” the audience that is not ready to buy goods at your price.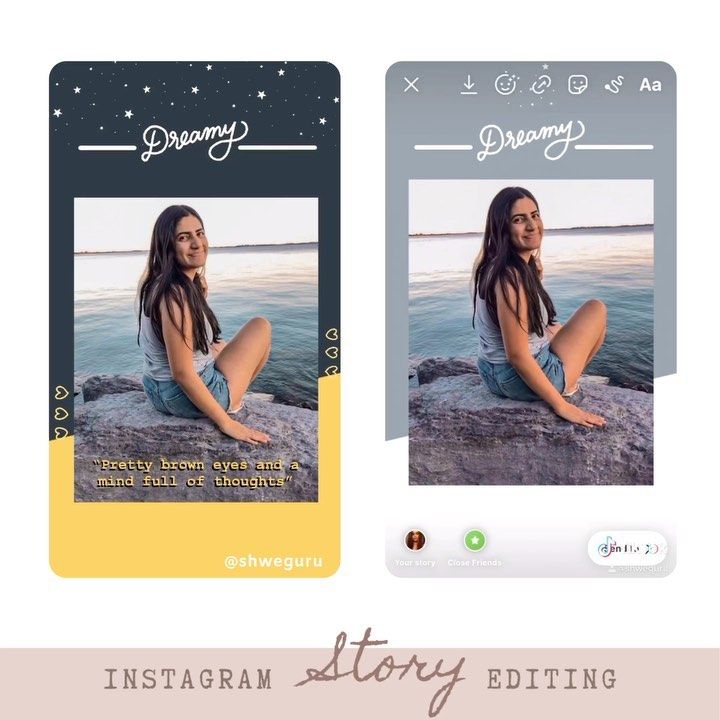
Call to action
Call to action is an obligatory part of advertising. It prompts the user to subscribe, follow the link, register. You should not expect that a potential client will figure out what exactly needs to be done. Tell him.
If you don't say what to do, there's a good chance you'll miss the user. Without a call, only someone who is very attentive and who understands that he really needs your product will perform the target action. And the task of the marketer is to attract all the target leads who have a similar problem and who want to solve it.
And a few more tips
1. Always think about what image an advertising creative creates and what associations it evokes in people. Your advertisement can be creative, bright, with a clear offer. But if it does not match the image of the company, you risk attracting an untargeted audience and cause distrust among potential customers. This is especially true when your product or service involves risks or health.
2. Let the layout rest for some time before launching the advertisement. Perhaps, looking with a fresh eye, you will notice flaws in the visual or errors in the text.
3. Check how the layout looks on different devices. The creative should be well viewed both from a laptop and from a small smartphone.
4. Don't chase coverage. Reachable and viral creatives can lead to the wrong audience, and you will have to turn off the advertising campaign.
When you run targeted ads or order services from a blogger, success depends primarily on the advertising layout for Instagram. It should catch the viewer from the first seconds, be unique and easy to understand. To create an effective layout, it is best to contact a copywriter and designer. But if you don’t have such an opportunity or you want to learn how to create them yourself, read our article.
Advertising layout (creative/creo or banner) – material that we use in advertising to hook the target audience. This is how we motivate the viewer to take a certain action: buy a product, download a checklist, or subscribe.
Instagram ad layout requirements:
First, let's figure out what a blogger's Instagram layout is. If, when setting up targeted advertising on Instagram, you choose the audience yourself, then the blogger already has his own subscribers. Find out more about the interests and lifestyles of his readers to make a layout that will interest them. Consider the naturalness of the ad, that is, find out the planned content of the blogger on the day your ad is shown.
When designing your ad layout, follow these steps:
Tailor your Instagram ad layout to the needs of your target audience to grab their attention. People need to understand what needs your product will satisfy.
Punch through banner blindness. This is a phenomenon in which website visitors do not notice ad units or objects similar to them. You have 1.5 seconds to get the viewer interested before they scroll through the ad. Creative ideas and a clear message will help you with this.
Select a font and background so that the layout is as readable as possible.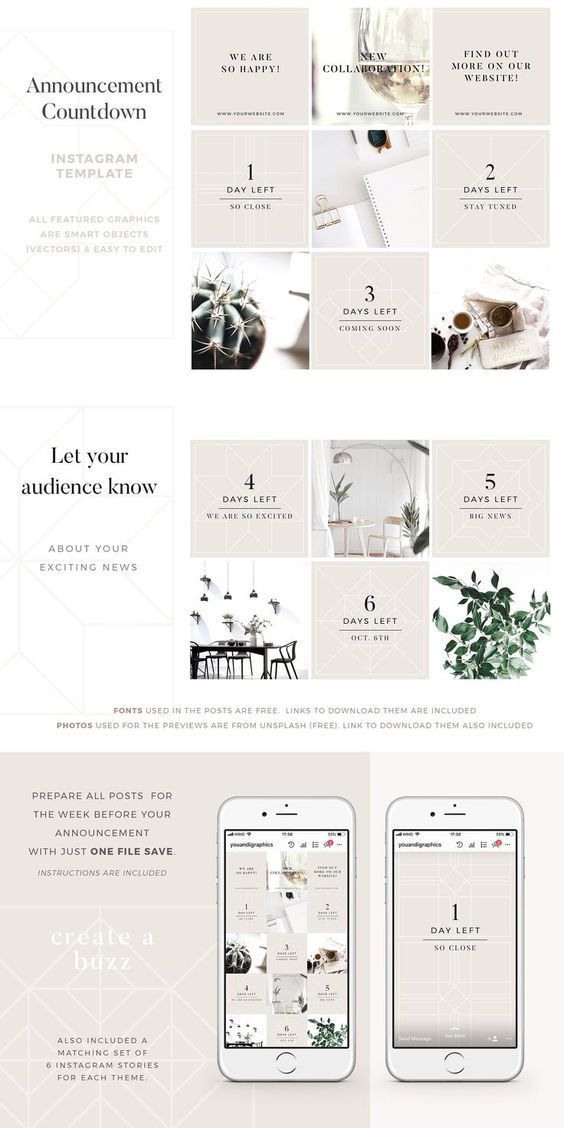 Remember that although the banner broadcast time is 15 seconds, the reader makes his conclusion about the advertisement in just 1.5 seconds.
Check the clarity of the text. One layout, one idea.
Outline the text on the layout.
It should intrigue, immediately convey the essence of advertising, give emotion or benefit. Therefore, remember how your target audience lives and what interests them.
Here are examples of good headlines if you are promoting your personal blog:
In story creatives, reveal the essence of the headline and be as short as possible. No need for veiled phrases, write directly and to the point.
For example, to the heading “How to make creative stories for a personal blog?” add one of the following descriptions:
Should always be and coincide with the action itself. In this case, the reader understands what he needs to do when he sees the advertising layout.
Templates for Instagram ads can be found in the applications described below. We recommend testing as many creatives as possible to choose the most effective one.
Canva is an online platform with many free templates that you can use to create Instagram ad layouts. She also has a mobile phone version.
It's very simple: search for "instagram story", select the appropriate template and change the details for yourself.
The application makes beautiful animated layouts for advertising on Instagram. It has many templates for advertising blogs, products, events, and more. The app is free, but some creative templates are only available with a subscription.
Create video stories and ads, animation covers, headers and illustrations for social networks, websites and blogs.
Video editor for social networks and automatic playback. With it, you will create a spectacular video and immediately publish it. For more serious projects, use the paid version.
We've put together a selection of cool layouts to help you figure out which direction to go.
These 4 layouts have a good structure and a specific target action.
- The layout below has text and graphics that are not very readable.