by Mar Pages
Posts may contain affiliate links. Full disclaimer here. Need help growing your Facebook Group? Click here.Your Facebook Group link or URL is one of its most visible parts after the About page, name and cover image, and it is also fully customizable. It is the only unique identifier for your group online (two groups can have the same name) and it can help you rank higher on Facebook’s search results.
In this article, we will talk about how to change your Facebook Group URL to a custom address and why you should do it.
Like any website or business online, you can name your group practically anything you’d like but your group’s URL needs to be unique.
That is why Facebook automatically assigns a numeric URL to each group when it is created, the same way it assigns a numerical URL to a new Facebook profile or page. This means that the last or the 3 parts of your group’s URL is the one you can customize.
After the numerical number is assigned, we strongly recommend that you go and edit this to create your group’s vanity URL. The case for customizing your URL is best understood with an example. Of the below two links, which would you be more likely to click on?
https://www.facebook.com/groups/solofemaletravelers/
https://www.facebook.com/groups/198556510962482/
With the top URL, you know exactly what it is you’re clicking on as opposed to the second URL, which is a mess of numbers and could lead you to anything. The first URL is far easier to remember than the second, and the strength of the branding has a higher chance of empowering people to click through.
Why should you customize your Facebook Group URL? We recommend you do it because:
 The URL acts as an additional element of your group that complements its name, cover image and description.
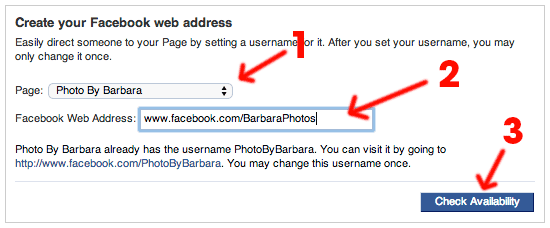
In brief, not customizing your URL can greatly limit your potential for growth.
By default, when you create a group, you will get a numeric identifier at the end of the generic Facebook URL that looks like this: www.facebook.com/groups/[numerical identifier].
In order to customize that, you need to go to your groups’ Settings and then scroll to Customize Group. The first option you will see is Web address also known as your Facebook Group vanity URL.
To customize your URL, click on the pencil icon under Web Address and type the URL you want for your group. If a URL is taken, it will show up in red as seen below. If a URL is available, you’ll get the green tick, and can hit Save to make the URL live:
Things to consider when changing your Facebook Group URLBefore you change your group’s URL, you should take a moment to think about it carefully for several reasons:
 If the name of a group and its URL do not match, this may confuse potential members and send contradictory signals.
400 + Actionable Pages
390 + How-to Screenshots
32 Proven Unpaid Growth Strategies
Sounds PERFECT! Show me the eBook!
My group has exploded using your strategies.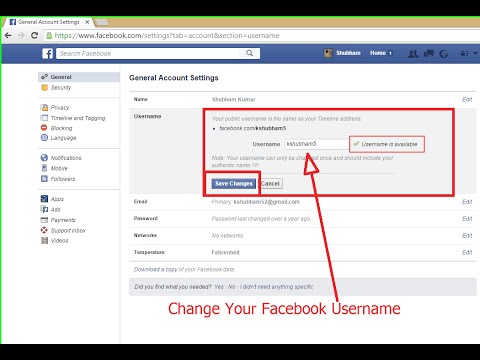 A competing group actually asked me how I was growing so quickly!!
How often can I change my Facebook Group URL?
You can change it every 28 days but will not be able to do so after your group has 5,000 members.
Why should you create a custom Facebook Group URL?
Customizing your group’s URL makes it easier to remember and is useful when sharing it verbally or offline. It is also another signal that can help your group rank in search results on the platform and builds trust with your members versus the generic numerical address that Facebook assigns every new group. As a unique identifier for your group, it is also recommended that you claim the best URL for your type of group first so other groups created later on cannot capitalize on it. Two groups can have the same name but not the same URL.
How do I change my Facebook Group URL?
Go to your group’s Settings, scroll down to Customize Group then click on Website address and type the last part of your groups URL that will appear after www. facebook.com/group/
By Khizer Kaleem
Finding and sharing links of profiles, pages, and groups on Facebook is relatively easy -- though it requires a few more steps on the mobile app.
Facebook boasts of being a social media platform with the highest number of active users, but finding different pages and posts can be challenging.
Thankfully, you can find the Facebook URL of desired posts and profiles from your PC and smartphone with a few simple steps. Here's all you need to know about what a Facebook URL is and how to find URLs for profiles, pages, and groups.
Facebook is one of the most popular social media platforms of all time. One reason for it being so popular is the ease with which you can share Facebook’s content. Facebook URLs are online links given to a particular page or profile on the site.
Facebook links can be shared with people wanting direct access to particular profiles, pages, and groups. You can share the URL on other platforms, and the users can open it simply by clicking.
These URLs make it easy to find a particular piece of content and increase engagement on Facebook posts.
However, depending on whether you're using the mobile app or not, finding these links can be more complicated than expected at times.
To find your own Facebook profile link:
To find the Facebook profile URL of another user:
1. Search the profile you want to share.
2. Once their profile is loaded, the link in the address bar will change to their Facebook username.
3. Copy the URL from the address bar and paste it at the desired location. The format for the URL is https://www.facebook.com/username.
You can find a Facebook profile URL on your smartphone through the Facebook mobile app or the browser.
3 Images
To search for another profile using the Facebook app, use the search bar to open the profile. Click on the three dots to open the Manage menu. Copy the personalized link and paste it.
If you're using the Facebook mobile website, follow these steps to find your profile's link:
3 Images
If you're searching for the link to another user's profile, follow these steps:
2 Images
You can search for and find a Facebook page's link on both using either your PC or smartphone.
You can find a Facebook page URL through the Facebook app or web browser.
If you're using the Facebook app:
2 Images
In case you're using a mobile web browser, follow these steps:
2 Images
Facebook groups can be public or private. You can share any group by copying its link.
When using a smartphone, you can use your Facebook app or browser to find the URL of any group.
If you opt for the Facebook app:
2 Images
If you're going with a mobile web browser:
2 Images
Facebook is a popular platform, and it allows sharing of profile, page, and group links so that you can easily connect with people.
When copying URLs of profiles and groups, it is essential to remember that contents in the Private/Friends Only mode are only accessible by people added in that particular section.
This article is about the physical address shown on the Page. To change the web address (URL) of a Page, change its username.
You can manage the classic or new version of Pages. The new version is not yet available for all Pages.
Classic Pages
Only admins of a Page can update its address.
To add or edit an address:
Classic version for mobile browser
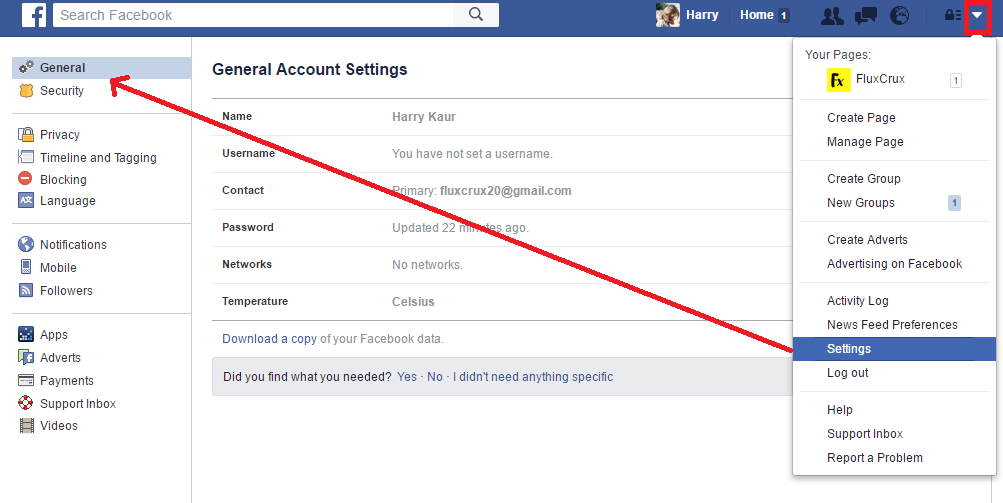
Click the icon in the upper right corner of the Facebook window.
Click Pages.
Go to your Page and click More at the top of the screen. You may need to swipe left or right to see this option.
In the Page Management section, select Edit Page Information.
In the Location section, enter your company address.
Click Save Changes at the bottom of the screen. nine0003
New version for mobile browser
Click the icon in the upper right corner of the Facebook window.
Click Pages.
Go to your Page and click Edit Page.
In the Location section, enter your company address.
Click Save Changes at the bottom of the screen.
Note. You can add only one address. If you're having trouble adding an address to your Page, make sure you're assigned the admin role, or change the Page's category. nine0003
Note. If you link your Page to your Instagram profile and add or update your Page address, the location will be added to the map on Instagram.
New version of Pages
If you only have access to perform certain tasks, you will not be able to update the address of the Page. If you have access to a Page on Facebook, you can go to it and add or edit the address of the Page.
To add an address to a Page:
Log in to Facebook from a computer.
Go to your Page.
Click Info under your Page's profile photo.
Select Contact and Basic Information on the left side of the screen.
In the Contact Information section, select Add an address and enter the required information. You can drag the map to change the company's location.
Click Save.
To edit an address on a Page:
Log in to Facebook from a computer. nine0003
Go to your Page.
Click Info under your Page's profile photo.
Select Contact and Basic Information on the left side of the screen.
Click the icon next to the address, and then enter the new information. You can drag the map to change the company's location.
Note. You can add only one address. If you're having trouble adding an address to your Page, check your Page role or change the Page's category. nine0003
Note. If you link your Page to your Instagram profile and add or update your Page address, the location will be added to the map on Instagram.
On the Facebook platform, you must indicate the country where you live in your personal profiles and pages. If you have moved, are temporarily abroad, or are transferring your business, then you need to edit this information in your profile or page. nine0003
In this article, we will take a closer look at how to change the country of your location on Facebook, and why you need to do this. At the end of the article, you will learn how to set up your location automatically.
Content:
People often move to other countries and locations. This is a fairly common occurrence, due to study, a job change, or simply a desire for a change of scenery. To quickly get used to a new region, find new friends and get up-to-date recommendations from Facebook, let's look at how to change the country of residence and city on the network. Among the functions of the platform is adding and editing the place where a person lived in different periods of time. nine0003
Procedure:
In addition to the country and city, you can optionally add a full postal address. Also available here are privacy settings and a choice of the circle of people who can view this data. nine0003
Whether to publish the actual address of the organization on the network - this decision is made only by the owner of the account.
To add an address, do the following:
Facebook has slightly different requirements for pages than for personal accounts. The reason is that the published content is viewed by a wider audience.
The contents of publications must not contradict the laws of those countries whose citizens can view them. That is why Facebook has special settings that limit views for a specific audience:

Some large companies that ship products to different countries have different language versions of their pages. This is done for the convenience of users who go to their public on Facebook.
Automatic display can be changed:
When you create an ad account, the system asks you to specify the country. This information is needed for objective reasons - to comply with tax laws. But there is a way to change the country in a Facebook ad account. nine0003
The required field is located in the page settings at the very bottom. If this line is inactive, then changing the country in this account will not work. But there is a way out of this situation:
Important : Please note that the time zone and currency have nothing to do with the country you specified in the advertising campaign. In order for an ad to pass moderation, it is sometimes required that the specified currency be the same as the country where it will be broadcast. If the site administration detects a discrepancy, it will request confirmation of the identity of the account owner.