Having trouble with the button above?
Do check the comments below, many other people may have asked similar questions to you and will save you some worry!
Here are some common questions and answers...
#1 The first pop-up closes after I select where I want to go live to
When you click the go live button, your browser will normally display a pop-up. You'll be able to choose where you want the live video to be posted to. Once you've done this, this window should close and another pop-up should appear. Here you'll be able to craft your post, get the stream key and see your preview. However some browser's block this second pop up. If this happens to you, check your browser settings to allow pop-ups from this site (iag.me). Check this article out to find out how to allow pop ups for your browser.
#2 I get a "Cannot connect to server" or a blank preview
Something is blocking your connection between OBS Studio and Facebook Live. It's likely that your ISP is blocking your connection. If this is happening to you, could you let me know in the comments below along with the name of your ISP? I'm interested to know. This is happening rarely, but it is happening to some people. If this is the case, I highly recommend that you try connecting on a different internet connection (such as at a friend's house or at your local coffee shop). If it works there then you know it's your internet connection. If it is your internet connection then check you don't have any firewalls that could be blocking the connection. Also restart your router to see if that solves it. If it doesn't then try and call your ISP and ask them to unblock Facebook Live. They'll probably fob you off, but keep trying. Please let me know how you get on in the comments below!
#3 There is a big delay in my stream
This is a more difficult issue to solve. There is always going to be a delay (perhaps up to around 5-10 seconds) but some people have complained of a much longer delay.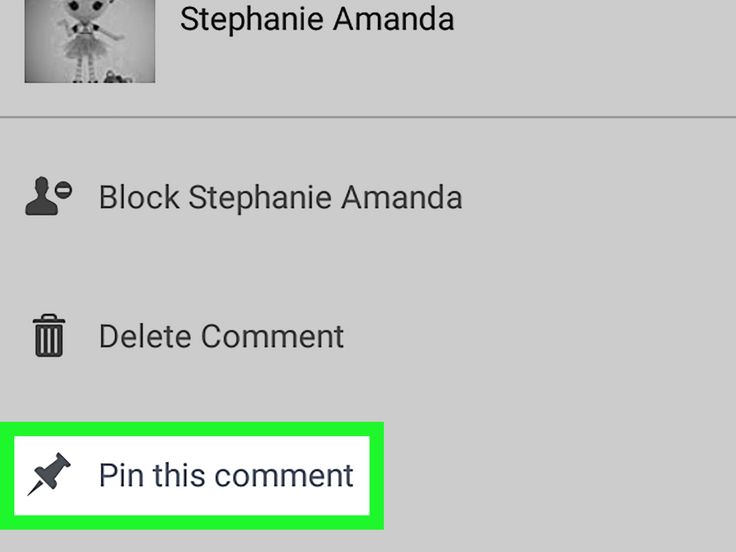 Firstly make sure you check your upload speed using a service like Speedtest.net. It's not your download speed that makes a difference, it's the upload speed - since you are uploading the video to Facebook in effect. You should have an upload speed of at least 3Mbps, although 4Mbps and higher is preferable. You can use Facebook Live if you have a slower speed, but you may have issues. Also, the speed of your computer is important. Older and less powerful computers will take their time encoding the video. Keep an eye on the CPU usage in the bottom
Also, the speed of your computer is important. Older and less powerful computers will take their time encoding the video. Keep an eye on the CPU usage in the bottom right-hand corner of the OBS Studio window. If it's really high (above 90%) then your computer may be struggling.
In OBS Settings you can change the encoding preset to “ultra fast” or “super fast”. You can find this in Settings->Output.
This will mean your computer’s processor will be used a little less.
#4 I use a Mac, and I'm not able to stream the audio from other apps such as Skype in OBS to Facebook Live
Macs handle desktop sound a little differently to Windows. On the Windows version of OBS Studio, the sound from Skype will automatically be captured as desktop audio in OBS Studio. On a Mac you need to route the sound from another app to OBS Studio.
This requires a 3rd party app. Wirecast has this functionality built in (a driver that records desktop audio), but with OBS Studio you’ll need a bit of extra help.
There are a number of options...
 It costs $99, but apparently, it’s worth it!
When you install one of these, you can then route the audio output from Skype into OBS Studio and it should just work. It’s a pain that you have to jump through a few hoops here, but it’s just the way Macs work.
#5 My webcam appears black!
If your webcam preview just appears black in OBS Studio, you may need to adjust the resolution by changing it to custom. Right-click the webcam source and click properties to change the resolution.
#6 Audio and Video are out of sync
There are a number of factors that can affect a delay between audio and video. The first thing to ensure is that you close as many background apps as possible. Close down as many apps as you can, check for any bandwidth draining apps such as Google Drive, Dropbox etc. You could also see what else is running in the background and shut down any other apps.
The 2nd thing is to check your upload speed. Use something like speedtest.net. If you have at least 3Mbps or 4Mbps upload speed you should be fine. Ideally use a wired connection as opposed to a wireless one.
The 3rd thing is to turn up the encoding preset. Go to settings and then output, and put the encoding preset up to max.
If none of that solves your issue, your computer may just be struggling with streaming the video. Live streaming takes a lot of processing power. Although OBS Studio as amazing - particularly for a free app, it's not quite as efficient as the likes of Wirecast. So, you may need to give it some help and manually fix the "sync offset".
To do this, click on the cog by the mixer on the main screen, and then adjust the sync offset of your audio. There is no ideal setting here, unfortunately, so you'll have to play around until you get a setting that works for you:
When Facebook was first launched in 2004, it wasn’t as big as we see it today.
At that time, there were no messaging and notification features. Neither was there any wall or any option to make any status updates. And a user was allowed to upload only one photo.
Here are a few screenshots to remind you how Facebook looked at that time:
Since then, this social media platform has evolved rapidly. The news feed was added in 2006 and the Facebook chat was introduced in 2008. By October 2012, almost 1 billion people in the world had their profiles on Facebook.
In April 2016, Facebook started a feature called “Facebook Live”, that allowed users to broadcast their live video on their timelines.
Since its launch, the Facebook Live feature exploded in popularity, with over 3.5 billion live broadcasts created by the users within two years.
In case you haven’t yet explored this feature or if you don’t know how to go LIVE on facebook, here is your detailed guide.
We will tell you everything, right from how you should start a Facebook Live on PC, how to analyze your live video, and where to end.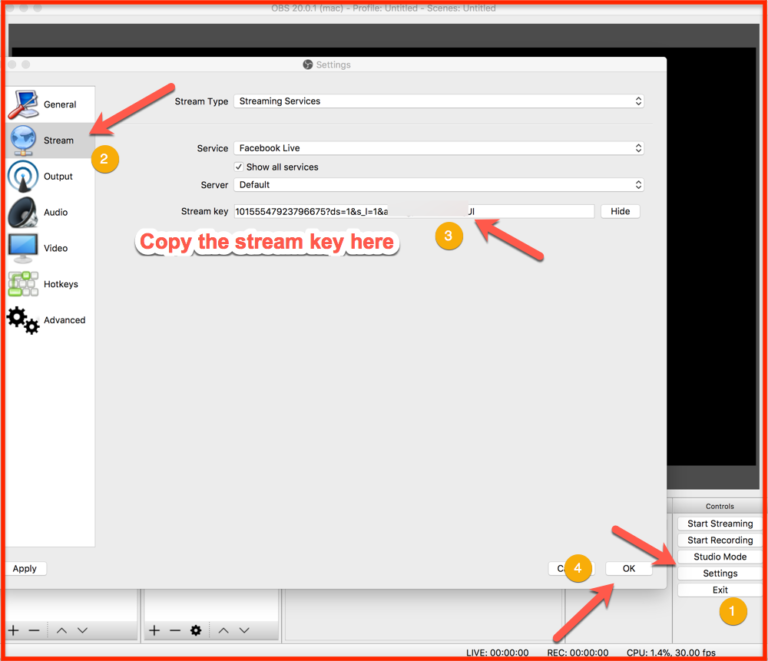
Let’s get started!
The first thing you need to decide is whether you want to go LIVE through your smartphone or desktop. A smartphone can be a great option for events and off-the-cuff live broadcasts.
However, in most cases, a Facebook Live Stream from a PC is a better option, especially for marketers using Live to promote their business. It will help you broadcast your live streaming in a more professional manner.
Below is the step-by-step guide to use Facebook Live on PC or laptop.
The first thing you need to do before you can start your own Facebook live video is to log into your Facebook account. Visit Facebook.com and enter your e-mail ID or phone number and password, and then click on Log In.
In case you do not have an account yet, you can fill up the details below the “Create An Account” section and click on “Sign Up. ”
”
Next, you need to go to your Facebook homepage and tap on the “Write Something Here” box as you do when you write a new post. In some cases, it might show as “What’s in your mind?”
When you tap the “Write Something” here or “What’s on your mind” box, you will get a drop-down menu displayed in front of you. It will contain options to share pictures and videos, to tag people, and update how you are feeling, among several other options.
You need to choose “Live Video” from this drop down list, and a new window will appear in front of you. Alternatively, you can also click on “Live” on the Create toolbar located just below your cover page on your profile homepage.
From here, you can schedule your Facebook Live video. Start immediately or decide a future time and date for your Live.
You will be asked to “Say something about your Live video.” In this box, you need to write a compelling description or header and a summary for your Live Video. Make them catchy enough to attract the viewers.
Now, you are all set to start your Facebook Live broadcast. Below are the steps to start your Live broadcast:
Done everything mentioned above? That’s it!
You are now Live. Smile!
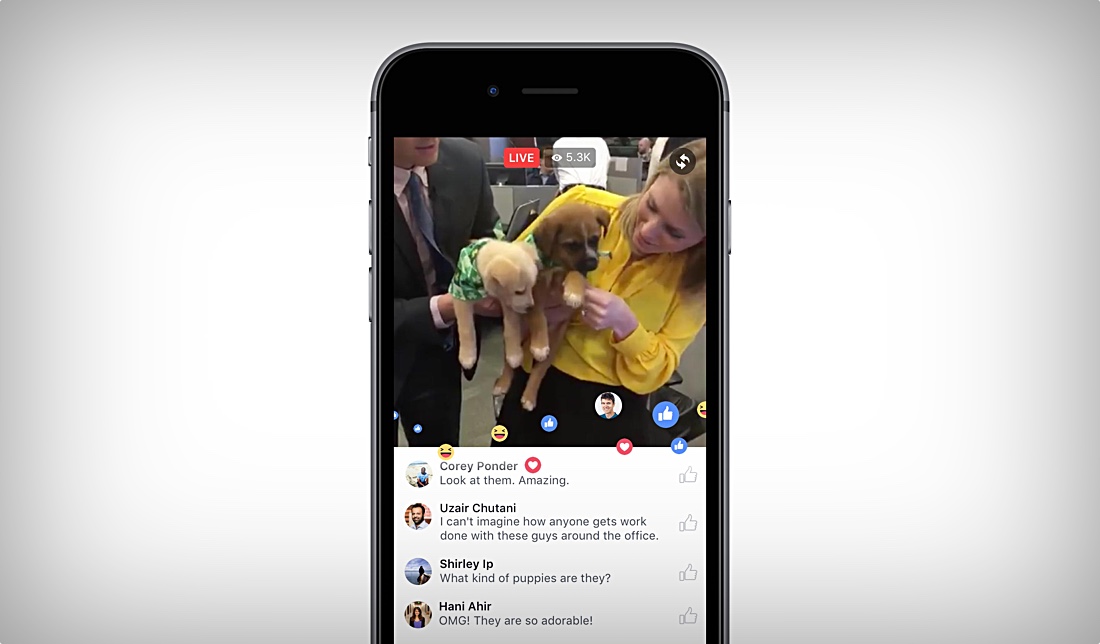
Interact confidently and cheerfully engage with your audience. You can read live comments and reactions from the viewers during your Live video.
After you’ve completed the Live, you can click on “Finish” or “End Live Video” to end your Live broadcast. The recorded video will appear on your timeline and others’ news feed. You can tag more people in your video and even change its description afterward.
If you want more engagement on your video, you can pin it to the top of your page so that it’s the first thing people see when they visit your homepage.
Merely starting and ending your Live video are not the only things you can do with Facebook. You can even analyze your Live Video or schedule your Live video for the future. Besides, there are many more Live video features that Facebook offers. Here are some:
Want to go Live on a future date? You can schedule your Facebook Live in these steps:
 You can also add an image to grab the attention of viewers who will be watching this post
This mode is particularly useful for first-time users. If you just want to practice your Live show ahead of the actual Live video, you can use the admin-only mode offered by Facebook.
Under this mode, your live video will be visible only to you and other page admins (if any). You can check if everything is working properly before going live and even use this feature to get used to the Live camera.
To apply this feature, you need to scroll down on the left-hand sidebar of your Facebook Live broadcast page, and check the box which says, “Publish as a text broadcast.”
If you are using your Facebook Live broadcast to teach or present something to the viewers, the screen sharing option can be useful for you.
Using this feature, you can show your desktop screen to the viewers during a Live Video instead of showing the contents of your webcam.
To start screen sharing, you need to go to the set-up menu on the right-hand side of your Facebook Live broadcast page, and click on “Start Screen Share.”
You can enhance your presentation or video by adding graphics to your Live broadcast. It will make your Live video more attractive and hence, can help in holding your viewer’s attention for a longer period of time.
To add graphics to your Live video, you need to click on the “Graphics” tab located at the top of your Facebook Live broadcast page.
You can then select the type of graphics you want to add to your broadcast, such as comments on the screen, image overlay, a moving ticker, or a permanent logo.
You can analyze your Live video performance and get insights about the viewership, likes, comments and other details. This will help you in maximizing the reach of your Live broadcast.
To analyze your Facebook Live broadcasts, click on the “Insights” tab located on the top of your Facebook Live page. You will get a drop-down menu from which you can choose to view the insights on particular subjects.
For pre-recorded videos, Facebook allows you to analyze minutes viewed, total number of viewers, 10-second views, video news, average time viewers spent on your video, and a breakdown of the reactions, comments, and shares received on your video.
For Live videos, Facebook lets you view all the metrics mentioned above along with the peak live viewers on your video, reach of your video, and the demographics of the people watching your video.
Now that you know what all you can do with your Facebook Live broadcast, you can tap into this exciting world of live-streaming and start your Facebook Live video now. But before you start your live broadcast, below are some awesome tips to make your Live even better:
 The viewers must feel rushed the next time you come up with your live broadcast.
According to the Founder of Facebook, Mark Zuckerberg, “People interact way more around live videos than regular ones.”
The concept of Facebook Live garnered huge attention from social media users within a few years of its launch. In 2020, Facebook Live video view count was approximately 2 billion.
According to stats, Facebook live videos get 10 times more comments and 6 times more interactions than traditional videos.
So, if you aren’t Live yet, wait no longer!
Marketers can simplify their social media marketing campaigns using advanced marketing tools, like those provided by SocialPilot.
SocialPilot helps you publish and schedule Facebook posts, analyze your performance, seamlessly communicate with your team, as well as post Facebook Ads, all with one tool.
Try its free trial today!
Facebook Live is a great way to keep in touch with friends, family, customers and clients. In this article, we'll show you how to live stream on Facebook using a browser, mobile device, and live streaming software and hardware encoders.
Facebook's huge reach makes it impossible to ignore it as a platform to promote your business or project. But keep in mind that Facebook is first and foremost a social network. If your goal is to reach a new audience, streaming to YouTube (or better yet, multiple platforms) is your best bet. But there's nothing better than Facebook when it comes to the people you're already connected to: existing customers or customers, your local community, interest groups, and so on. nine0003
You can stream on Facebook via:
Which option to use depends on your goals. The web, mobile device, or streaming software will probably suit most general streamers, while gamers will want to choose a software or hardware encoder. Consider a hardware encoder, especially if you're making broadcasts for your business or want to make broadcasts your business. Businesses should consider paid business streaming platforms to access advanced features related to monetization, analytics, and lead generation. nine0003
Please note that Facebook sets a live broadcast time limit of eight hours when streaming through a computer, software or hardware encoder, and four hours for streaming from a mobile device.
If you plan to broadcast via a software or hardware encoder, make sure the application or device you choose supports real-time secure messaging (RTMPS) streaming. Don't confuse this with the Real Time Messaging Protocol (RTMP) without the "S". Many encoders are capable of streaming with RTMP, but not all support RTMPS. nine0003
This distinction is important if you plan to stream on Facebook. Facebook Live switched to RTMPS in mid-2019 to better protect user broadcasts from cyber threats.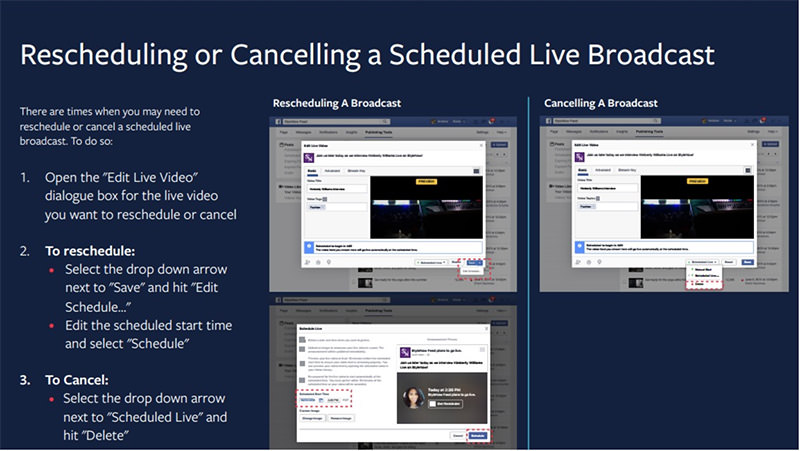 Unlike YouTube, which still allows RTMP streaming, Facebook is RTMPS only. (Our Webcaster X2 supports both RTMP and RTMPS streaming.)
One of the easiest ways to live stream to Facebook, right from your web browser, using the built-in or external USB webcams. A webcam is enough for you if your only goal is to share your thoughts and interact with the audience in real time. You can also broadcast through a web browser using higher quality equipment such as a digital video camera or digital SLR. To do this, you will need a USB capture card to transfer the video signal to your computer. Facebook can then recognize the camera as if it were a Plug-and-Play webcam. nine0003
The process of broadcasting to Facebook through a web browser is as follows:

That's it. Don't forget to click "End Broadcast" when you're done. Facebook will post the post to your feed shortly. Thus, viewers who missed the broadcast will be able to watch it. You can prevent this by clicking "Delete Video" on the logout screen. nine0003
You can view and manage all current, scheduled and past live videos by selecting Publish Tools from the top navigation bar and then Creator Studio from the menu on the right (under Tools).
instant audience engagement and dynamic events where freedom of movement is the key to a compelling webcast.
Live streaming to Facebook from a mobile device is extremely easy:
You are now ready to stream without limits, except for the four-hour limit for mobile devices. There are many interesting options (filters, masks, etc.) that can be accessed via the icons on either side of the Start Broadcasting button. They're fun to play with, especially on social media, but if you don't want to add visuals to your stream, make sure you don't have any of these options checked beforehand. nine0003
When you're done, click Done in the bottom right corner of the screen. Decide if you want to post the replay to your feed. Click "Share" in the lower right corner of the screen, or "Delete" right next to it. If you want to edit posts, the easiest way is through Facebook Creator Studio in the browser.
Live streaming software is a good choice if you want to share your screen (e.g. to stream gameplay), get access to additional features such as captioning in real-time and overlay, or use multiple cameras. Open Broadcaster Software (OBS), XSplit, and Wirecast are just a few of the options. nine0003
Any streaming software should automatically detect any USB cameras connected to your computer. You can also transfer non-USB video to your computer via a USB capture card. Streaming software recognizes the camera as a USB video (UVC) class device.
The exact process of live streaming to Facebook with a software encoder will depend on the software you use, but it should look something like this:


 Copy the URL of the server with the fastest TCP round-trip time (in milliseconds) and paste it into the Server URL field in your streaming software.
 Don't forget to click End Stream when you're done. Facebook will post the post to your feed shortly. Thus, viewers who missed the broadcast will be able to watch it. You can prevent this by clicking "Delete Video" on the logout screen.
Hardware encoder or encoder is a device specifically designed for capturing, recording and streaming video.
Live streaming to Facebook with a hardware encoder offers several advantages over using a web browser or mobile device. These advantages make hardware encoders the best option for companies filming high-stakes tournaments (eg concerts, sports) and those who want to enhance the look and feel of their live broadcasts. Streaming live to Facebook via a hardware encoder may seem complicated, but the benefits of using it more than make up for the time it takes to learn. nine0003
In essence, hardware encoders make it easy to create high-quality multi-camera broadcasts that are sure to impress and engage your audience. How? Flexibility is one of the main benefits. Many hardware encoders include multiple video and professional audio inputs, allowing you to connect and stream video from HDMI and SDI cameras, laptops, tablets, XLR or TRS microphones, and more. And as dedicated devices, hardware encoders often perform better than software encoders. After all, software encoders must share resources with your computer's operating system and other active processes. nine0003
There is a wide variety of streaming hardware on the market, making it impossible to write a comprehensive guide to setting up hardware encoders to work with Facebook. For this reason, we will look at how to stream to Facebook using our Webcaster X2 encoder.
For detailed instructions on how to stream to Facebook using Webcaster X2, see our step-by-step user guide. And here we give an abbreviated version:
That's it! If you want to write a title, description, tags, and more, you can do so using the Webcaster X2's built-in user interface. You will need an HDMI display, a USB mouse, and a keyboard. Connect them to the Webcaster X2 and in the user interface, click "Settings" in the lower right corner. Here you can change the post destination, give your live stream a title and description, and more. nine0003
When you're ready to stop broadcasting, simply press the Webcaster X2's power button again and it will go offline.
Until recently, live broadcasting on Facebook was only possible using a mobile application. But now this function is also available from a computer, which is very convenient for conducting online webinars. Live broadcast can be started:
/cdn0.vox-cdn.com/uploads/chorus_asset/file/8563785/landscape02.png)
Consider the process of launching a broadcast from different devices.
First you need to download the social network we need. In our case, this is Facebook. After you install the required application, launch it. To do this, click on the Facebook icon on the phone screen. We immediately get to our page. We click on the white field "What are you thinking about", several lines appear. Click on the red "Play" button. nine0003
The broadcast field opens, the camera on your smartphone turns on. At the bottom of the screen we see the line "Describe your live broadcast ...". There you can enter the name of the broadcast and any other important information about your live broadcast. When everything is ready, click the "On air" button in the lower right corner of the screen. A countdown appears, after 3 seconds your live broadcast will start.
It's important to know that your video will still be available on your Facebook page after you stop streaming.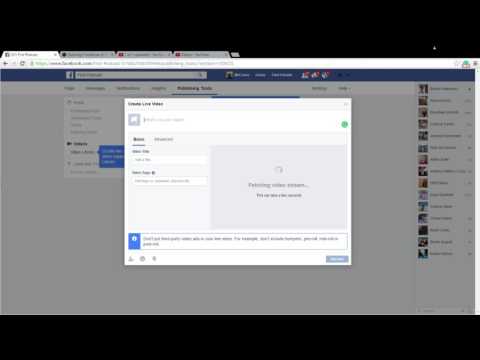 When the broadcast starts, the inscription “You are on the air! We are gathering an audience for you.", "Go on. We invite your friends to join the broadcast. Soon subscribers will connect to your broadcast. In order to end the broadcast, click on the "Finish" button in the lower left corner of the screen. nine0003
Important: live broadcast cannot be shorter than 4 seconds.
Starting a live broadcast on iPhone is no more difficult than on Android. Install the desired social network through the AppStore application. Once the app has downloaded, click on its icon. Let's log in. At the top we see a white field “What's new with you?”, And at the bottom left of this inscription there is a red “Live broadcast” button. We click on it.
A screen appears with the camera already on. Click on the inscription "Tap to add a description ...". Here you can enter the name of your broadcast. Next, to start broadcasting, click on the "Start Live Broadcast" button. After a three second countdown, the broadcast will start. nine0003
To end the broadcast, click the End Broadcast button at the bottom of the screen. Facebook will prompt you to save or delete the video. If you save the broadcast, this video will appear on your page and will be available to all users (if you have access to the page).
In order to broadcast live via a computer, go to Live Producer (we type in the name in the browser). You will see a page with selection windows where to broadcast live. Select the desired window and click the "Set up broadcast" button. Here you need to choose whether you will broadcast now or want to schedule the broadcast for a specific date and time. nine0003
In the "Broadcast settings" section, select the video source. You can use the camera of your PC or laptop. When configured, click "Next". In the "Create publication" section, you can write the name of the broadcast, set up audience selection. Also here you can mark friends or places, choose your mood or action. When set up, click "Finish". If all the settings are ready, click the "Go Live" button in the lower left corner of the screen.
In order to save the live broadcast on your Facebook, after the broadcast is over, click on the "Save broadcast" button that appears. Next, you can edit your video. If you want to change the preview of your video, click "Edit Post" in the top right corner. Next, you can choose a thumbnail from the proposed frames, or upload your own image.
When the saved broadcast settings are ready, click "Save" in the lower right corner. The video will appear on your Facebook page. nine0003
You need to open the application to start live streaming from your personal Facebook profile. Once open, click on the white area "What are you thinking about?". Select the red "Play" button. In the line on the screen, enter a description of your broadcast. Add a title. Click on the "Available to all" button, select the audience. Next - "Done".
Click on the "Publish and Story" button, enable or disable the creation of a publication after the broadcast ends. If you disable the option, then after the end of the broadcast, it will be unavailable. nine0003
Press the "On air" button. Within three seconds, your broadcast will be active. After the start of the broadcast, click on the little man icon to invite friends directly to your broadcast. When you want to end the broadcast, click the "End broadcast" button in the lower right corner of the screen.
Open your Facebook app and click the Menu button in the top right corner. There you can select the business page/group/event you need. Open it, scroll down to the "Publications" section. Click on the red 'Play' button. nine0003
Important: If your business account is linked to Business Manager, you need to install the Facebook Page Manager app.
Without it, you will not be able to conduct online broadcasts.
Next, you need to enter the name of the broadcast and its description. This is done on the screen itself. The line will be centered, just touch it once. Next, you will be able to enter what you need. If your business is local, you can add the address of your business page to the description. To do this, click on the geolocation icon in the lower left corner of the screen. nine0003
Target your future live broadcast by clicking on the Location Restriction button. Next, you can specify the gender, age, and location of your future audience. After the settings, access to the application will be given to those users who will fit the parameters you specified.
When the settings are complete, click the blue "Start Broadcast" button at the bottom right. In three seconds, your broadcast will be available to users. The main difference between broadcasting from a business account and broadcasting from a personal account is that the former can include all Facebook users in general. Whereas the live broadcast from the personal page will be available to your subscribers and friends of subscribers (this moment is regulated in the broadcast settings from any device). nine0003
First you need to download OBS (Open Broadcaster Software) Studio. Choose a button for Windows or for Mac. In order to download this program, click the green Download Installer button in the lower right corner. Download it to your computer and install it like a regular program that you have on your computer. When the program has downloaded, double-click on it with the left mouse button. Then the download starts. nine0003
Done, click Finish. We get acquainted with the license agreement, click "OK". After that, you need to configure the program. Click on the + (plus) at the bottom under the word "Sources", then - "Video capture device" - "Create new" - "OK".
After configuring the program, we can see ourselves on the screen (do not forget to check that your webcam is working and active), but in a small size, in the upper left corner. In order to be able to broadcast, you must apply the standard version of the screen settings. To do this, click on the gear at the bottom of the screen. nine0003
In the "Resolution/Frame Rate" column, select "Custom" instead of "Device Defaults". Further, in the column "Resolution" we compare 640x480. Click "OK". After that, with the cursor, expand the screen to the required one.
Then go to Facebook. We can arrange a live broadcast both from our personal FB page, and from the group page, business page.
Click on the "Publishing Tools" button. On the left, you will see the "Video Gallery" button. Here we see that the button "On Air" has appeared. Click it, and now we can create a live broadcast directly from your professional video equipment. To do this, you need to copy the “Stream Key”, return to the previously installed OBS Studio program. nine0003
In the upper left corner, click on the button "File" - "Settings" - "Broadcast". In the "Broadcasting" section, paste the stream key. In the "Service" column, select the line Facebook live. Next - "Apply" - "OK". In the lower right corner, look for the button "Start broadcasting", click.
Now for the second way to broadcast live on Facebook. To get started, you need to go to this page.
Scroll down the page and find the blue "Broadcast on Facebook Live" button. We press it, the window “Live on Facebook” drops out to us. nine0003
In the "Share to your timeline" section, you can choose one of four options. Choose, for example, "Share in your timeline" - "Next". We will open the Facebook settings page, we will have to copy the “Stream Key”.
Next, open "File" - "Settings" - "Broadcasts" in OBS Studio and change the stream key. "Apply" - "OK".
Then, on the main screen of OBS Studio, click the "Start broadcast" button in the lower right corner. Now we see that our broadcast has begun. In the window with the ether, it is worth removing the sound so that there is no bifurcation of the sound. At the top of the broadcast there is a yellow inscription "Preview". This means that for now we only see ourselves in preview mode. nine0003
Scrolling down a little, we see the "Available to all" button (by clicking on it, you can choose who will watch your broadcast). Having decided on the audience, press the button "On air".
Then, go to the main (main) page of your Facebook and see that the broadcast has begun. The number of viewers will be displayed next. Under the video, you can see all the comments that users watching your broadcast will leave. When the broadcast ends, your video will be available for viewing on the Facebook page. nine0275 To stop the broadcast, in OBS Studio you need to click the "Stop Broadcast" button in the lower right corner.
Go to the Facebook page where we want to create a live broadcast. Click the Publishing Tools button at the top of the page. Next, on the left, click the "Video Gallery" button and click the "On Air" button. On the page that appears, find the line "Stream key" and copy it. This key will need to be inserted into the appropriate window in the OBS Studio program. nine0003
Further on the right in the line "Tell us about this live broadcast" we can leave a description of the broadcast. In the line "Name" we write the name of the broadcast (if you wish, you can write tags in the column "Tags"). Now we go down below and click the "Schedule" button. The “Schedule the broadcast” window appears, click on the calendar. We set the date and time we need. Upload an image for the announcement if you wish. To save the selected image, click "Save Changes" - "Schedule".
You can schedule a live broadcast no earlier than 10 minutes after the start of scheduling. On the main page in the "Publications" section, the scheduled broadcast will be displayed. If suddenly you decide to change something in the scheduled broadcast, then you can click on the button "Administrator only: edit your data. " You will see a window where you can change everything you need. After making changes, click the "Save" button. nine0003
3 minutes before the start of your broadcast, all your readers and subscribers will be notified of the scheduled broadcast. You will have a countdown to the start of the broadcast. Your viewers/subscribers will be able to watch your live stream from any device they have Facebook installed on.
If you suddenly miss your broadcast, that is, did not have time to connect to it for some reason, the link and stream key will be valid for 7 minutes. Then the broadcast will not be considered valid. Then you will have to repeat all the steps that are described above. nine0003
During a live broadcast, there is constant interaction with the viewers of the broadcast. Viewers write comments and ask questions. You need to read and respond to them in order to retain your audience. If you are not interested in comments and reactions, you can hide them from your stream. In order to hide comments and reactions, you need to swipe right on the screen during the broadcast. Swipe left to bring back comments and reactions. nine0003
You also have the option to enable silent mode. To do this, click on the video and select the icon in the form of a crossed out circle in the dialog in the upper right corner of the screen. To return comments and reactions, click on this icon again. This instruction is the same for both iPhone users and Android users.
If you also want to write something in the comments to your broadcast, to do this, open the "Comments" line and write the desired text. Then click the "Submit" button. nine0003
To edit a Facebook Live Stream, you need to go to Facebook.com/lookback. Then click on the "Edit" button in the upper right corner of the screen. You can then use the checkmarks on your photos and other stories to show them in your video. Select those photos that you want to add/remove to/from your movie. The video will update automatically.
When you're done editing, click Refresh or Share Your Movie above the video player. Your changes will be saved. nine0003
Facebook has a number of requirements for users to live stream from their Facebook pages:
You can analyze Facebook live performance in the same way as in simple videos, but there are some nuances. This feature is especially important for business accounts. In order to view the statistics of the broadcast, click on the "Statistics" button. Next, select the video you want and click on it.
What exactly can you learn by analyzing the performance of a Facebook broadcast? nine0003