With over 1.5 billion active users, WhatsApp is the most popular social IM app of the present time. Chances are that you must also use it on your iOS or Android device to communicate with your contacts. If you don’t want to lose your important chats and WhatsApp media, consider taking a WhatsApp backup on iCloud. This native feature of WhatsApp helps us keep our app data secure. Also, if you have an iCloud WhatsApp backup, you can easily switch your phones while retaining your chats. In this ultimate guide, we will teach you how to take WhatsApp backup to iCloud in every possible way.
Ideally, there are two ways to save WhatsApp backup on iCloud. You can solely take the backup of the app data or the entire device.
As you know, WhatsApp can be linked to your iCloud account to save the backup of the app. In this way, you can go to your WhatsApp settings and take the backup of the chats, attachments, etc. on your iCloud account. Needless to say, you should have enough space on your iCloud account to accommodate the WhatsApp backup. If you want, you can also turn on the automatic backup feature of WhatsApp on the iCloud drive.
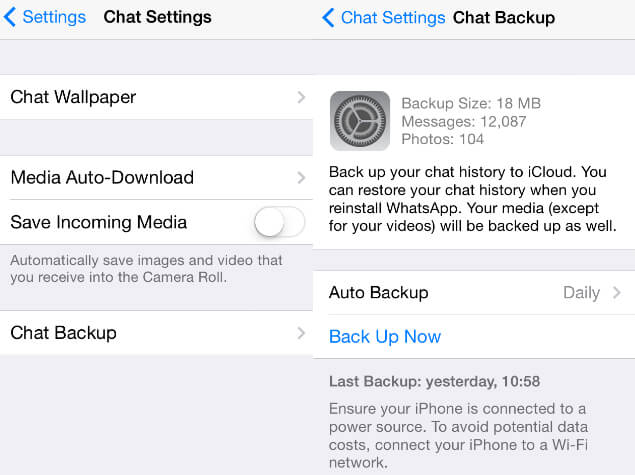
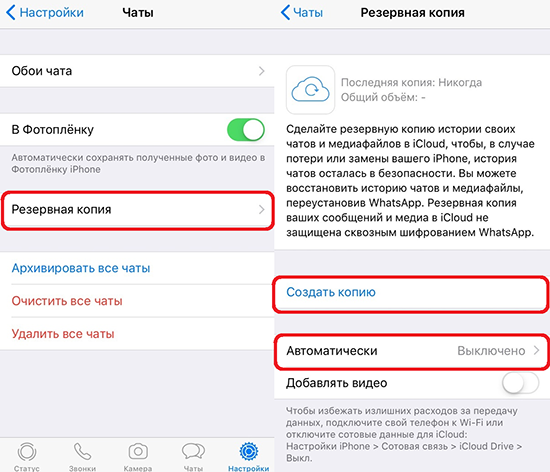
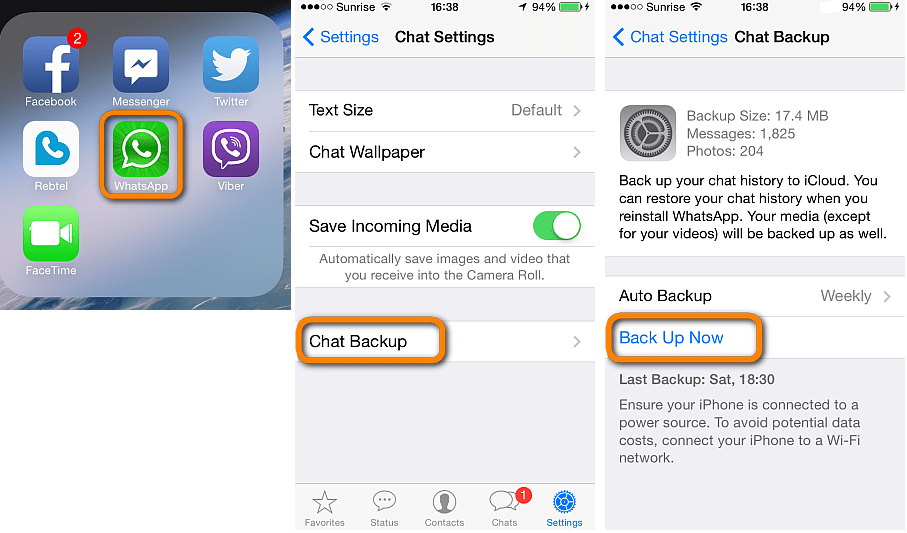
Step 1. Launch WhatsApp on your iPhone and go to its Settings > Chats > Chat Backup.
Step 2. Just tap on the “Back Up Now” button to take an immediate backup. In case WhatsApp is not linked to your iCloud, then a prompt will appear for you to sign in to iCloud. There is also an option here to include/exclude videos in the backup.
Step 3. To take automatic backups, go to the “Auto Backup” feature and set its frequency to daily, weekly, or monthly.
Apart from the above feature, you can also take the entire backup of your device on iCloud. Since Apple only provides 5 GB of free space to its users, you might have to buy more storage for this method. Not just your WhatsApp data; you can also save your photos, videos, documents, notes, etc. Though, the restoring process would also reset the entire device while retrieving the WhatsApp backup. Here’s how you can take WhatsApp backup on iCloud with this feature.
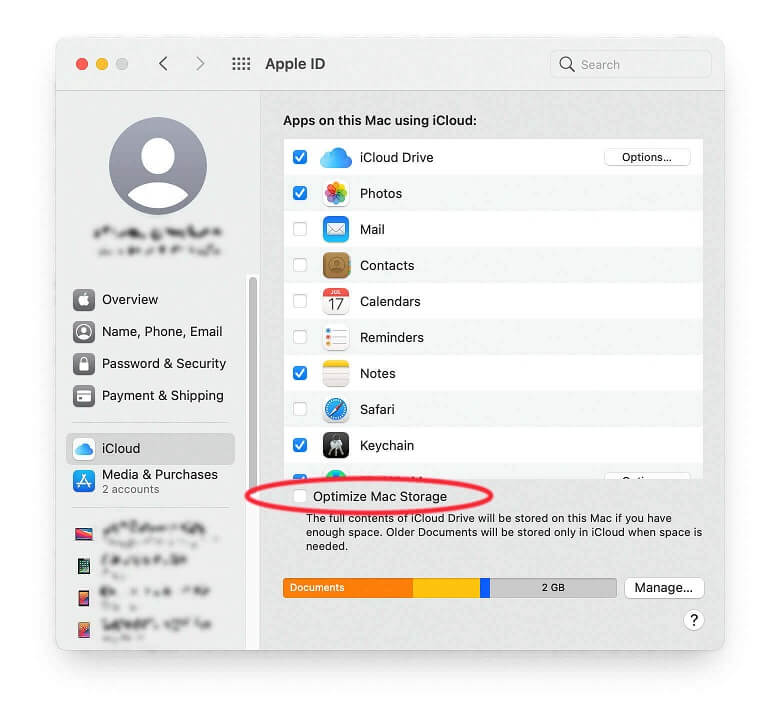
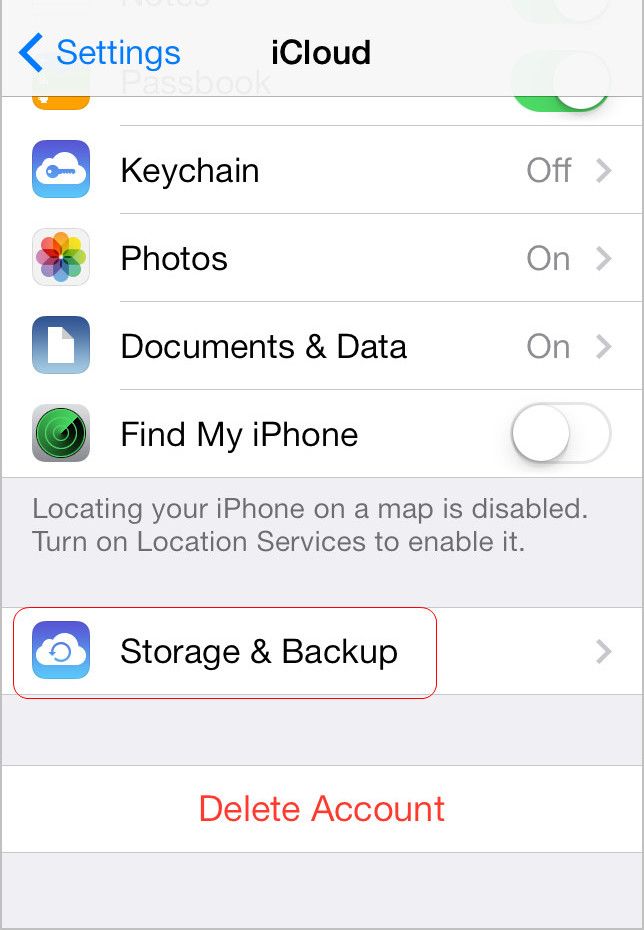
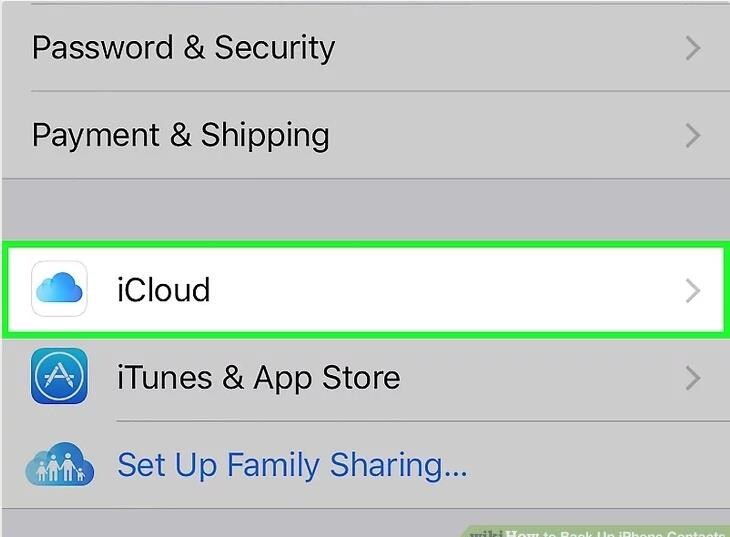
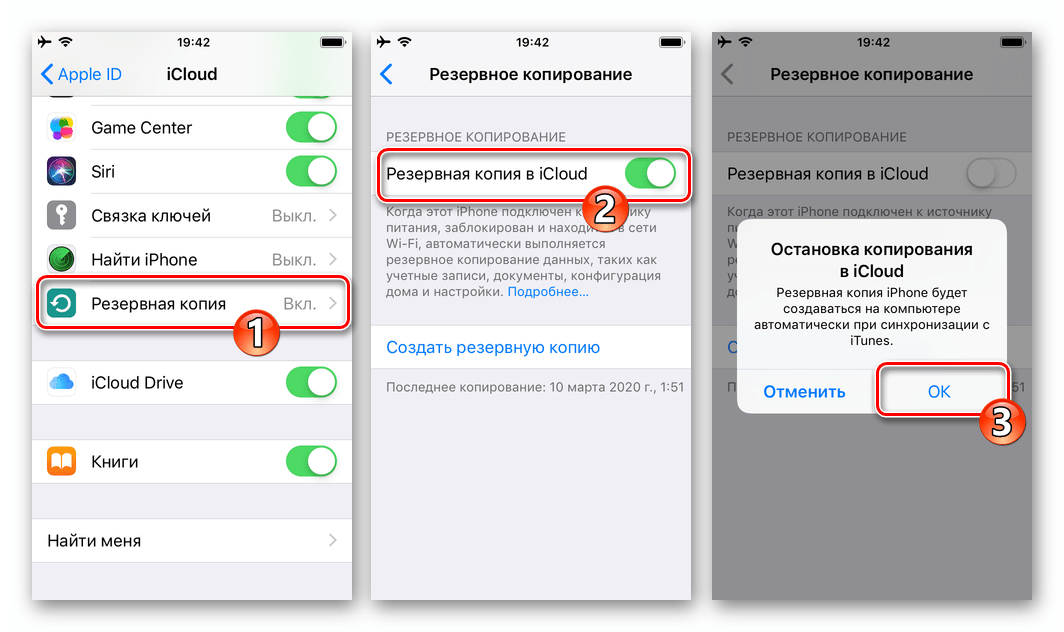
Step 1. Unlock your iPhone and go to its Settings > iCloud. In the new iOS versions, tap on Apple ID > iCloud.
Step 2. After launching the iCloud settings, go to the Backup field and turn on the iCloud Backup feature.
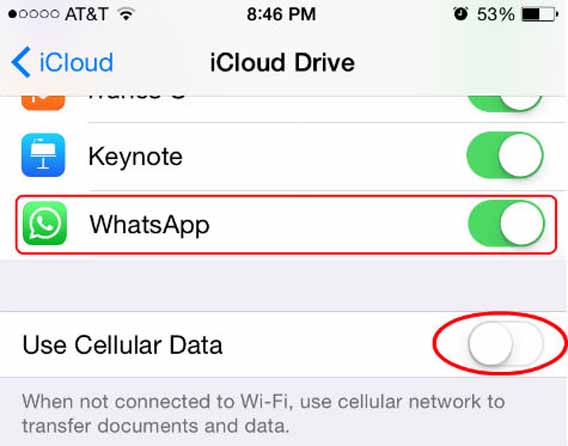
Step 3. Furthermore, you can go back and view the apps that are included in the iCloud backup. Scroll down and enable the backup option for WhatsApp.
| Dedicated WhatsApp Backup | Entire Device Backup on iCloud | |
|---|---|---|
| What is it? | Will only take the backup of WhatsApp data on iCloud | Will back up the entire device, including WhatsApp data |
| How to restore? | Simply reinstall WhatsApp and restore the app data. | Reset the device and while setting up, restore the entire iCloud backup. |
| Space | Low space consumption | More space consumption |
| Time | Less | More |
| Ease of use | Preferred | Recommended only to back up the entire device |
Now that you know how to upload WhatsApp backup to iCloud, let’s get into some details. If you have applied the second method, you can take an extensive backup of your device, including its WhatsApp data. Though, a lot of times, users wish to find WhatsApp backup on iCloud or even extract some content from it. Since there is no native solution for this, you need to use a third-party iCloud backup extractor like dr.fone – Recover (iOS).
It can also extract a previously taken iCloud/iTunes backup and let you preview its content on its interface. Here’s how to find WhatsApp backup on iCloud using dr.fone – Recover (iOS).
Step 1. Start by launching the dr.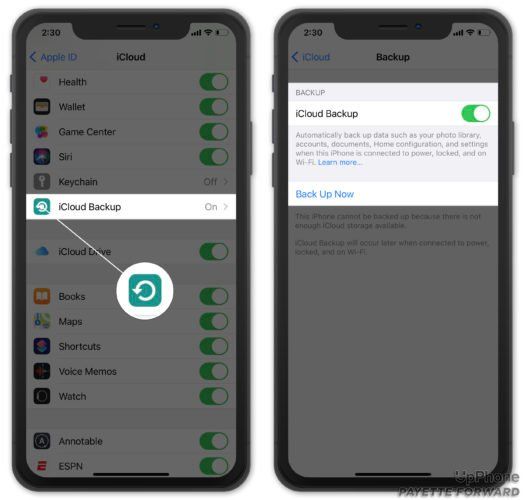 fone – Recover (iOS) interface and connect your iPhone to the system. From its home, select the option to recover an iOS device.
Step 2. Now, from the sidebar, go to the option – Recover from iCloud backup and log-in to your iCloud account where the previous backup is stored. If the 2-factor authentication is enabled, then you need to enter the generated code to verify yourself.
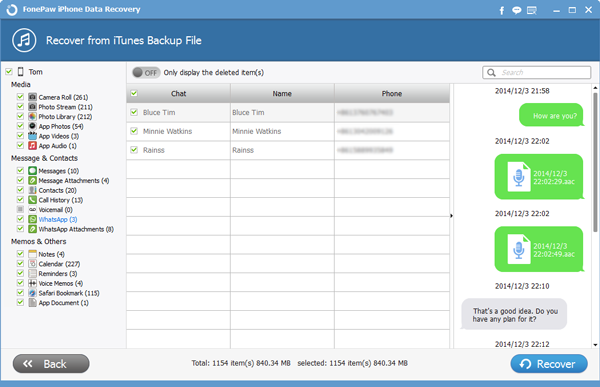
Step 3. After when you would successfully log-in, you can view details of the available backup files. Select the appropriate iCloud backup where your WhatsApp data is stored.
Step 4. The application will ask you what you wish to download from the backup. To save your time, select the WhatsApp feature – that is, WhatsApp chats and attachments.
Step 5. That’s it! You can now preview the WhatsApp chats and exchanged media files from here and save them separately on your computer by clicking on the “Recover” button.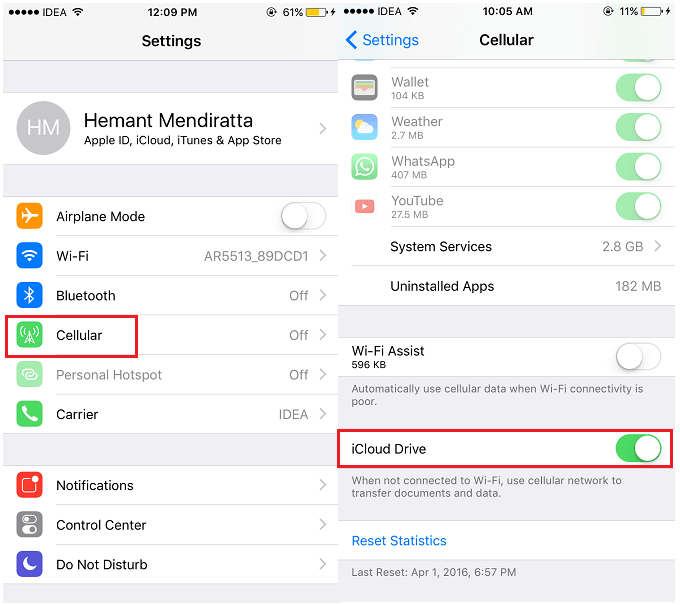
Once you have taken the WhatsApp backup on iCloud, you can easily restore it whenever possible. To do this, you can take the assistance of a native feature or a reliable third-party tool.
If the WhatsApp backup is already stored on iCloud, then you can easily get it back. To do this, you must delete WhatsApp from your device and reinstall it. While setting up WhatsApp, the option to restore an existing backup will be displayed. Additionally, if you want to restore an entire device, then consider doing a factory reset instead.
Step 1. Reinstall WhatsApp on your iPhone and perform its initial setup by entering the same phone number that was previously linked to it. Also, ensure that the device is linked to the same iCloud account as before.
Step 2. Once you log in to the app, WhatsApp will automatically detect the presence of an existing backup. To get it back, just tap on the “Restore Chat History” button and maintain a stable internet connection as the backup will be restored.
Step 3. If you want, you can restore the entire device as well. To do this, factory reset your phone and perform its initial setup. Choose to restore it from an iCloud backup and log in to your account to select the relevant backup file.
Sometimes, while performing iCloud WhatsApp backup or restoring the backup, the operation might get stuck in between. You can follow these solutions to fix the WhatsApp backup on iCloud operation.
Chances are that your iCloud account might be running low on storage and can’t accommodate the backup content. To check this, just go to your device’s iCloud settings and view the available storage. If you are running low on free space, then consider deleting something or buying more iCloud storage.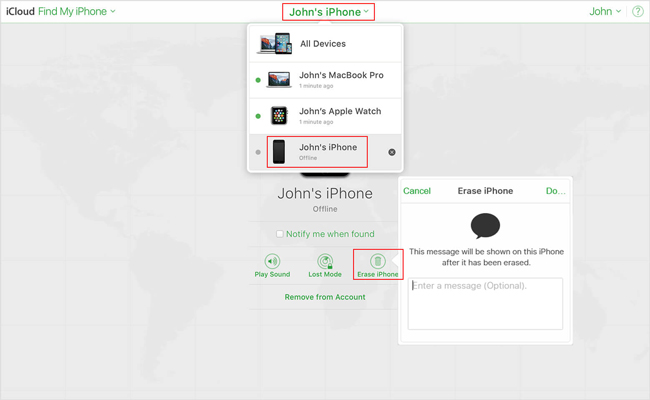
Sometimes, a previously saved backup can tamper with the WhatsApp backup on iCloud. To resolve this, just go to your device’s iCloud Storage > Backups and delete an existing backup from it.
Needless to say, to take WhatsApp backup to iCloud, your device should be connected to a stable internet connection. Make sure that the WiFi network is working properly beforehand. If there is an issue with your phone’s network settings, then go to Settings > General > Reset and choose Reset Network Settings.
There could be an issue with your iCloud account sync or functioning as well. To fix this, just go to your iCloud Settings and scroll down. Tap on the “Sign Out” button to log out of your account first. After that, log back in and try to take an iCloud WhatsApp backup.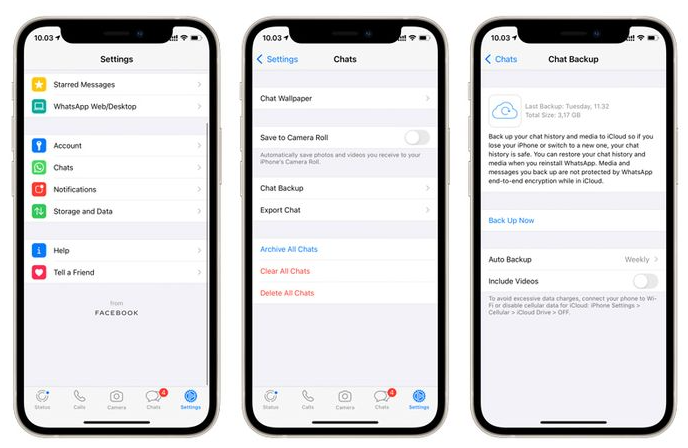
If nothing else would seem to work, consider an alternative solution. For instance, you can try MobileTrans - WhatsApp Transfer to take a comprehensive WhatsApp backup with a single click.
Backup your WhatsApp to iCloud is easy, but you might suffer from the limited free storage of iCloud and cannot back up your WhatsApp completely. Worry less, MobileTrans is here for you. You can quickly back up your WhatsApp data to a computer with its help of it.
What's more, MobileTrans is a trustworthy phone-to-phone/computer transfer tool. You can transfer all of your important files like WhatsApp, contacts, etc. from your old phone to your new phone with just one click. You can also transfer your photos, music, and more data types to your Windows PC and Mac to free up space on your phone.
Here's how to backup your WhatsApp messages to a computer with MobileTrans
Step 1:Download and install MobileTrans on your computer
Wondershare MobileTransBackup WhatsApp Data in A Free Way!

Try it Free Try it Free
4,085,556 people have downloaded it
4.5/5 Excellent
Step 2:Go to Backup & Restore > App Backup & Restore, and then choose to backup WhatsApp.
Step 3:Connect your phone to your computer with a USB cable, and MobileTrans will detect your WhatsApp data automatically. You can click on the Start button to begin the backup process.
Step 4:That's it. All you need to do is wait for the process to be completed.
That’s a wrap, folks! After reading this extensive guide on iCloud WhatsApp backup, you will certainly be able to keep your WhatsApp data safe. As you can see, there are numerous native as well as third-party solutions that you can try to take WhatsApp backup on iCloud or local storage. To make things easier for you, we have also listed how to fix issues while performing WhatsApp chat backup on iCloud. Also, you can try MobileTrans - WhatsApp Transfer as its ideal alternative to backup and restore WhatsApp like a pro. Besides WhatsApp, the tool can also be used to back up and restore several other apps like WeChat, LINE, Viber, and Kik.
Free Download Free Download
New Trendings
"Is there any solution to backup WhatsApp data without iCloud?"
If a similar query has brought you here, then this would undoubtedly be the last guide that you will read about WhatsApp backup.
Most regular WhatsApp users already know how the app lets us backup its data on iCloud. Unfortunately, though, there are a lot of times when people don’t wish to use this feature.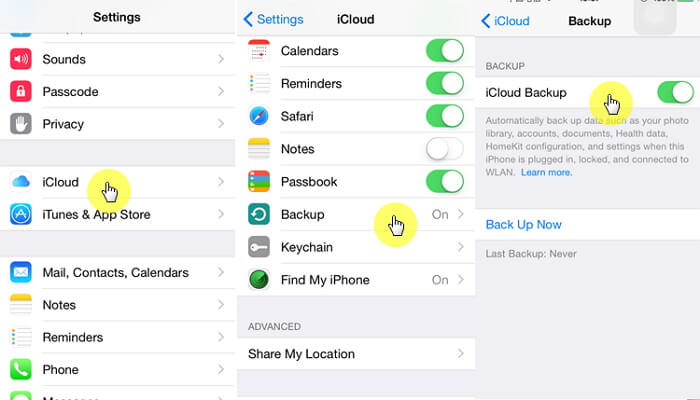 For instance, you might be running on low space on iCloud or have security concerns. The good news is that there are several ways to backup WhatsApp without iCloud.
This guide will discuss three of these WhatsApp backup solutions in detail.
If you are looking for a hassle-free and one-click solution to backup WhatsApp without iCloud, then you should try MobileTrans - WhatsApp Transfer. It provides seamless backup and restores support for numerous apps like WhatsApp, WeChat, LINE, Kik, and Viber. Not just that, the application can also directly transfer your WhatsApp data from one device to another (even between iOS and Android). Therefore, using MobileTrans - WhatsApp Transfer, you can easily switch smartphones without losing your social data.
MobileTrans - WhatsApp TransferBackup WhatsApp from iPhone to Computer with a few Clicks!
free download free download
4,085,556 people have downloaded it
1. Launch the MobileTrans and visit its home page's “Backup&Restore” section. Also, ensure your iPhone is connected to the system using an authentic cable.
2. Click "WhatsApp" to get things started. You can find other different options here.
3. The application will automatically start taking an extensive backup of all the WhatsApp chats and media. So simply wait a while and keep your phone connected until the process is completed.
4. At the end, when the entire backup is stored on the system, you will be notified.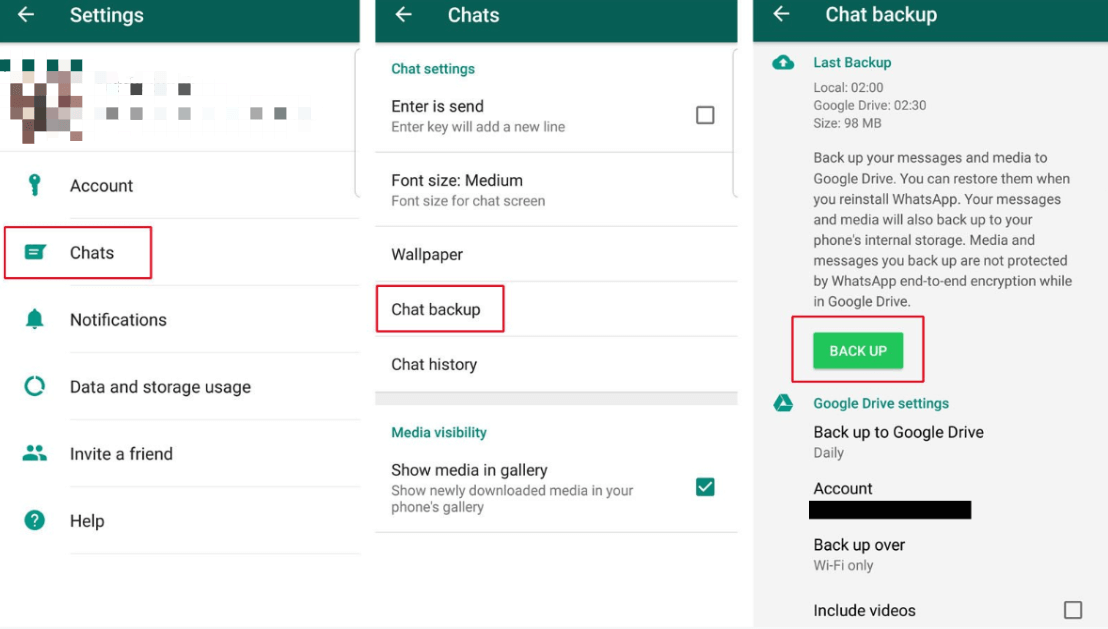 You can view the backup content from here as well if you want.
5. Similarly, you can restore the backup to any device by connecting it to the system and viewing the backup content. Select the data you wish to save and export to the desired format or restore it to the device.
Learn more from our YouTube tutorial:
free download free download
iTunes is the first thing that comes to mind when we wish to backup WhatsApp without iCloud. Like iCloud, iTunes is also a native solution that Apple provides to manage our iOS devices. Using it, you can backup your entire device and later restore it as well.
While the solution is free, it would take a backup of the entire phone memory – including WhatsApp.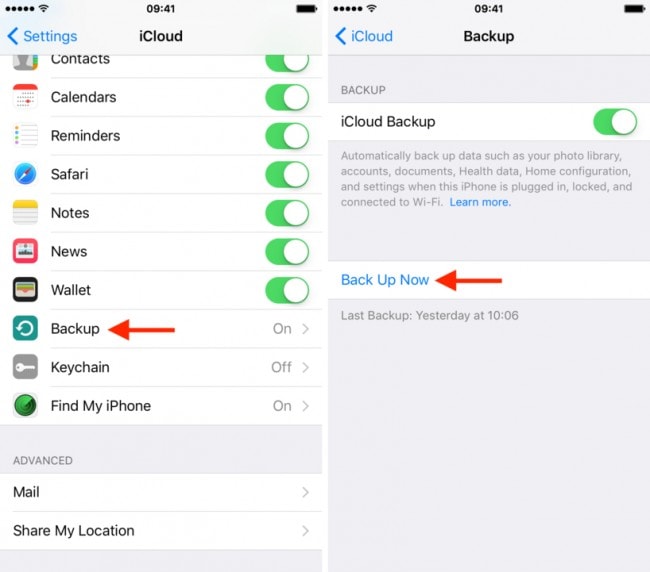 Later, the backup would be restored, wiping off the phone’s existing data. Therefore, you are recommended to follow this approach only when resetting your device.
Pros:
Cons:
If you only have a handful of conversations to back up, you can email them to yourself as well.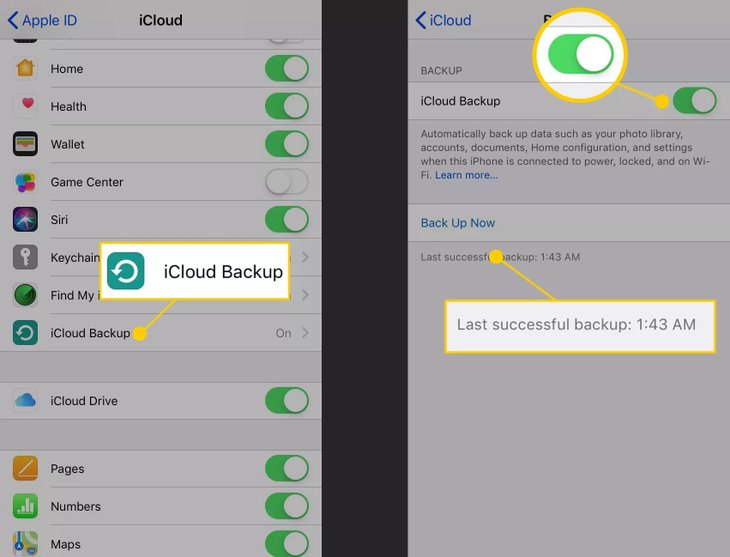 This can be done by the native feature of WhatsApp that lets us email conversations to any contact. You can even choose to include or exclude attachments in the backup mail. Ideally, this would not restore your WhatsApp chats back to your device. Instead, though, it will make sure that you always have a backup of your important chats saved on your email. Here’s how you can backup WhatsApp without iCloud via the email chat feature.
1. Launch WhatsApp on your iPhone and go to the conversation (individual chat or group) you wish to save.
2. Swipe the conversation icon on WhatsApp and go to its more options to find the “Email Chat” feature. You can also tap the chat icon, go to its info, and select the “Email Chat” option.
3. This will give you an option to include/exclude chat attachments. Since most email servers have a limit of 20 MB, it is recommended not to attach large media files.
4. Later, it will ask you to select the email app. A draft window would be opened with a TXT file of your WhatsApp chats automatically attached. You can now send this email to yourself or any other contact.
Pros:
Cons:
There you go! Now when you know three different ways to backup WhatsApp without iCloud, you can easily keep your data safe. If you wish to save your time and efforts while managing your WhatsApp data, then prefer using MobileTrans - WhatsApp Transfer. It is a highly resourceful social management app that would let you backup and restore WhatsApp, LINE, WeChat, Kik, and Viber data. Apart from that, you can also directly move your WhatsApp data from one device to another, irrespective of the platform it runs on. Go ahead and give this popular application a try and never lose your social app data again!
free download free download
New Trendings
Need more iCloud storage? You can easily manage your storage to get more space or upgrade to iCloud+.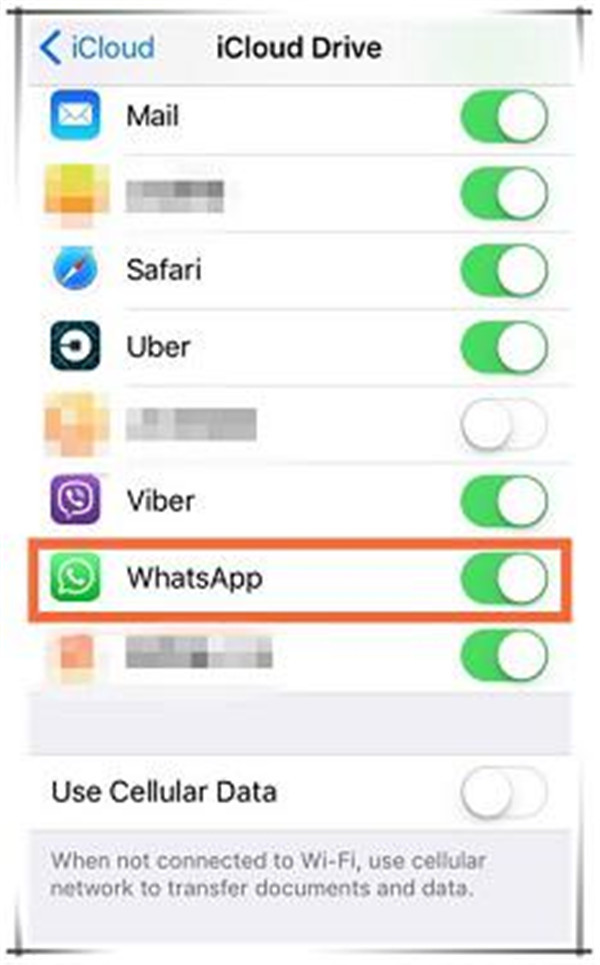
When you set up iCloud storage, you automatically get 5 GB of free space. You can use it to back up to iCloud, save photos and videos to iCloud Photos, sync documents via iCloud Drive, and more. You can always check your used iCloud storage in your device's Settings menu or on iCloud.com. If you run out of free space, you can increase your available space or upgrade to an iCloud+ plan at any time.
How is your device storage different from iCloud storage? Learn more about device storage and iCloud storage.
If you run out of iCloud storage space, your device won't back up to iCloud, your photos and videos won't be sent to iCloud Photos, but iCloud Drive, other iCloud apps, and messages will not sync across all your devices. Also, you won't be able to send or receive messages using your iCloud email address.
You can delete content you don't use to free up iCloud space:
It's a good idea to back up or copy your iCloud information before deleting anything.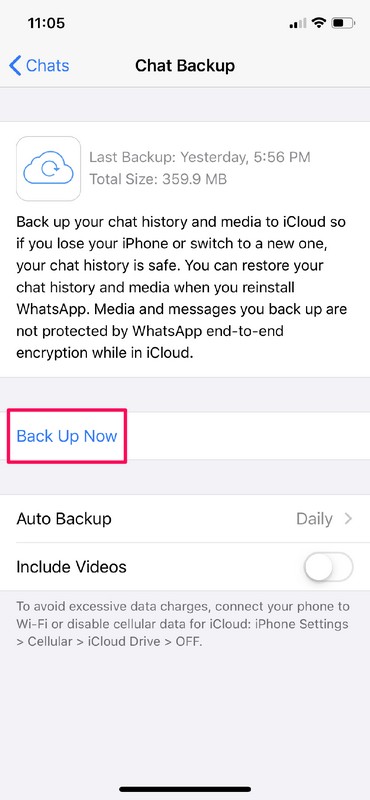
When you back up your iPhone, iPad, or iPod touch to iCloud, your most important information on your device, such as documents, photos, and videos, is automatically backed up and stored. Learn more about the data included in iCloud backups.
Many apps back up data to iCloud automatically after installation. You can exclude unused apps or delete old iCloud backups to reduce the size of your iCloud backup and free up space on your iCloud storage.
After you confirm that you want to turn off and delete an app, iCloud backup is disabled for that app and all data about it is removed from iCloud.
Some applications always create backups and this feature cannot be disabled.
You can delete old iCloud backups associated with your current device or older devices that you no longer use. iCloud backups are available for 180 days after you disable or stop using iCloud Backup. Backups that are used to restore your device cannot be deleted.
Deleting a backup disables iCloud backup for iPhone, iPad, or iPod touch. You can enable iCloud backup service again in the iCloud settings on the device.
Deleting a backup disables iCloud backup for this device. You can enable iCloud backup service again in the iCloud settings on the device.
Deleting a backup disables iCloud backup for this device. You can enable iCloud backup service again in the iCloud settings on the device.
iCloud Photos uses iCloud storage to sync all your photos and videos across all your devices. To increase your free space in iCloud, delete unwanted photos and videos from the Photos app on any of your devices.
Before deleting anything, be sure to back up any photos or videos you still need. If you delete a photo or video on your device while using iCloud Photos, it is also deleted on all other devices that you're signed in with the same Apple ID.
Follow the steps below to remove photos and videos from iCloud Photos. If you're not using iCloud Photos, you can remove photos from your Camera Roll album.
If you have access to a shared iCloud Photo Library, the photos you add to it will only take up space in the storage of the user who created the shared library. To delete photos that are taking up space in your iCloud storage, make sure you're viewing them in your personal library.
If you're not using iCloud Photos, the files in your Camera Roll are included in your iCloud backup. To check their space in iCloud backup, follow these steps:
To reduce the file backup size of the Photos app, save your photos and videos to your computer, then manually back up your device data. If you want to keep your photos and videos on your device, you can exclude the Photos app from your backup or upgrade to an iCloud+ plan to get more storage space. Unwanted photos can be deleted:
Deleted photos and videos are placed in the Recently Deleted album, from where they can be recovered within 30 days. If you want to delete files from this album faster, click the "Select" button and specify the items to delete. Click Remove > Remove. If your iCloud storage space is completely depleted, any photos and videos you delete from your device will be deleted immediately without being copied to your Recently Deleted album from which you can later restore them.
Optionally, you can delete folders and files stored in iCloud Drive and manage them from your iPhone, iPad, iPod touch, Mac computer, or Windows computer. If you have access to another user's shared folder, it's not included in your iCloud storage. Learn more about shared folders in iCloud Drive.
In iOS 11 and later, files deleted from iCloud Drive are stored in the Recently Deleted folder for 30 days before being deleted from the device.
On a Windows 7 or later computer, you can manage files from iCloud Drive using Windows Explorer. To add the iCloud Drive folder to Windows Explorer, follow these steps:
If you use Messages in iCloud, all your text messages and attachments you send and receive are stored in iCloud. To free up space, delete unwanted text messages and attachments, such as photos, videos, and files.
You can delete messages from your iCloud email account to free up iCloud storage space. You can also move email messages from your iPhone, iPad, or iPod touch to your Mac or Windows computer so they no longer take up space in your iCloud storage.
Follow the steps below to delete messages from an account. Remember that messages with large attachments take up more space than text-only emails.
If your iPhone, iPad, or iPod touch is set up to access iCloud email, you can delete messages from any mailbox and then empty the Trash to free up space.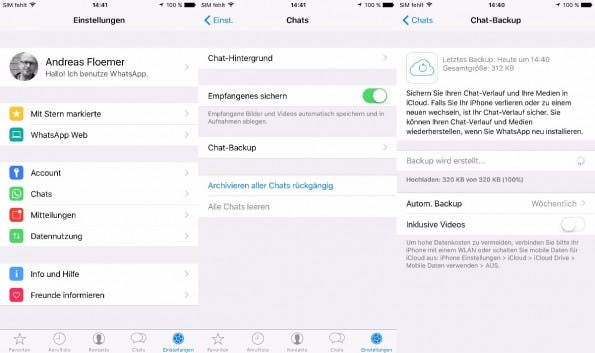
If you use iCloud Mail with a desktop email application such as Mail on a Mac or Microsoft Outlook on a PC, do the following:
 To delete multiple messages, select them and click Delete.
 The Voice Recorder app in iCloud saves your voice recordings to iCloud. They can be quickly removed if additional space is needed.
Information about non-Apple products or independent websites not controlled or tested by Apple is not endorsed or endorsed by Apple. Apple is not responsible for the selection, functionality, or use of third party websites or products. Apple is also not responsible for the accuracy or reliability of information posted on third party websites.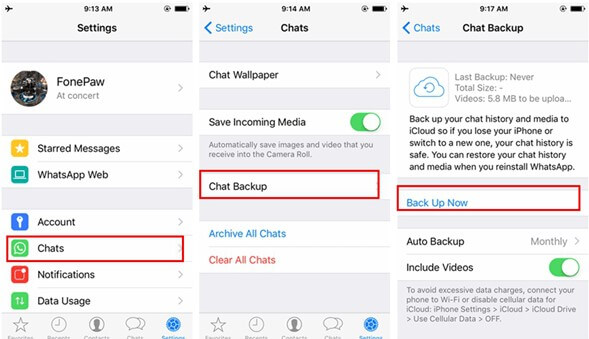 Contact the supplier for more information.
Publication date:
Learn what to do if you're having trouble backing up your iPhone, iPad, and iPod touch to iCloud.