Let's say you've already created a fantastic Facebook cover photo, you're posting engaging social media content on the regular, and your Facebook Page is totally optimized for the Timeline design. You savvy social media marketer, you ;-)
But are you ready to take your Facebook Page to the next level?
If so, we think you might be game for a new Facebook marketing challenge: creating custom Facebook tabs. Tabs give you a way to showcase custom content alongside the default tabs (e.g. "About" and "Likes") and any ready-made apps you may have already added to your page.
Custom tabs are valuable to your social media marketing strategy because they let you create a much richer user experience on Facebook and control the content your visitors and followers see when they come to your page.
So how do you create your very own custom Facebook Page tabs? Just follow these 6 simple steps, and you'll be up and running with a more customized Facebook Page experience in no time.
Editor's Note: This post has been updated to reflect Facebook's custom tab setup documentation for 2015. That said, Facebook has made this setup process somewhat trickier over the years, requiring a bit more tech-savviness then the average marketer may have. If you hit any snags, it might be best to call in a seasoned developer to help you get set up.
Before we get started, let's make sure we're all on the same page (hehe, get it?) about where you even find Facebook Page tabs. Tabs exist under your Facebook cover photo and can be expanded by clicking on the 'More' drop-down arrow on the right. They're something like the website navigation for your Facebook Page, allowing visitors to browse all that your page has to offer. Check out a screenshot of HubSpot's Facebook Page below. Can you spot our tabs? (Hint: We've highlighted them for you.)
Before I discuss some use cases for custom Facebook tabs, let me show you a custom Facebook tab in action.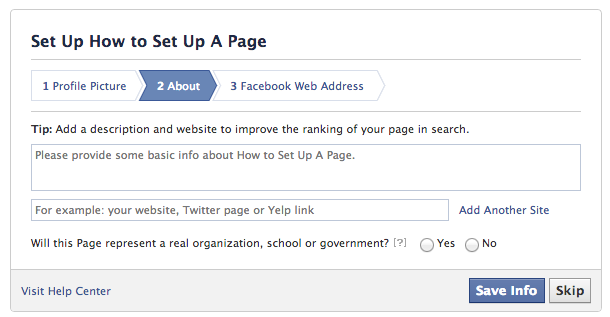 Take a look at Coca-Cola's "House Rules" tab on its Facebook Page (pictured below) ...
Coca-Cola is cleverly using custom tabs as a way to showcase guidelines for how Coca-Cola will govern its page, and how visitors and followers should behave when interacting with it. Smart, especially if you're a big company like Coca-Cola. This is just one way you can use custom tabs on your page.
The possibilities are endless. Okay, now that you understand what a Facebook tab is and how it could potentially be used, let's start customizing!
Think of your Facebook tab like an iFrame that loads inside Facebook. In other words, you can display pretty much whatever content you'd like inside your custom Facebook tab. You do this by creating a web page outside of Facebook. The contents of this page are what you'll tell Facebook to display within your custom tab.
Important: Facebook requires you to provide a secure URL for your web page in order to set up your Facebook tab. A secure URL is a URL with "https://" instead of "http://" at the front. If the website you use to create your Facebook Page tab does not support https, Facebook will not allow you to set up a custom tab, and you'll need to get an SSL certificate first.
To ensure that your page's content displays correctly on Facebook, make sure the width of your web page is either set to 100%, 520px, or 810px. Make sure all images, videos, etc. that you include on your page are also less than either 520px or 810px, depending on how wide you chose to make the content of your tab. You'll also want to get rid of any margin or padding around the body of your content so it's optimized for the space Facebook provides within the tab.
Since Facebook's latest Business Page layout is wider than it used to be, I recommend making the content of your tab 810px. Facebook's previous Business Page layout was much narrower at 520px.
Step 2: Log In to Facebook as a Facebook DeveloperVisit https://developers.facebook.com/apps. You'll be able to log in with your normal Facebook credentials.
Step 3: Create and Name Your New Tab1) Click the green '+ Add a New App' button from the top right-hand corner. Then choose the 'Website' button at the far right.
2) Instead of using the "Quick Start" wizard that Facebook launches (which gets confusing), click on the 'Skip and Create App ID' button at the top right.
3) Here, you'll need to provide a 'Display Name,' which is what your "app," or tab, will be displayed as on your Facebook Page. You can also create a 'namespace,' which is basically just a unique ID for your app -- although this is not required, and you're welcome to leave it blank. Select 'No' for the question about test versions -- this is more applicable if you're creating a Facebook app that you want others on Facebook to use, not if you're just creating a custom tab for your own page. Lastly, choose 'Apps for Pages' as the category, since you're creating this app as a custom tab for your Facebook Page.
4) Click 'Create App ID,' and you'll be taken to your App Dashboard for the next step. (Note: You may be required to enter a captcha first to prove you are indeed human ;-)
Step 4: Configure Your Facebook Page Tab1) Once in your App Dashboard, click 'Settings' in the left-hand navigation; then click the '+ Add Platform' button to start configuring your Facebook Page tab.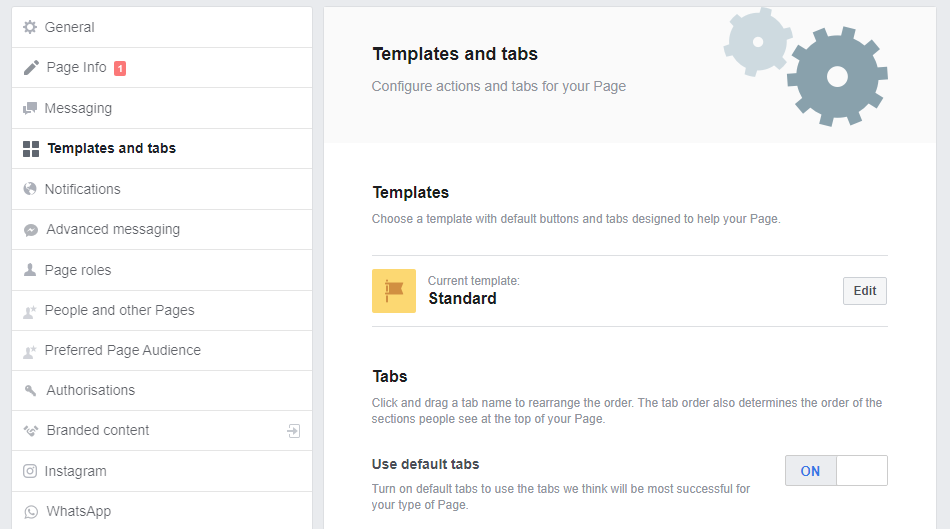
2) When prompted, select 'Page Tab' as your platform.
3) Next, add the 'Secure Page Tab URL' of the external web page you created in step 1. Remember, Facebook requires a secure URL (which starts with https://), otherwise it won't work. (See step 1 for more details.) Then specify whether you want a wide page tab (810px), which I recommend so your content fills the full width of the tab. This should also align with the width of the page you set up in step 1. You can leave 'Page Tab Edit URL' field blank. You can also upload a 'Page Tab Image' here (which must be 111 x 74 pixels), although to be honest, I'm not sure how Facebook uses this image since it no longer uses thumbnails in the Facebook tab navigation on your page.
4) When you're done editing the contents of this section, click the blue 'Save Changes' button at the bottom right.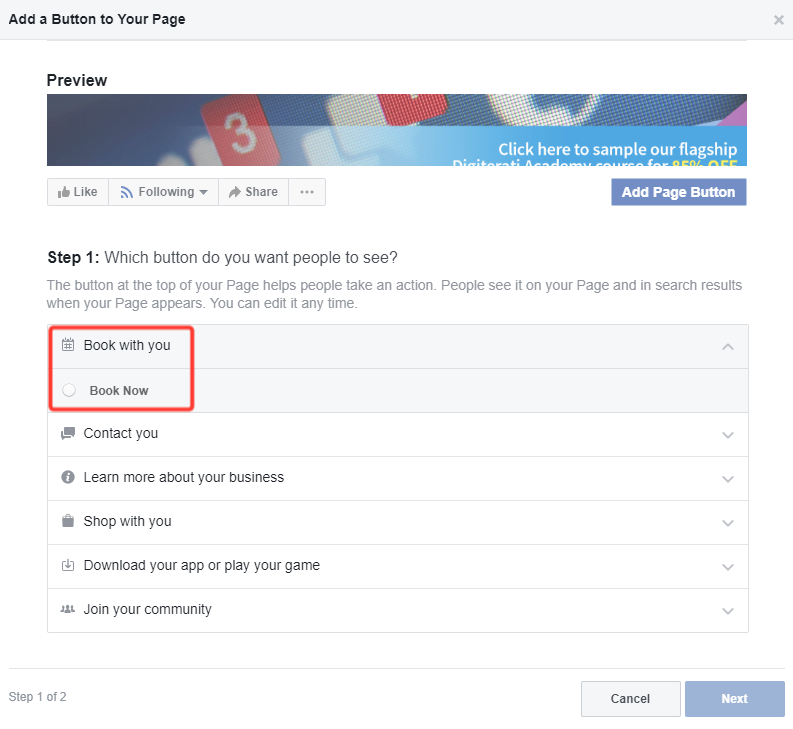
This step can be a bit tricky, so read carefully. In order to add your new tab to your Business Page, you'll need to visit a link with several custom URL parameters. I know it sounds strange, but bear with me. Here's the link you'll need to modify:
http://www.facebook.com/dialog/pagetab?app_id=YOUR_APP_ID&next=YOUR_URL
1) First, replace the parts in red in the URL above -- YOUR_APP_ID and YOUR_URL -- with the 'App ID' found in the basic settings for your app, and your 'Secure Page Tab URL.'
So using my example, my new URL would be:
http://www.facebook.com/dialog/pagetab?app_id=1546958298917818&next=https://www.hubspot.com/custom-facebook-tab
2) One you have your URL, visit it in your browser.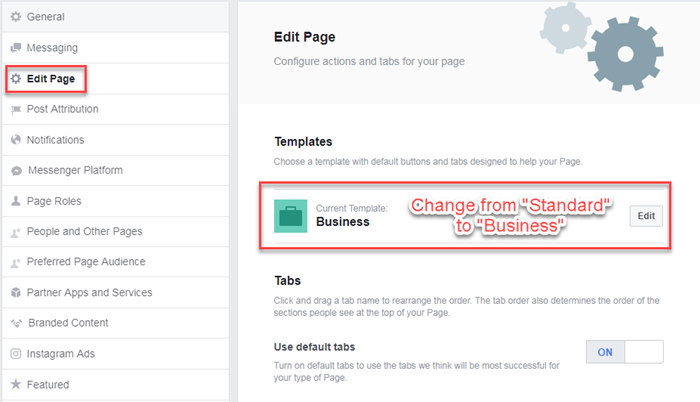 When you do, this will pop up ...
3) Last but not least, select the Facebook Page you want to add your tab to. Then click 'Add Page Tab.' Keep in mind that you'll need to be an administrator of the Facebook Page in order to add the tab.
Voila! Your custom Facebook tab should now be added to your page. Go check and see!
Editor's Note: We've heard rumblings of people getting 405 and 403 "Forbidden" errors within their page tabs once they've been set up. When a Facebook user clicks on your custom tab, their browser sends a HTTP POST request to your tab's Secure Page Tab URL. They'll see this error message if the page you're using to host the content of your Facebook tab forbids HTTP POST requests. If you see these errors, your best course of action is to work with an experienced developer to help you set up your custom Facebook tab.
Because Facebook only allows you to display four tabs before the rest get bucketed under the 'More' dropdown, you can also rearrange the order of your tabs so your new custom tab appears more prominently in the main navigation of your page rather than in the 'More' dropdown.![]() To rearrange your tabs, click 'Manage Tabs' in the 'More' drop-down menu on your Facebook Page, and then drag and drop your tabs in the order you want them to appear. Just note that 'Timeline' and 'About' must appear first no matter what.
To rearrange your tabs, click 'Manage Tabs' in the 'More' drop-down menu on your Facebook Page, and then drag and drop your tabs in the order you want them to appear. Just note that 'Timeline' and 'About' must appear first no matter what.
Bonus: You can also reorder the content modules that appear to the left of your Facebook Page timeline by hovering over a module, clicking the pencil icon, and selecting 'Manage Sections.'
For Facebook's official documentation about creating custom Facebook Page tabs, click here.
Editor's Note: This post was originally published in 2011 and has been updated to reflect Facebook's custom tab setup documentation for 2015.
Topics: Facebook Business Pages
Facebook Marketing • Apr 12, 2021
Facebook pages are highly customisable in a way that other social media platforms are less so.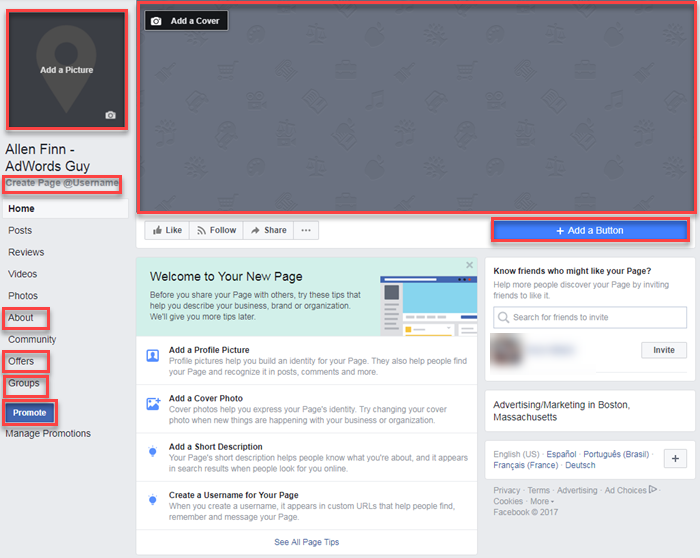 You can mould them into whatever you want, to showcase your business in the best possible light. Customising your page tabs can help with this.
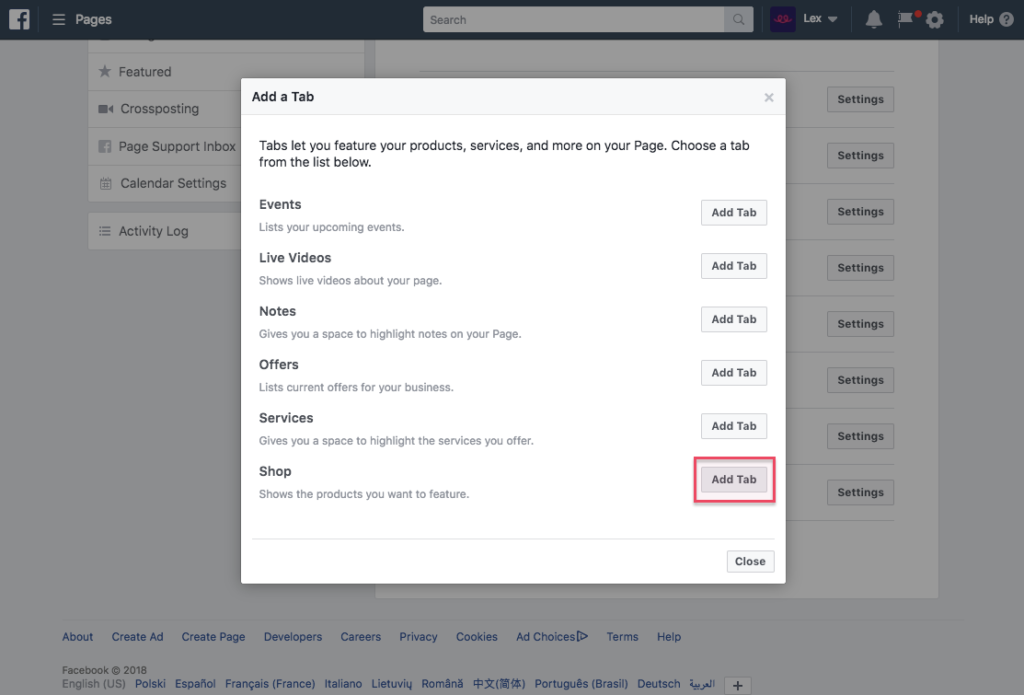
The structure of your Facebook page is built around tabs. They are situated at the top of your page and act as a menu, leading the viewer to specific sections of content. While the ‘Home’ tab is automatically displayed upon viewing a Facebook page, and your posts and updates in the ‘Home’ tab are in a logical, often chronological fashion, other tabs take the viewer directly to certain types of content e.g. photos, events or shop.
'Shop' tab by @TheFrancoisFourmy (left) and 'Photos' tab by @The02 (right)Each tab groups together content that the viewer is specifically looking for, making your page easier to navigate. As the owner of a page, using various tabs gives you different options to add suitable content, such as showcasing events, featuring products, advertising job listings, highlighting reviews are more.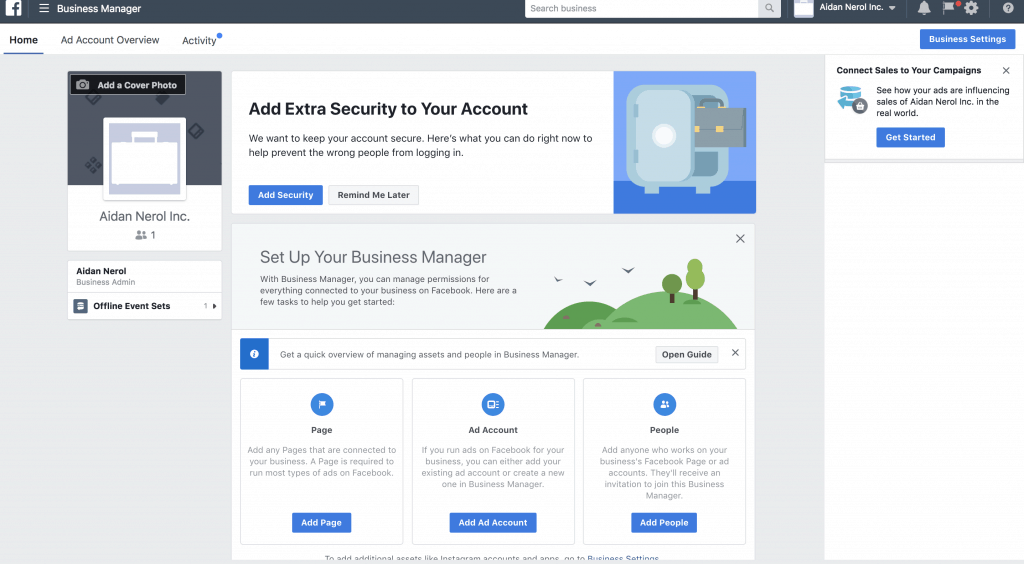
Whether you want to have a look at your options or remove unused sections, there are many reasons you may want to change your tabs.
It could be to:
3. Select ‘Templates and tabs’ from the ‘Page settings’ panel on the left-hand side of the screen.
Step 3: Select 'Templates and tabs'You can also get to this page by going to the tabs at the top of your Facebook page, selecting the drop-down menu ‘More’ and selecting ‘Edit tabs’.
This brings you to a page where you can choose a template for your type of business page and customise tabs as appropriate to your needs.
Here you can select a page template that suits your business needs. Different templates use different tabs which align with the type business they are likely to suit. Select the ‘Edit’ button in the ‘Templates’ section to peruse your options and change your business template.
Page TemplatesOnce you have decided on a template, you can toggle additional tabs on and off to get them to appear on your page. You can rearrange the order of your tabs by dragging your chosen tab up or down the list.
Toggle tabs on and offThe tabs you choose will depend heavily on the type of business you own and the information you want to share with your Facebook audience. If you are selling products, you may want a shop tab. If you’re looking to encourage more custom, including a review tab may help this. If you run events, the events tab can help promote events and build a guest list. Build your Facebook tabs around what works for your business and display what matters most to your brand.
Check out the examples below. Notice how the tabs are different. The promotions company has chosen to include the ‘Events’ tab as one of the first tabs, whereas the online retailer has chosen to include the ‘Shop’ tab instead. This is a perfect example of how different tabs work best for different company types.
@livesoundpromotions includes the 'Events' tab (left), @boohoo.com includes the 'Shop' tab (right)
We are dedicated to bringing you information and tools to help you grow your business on social media.
Get the latest posts delivered right to your inbox.
Your email address
Now check your inbox and click the link to confirm your subscription.
Please enter a valid email address
Oops! There was an error sending the email, please try later.
Facebook Business Manager is the most useful tool for both clients and agencies or professionals who are engaged in targeted advertising in social networks.
Why a Facebook Business Manager is needed for a client/customer

Why an agency or professional needs a Facebook Business Manager
This is a very useful and convenient tool for both business owners and those who set up ads for them. It not only simplifies the management of advertising and the transfer of projects between specialists or agencies, but also provides more opportunities for advertisers.
Next, let's take a step-by-step look at creating and configuring a Facebook business manager.
Create a Facebook Business Manager
Add your company page on Facebook.
Add your company's business account on Instagram
Create a Facebook ad account
Create a Pixel
Create a product catalog
Add employees or contractors
Assign a role and management objects to each employee in Business Manager
An important clarification before you start: A business manager is created from a personal Facebook profile. If you need to create a Facebook Business Manager, first register a personal Facebook profile. If you already have it, feel free to proceed to the instructions.
3. Fill in all the fields in the opened popup and click the Send button.
It is important to provide real data, in case you need to confirm your identity or company.
4. Confirm email address. To do this, find the email from Facebook in the mail and click the Confirm button.
5. After that, you will be redirected to Facebook Business Manager.
Important! To add a Facebook business page to Business Manager, you must be an administrator of the page.
3. In the drop-down menu, select the Add page item.
4. Enter the copied URL and click the Add page button.
5. If everything is done correctly, the page will appear in the list.
1. Go to the Instagram Accounts tab and click the Add button.
2. In the pop-up window, click the Connect Instagram account button and then enter the login and password for your business account.
If done correctly, the account will appear in the list.
Note: if your Instagram account is linked to a Facebook business page, then when you add it to Business Manager, it will automatically be pulled up.
1. Switch to the Advertising accounts tab and click the Add button.
2. In the drop-down menu, select Create an advertising account.
3. In the next popup, select the appropriate item and click the Create button.
4. In the next popup, select the appropriate item and click the Create button.
5. The next step is to add payment information.
6. Select the type of payment and click Next.
7. Enter the details of the card with which you plan to pay for advertising and click the Save button.
Facebook Pixel
video instructions
3. Name the Pixel and paste the URL of your site.
4. Click the Continue button.
If done correctly, the new Pixel will appear in the list.
1. On the Data Sources tab, switch to the Catalogs section and click the Add button.
2. In the drop-down menu, select Create catalog.
3. Give a name to your catalog and click the Create catalog button.
4. Select the Pixel that will be associated with the directory and click the Save button.
1. Switch to the People tab and click the Add button.
2. Enter the email of the employee / contractor you want to add to Business Manager
3. Select the access level and click the Next button.
Important! In the email field, you need to enter the address from which the employee is registered on Facebook. If an employee has an account, but only a phone number is added to it, you need to add an email as well.
4. Assign which resources the new employee will have access to and click the Invite button.
If everything is done correctly, you will see the employee's email in the list with the status "pending".
After the employee accepts access, the "under review" status will disappear.
Administrator has the ability to edit, assign / remove access to other employees, edit accounts and tools. Has access to all resources in Business Manager.
Employee can only work with the resources and tools that are assigned to him.
3. In the pop-up menu, select objects (according to the list) and assign roles.
4. Click the Save changes button.
After that, in the general list you will be able to see the assigned objects for each of your Business Manager's employees.
Income from the Facebook channel for 3 months
How to get 1140% ROAS, 772 orders from social networks for products / audience 35+
429 sales at $2. 28 | Facebook and Instagram catalog advertising case
Facebook and Instagram catalog advertising for a children's clothing manufacturer
Facebook and Instagram audience statistics Ukraine
research for January 2021
Business page represents your company on Facebook. On it, potential customers can communicate with the brand, find contacts, view a list of services or reviews of other users. And most importantly, it is an opportunity for advertisers to launch campaigns on Instagram and Facebook. We share step-by-step instructions on how to create a page for business on Facebook.
A business page requires a personal Facebook account. If you are already registered, log in to your profile and click the plus in the upper right corner, and then select the "Page" tab.
In the window that appears, fill in the information about the company: name, category and description. In the preview on the right, you can see what your page will look like.
What can not be used in the title of the page:
Add a short company description. It will be displayed in search results, so it is important to indicate how the company will be useful to customers. The more fields you fill out, the more information users will receive.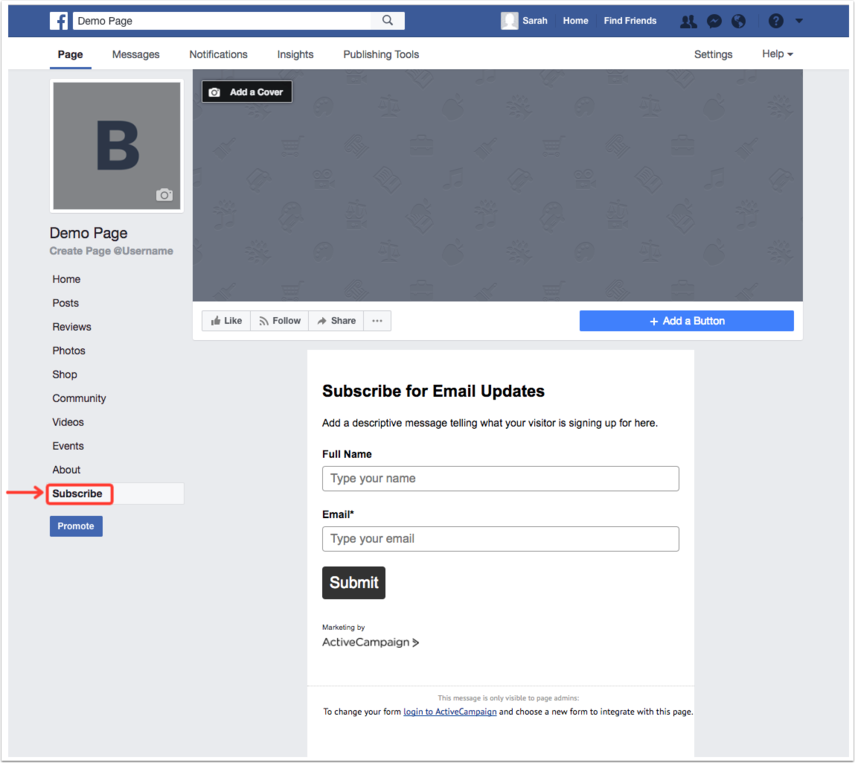 This will increase their loyalty to your product.
Save the page, it can now be found in the "Pages" tab in the right menu of your personal profile.
What should be on the page:
Let's take a closer look.
Cover pages tend to get more hits and likes.
If you skipped this step when creating the page, you can add a cover image in edit mode. Click on the "Change" button and select one of the options. If there is a logo or text on the cover, then it is better to upload the file in PNG format so that the quality does not deteriorate (photo upload rules).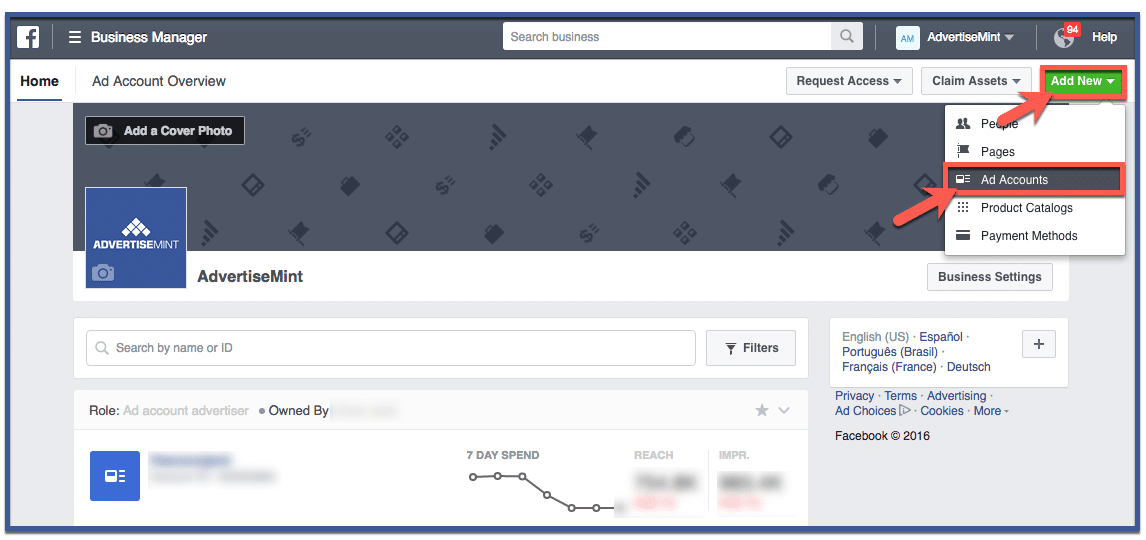
Your profile photo will appear in your posts and comments. To download it, click on the camera icon and select "Edit profile photo".
@username is the URL of your page. If you have a brand, then just enter its name in Latin. If your page title contains key characteristics, then you do not need to write them. The shorter the better. The username is written in Latin and may contain numbers. Maximum 50 characters.
If the name is free, a green checkmark will appear.
Add a button to encourage users to take a targeted action. It can be changed later.
Select the desired target action:
In the next step, specify a link to the site or form that users will go to when they click the button.
To do this, select "Edit" in the left menu of the page management. In this tab, you can also change the description and categories, add a work schedule.