Last week, Instagram added a new photo album feature that allows you to put up to 10 photos or videos in a single post.
Albums could have turned out badly. Major changes in popular social networks almost never go smoothly, and this one seemed poised to create a firestorm. “Instagram Just Announced Its Biggest & Most Controversial Update Yet,” Refinery29 blared. “Instagram just ruined Instagram,” cried Mashable.
But here’s the thing: The update is actually good (and the first new feature in a while that isn’t blatantly ripping off Snapchat). It’s useful for storytelling and photo series. You could even go as far as to call it… cute.
But while the feature itself is not bad, people are using it to do bad things. Specifically, clog your feed and take up your time.
A post shared by Instagram (@instagram) on
Instagram is popular because it’s easy; easy to understand, and easy to see what your ex who finally unblocked you was up to 53 weeks ago. Although Twitter has its charms, it can occasionally be overwhelming, and is obviously a text-focused experience. Facebook is for clicking “attending” on events one does not actually attend and for deleting people one does not actually know on their birthdays. Snapchat is for DJ Khaled and that guy who caught a rabbit.
Instagram, however, is a site based on the pure pleasure of aesthetics, personal vanity, the fun of scrolling, and not much more. It’s a safe space for those of us who would rather not think too much; for those of us who enjoy a quiet, endless scroll of well-lit selfies, photos of food we can’t afford, and of course all of our “friends” who are “models.” But the new album update is turning the app into work.
This is an example of the damage that can be done with slideshows as Cosmo asks you to “hold your ovaries” while looking at these “total smokeshows.”
A post shared by Cosmopolitan (@cosmopolitan) on
“Hold your ovaries” while looking at these “total smokeshows.”
Based on my extensive research as an Insta thot, the appropriate maximum time to spend on a photo is two seconds. You look, maybe read, and move on. But with the addition of albums, you have to look a little longer — and the ability to add multiple videos prolongs the scrolling experience even more. Allowing users to add up to 10 photos is frankly unnecessary. Specifically, it is five too many.
Since it's unlikely that any higher ups at IG’s HQ will read this article and heed my advice on how not to annoy its audience, here are some best practices for Instagram albums.
Here’s the deal:
The first rule is that Instagram albums should be used for vacations, tutorials, i.e. cooking or doing makeup, or some kind of celebration — but only if it will make your followers feel like they’re missing out on something. Otherwise, what’s the point?
More importantly, if you must post an album, it should be no less than three photos or videos and no more than five. Why? I’ll tell you. Two photos is useless. Two photos is hardly a reason to utilize my swiping ability. Two photos says, I clearly couldn’t decide between these and I'm hoping nobody notices. We noticed.
The appropriate maximum time to spend on a photo is two seconds.
Three is solid: It’s a beginning, a middle, and an end. Four and five are reasonable numbers because those amounts let you mix it up and have a little fun! Tell us a story, go ahead, but don’t get too deep. Five stories = 10 seconds. Similar to Snapchat, that is the max amount of time that should be allotted for an Instagram photo album.
Six is selfish. No one wants to pay attention for that long. As my father always says, there is a time and a place. 2017 is not the time. Your Instagram feed is not the place.
Posting more than six photos in one sitting is just plainly not respecting your followers’ time. Do not be that person. Do not steal 14 to 20 seconds out of our day. What makes your seven photos more important than the ones below it?
If you’re thinking, but wait! I NEED to do six or more. Well then, my advice is just to add it to your story. You get just as much attention there and no one has to look at it for longer than a day.
For videos, the more individual clips you have, the shorter each should be. Try to keep your content to Snapchat terms — use no more than 10 seconds per clip, but ideally five or less. If you post an all-video Instagram album, you’d want it to reach no more than 25 seconds. Also, consider whether this is really one that must be retained for posterity forever, or something you could share in your story.
There is room for Instagram to improve the new album feature. I would love to see who swiped on my albums — just as you can see who viewed a story — for example. But capping the photos at five would be a strong start.
Instagram made some changes recently to how you add or select multiple photos for a post. Naturally, a lot of people started wondering why Instagram won’t let me post multiple photos but worry not, we have got everything covered here. If you are looking to add more than one photo on an Instagram story but are finding the multiple pictures selection button missing or gone, then here is a small trick you need to use to be able to select multiple photos for your Instagram story.
All the fancy gimmicks aside, the core driver of Instagram’s popularity has been its minimalist scrollable feed, populated with posts from your friends and people you follow. Posting pictures and videos on the feed is how people share snippets of their lives and connect with each other.
Posting a single photo is easy enough. But if there are multiple photos, posting them one by one can feel nothing short of drudgery. Posting a flurry of photos doesn’t just ruin an otherwise well-maintained feed, but it also brings one dangerously close to spam territory.
A better alternative is to post all those pictures as a single post. Here are all the ways you can upload multiple photos to a post, be it from the app or from your PC.
No, you can easily add multiple photos to your Instagram post or story. But yes, the button to select multiple photos is undergoing some change — like it or not.
On iPhone, the multiple button is now gone but as of now (May 23, 2021), on Android, it’s ever-present. But don’t worry, you can simply tap and hold on any image of yours to get the multiple selection back. We have got it all covered below, so jump to the first guide below to learn about adding multiple photos on your Instagram post.
Adding multiple photos to a single post doesn’t just keep things simple for you but also your followers whose feeds the post is going to appear in. Here’s how you can do so from the app.
The first method is the easiest native method to add multiple photos to a post. Open Instagram and tap on the ‘+‘ icon at the top left corner.
Swipe to get to the Post tab at the bottom of the screen.
Here, tap on Select multiple. If you find the Multiple button missing on your device, then simply tap and hold any of image of yours to get the multiple selection back. Yes, it’s a tad hidden now.
This will add a little circle at the corner of the photos, allowing you to pick multiple photos for your post. Tap on the photos that you want to add.
The photos will be added depending on the number that is associated with them. But you can always unselect/select and move the order around.
Once you’re done selecting, tap on the arrow at the top right corner.
On the next screen, you can add filters to your images.
To get more edit options, tap on the white circle on a photo.
Here, under the “Edit” tab, you have a variety of options to adjust and give the image final touches.
When done with editing, tap on the tick at the top right corner.
Swipe left/right to get to other images and edit them if you want. Once done, tap on the right arrow at the top.
Now you can write a caption, tag people, and add location as you prefer. Then, to finally post, tap on the tick at the top right corner.
And that’s it, your post with multiple pictures is up.
The other way to post multiple pictures is available on your Profile page. Tap on your profile icon at the bottom right corner of the screen.
Here, tap on the ‘+‘ icon next to your username at the top.
Tap on Feed Post.
Now, you will get the same screen that lets you pick multiple pictures at once. From here on out, the steps to post multiple pictures are the same as in the previous step.
Method #3: Create a collage with Instagram’s Layout appAdding multiple pictures to a post is easy enough once you know the steps. But what if you want to create a collage with multiple pictures on a single image? Instagram Stories have a ‘Layout’ option that lets one do so. But there’s no such option for posts.
There is, however, Instagram’s Layout app which can be used to that effect.
Download: Instagram Layout for Android | For iPhone
Once the app is installed, with Gallery highlighted at the bottom, tap on the photos that you want to make a collage out of. A maximum of 9 photos can be added to a single layout.
Now, it’s time to choose the layout. Drag the layout window down to expand it slightly. Then swipe left to see the layouts available to you. When you find the one that you like, tap on it.
This will lead to the Edit screen where you’ll be able to replace your photos, mirror, flip and give them a border.
Once done, tap on Save at the top right corner. The collage will be saved to your Camera Roll.
Tap on Instagram.
Then Feed.
Now, you’ll be redirected to Instagram’s New Post page. Tap on the arrow at the top right corner.
The steps from here on out are the same as before. So go ahead and edit and post your photos as you normally would.
Although Instagram doesn’t let users post photos and stories from the desktop, there are a couple of ways that unlock that potential. A simple way to add photos on PC is by enabling DevTools of your browser. But as it only lets you add a single picture at a time, we have to look elsewhere. The following are a few ways to add multiple photos to a post from your desktop.
Posting pictures through the Facebook Creator Studio method requires you to have the following:

If you meet these requirements, then you can go ahead and use Facebook Creator Studio for Instagram. Fret not if you don’t have a Creator or Business account, or don’t know how to connect your Facebook page to it. The steps for these two are given below.
Go to Facebook Creator Studio and log in. Then click on the Instagram icon at the top.
Click on Connect Your Account if you haven’t done so already.
Then log in to your Instagram. If you don’t have a creator or business account, you will be asked to switch to it.
To do so, open the Instagram app, tap on the profile icon at the bottom right.
Then tap on the three horizontal lines at the top right.
Tap Settings.
Then Account.
Scroll down and tap on Switch to Professional Account.
When you get to the Creator page, select either “Creator” or “Business”. Then tap Next.
Once you’re the creator, you will have to link your Facebook page to your Instagram. For this, tap on your Profile icon on Instagram.
Then tap Edit Profile.
Under “Profile Information”, tap on Page.
Tap Connect an Existing Page.
Check the two linked accounts, then tap Continue to set up the Accounts Centre.
Once the Accounts Centre is set up, select your Facebook page and tap Done.
Now, go back to Creator Studio on your PC and click on Try again to connect to Instagram.
You’re all set up and ready to start posting (with multiple pictures) from your PC. First up, click on Create Post.
Select Instagram feed from the list.
Now click on Add content.
Then choose From file upload.
Browse and select the pictures that you want to have in your carousel post and click on Open.
Once the pictures are uploaded, you can click on the numbers to decide their order in the post. Additionally, you can tag people, change the dimensions of the photo, or delete the photo with the options given under each photo.
Give your post a caption and then click on Publish at the bottom right corner.
And that’s it! Your multi-picture post is posted on Instagram from PC.
Using the Facebook Creator Studio also lets you schedule your Instagram post for later. This is especially useful for posts with multiple pictures as they tend to be more thought out and deliberate. It also lets you create the post now and have it published at a later, more propitious, time.
To do so, first of all, create a post in Facebook Creator Studio as shown in the previous step. Once you have added the photos, edited them, and written your caption, instead of clicking on “Publish”, click on the downward arrow next to it.
Then click on Schedule.
Specify the data and the time when you want your post to go up. Then click on Schedule below it.
Leave it to third-party developers to solve problems that cannot be solved natively. There are a few applications that let you post pictures and videos from a PC, regardless of whether or not you have a creator’s account or a Facebook page. Here is a couple of them that you may want to try out:
Later (PC and Mac)‘Later‘ is a web-based application that lets you add and schedule your Instagram posts straight from your PC as well as your mobile. For carousel posts, however, you will have to get a paid plan. Also, since this is basically a scheduler app that works via push notifications, you will have to download its mobile app as well.
Download: Later for Android | For iPhone
Uplet (Mac only)Uplet is available exclusively for Mac users. It lets you edit and upload multiple photos from your computer and is super easy to use. Simply download Uplet, log in to your Instagram, and get started.
Download: Uplet
Currently, Instagram only lets you add no more than 10 photos to a post. That means it doesn’t matter how you’re adding photos to your carousel posts, you’ll always be limited to 10 pictures. Also, you might want to keep in mind that once a post is up, you won’t be able to add more photos to it. So if you want to add multiple photos to a post, make sure you get them all in before you hit “Post” or “Publish”.
These were all the ways that you could post multiple photos or a carousel post on Instagram. Though there are some other ways to do so as well, they don’t let you post multiple pictures to a post at once and so have been avoided purposefully. Either way, we hope that you’re able to do so on both your phone as well as your computer.
Need to post multiple photos to Instagram* from a computer? We will tell you how to do this through the social network and through the SMMplanner scheduling posting service.
If you're going to post multiple photos to Instagram* from your computer, the first thing to remember is that no matter how hard you try, you can't fit more than 10 photos or pictures in one post. The rest of the process is simple and fast, let's do it.
Home pageOpen your profile home page or feed. On the top option panel there is a plus sign in a square. Click on it to post some photos to Instagram* from your computer.
Drag and drop a photo here For convenience, it is better to create a folder on your PC in advance with a photo for publication and drag a photo from it to this window.
You can also click the blue "Select from Computer" button and upload photos from any folder on your PC. You can navigate between folders, but you won't be able to select pictures from several at once.
Uploaded photosAfter uploading several photos and before posting them, you can edit them. To do this, click in the menu " Crop ".
Grid helps you to center the desired part of the frameUse the grid to move the image around to select the desired area of the photo. To do this, move the cursor over the photo and hold down the left mouse button. Everything, you can move the image.
Picture formats, you can choose the appropriate oneClick the button with the circled checkmarks to select the format of the uploaded image and use the grid to move it horizontally or vertically.
Zoom - when you need to get closer to your subscribers :–) There is also an option Zoom , which is controlled by a button with a magnifying glass in a circle. You can zoom in and out of objects in the photo to place the areas you need. This is a great way to help followers pay attention to the right part of the frame.
With the plus button you can add photos to the carousel . It works provided that there is space left - the number is less than or equal to 10. You can change the order of the photos in which they will be shown to subscribers. To do this, click "Next", and then on the plus in the circle and select files from your PC in the window that opens. Nothing complicated :-) In this way, you can set not only consecutive frames, but also a variety of pictures.
Click NextAfter all the manipulations with the number and scale of the photo, click "Next" and go to the "Edit" menu. There you can apply filters and change image settings.
Applying filters In the image editing menu, you can apply 1 of 12 suggested filters to each photo. Click on "Filters" and use any of the ones you like. You can choose a separate filter for each image, but we still recommend choosing similar filters so that the photos do not look too scattered within the same post.
Image settings allow you to adjust brightness, contrast, saturation, etc. Click Settings and move the slider along the line, adjust the level of each parameter until you like the result. Already changed values can be transferred back if you do not like what happened. Or generally click on the arrow to the left of "Edit" to exit the editor and enter it again. In this case, the settings will be reset, and you will not have to reattach the pictures.
We talked about creating a beautiful visual in the article “How to create a beautiful visual for Instagram* in 2022”. In it, we tell you how to design posts in your account so that readers like your profile, and show what rules and tricks you should follow.
Image settings applied This is what the photo looks like after editing. After applying the settings and photo filters, click "Next" to move on and add a caption, hashtags, and more.
We talked more about hashtags in the article “How to use hashtags to promote on Instagram *: examples, opportunities, mistakes” - we talked about how to use tags correctly so that they benefit your account.
Menu before publication - do not forget to enter the textBy the way, about the text. It is better that subscribers are hooked not only by the picture, but also by the text under it. This will help users stay on your profile. If you need ready-made texts, take a look at our article Posts for Instagram*: where to get ready-made texts. And if the text turns out to be too large - it does not matter. What to do in this case, we tell in the article "Large texts on Instagram *: why are they needed and how to design."
In the Create Publication menu, you can add a signature, geodata, and take advantage of Accessibility and Advanced Settings.
Accessibility By selecting the "Accessibility" option, you can make a caption for each photo for people with visual impairments. Write your own text or it will be generated automatically. Alternative text is displayed only for special programs that recognize such texts and use them to describe the content of the photo aloud.
If you don't want your post to be commented on, disable this feature in the "Advanced settings".
Description of the publicationCreate a caption with or without hashtags, add a geotag to your publication. It all depends on the nature of your post: if you have a “local” business and you want your photos to be easy to find, use geotags and geotags, without neglecting hashtags with your brand. More about place hashtags in our articles “80 hashtags for promotion and promotion in social networks” and “How to correctly search for posts and people by hashtags on Instagram *: instructions”. In them you can find detailed information on how to use it and why, as well as what benefits it can bring.
Ready post A great way to not only publish several photos in one post, but also prepare posts in advance before publication is to use the SMMplannert delayed posting service.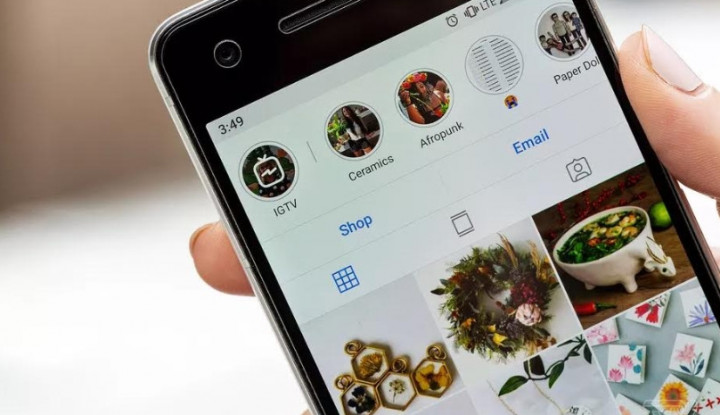 When registering via the link, you will get free access to all functionality for 2 weeks.
So, how to post a few photos on Instagram* from a computer:
Log in to the site, go to the "Posts" tab.
In the same way, you can publish a post in several social networks at onceClick "Schedule a post". An active window appears, in which we will create a future post for the profile.
In an empty box, write the text for the future postAdd photos. We click on "Photo / Video", a page with folders on the computer opens. Among them we find what we will publish.
To post multiple photos on Instagram* from your computer, simply select all the photos you want to post.
If a picture doesn't fit or you don't like it, click on the cross, it will disappear. For example, if you are promoting a short-term promotion, the post can be deleted after the discount expires. Select a page or multiple projects where the post will be published. An expanded list of options will appear:
You can also add a poll to your post, or create a custom design for one or each of the photos using Canva. There are many options for editing and improving images for a post. But the main advantage of the service is that it will publish posts while you are resting :-)
When everything is ready, click "OK", and the post will go to publication at the time specified for it.
Read our blog to keep abreast of news, find out the tricks of publications and advertising, understand how to promote accounts in all social networks. We'll tell you everything!
We make your page interesting and encourage subscribers to look at your page or website more often for shopping
Fresh publications regularly
Get our book Social Media Content Marketing: How to get into the head of your followers and make them fall in love with your brand.
Subscribe to the newsletter and get a book as a gift!
Instagram is an actively developing social network that never ceases to please with new functionality and user-friendly interface. Relatively recently, the function of adding more than 1 image has become available to users. This has greatly simplified the lives of many people, as the rather boring collages have faded into the background. The advantages over them are obvious: posts are larger, which allows you to take a good look at everything, and full-fledged pictures look much more attractive than their small copies or parts. To understand all the benefits, let's look at how to put, make and add a lot and upload several photos at once to Instagram, how to send and upload them to Instagram, post, insert, publish, merge, expose, launch, and publish 2 (second) photo in one Instagram post.
Surely you have already noticed that some people have dots displayed. If you swipe the entry, other images will become available to you.
The main stages of adding more than two or three pictures:
 After completing the procedure, select "Next".
 The instruction is detailed, so there should be no problems with further use of the innovation. In any case, Instagram developers help their users adapt to the new conditions for maintaining their pages.
If the function is not available on your device, just go to the Play Market or Apple Store (depending on which platform you are using) and click the "update" button.
If even after this manipulation nothing happened, restart the phone or close the application, and after 15 minutes go back to it.
Throws you out? This is a version 10.13 issue. In this case, you will just have to wait for the update on your device.
Many users are already familiar with the concept of "story". The function provides for posting a photo or video lasting 24 hours. After the time expires, the publication will no longer be available to subscribers.
They are gaining popularity as the main advantage is the ability to view users who have clicked on the glowing halo around the profile picture.
Now the question is: “How to upload more than one photo to a story?” Unfortunately, this is not possible, as the story is designed to publish only one moment at a time. You can post a new photo or video in the next. Timing - 15 seconds.
If you add 2+ pictures within a day, they will automatically merge into one photo stream. Your subscribers will be able to block view stories.
Experienced users know that to insert a photo from Explorer, you just need to swipe up from the bottom of the screen. In this case, the storage will open in a reduced version. The main rule: you can upload a frame that was taken in the last 24 hours.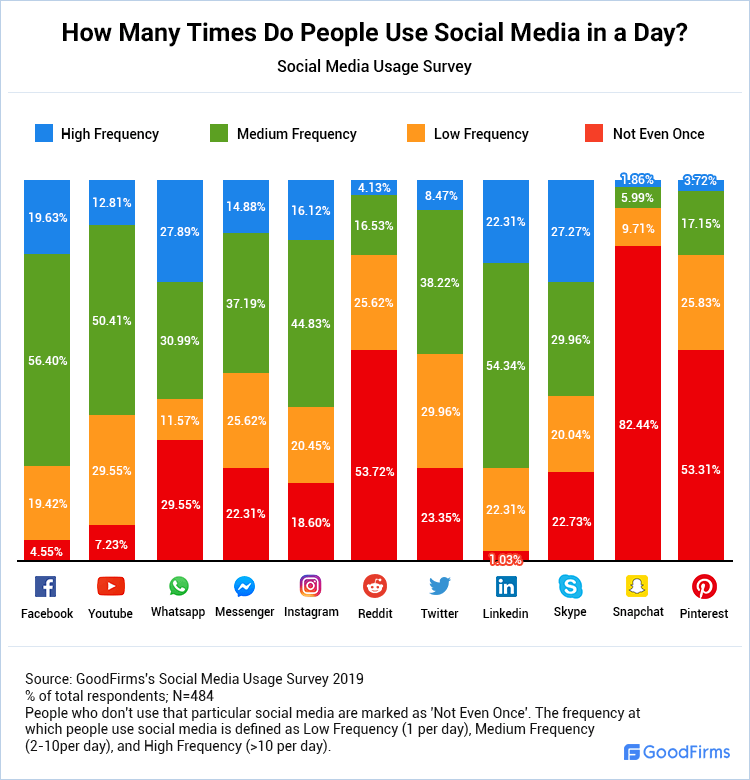
But there is a little secret: if you want to show an old photo, just screen the screen.
Unfortunately, Instagram does not allow you to delete more than two or three pictures at a time. You won't be able to do this even if you download the mobile app on your computer. You can get rid of several images at once only if they are all within the same post.
Now there are many services that provide such an opportunity.