Learn how to make inspiring Reels, photos and carousels that can bring your brand to life and help grow your community.
Something Went Wrong
We're having trouble playing this video.To watch the video, please upgrade your web browser.
Learn more
Learn the basics of posting entertaining Reels and captivating photos.
Create engaging contentEvery post is an opportunity to connect with your community, whether it be in a Reel, photo or carousel.
Get discovered with entertaining, original videos.
Something Went Wrong
We're having trouble playing this video.To watch the video, please upgrade your web browser.
Learn more
Show off your products with eye-catching imagery.
Tell a deeper story with up to 10 photos or videos.
Something Went Wrong
We're having trouble playing this video.To watch the video, please upgrade your web browser.
Learn more
Once your content is ready, it’s time to craft a caption that captures what your post is all about.
You’re almost ready to post! Adding tags before you share helps customers discover and learn about your business.
Something Went Wrong
We're having trouble playing this video.To watch the video, please upgrade your web browser.
Learn more
CREATE A POST
Get inspired Now that you know how to create Reels and photo posts, try different posting styles to discover what resonates most with your audience.
Use timesaving tools and helpful tips to make the most of each Reel and photo you post.
Plan when, where and how your posts will appear in advance, so you can create content efficiently.
Learn how
With tools like effects, music, and stickers, Reels can help you creatively share your story.
Learn how
Turn any post into an ad that encourages potential customers to take the next step with your business.
Learn how
Get a detailed breakdown of how people engage with your posts and discover trends across your followers.
Learn how
CREATE A POST
With over 1 billion active users, Instagram is one of the best social media networks to advertise your business, reach new audiences, and grow brand awareness. So even if you aren’t active on the website yet, it’s never too late to adopt an Instagram strategy in your marketing plan.
If you're ready to start sharing content through this channel, we've got you covered. Here, we've cultivated a quick-and-easy guide to posting on Instagram, to ensure you can begin attracting the attention of your audience with Instagram marketing.

Posting to Instagram consistently can help businesses find resonance with their audience and grow better, but doing it right is just as important. Here's how to post to your Instagram account step-by-step.
See that plus sign [+] in the image above? That's your starting point. See that post from our culture account? That's your endpoint. Click that plus sign and you'll be ready for the next step, below.
Instagram will show you the photos already saved to your phone. Choose one of those to post. Alternatively, you can click on the camera icon to take a photo or video within the Instagram app itself, if you don't already have an image you want to use.
Once you select and crop an image (or carousel of multiple images), click the arrow button in the top right corner of the app.
Do you have multiple photos and want to highlight them all? Instagram allows you to do this with its carousel feature.
As you go to tap a photo or video, first tap the icon just above your photos to the right that looks like stacked squares. Once you tap this, you'll see a number on the corner of every image or video you tap. This number notes where the content will show up in the carousel.
You aren't limited to just a square image on Instagram. You can actually share horizontal or vertical images as well. To get more of your image seen, pinch the screen of the photo you've selected on the Library screen.
However, while Instagram does allow vertical and horizontal options, the images still need to fit into some specific dimensions. So, you might still need to crop a tiny bit of your photo to get it to fit.
Instagram offers 24 filters — scroll to the right to peruse your options, and click on one to preview how it will look on your photo.
By default, the filter will be applied by full strength. However, if you want to scale back the intensity of the filter, double click the filter tile once it's been applied, and a scale selector will appear, allowing you to downplay the effect.
You can also tap the magic wand at the top of the screen to adjust the photo further.
(Take a look at our Ultimate Guide to Instagram Filters to learn more).
You can also click "Edit" at the bottom right to adjust the image to your specifications.
Here are the editing options that come built into Instagram for you:
 Drag the selector to the left to desaturate the image (all the way to the left if you want a monochrome look), or drag the selector to the right for extremely saturated colors.
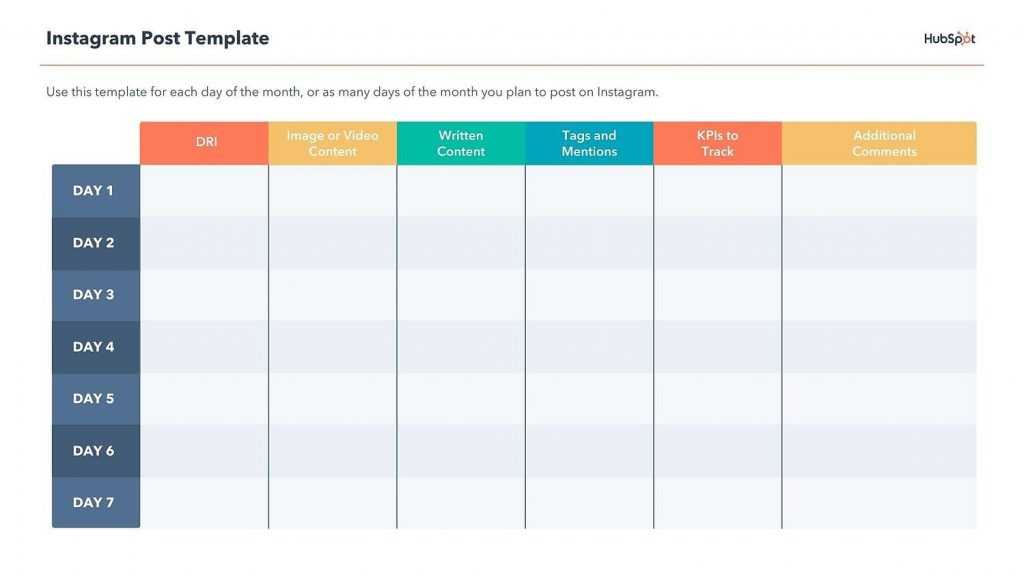 Dragging the selector to the left will darken the shadows in your image while dragging the selector to the right will lighten the shadows in your image.
Featured Resource
Get creative and write a nice, interesting caption to go with your photo. Since text can help optimize your post in Instagram's search, writing something can only benefit you.
With Instagram's search feature, users can search by hashtags. So, you should make sure to write relevant hashtags in your caption. If someone does a search of a hashtag you placed in your caption, they might find your post as well as others that included the same one.
Want your friend or their followers to see a photo that you posted of the two of you? Tag them!
On the new post page, you can click "Tag People" to tag other Instagram accounts in your post. Alternatively, you can include their handle (or their username beginning with an @ symbol) in your caption.
If you're on a fun vacation or at a neat event and you don't feel like including that information in your caption, you can mark where you are in another way. On the new post page, tap "Add Location" to put a location on your image (which makes it easier for people to find your post).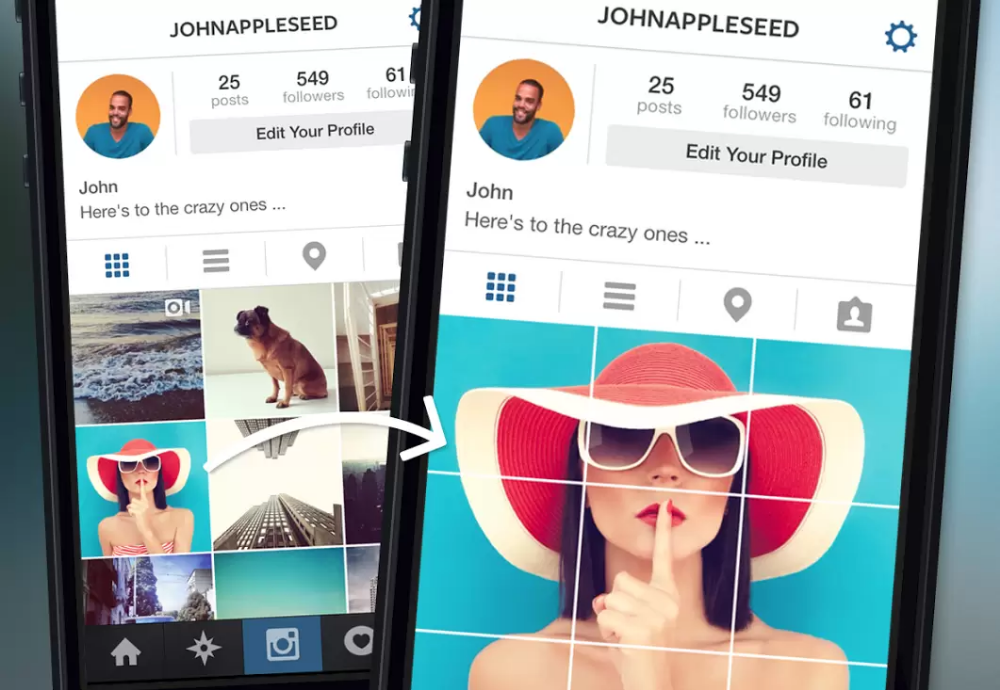
When you post an image or video with a location, it will show up between your name and the block of content on the feed.
Emojis are fun and can make your caption more eye-catching. If you know of a few relevant emojis that could fit with your post, stick them in the caption area. For example, if you're posting a vacation photo, you could include a palm tree 🌴 or a plane ✈️ to show you flew somewhere.
Here are the top Instagram emojis you can use:
However, keep in mind that there's a multitude of choices to add flair to your posts, from keeping it real 💯 to the cringe face 😬.
Be sure not to go overboard and post emojis just for the sake of posting them. If you post a bowling emoji along with a photo of a beach, that obviously won't make sense to people. Similarly, if you post 20 emojis that loosely relate to a post, you might just annoy your followers or come off as desperate.
Finally, if you want to share your content on your other, connected social media sites (like Facebook or Twitter), simply slide the bar from the left to the right.
When you're ready to post, click "Share" in the top right.
Instagram Saved DraftsIf you're not ready to post right away, you can also save it to your Instagram Saved Drafts. Simply go back to the filtering and editing step, tap the back arrow in the top left, and select "Save Draft."
Typos happen to everyone! If you just posted something and notice a glaring spelling error, don't panic. Simply tap the three dots that appear on the right across from your name, then tap "Edit."
Make the adjustments you see fit and save them so it reflects on your Instagram. Otherwise, your post is complete and live for everyone to see.
Now that you know how to post to Instagram, you can begin creating content for the platform and connecting with your audience. If you're a business or brand, you'll want a solid strategy for earning engagement and awareness.
Editor's note: This post was originally published in November 2019 and has been updated for comprehensiveness.
Topics: Instagram Marketing
Do you want to make a post with photos on Instagram, but you have never done it before? Our small but useful guide on this topic may be useful to you.
Posting a new post on Instagram* takes a little time and is not difficult. How to add a post to Instagram* from your phone: first you need to go to your profile through the official application, then follow the steps.


We looked at how to post on Instagram* from Android. If you have iOS, the intuitive process will be the same, just some functions will be called differently.
There is another way to post from your phone. This is very convenient, for example, when you scroll through your gallery and find a photo that you urgently need to share with other users.
Step by step how to add a post to Instagram* from your phone through the gallery:
 For each your own filter or one for everyone - just like when publishing simply through the Instagram application *.
 You can also crop unwanted parts of the frame to make it more accentuated in the right place in the photo. Or do nothing, don't edit, just click on the blue arrow to go to the next block.
You can use any suitable hashtags and geotags of your choiceOur blog has a lot of articles about the benefits of hashtags and how to use them correctly in publications. For example:
And if you just need to quickly find hashtags for publication, you can use our bot "Gennady". You give him a photo or a word for which you need to pick up hashtags, and he gives you a whole cloud of hashtags that can be attached to a post. But we digress. While we were thinking about hashtags, our post has already been published.
Let's say you tried both options, but the photo still doesn't want to be added. What to do in this case? Determine the cause and try to fix it:
 To fix this error, download the new version of the application from the Play Market or AppStore.
We have figured out how to post to Instagram* from your phone using the Instagram* app or photo gallery. We talked about how to change settings, edit images and their number, add geotags and tag people. We studied why the photo might not be added to the post, and what to do in each of the cases. You can find more information about Instagram*, posts and promotion in our blog.
Instagram is a mobile social network. Therefore, all posts are made only from a mobile device. There are services for downloading records from a computer, including for delayed posting. But they don't always work well. You will have to constantly check whether the post is out or not. Plus, many of them do not have access to filters. And these services are often paid.
The main types of posts are:
To upload a photo to Instagram on your home page, click the plus icon on the bottom taskbar.
Next, you will be prompted to select a photo from the gallery.
You can also immediately take the desired photo or video with the camera.
After selecting the desired photo or picture, click next. Here you can select a ready-made filter. If you double-click on it, you can increase or decrease the filter settings by a percentage. We do not recommend you to use filters from Instagram, as they are not of very high quality. If you really want to take cool pictures, read our article on photo editing apps and give them a try. See, the difference is huge!
You can also change the basic characteristics of a photo in the Edit tab. These include the following functions:

After editing the images, click "Next" In the next window, add a description to the image and hashtags (you can put no more than 30), but we do not recommend getting carried away with high-frequency hashtags and using only branded or navigational ones. You can also add locations and label people or products in the photo. The same post can be shared on the social network to which your account is linked. In advanced settings, you can turn comments on or off. Next, click the "Share" button and that's it. The post is ready.
Target video course
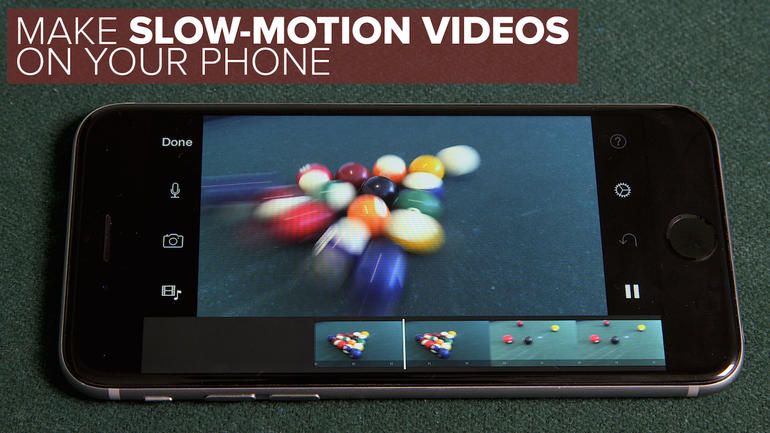
Uploading a video is not much different from uploading images. Choose from the gallery or shoot here and now. The main thing is that the video should be no longer than 1 minute.
Click Next. We trim the video, if necessary, using a kind of track in the "Trim" tab.
We apply filters, as in the photo. We select the cover - the one that will be shown at the start of the video - by video frames. Click "Next". We write a description, put down hashtags. You can’t designate people, but adding geolocation is quite possible. As with the photo, you can share it on other social networks and disable / enable comments.
To make a Carousel (several photos and/or videos in one post), you need to click on the corresponding icon. Select images or videos in the order you want them to be viewed. Further, everything is the same, except that a different filter can be applied to the elements of the carousel.
Collages are made using a special program from Instagram Layout.