You can use Facebook's Portal device to video chat with friends, family, and colleagues. While your phone and laptop can do much of the same thing, Portal's features — including a camera that tracks your movements and an array of microphones — set it apart in video and audio quality. Portal is more than a simple webcam — you can use it to cast and share photos, control your TV using it as a virtual remote, connect to Alexa hands-free, take notes with reminders and video messages, and more.
The Portal is designed to live on a flat surface like a desk or countertop and allows for you to move around and multitask without worrying about being in frame. But be mindful of where you put it. Avoid placing the Portal too close to sinks, stoves and radiators to avoid damage.
Once you find the right place to plug it in, setting up your Portal takes only a few steps.
Unlike a tablet or laptop, the Portal doesn't run on an internal battery. Before starting this process, find a good place to plug it in and follow the on-screen instructions once it's powered on.
1. Select your language and tap "Next."
2. Select your Wi-Fi network and enter your password.
3. Tap "Join."
4. Tap "Next" and then "Continue." Your Portal may need to download new software to start up completely. Once it has downloaded any software, you may also need to restart it.
You may need to restart your Portal device after installing new software. JOSH EDELSON / Contributor/Getty Images How to log into a Portal
When the Portal has finished downloading the necessary software, you can log in to your Facebook or WhatsApp to begin chatting with friends.
1. You'll be asked to give your Portal a name. Tap one from the menu or tap "Custom Name" if you have something else in mind.
2. Tap the box next to Facebook or WhatsApp to log in.
3. Tap "Next."
4. Follow the instructions and enter your account information for either application.
5. Some functions of the Portal, including Facebook Gaming, streaming service Facebook Watch, and display settings are only available after logging in to your Facebook account.
After you've logged into your Portal with Facebook or WhatsApp, you can set up Amazon Alexa.
1. On the "Home" screen on your Portal, tap "Settings."
2. Tap "Accounts."
3. Tap "Amazon Alexa."
3. Log in to your Amazon account to enable Alexa.
You can use Alexa on your Portal or Portal TV device. JOSH EDELSON / Contributor/Getty Images
 Vivian McCall
Vivian McCall is a freelancer for Business Insider's Reference team.
Read moreRead less
Insider Inc. receives a commission when you buy through our links.
The Facebook Portal smart display is great at making video calls to Facebook Messenger and WhatsApp contacts, and while its setup process is easy, it is somewhat lengthy. In case the Portal’s instructions are confusing to you, here is a step-by-step guide on how to set up the Facebook Portal.
Today's best Facebook Portal 10" deals
Reduced Price
$179.99
$75
View Deal
Reduced Price
$179
$76. 50
50
View Deal
Show More Deals
1. Unbox the Facebook Portal.
(Image credit: Future)2. Insert the power cord into the back of the Portal, and plug it into an outlet.
(Image credit: Future)3. After the Portal boots up, select the language you want to use.
(Image credit: Future)4. Select your Wi-Fi network, and enter your password.
(Image credit: Future)5. After the Portal connects to your network, it will automatically download and install the latest update. During this time, you can take a virtual tour of the device.
6. After the Portal has finished downloading the update, it will ask you to restart it.
7. Once the Portal has restarted, press continue to agree to the terms of service.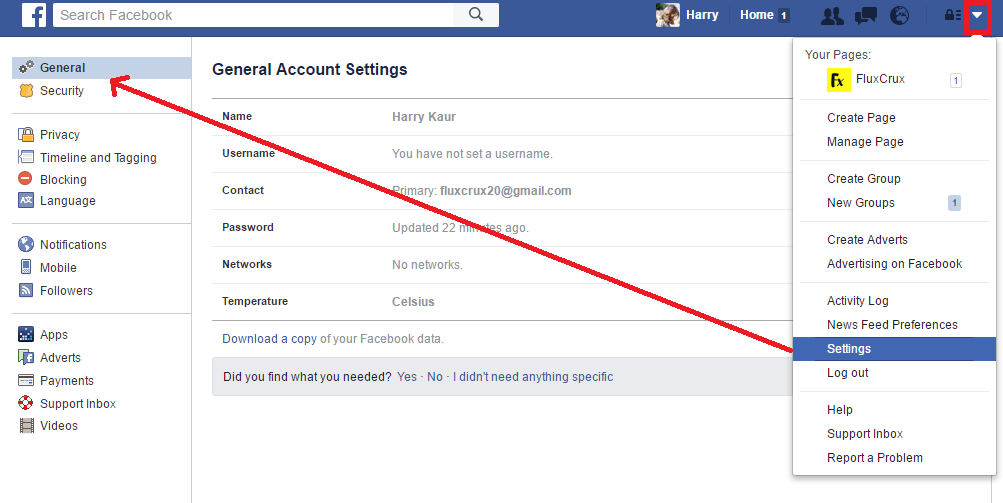
8. Give your Portal a name. You can select from the menu, or create your own name.
(Image credit: Future)9. Connect your Facebook account. A code will appear on the screen of the Portal. On a web browser on your computer or smartphone, go to www.facebook.com/device and enter the code to connect to your Facebook account. Alternatively, you can enter your Facebook password directly on the Portal itself. If you successfully connect your account, a screen should appear confirming this. Press Next to continue.
(Image credit: Future)10. Connect your WhatsApp account (optional). If you opt to connect your WhatsApp account to the Portal, a QR code will appear on the Portal’s display. Open the WhatsApp account on your smartphone; on iPhones, go to Settings, and on Android phones, go to chats and select the three vertical dots. Next, select WhatsApp Web, and hold your smartphone’s camera up so that it can read the QR code.
11. Select your favorite contacts. These are the profiles that will always be visible, so you can more easily call them from the Portal.
(Image credit: Future)12. Choose to hide contacts (optional). If you don’t want all of your contacts to appear on the Portal, you can hide them, if you so choose.
13. Next, you can see how the Portal’s camera works; it can lock on to your face, and digitally zoom and pan to keep you in the frame as you walk around the room. You can skip this step if you want.
(Image credit: Future)14. Connect Pandora and Spotify. If you have accounts with either of these music streaming services, you can link them to the Portal. Select “connect” next to the service you wish to use.
(Image credit: Future)15. If you want to use the Portal as a digital picture frame, select Preview Facebook Photos, and then Add Facebook Photos in the next screen. You can choose which Facebook albums you want to display. Later, you can also connect your Instagram account if you want to display photos from there, too.
16. Select Get Portal App if you want to add photos directly from your phone. This will require you to install a separate app on your smartphone.
(Image credit: Future)17. Connect Alexa if you have an Alexa account, and want to use it on the Portal. We recommend using Alexa rather than the Portal’s own voice assistant, as Amazon's assistant is far more capable.
(Image credit: Future)18. Press Next to use the “Hey Portal” trigger to initiate video calls.
(Image credit: Future)19. The last step is to allow the Portal to store your “Hey Portal” voice recordings so that Facebook can listen to them in order to improve its voice-recognition capabilities. This is optional, and even if you agree to this during the setup process, you can turn this off and delete all your recordings at a later time.
20. Your Facebook Portal should be set up now. The main home screen should display your favorite contacts as well as those individuals whom you called recently. If you swipe to the left, you’ll see all of your installed apps, Contacts, and Settings.
Get instant access to breaking news, the hottest reviews, great deals and helpful tips.
Contact me with news and offers from other Future brandsReceive email from us on behalf of our trusted partners or sponsorsMichael A. Prospero is the U.S. Editor-in-Chief for Tom’s Guide. He oversees all evergreen content and oversees the Homes, Smart Home, and Fitness/Wearables categories for the site. In his spare time, he also tests out the latest drones, electric scooters, and smart home gadgets, such as video doorbells. Before his tenure at Tom's Guide, he was the Reviews Editor for Laptop Magazine, a reporter at Fast Company, the Times of Trenton, and, many eons back, an intern at George magazine. He received his undergraduate degree from Boston College, where he worked on the campus newspaper The Heights, and then attended the Columbia University school of Journalism. When he’s not testing out the latest running watch, electric scooter, or skiing or training for a marathon, he’s probably using the latest sous vide machine, smoker, or pizza oven, to the delight — or chagrin — of his family.
Topics
Smart Home
Twitter LinkedIn Facebook E-mail address nine0003
Note
Effective October 12, 2022, using Power Pages as portals for Power Apps. More info: Microsoft Power Pages is now available to everyone (blog)
We will be migrating and merging the Power Apps portals documentation with the Power Pages documentation soon.
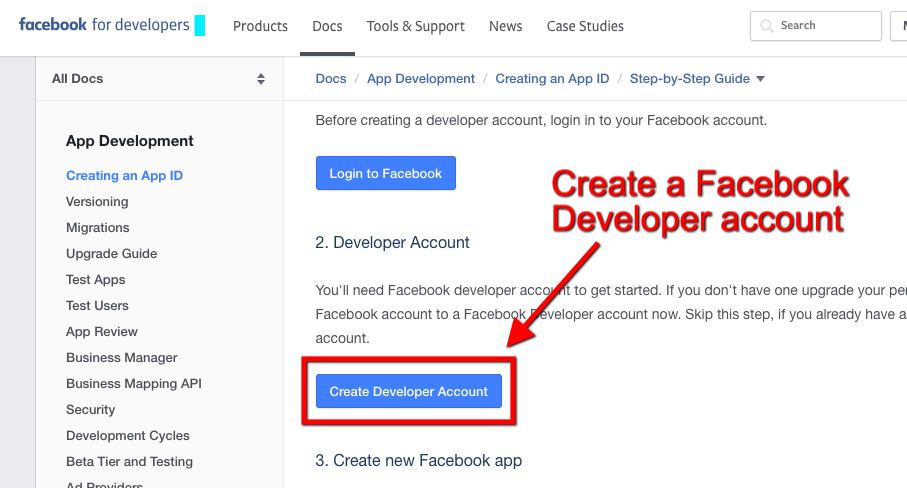
As explained in Configuring an OAuth 2.0 provider for portals, Facebook is one of several identity providers that use the OAuth 2.0 protocol. To start setting up Facebook as an identity provider, select Set up on the provider settings page.
To use Facebook As an identity provider, you need to create a Facebook app with a redirect URL. For detailed instructions on creating a Facebook app, see Facebook for Developers: Creating an App.
Note
The response URL is used by the Facebook application to redirect users to the portal after successful authentication. If your portal uses a custom domain name, you may have a different URL than the one shown here. nine0003
To create a Facebook app

contoso.powerappsportals.com . https://contoso. powerappsportals.com/
 or https://contoso.powerappsportals.com/signin-facebook https://contoso.powerappsportals.com/signin-facebook  To use Facebook Login, switch public_profile to public access." You can also select Browse app in the left pane, and then select Permissions and Features .
  nine0006
 Once you have created the Facebook app, configure the site settings for the provider:
To configure Advanced settings for the Facebook provider, see Configure advanced settings for OAuth 2.0 providers.
Note
What is your preference for documentation language? Complete the short survey (please note this survey is in English).
The survey will take approximately seven minutes. No personal data is collected (privacy statement). nine0003
Send and view feedback on
This product This page
View all reviews per page
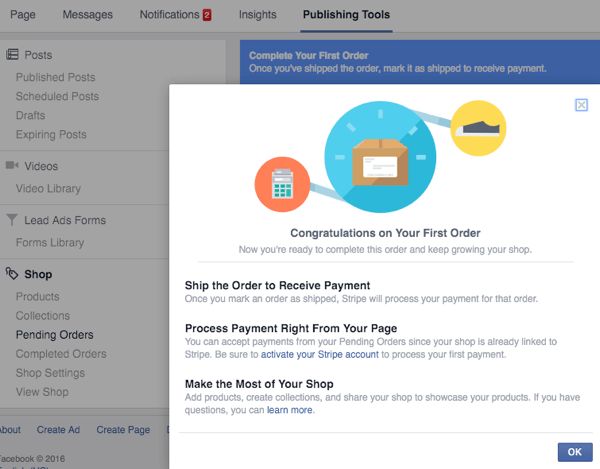
Setting up integration with Facebook - receiving and sending messages Skip to content Integration 3CX 3CX with Facebook with FaceBook allows your contact center agents to respond to social media messages directly from the 3CX interface, without logging into Facebook. Messages can be routed to an individual extension, a Queue, or a Call Group. This allows you to distribute incoming chats between operators according to the desired strategy, as well as transfer chats between colleagues. nine0003
You must have a verified Facebook Business account to set up the integration.


The application is now configured to work with 3CX and you can send a message from your Facebook page. At this point, the application is in 'Development' mode - you can only interact with users who have permission to manage the page. To switch to 'Live' mode, please request additional permissions and verify the app. nine0003
Attention! At this point, it may take up to 24 hours after sending/receiving test messages in Development mode for the button to become available.
This Facebook App is used to integrate the 3CX Phone System (https://3cx.com) with Facebook Messenger chats. Each 3CX customer has their own 3CX instance and will create their own App to integrate their Facebook Page.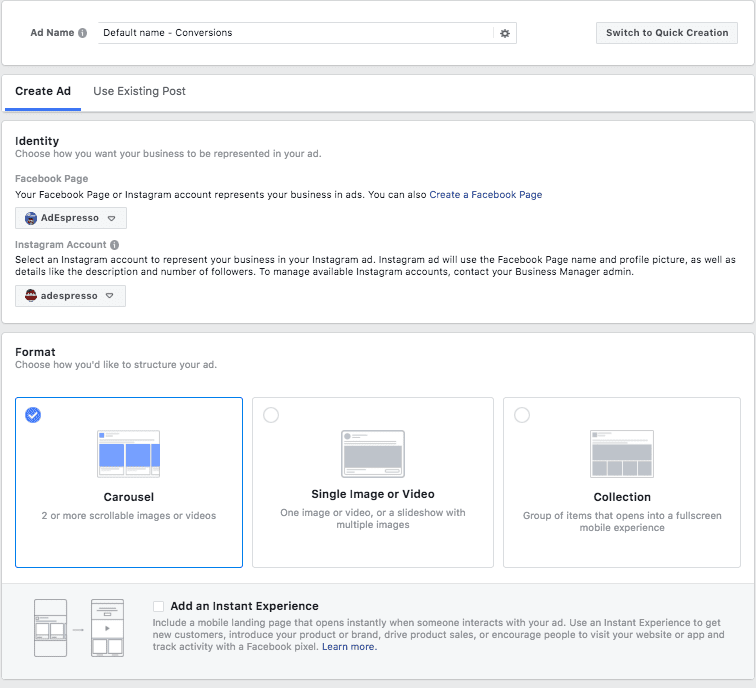 We need “pages_messaging” to receive and reply to messages started by a Facebook Page’s visitor. “Business Asset User Profile Access” is needed because it exposes the user's name and picture for identification of chat by agents. 3CX is using the name and picture attributes. nine0003
This Facebook App is used to integrate the 3CX Phone System (https://3cx.com) with Facebook Messenger chats. Each 3CX customer has their own 3CX instance and therefore will need to create their own App to integrate a Facebook Page. “pages_messaging” is required to receive and send messages started by a Facebook Page visitor.
 Edit the text below to add the credentials of the temporary test user created in Step 2. webclient
 Extension: ________
Password: ________
Step 2. Write and send a test message on the Facebook Page.
Step 3. Receive and reply to the message in 3CX Web Client.
This Facebook App is used to integrate a 3CX Phone System (https://3cx.com) with Facebook Messenger chats. Each 3CX customer has their own 3CX instance and will create their own App to integrate their Facebook Page.