Posting Instagram content when your audience is most active on the app increases chances of engagement, brand awareness, referral traffic, and conversions. However, it's not always efficient to hover over your phone or laptop to post on Instagram at the perfect moment — so you'll need a way to schedule Instagram posts ahead of time.
This is where Instagram scheduling software comes into play.
Can you schedule Instagram posts?
Why You Should Schedule Your Instagram Posts
Instagram Scheduling Best Practices
Best Way to Schedule Instagram Posts
Tools for Scheduling Instagram Posts
HubSpot Social Media Management Software
Later
Tailwind
Buffer
Sked Social
Sprout Social
Loomly
How to Schedule Instagram Posts
Schedule Your Instagram Posts
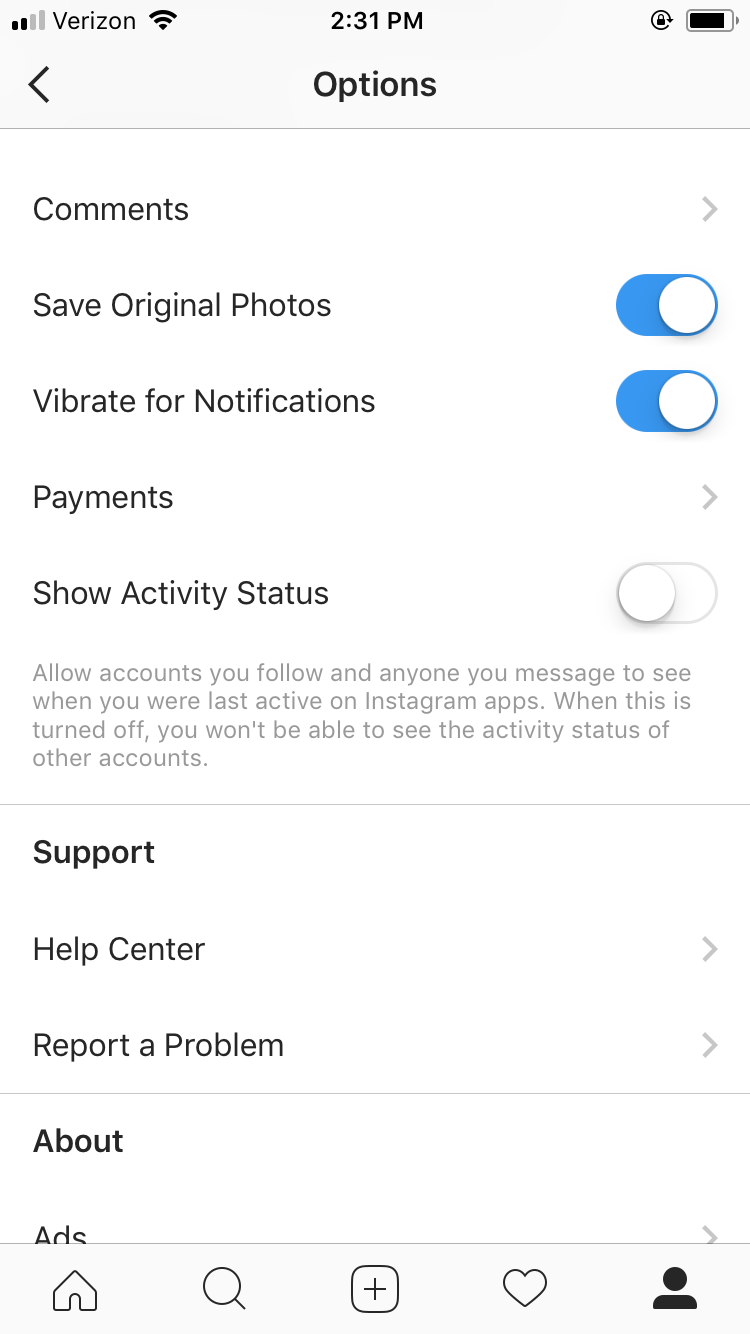
Yes! If you're a content creator or business owner with access to Meta's Creator Studio, you can connect your Instagram account to Creator Studio to schedule posts.
If you don't have Creator Studio, Instagram's API lets users of marketing tools like HubSpot schedule Instagram posts in advance.
It's also worth mentioning that Instagram is testing a new in-app tool to schedule posts and Reels. In October 2022, a Meta spokesperson said, "We are testing the ability to schedule content with a percentage of our global community."
That same month, Twitter user @WFBrother posted a screenshot showing how the tool works.
Now you can schedule posts on the Instagram app! ✨
You can schedule posts and reels by going to Advanced settings when creating new content. #Instagram @MattNavarra pic.twitter.com/yJykq108wK
— ㆅ (@WFBrother) October 18, 2022
However, the tool is still in the testing stage, so you'll need to rely on either Meta's Creator Studio or third-party social media scheduling software to schedule your content.
There are many reasons you should get in the habit of scheduling your Instagram posts.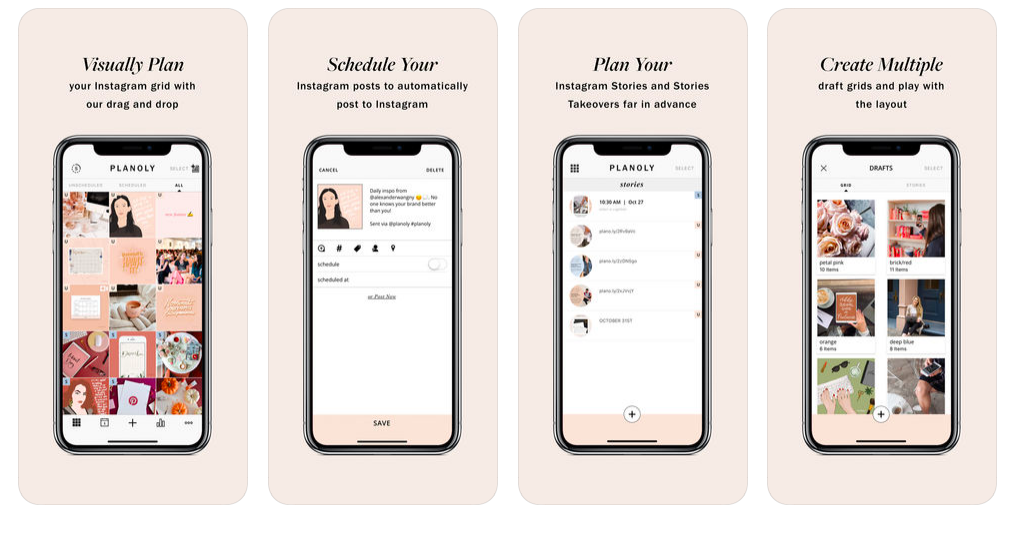 One reason is that it saves valuable time and gives you the opportunity to plan and execute a comprehensive marketing strategy. Think about it — instead of scrambling to post content at the perfect time, you're able to schedule a string of compelling posts that include stories, Reels, carousels, polls, and more in advance.
You'll also have more time to interact with followers and reply to comments, which can build lasting relationships with customers and generate leads.
Here are some best practices to keep in mind when scheduling posts to Instagram.
Track how your posts perform at different times, and use that information to optimize your posting schedule. To get you started, here are some great posting times, according to Search Engine Journal:
 m.
m.If you're scheduling content ahead of time, there's no need to rush writing your caption. Take the time to figure out the right hashtag to use, the right accounts to tag (if any), and a compelling call to action.
The time you save by scheduling posts can be used to connect with your audience, Block off time to reply to comments, and host polls. If your audience tags you in a story, post that story to your account.
The simplest way to schedule Instagram posts will be via Meta's Creator Studio if you have access to it. To schedule posts via Creator Studio, do the following:
If you don't have Creator Studio, you can use plenty of excellent, user-friendly scheduling software. Here are some of your best options.
With HubSpot's Social Media tool, which is part of HubSpot Marketing Hub, you can schedule and publish social posts to Instagram, Facebook, Twitter, and LinkedIn.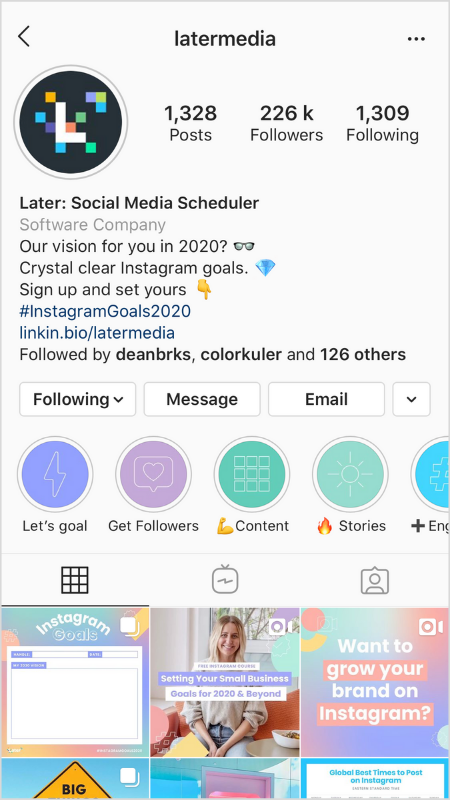 From within HubSpot, you can edit your post, schedule it, and add @mentions to tag other accounts and users.
Upload the image you want to share on Instagram to HubSpot, then drag and drop it into the post you're scheduling. You can preview the final post before it goes live to see what your visitors will see.
After you choose the date and time, your Instagram post will be shared and previewed. Tag it with a relevant HubSpot campaign, so all your social posts associated with a marketing campaign you're already running are organized.
Once you schedule your post, you can select "Schedule another" to plan another social post. There's an option to auto-copy and paste content from the post you just scheduled so you can plan similar posts for different dates, times, and platforms.
Lastly, if you're using HubSpot's social tool to schedule and publish across other platforms, target specific audience groups (for instance, you can target specific countries or languages on Facebook).
Get HubSpot's Social Media Management Software to help you focus more on connecting with your customers and target audience by using time-saving publishing and scheduling tools that prioritize social interactions.
Later is a social media post scheduler dedicated to Instagram. The platform includes a full social content calendar, drag-and-drop post planning, and the ability to publish automatically to your Instagram Business profile. In addition, the service's Linkin.bio feature allows you to link individual posts to specific product pages.
Tailwind is a social media scheduler and innovative assistant platform specifically for Instagram and Pinterest. Using smart features like bulk image uploading and the built-in Hashtag Finder, the tool allows small businesses to personalize their Instagram posts and get them scheduled quickly.
The tool also allows you to visually plan and preview your Instagram post schedule and grid via a single dashboard your audience will see before posting.
Buffer allows you to schedule social media posts across six social networks: Facebook, Instagram, Twitter, LinkedIn, Pinterest, and Google+. Buffer for Instagram makes it easy to manage and schedule your posts via a single dashboard.
There's an option to include hashtags in your Instagram post in the Comments section versus in the caption (to keep the post and caption as simple as possible). Using Buffer's social media analytics feature, you can also analyze your Instagram posts to determine what worked among your target audience.
In addition to a mobile app for iOS and Android, Buffer also offers an extension for your internet browser.
Sked Social offers an Instagram scheduling and auto-posting tool for Instagram posts and stories. Using the tool, you can plan to post your stories automatically, whether photo or video, so you never have to intervene or receive reminders to click "Post" again.
You can also schedule your Instagram posts via iOS or Android to upload content directly from your mobile device's camera roll.
Sprout Social is a social media management platform that's clear with six major social networks, including Instagram. It has a social media content calendar allowing you to schedule your social posts and measure engagements once live.
Easily upload the image you want to post on Instagram, add the caption and other Instagram post details (e.g., location), and then schedule it to go out at the date and time of your choosing.
The tool's social listening abilities also help you identify unique trends across your Instagram content and then apply these trends to the rest of your Instagram marketing strategy.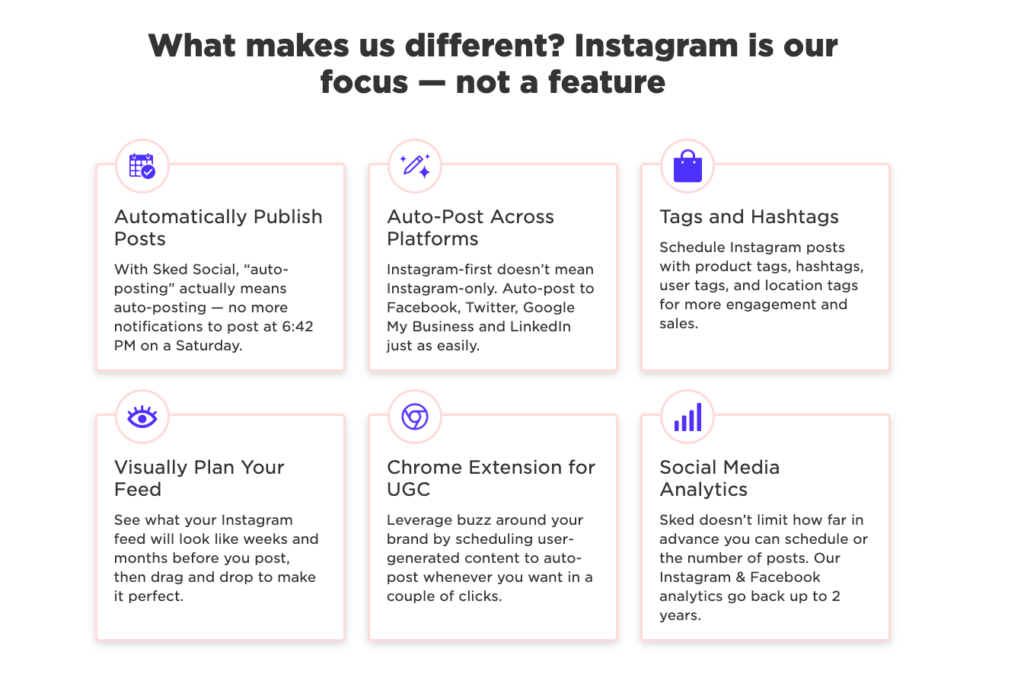
Loomly is a brand success platform with content management and social media publishing and scheduling features. Schedule your social media posts in advance — there are automated scheduling and publishing options for various social platforms incl,uding Instagram, Facebook, Twitter, LinkedIn, and Google. Loomly also offers automated Instagram Ad (and Facebook Ad) publishing.
With the platform, you easily manage your organic and paid social media content — you can also get notifications (via email, Slack, and more) whenever one of your team members works on a piece of social content to make for easy team-wide collaboration. The tool provides social media post recommendations based on trends, events, holidays, and social platform best practices.
Next, let's dive into how to schedule Instagram posts for an Instagram Business page — for the sake of this post, we'll use HubSpot as our scheduling and publishing tool.
Instagram and Facebook might be separate accounts to you personally, but businesses that want to automate their Instagram posting schedule will need to tether both accounts together. So, you'll need the username and password of your business's Facebook account to do this — in other words, head over to the Instagram Business landing page to set up your account if you don't already have one.
If you have a personal Instagram account, you probably know you can manage more than one profile from the app — and the other profile is your business account (keep in mind you'll need an Instagram Business account to schedule Instagram posts in HubSpot).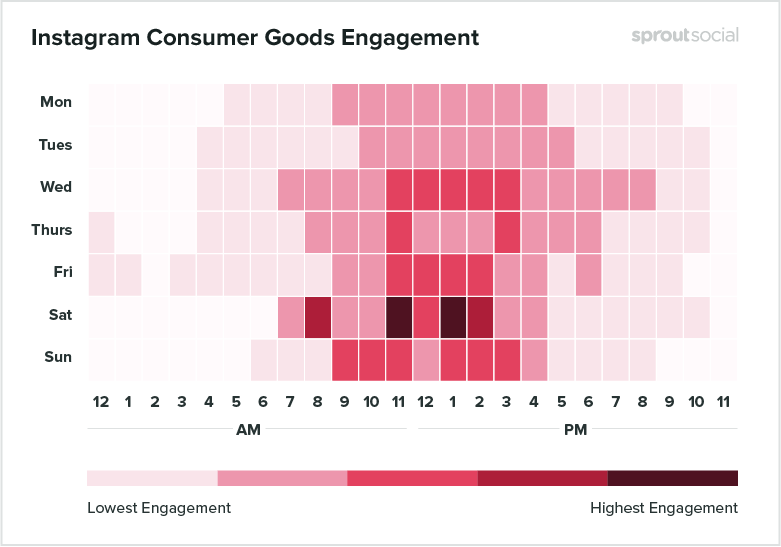
To switch to your Instagram Business page from your page, navigate to your profile on your mobile device and tap the three dots in the upper-right corner of your screen. Then, in the next screen, select "Switch to Business Profile," as shown below:
Under "Settings," select "Linked Accounts." Here's where you can choose Facebook and link your two accounts together. You might be asked to "Log in With Facebook," at which point you'll enter your business account's username and password. Otherwise, select "Continue as [yourself]."
Now that your Instagram profile is anchored to Facebook, you can integrate it with your post scheduler. As mentioned, we will use HubSpot's Social tool for our purposes.
Open HubSpot, select "Settings" > "Marketing" > "Social" > "Connect Account" > "Facebook and Instagram."
Click the first option, "Facebook & Instagram," and follow the prompts to complete this step (which are listed here in greater detail).
Once your Instagram account is integrated into HubSpot, you'll see an option to "Create social post" in your HubSpot dashboard. Click it, and you'll see icons for which social network you want to start with. Select the Instagram icon to compose your first post for your Instagram account.
Customize your Instagram post and upload an image using the landscape icons on the bottom-lefthand corner of the white text field that appears. Then, caption your image with the text, hashtags, and user mentions you'd like to post your photo with, as they should appear on Instagram.
Above the photo you're posting, you'll see a field where you can add the date and time the date and time that your post will be scheduled to go live. Use this field to automatically set the date and time you want your post to go live on your Instagram profile.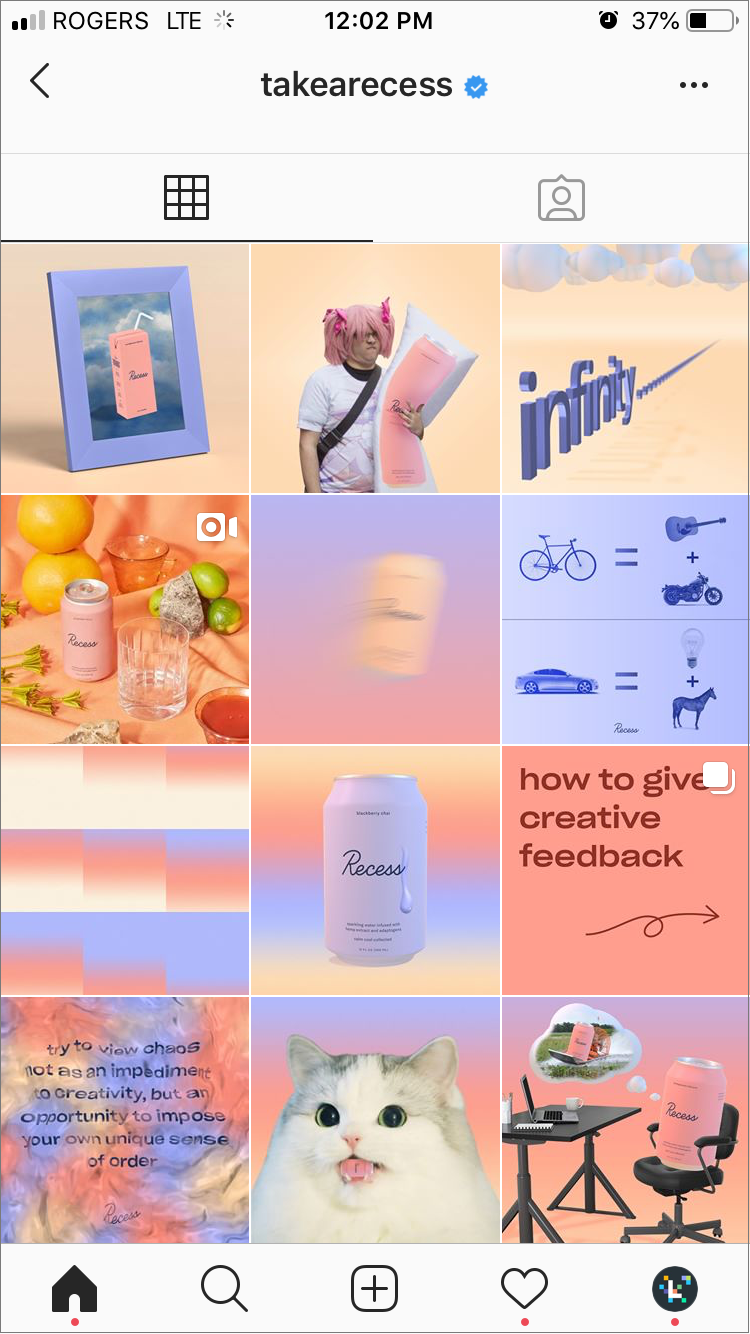
Any grammatical errors? Are all your intended hashtags included? Is the image successfully uploaded? Check to make sure, and you'll be ready to schedule.
Got any more Instagram posts planned? Draft them now and schedule all of them simultaneously — with HubSpot, you can schedule your social posts in bulk.
Once every post you want to schedule has been loaded into HubSpot, you can hit the "Schedule" button on the page.
Start scheduling your Instagram posts to make your workflow more efficient and to ensure the content you need to get in front of your audience does so in a timely fashion.
Editor's note: This post was originally published in August 2018 and has been updated for comprehensiveness.
Topics: Content Planning Instagram Marketing
Instagram Tips & Resources
By Monique Thomas
•
Updated on December 16, 2022
•
10 minute read
If you want to learn how to schedule Instagram content in 2023, bookmark this guide.
Published December 16, 2022
Scheduling your Instagram posts in advance is one of the most effective ways to save time and post consistently.
In this guide, we’re breaking down everything you need to know about planning for the ‘gram — including the best Instagram Scheduler in 2023.
And the best part? You can do it all for free. Let’s get into it.
Why You Should Schedule Instagram Posts in 2023Scheduling content has got to be one of my favorite ways to prepare for the next month.
Batch your work. Schedule your content. Get ahead.
— Niti Sarran (@NitiSarran) December 9, 2020
Before we show you how to schedule Instagram posts, we quickly need to cover the why.
Here are the top six reasons why using an Instagram scheduler should be a priority this year:
Save Time
Be Consistent
Write Stronger Captions
Craft a Cohesive Story
Keep Your Content Calendar Organized
Post From Your PC or Mac
Whether you’re a business owner, creator, or social media manager, you’re likely juggling many hats — and with only so many hours in a day, time is money.
Saving time is the biggest reason for scheduling your Instagram posts in advance.
It leaves more room for strategic brainstorms, content creation, and other business needs.
Plus, you won’t be rushing to whip up a post in real-time, and can plan ahead instead.
Did you know: you can schedule Instagram posts with Later — for free? It’s the handiest tool trusted by over 4M brands, creators, and small businesses. Create an account today:
Benefit #2: Be ConsistentAsk any social media manager or creator, and they’ll say one key reason for their success is having a consistent posting cadence.
The reason your struggling with being consistent online is because you try to create content day by day
Take time to batch create your content for a week or two & schedule it
This will save you time & stress
— Ashley France (@theashleyfrance) September 15, 2021
While it doesn’t have to be every day (we know that’s not always realistic!), it’s important to post content throughout the week so that your audience can engage.
Crafting captions on-the-fly is difficult.
You may experience writer’s block, make a spelling mistake, or could miss the opportunity to tell your brand’s story in the best way possible.
By planning and scheduling your posts in advance, you can set time aside to brainstorm and write stronger captions.
Don't forget about Instagram SEO — write descriptive captions with relevant, highly-searched keywords throughout to boost you reach. ⚡
— Later (@latermedia) May 18, 2021
This includes optimizing your post to include highly-searched keywords for SEO, and relevant hashtags to increase reach.
So say goodbye to caption fatigue!
Benefit #4: Craft a Cohesive Visual StoryIn 2023, the Instagram aesthetic may no longer be “picture-perfect,” but users are still drawn to grids that tell a cohesive visual story.
This could be a grid that makes use of complementary colors, or one that mixes up memes and lifestyle posts:
You only have a few seconds to make a great first impression, so planning a visually appealing grid can help visitors understand who you are and what you do, right off the bat.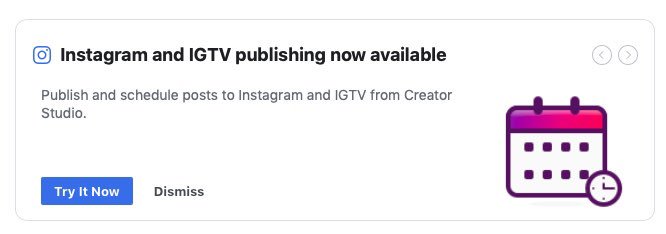
TIP: Later's Visual Planner lets you preview your Instagram grid and see how your scheduled posts will look! Start planning:
Benefit #5: Keep Your Content Calendar OrganizedAnother reason for scheduling your Instagram posts?
To keep your content calendar organized.
This way, you’ll have a holistic view of your content, and can spot any gaps or opportunities for the upcoming weeks.
My love language is a fully planned out content calendar. 🥰
— Later (@latermedia) December 4, 2021
Ask yourself, are there any social media events or holidays that you can capitalize on? Are you posting a healthy balance of product and lifestyle shots?
It’s an easy (and effective!) way to make sure you aren’t posting for the sake of posting, and that your content is always on point.
Benefit #6: Post From Your PC or MacPosting to Instagram from your desktop is a great way to be efficient — especially if you’re already creating graphics and social media assets on your PC or Mac.
Scheduling via your desktop also means you can review upcoming posts on a bigger screen, write your captions with a full keyboard, and easily toggle back and forth between tabs.
Hello, multitasker!
With Later for desktop, you can batch prep your content in advance and schedule it to go live at your best posting time. Check it out today:
How to Schedule Instagram Posts With Later (for Business and Creator Profiles)Later is trusted by millions of brands, creators, and social media managers — making it the best Instagram Scheduler in 2023.
And it’s easy too! Here’s how to get started:
Step #1: Connect Instagram Business or Creator ProfileWhen you sign up for Later, you can connect your Instagram Business, Creator, or Personal profile.
However, due to Instagram’s API limitations, each profile type has access to different Later features — which is why we recommend using an Instagram Business or Creator profile.
To find out the difference between all three profiles, check out this helpful page, which includes the Later features you can use!
For the sake of the remaining steps, we’ll assume you have an Instagram Business profile.
Step #2: Upload Content to Later’s Media LibraryClick “Upload Media” on Later for desktop and add content from your computer, Dropbox, or Google Drive:
You can also drag and drop files directly into the Media Library, for an even faster process!
Step #3 (Optional): Find User-generated ContentLater has a collection of paid tools to help you find user-generated content (UGC) to add to your library.
Using the "Collect Media" button, you can search for Instagram posts that have tagged or mentioned you, or search via a specific hashtag or profile:
Remember to:
TIP: No UGC? No problem. You can also find on-brand stock photography using Later’s Unsplash integration — for free!
Step #4: Select Content to ScheduleChoose the Instagram profile you’d like to publish to (double-check the highlighted circle).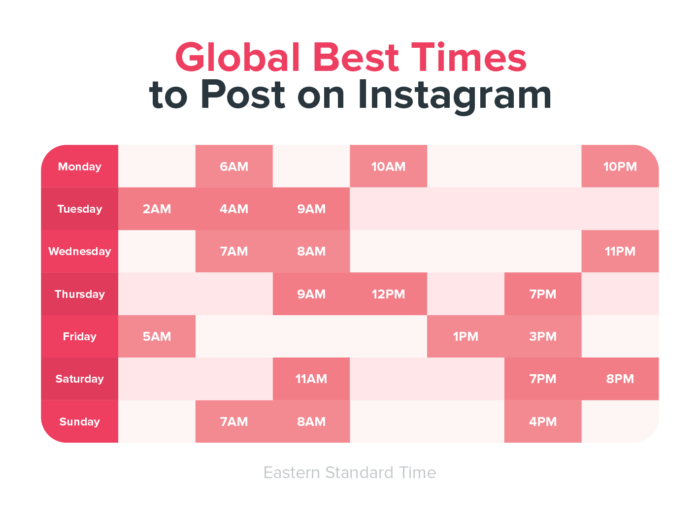
Then, drag and drop selected content (single photo or video) from your Media Library to the content calendar:
Step #5: Optimize Your Instagram PostWrite your caption, include relevant emojis (if applicable), and insert hashtags to help maximize your reach and engagement.
With Later’s Saved Captions tool, you can save your favorite hashtags as a caption for easy copy and pasting — whenever you need them.
Alternatively, you can use the tool to save a great caption for future purposes, too:
TIP: If you have a paid Later plan, you can also use Later’s Hashtag Suggestions tool to find relevant hashtags to add to your post.
Step #6 (Optional): Edit Your Image or VideoTap “Edit Image” or “Edit Video” to add design elements to your post.
With Later’s crop tool, you can make sure your content meets Instagram’s approved dimension sizes — whether it’s square, portrait, or landscape:
With the filter tool, you can choose from an array of colorful filters to enhance your photo.
And the trim tool lets you trim the length of your videos.
Click “Update Image” or “Update Video.”
Step #7: Choose the Date and Time to Schedule Your PostIf you have an Instagram Business profile, select “Auto Publish” from the dropdown list and select the date and time you want your post to go live.
Click “Save” — and voila!
If you have an Instagram Creator or Personal profile, you cannot auto-publish posts due to Instagram’s API limitations.
Instead, you will receive a mobile notification when it's time to post.
Once you open the notification and tap “Open in Instagram”, your caption (and hashtags) will be copied to your clipboard, and the image will be uploaded to your camera roll.
TIP: Here's a full breakdown of how notification publishing works.
Step #8: Review How Your Grid Will Look With Later’s Visual PlannerLater’s Instagram feed planner feature, the Visual Planner, is a user favorite — and for good reason.
With the feature, you can see exactly what your Instagram grid will look like before you post.
Not feeling its current lineup? Rearrange your posts directly in the Visual Planner to find the perfect balance for your grid.
When you’re happy, click “Save Changes.”
Your posts’ dates and times will automatically update based on their new order, as reflected in the Planner Scheduling sidebar.
Two words: game changer.
4 Instagram Scheduling Tips and Best PracticesInstagram scheduling is packed full of perks — here are our four best tips to make the most of it:
Post at Your Best Time
Use Relevant Hashtags
Include SEO Keywords
Create a Strong Visual Impression
Later analyzed over 11M posts and found that the best time to post on Instagram (in local time across time zones) is 4AM.
However, this isn’t a one-size-fits-all answer, so it’s important to experiment by using either:
A spreadsheet to manually track when you post on Instagram and analyze each posts’ performance
Later’s Best Time to Post feature, which will automatically find your unique best times (and days) to post for maximum engagement
TIP: Remove the guesswork and find your personalized best posting times with Later’s Starter, Growth, or Advanced plan:
#2: Use Relevant HashtagsHow many hashtags should you use on Instagram? It’s a question that’s caused much debate on social media.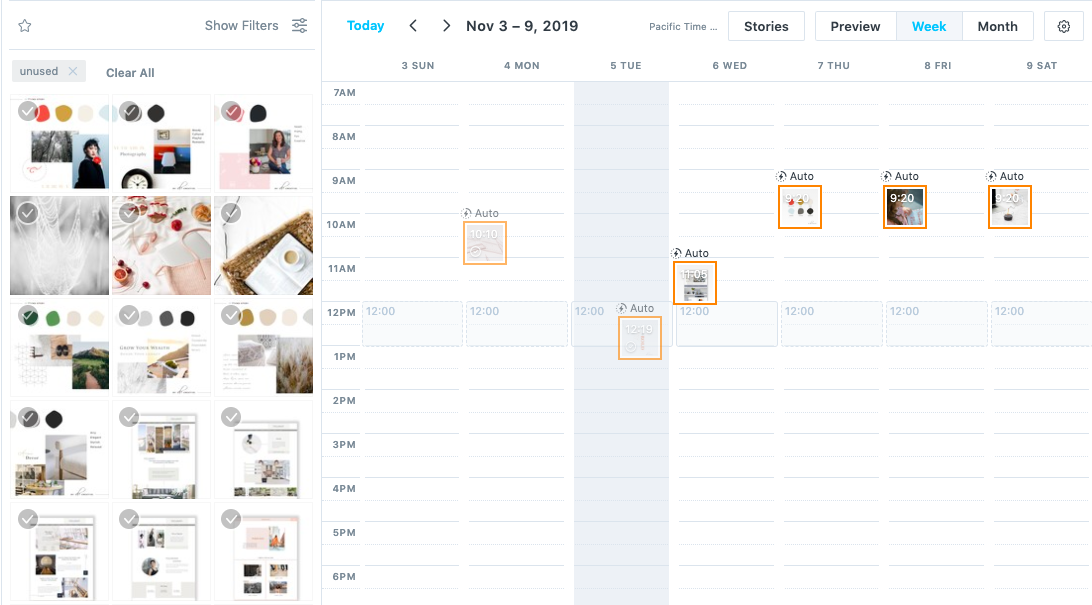
After analyzing over 18M feed posts, we discovered that using 20-30 hashtags is best for optimal reach and engagement.
But it’s important to make sure your hashtags are relevant to your content, audience, and business.
TIP: Later’s Hashtag Suggestions tool can help you find new hashtags to use in your posts. Create an account, today:
#3: Include SEO Keywords in Your CaptionsInstagram’s Explore page is constantly evolving, with new and advanced search functionalities being introduced throughout the year.
For example, you can now search by keywords (not just hashtags) to discover relevant content:
This suggests the Explore page algorithm considers both the visual content and words in your caption.
So, by using relevant keywords in your captions, there’s a chance your content could be more easily discovered by anyone searching on the app.
TIP: With Later for desktop, you can write captions and schedule your posts in advance.
Instagram is first and foremost a visual platform.
And while users no longer gravitate to super polished content, it’s still worth posting photos and videos that are high-res, on-brand, and easy on the eye:
Whether it’s bold colors or branded illustrations, make sure you’re scheduling Instagram content that’ll make a good first impression to anyone who visits your profile.
This way, you can convert them into a follower and potential customer.
TIP: Later’s Visual Planner will help keep your profile looking on point. And the best part? It’s free.
So… Why Choose Later as Your Instagram Scheduler?When picking the right Instagram scheduler for you, it’s important to think about what features meet your needs.
With Later’s Instagram scheduler you can:
Upload unlimited photos and videos to your Media Library
Schedule up to 10 posts per month
Find stock photography via Unsplash
Use the Saved Captions tool
Crop, edit, and filter your content
Access the Visual Planner feature to help design your Instagram grid
Use Linkin. bio to easily drive traffic to your website
Track and measure your weekly and monthly growth with Later’s Analytics tool
And if you upgrade to a paid plan, you’ll get even more features including:
The ability to schedule and auto-publish carousel posts
Hashtag Suggestions to find relevant hashtags
The ability to create a post and save it as a draft
Instagram location and user tagging
The ability to schedule Instagram Stories
Best Time to Post — to find your personalized best posting times
A Shopify store integration with your Linkin.bio
And more!
In a nutshell, Later can help you spend less time posting on a whim, and more time growing your business and nurturing your community.
Plus, with extra time on your hands, you can take some well-deserved downtime — especially on the weekends.
Create a free account and start scheduling your Instagram posts with Later today — it’ll take less than five minutes.
About the Author
Monique is Later's Editorial Content Marketing Manager. You can usually find her sipping matcha or adding another book to her TBR list. Say hi on Instagram — @wordsbymonique
Category Instagram Tips & Resources
•
7 min read
By Amanda Demeku
Category Instagram Tips & Resources
•
11 min read
By Jillian Warren
Category Social Media Marketing Blog
•
5 min read
By Lindsay Ashcraft
© 2022 Later.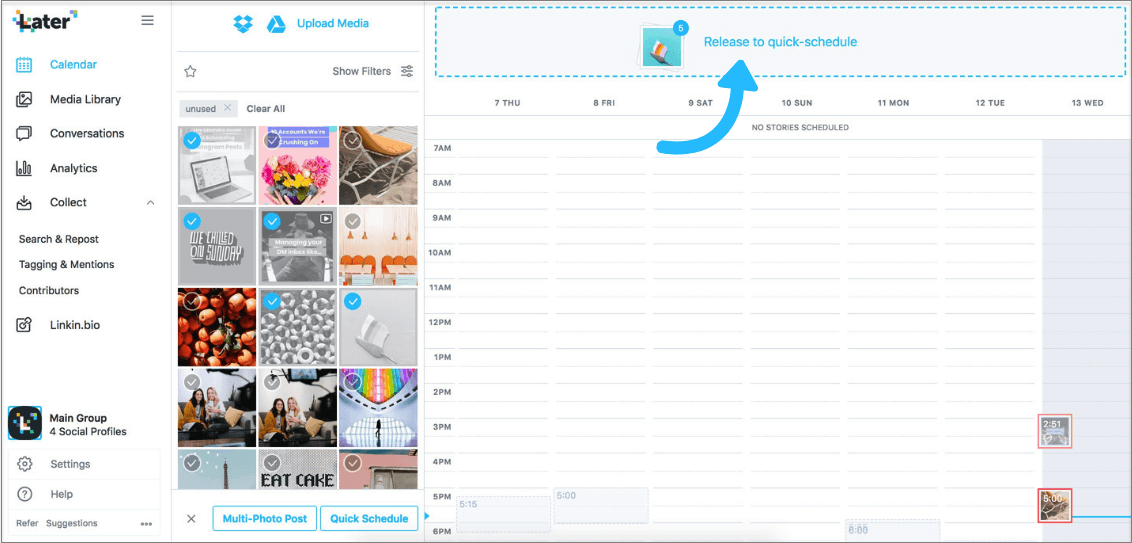 All Rights Reserved.
More recently, Facebook has pleased with the function. Now we can do delayed posting and schedule publications in advance without using additional programs and services.
There are 2 disadvantages to using autoposting services:
1. In some services, you need to enter the login and password from your Instagram account .
It is very easy to get on fake sites that simply collect logins and passwords of promiscuous social network users. I am too distrustful and I don’t want my account to be spammed in the comments “I earn up to 46 thousand a day with my child” after some time.
2. Other services access the account via API .
This method is safe for your account data, you just give access to actions on behalf of your Instagram profile without entering a login and password. But here another nuance appears: for suspicious actions, your profile may be banned. nine0009
For example: you have scheduled a publication through such a service at 18:00. And at 18:03 you go to Insta from your phone - like, post a story or just scroll through the feed. Instagram sees it like this: 2 active users on 1 account from 2 different devices from 2 different countries (such services are often placed outside the CIS) - it looks suspicious. Ban.
Therefore, in consultations, on live broadcasts and in private conversations, I did not recommend using different gliders. It's good that Facebook made this feature for Instagrammers. nine0009
To schedule a post, go to Creator Studio. There are two ways to get here:
Go to the Instagram tab , to do this, click on the logo on the Instagram logo. If this is your first time here, you will need to enter your username and password from your account. You trust the data to Facebook itself, and not to third-party applications, so you can not be afraid for your data. nine0009
In the upper left corner, click on the button " Create publication ". The service allows you to publish a post in the feed, or a video in IGTV.
Here you can also view account statistics: audience data, reach, engagement, impressions. In general, all the same numbers that are shown in the application. Below you can add other Instagram accounts.
Select " Instagram Feed " and the " Your Post " window will open. Insert text into it, upload a photo of the post, specify a geotag and, if necessary, enter hashtags. In one post, you can use up to 2200 characters, 30 hashtags and 30 mentions of other profiles. nine0009
You can publish the post right away, or you can set the desired date and time. See the little triangle on the right next to the " Post " button?
Click on it, select " Scheduled Publication " and enter the date and time.
Delayed posting via Facebook allows you to schedule posts several days in advance. It is very convenient when you are going on a trip or just tired of writing posts every day. Use delayed posting on Instagram, the feature is free and available to everyone. nine0009
If you have any questions, please write in the comments. I will answer.
Save not to lose:
Zarina Musina
practicing marketing copywriter
I have been writing since 2012. My specialization is selling texts for landing pages, websites and mailing lists. I train and improve the skills of copywriters. Subscribe and let's chat: VKontakte / Telegram channel / Chat in Telegram
The social network itself still has no special mechanics. But there are at least three suitable solutions. Detailed instructions on them were compiled for Pressfeed by the author of the blog SMMplanner Alexey Edakin.
The Instagram application and the website do not have a built-in function for delayed publications, as is done in VKontakte or Odnoklassniki. But on the other hand, Facebook, which owns Instagram, offers two tools at once - Creator Studio and Business Suite, where this function is available.
Creator Studio is Facebook's official content publishing tool. It is simple: you need to go to your Instagram account, click on the "Publish" button, set the release date. Everything, the post will go to the "future"!
Changing the type of account on InstagramFor delayed posting, your Instagram account must be switched to a business profile. To do this, go to Settings → Account → Change account type.
Link the page to Facebook right away: Edit profile → Page → Create or connect a page. nine0009 Associating an account with Facebook
Now let's start delayed posting.
Step 1. Go to the Facebook Creator Studio homepage. Select the tab to enter Instagram. You will need to enter your username and password on a new page.
Logging in via InstagramIf you have linked pages on Facebook and Instagram, log in via Facebook, so you can post to both social networks.
Step 2 . Click "Create Post" and select "Instagram Feed". nine0009 You can also make a delayed video in IGTV
Step 3. Create a post. Add a photo or upload several at once to make a carousel. There is no built-in editor, but you can mark an account and crop images to 1:1, 1.91:1 and 4:5 formats.
You can add a geotag to a post The maximum amount of text is 2200 characters. You can make 30 mentions and post 30 hashtags. All indents and paragraphs will be preserved - you do not need to use services to create invisible spaces. nine0009
In advanced settings, you can disable comments for a post and write alternative text for uploaded images.
Post advanced settingsStep 4. Making a delayed post. Click on the arrow next to the "Publish" button and select "Scheduled Post". We set the time and day.
A delayed post cannot be released immediately to the feed - the minimum time is +10 minutes from the current one. Planning for later dates is unlimited - you can set any day and time. nine0009 We plan to release a post on Instagram
As a result, the delayed post will appear in the profile exactly at the specified time, with all the tags and a breakdown by paragraphs in the text.
A delayed post is no different from a posted one from the applicationYou can view all posts in the "Content Library" section - the first in the list will be scheduled publications. In the same section, you can see the number of likes and comments for each post that appeared on your account.
Where to see the release date of post Creator Studio has a publication calendar - this is a visual content plan. A scheduled post can be edited or its deadline can be shifted - this helps to flexibly change the order of posts.
In the "Statistics" section, you can see the audience and study the dynamics of likes, coverage. The data is available for a week and a month and is no different from the statistics from the application.
How to view Instagram statistics on a computerCreator Studio has apps for iPhone and Android, but delayed posting is only available for Facebook. If you want to make scheduled posts on Instagram from your phone, you will need to install Business Suite. nine0009
Business Suite is a marketing platform for managing advertising and commercial accounts on Facebook and Instagram. The service has an online version and applications on the phone. The functionality is wider than that of Creator Studio, so you can also do delayed posting on Instagram.
Advertising no longer leads to the target audience?
Tell the media about your product for free
How it works
You need to transfer your Instagram account to a business profile and link it to Facebook - the Business Suite can only be accessed through this social network.
See instructions above.
After that, install Business Suite on the phone.
Step 1. Download Business Suite to your Android phone or iPhone.
Download Business Suite to phoneStep 2. Log in to Facebook by email and password. Click the "Publish" button in the center. We switch in the post editor to the Instagram profile. nine0009 If you do not switch, the post will be sent to both social networks at once
Step 3. Create a post. We write the text, add an image, mark people and put a geotag. We click "Next".
Writing a post. The restrictions are the same - 2,200 characters maximumStep 4. Set the exit time. Click "Publication scheduling options" → "Schedule for the future". Specify the date and time. Click "Schedule" and go back. Click "Publish".
We plan the release time of the post on Instagram The post went on hold. You can find it in the "Publications" → "Scheduled" section. You can edit the post, change the posting time, or delete it.
Business Suite, like Creator Studio, has access to profile statistics and a number of advanced features: you can reply to direct messages and run targeted ads. The only downside is that you can’t schedule stories in both services. But there is a solution.
To do this, we will use one of the delayed auto-posting services with the ability to edit stories - SMMplanner.
Step 1. Go to the SMMplanner website. We enter the account, create a new one or do it through any social network.
Step 2. Enter the menu. Go to the menu tab and select "Accounts".
To enter the menu, click in the upper left corner - the list will openStep 3. Connect your Instagram account. Select "Advanced API SMMplanner". Enter login and password. nine0009
What does this mean: posting via the Instagram API will not allow you to create delayed stories - its functionality is the same as Creator Studio.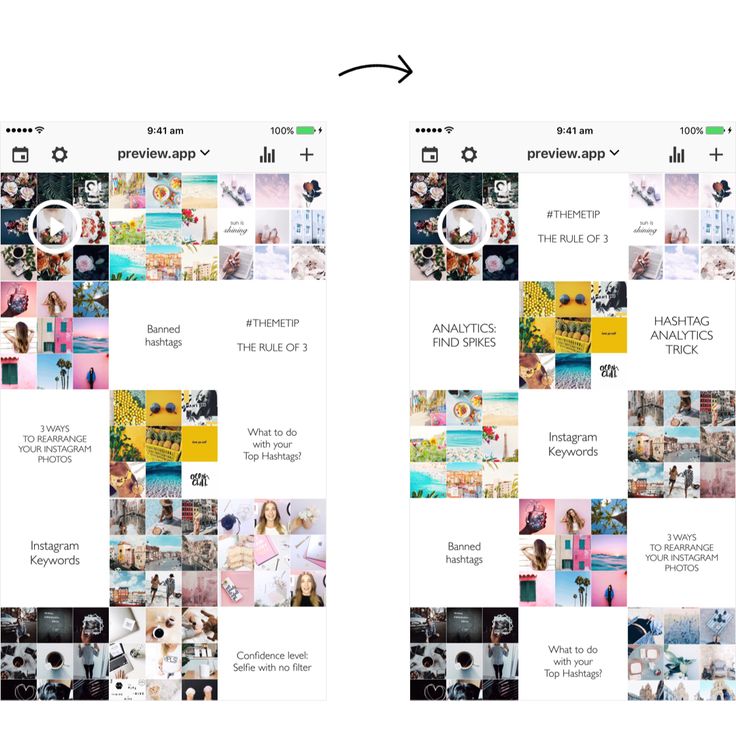
Step 4. Planning stories. We return to the "Posts" section and click "Schedule a story."
Planning a StoryStep 5. Creating a Story. First, select an account, then make a background - you can upload a photo or video. All stickers from the application are available, but if you need text, you will first have to add it to the image. You can use the Canva or Crello editors that are built right into SMMplanner. nine0009 Edit and set the timer
Step 6. Plan the time. Click "Schedule", set the date and time. After that, the story will appear in the "Posts" list - it can be edited or rescheduled for another time.
Instagram is in no hurry to introduce delayed posting directly into the application - apparently, it considers that this function is only needed by SMM-boxes and commercial accounts. Therefore, you have to use Business Suite, Creator Studio or SMMplanner. On the other hand, it is more convenient to create publications in these tools: the functionality is wider, it is possible to save drafts and plan a content grid.