If you’re here, that means you’re managing multiple Facebook Pages. Or trying to, at least.
Content creators, business owners, and social media marketers — you’re in the right place. Even if you just love reading about social media marketing, welcome!
Managing multiple Facebook business Pages has never been easier with the right tools, tips, and systems.
We’ll walk you through how to manage your Pages using either Facebook Business Suite or Hootsuite. Plus, we’ve got tips to keep your head on straight and advice on whether multiple Pages are right for your business.
Let’s go!
How to manage multiple Facebook pages
Should you have multiple Facebook Pages for your business?
Three lifesaving tips for managing multiple Facebook pages
Bonus: Get a free guide that shows you 8 Ways to Use Hootsuite to Help Your Work-Life Balance. Find out how to spend more time offline by automating many of your daily social media work tasks.
The good news is Facebook allows anyone with a Facebook user account to manage as many pages as they want.
The bad news is, if you manage multiple Facebook accounts, it can get out of hand fast — especially if you’ve got several brands to juggle.
If you’ve ever shared a photo of a bacon cheeseburger for your diner client, only to panic and wonder if you accidentally posted it to a vegan grocer’s feed instead, you know what we mean.
If you want to eliminate the confusion, there are two great systems to help manage your Pages:
Let’s take a look at how they work.
Hootsuite offers an easy way to manage multiple Facebook Pages.
Before you start, you need two things:
Now, let’s get started.
After creating an account, get to your Hootsuite dashboard. It should look like this:
Click on the yellow Get Started button in the center. Next, you’ll be prompted to connect your social media networks.
Click on Connect with Facebook for now. You can always add more networks later. Hit Add Facebook Page, then Select Destination and under that, Facebook.
Next, you’ll connect the Facebook account you want linked with your Hootsuite dashboard. Log in to Hootsuite with Facebook.
Note: you use your personal Facebook account to create and manage business or brand Pages. Don’t worry, you’re not going to accidentally post on your own feed!
Now, you can choose which Facebook Pages you want to add to Hootsuite.
Select the Facebook pages you’d like to appear on your dashboard.
Currently, you can add an unlimited number of Facebook Pages to your dashboard with a Hootsuite Enterprise account. For other plans, choose the increment that’s right for you. You can always upgrade later as your client base grows.
Note: You will only be able to add Facebook Pages of which you are the Page Admin or Editor. Once you do that, you’ll be able to add the Facebook pages to different tabs and Streams—which brings us to Boards!
On the left, under the Streams column, you’ll have the option to add a New Board. Streams display whatever content you choose from your connected social accounts. Boards are essentially buckets that hold your Streams.
You can add up to 20 boards, and each board can hold up to 10 streams.
Hit that plus sign icon and let’s add your first Board.
Let’s keep it simple for the first one and select Monitor my own content.
Then, choose Facebook and add one of your Pages. Hit Add to Dashboard to finish it off.
Rename your board on the left-hand column if you want, and boom! You’re done with step 1.
Now, you have the option to add Streams to your board. Hootsuite prompts you on the right to choose new Streams to add, or you can always hit the Add stream button on the navigation bar.
For the navigation bar Stream button, choose Facebook from the menu on the left and select the account you want to display under “Select an account. ” Lastly, select the type of stream you want on your dashboard from the drop-down list.
Now, your stream will show up on your board.
You can add Streams from different pages onto a single Board. For example, you can create a Board containing all the messages for your Facebook pages, making community management a breeze.
Or you can create multiple different Boards dedicated to your individual Facebook pages. If you manage different brands, you might want to keep all their page content on separate Boards.
Congratulations! Once you’ve created the Boards and Streams you want, you’re done! You just learned how to manage multiple Facebook pages via Hootsuite.
From your Hootsuite dashboard, you can now schedule Facebook posts in advance. You can write and reply to comments, like posts, and boost posts to reach more people.
Facebook Business Suite (the platform’s replacement for Facebook Business Manager) is a free Facebook Page management tool that allows you and your team to manage multiple Facebook Pages. If you’re looking for one place to manage all of your Facebook-related marketing projects, Business Suite is it.
With Business Suite, you’ll also be able to give multiple users access to things like your business’s Instagram account and product catalogs (via Commerce Manager). Think of it as the one-stop shop for your Facebook marketing and advertising needs.
If you like more in-depth access to Facebook analytics and more control over your Facebook ads, Facebook Business Suite is a good choice.
If you want to easily post on your pages, respond to followers, and keep all your social media accounts (not just Facebook) in one dashboard, though? A social media management platform like Hootsuite is your best bet.
You can also try Facebook’s Creator Studio. Creator Studio allows you to create and schedule posts, ads and Stories across multiple platforms. It’s pretty similar to Facebook Business Suite and has multiple overlapping features.
Business Suite is primarily designed for small businesses, especially ones with active ad accounts. Creator Studio, on the other hand, is better suited for content creators interested in monetization.
Read this in-depth comparison of Facebook Business Suite and Facebook Creator Studio for more.
To access your Facebook Business Suite, you simply need to log in to the Facebook account associated with your business Page. If you don’t have a business Page, you’ll want to create one. You’ll then be automatically redirected to Business Suite when you visit business.facebook.com on your desktop.
Alternatively, if you’re looking to manage multiple Facebook Pages on mobile, you can download the Meta Business Suite app on iOS or Android.
Your Facebook Pages will appear on the left-hand sidebar. Choose which Page you want to manage from the drop-down menu.
You can easily toggle in between Pages to manage your different brands. From here, you can create a post, reply to messages, schedule your posts, or check out your analytics.
If you can’t find a Page you’re looking for, you’ll have to get the Page admin to give you access to the Page or business asset group. Or alternatively, if you’re trying to give someone access to your business Page, follow these steps:
If your business has multiple audiences, it may be worth having multiple pages. This way, you can target content to specific audience segments.
Bonus: Get a free guide that shows you 8 Ways to Use Hootsuite to Help Your Work-Life Balance. Find out how to spend more time offline by automating many of your daily social media work tasks.
Download now
Take Buzzfeed, for example. With over 90 Pages on Facebook, Buzzfeed serves not only different demographics like Buzzfeed Parents but also different audience wants, like Buzzfeed News. They have divisions within Pages, too — Tasty is Buzzfeed’s recipe Page, and, as an off-shoot of that, they also have Tasty Vegetarian.
Your following might not be large enough to support 90 different Pages. But, if you have content that only some of your audience wants to see, it might be worth making a second Facebook Page to serve them.
Are multiple Pages not right for your business, but you still want to support the different communities that follow your brand? Then try creating separate Groups.
While Tasty doesn’t have a Tasty Baking Page, they do have a Tasty Bake Shop Group. Baking content is rolled into the Tasty Page because their followers love baking recipes, but The Tasty Bake Shop acts as a baker’s community hub.
Source: Buzzfeed Tasty on Facebook
Now you can manage your multiple Facebook Pages without crying. But we think that bar is pretty low, so we’ve pulled together three ways that’ll make managing Pages bearable and even — dare we say — fun!
1. Social media content calendars are your new best friendOh, how we love a nicely organized social media content calendar! As a digital marketer, content calendars are your new best friend.
A content calendar has two massive benefits:
 After all, social media is a conversation — sometimes, you have to put down the bullhorn.Though your ideal content mix is specific to your brand, the rule of thirds can help you get started:
For more on this, check out our article on how to create a social media content calendar.
2. Automate everything you can!You don’t have time to publish each post individually or pull analytics every time you’ve got a debrief! And even if you do have the time, you should spend it doing something else — like creating evergreen content (see below). Hootsuite or another social management platform can do the work for you.
Once you’ve got your content calendar in place, your next step is to schedule your posts, so they publish automatically. Figure out the best time of day to post on Facebook, and plan accordingly.
For your reports, set up Hootsuite Analytics to automatically pull your reports each month. Now, dust your shoulders off and go outside! You’ve earned it.
3. A bank of evergreen content is worth its weight in goldNever run out of content ideas again.
Okay, that might be an over-promise. But there’s nothing worse than staring at a computer screen with your mind absolutely blank. Or frantically searching for one of those social media holidays and wondering if National Hat Day makes sense for your client.
With a solid bank of evergreen content, you’ll never have to worry about scrambling to create a post again. Evergreen content refers to topics and content you can share at any time of the year. Instead of trending news, seasonal-specific content, and holiday-specific posts, think timeless .
If you’re like Tasty, you can share recipes people eat year-round.
Source: Buzzfeed Tasty on Facebook
Brainstorm topics in your industry that are always popular, then create a bank of content to use later. For more on this, check out our article on how to repurpose content. It’ll show you how to take articles you’ve already published and get the most out of them on social media.
We hope this article taught you how to manage multiple Facebook business Pages without crying.
Manage multiple Facebook pages alongside your other social channels and save time using Hootsuite. Schedule posts, share video, engage with followers, and measure the impact of your efforts. Try it free today.
Get Started
Stop guessing and get personalized recommendations for the best times to post on social media with Hootsuite.
Free 30-Day Trial
/en/facebook101/facebook-groups/content/
Many companies and organizations now use Facebook Pages instead of creating their own websites, or as another way to connect with the people who use their services. A Page allows you to post basic information about your organization on Facebook. Once you've created a Page, you can then invite people to like the Page and share posts and updates with them. Anyone who likes the Page can also leave reviews, ask questions, and more.
Visit the GCFLearnFree.org Facebook Page to see how we use this feature to share updates about the site and answer questions from our users.
You must already have your own Facebook account before you can create a Facebook Page. If you don't have an account, review our lesson on getting started with Facebook.
There are many ways to customize the appearance of your Facebook page. Here are some basic tips that will help to make your page look more polished and professional.
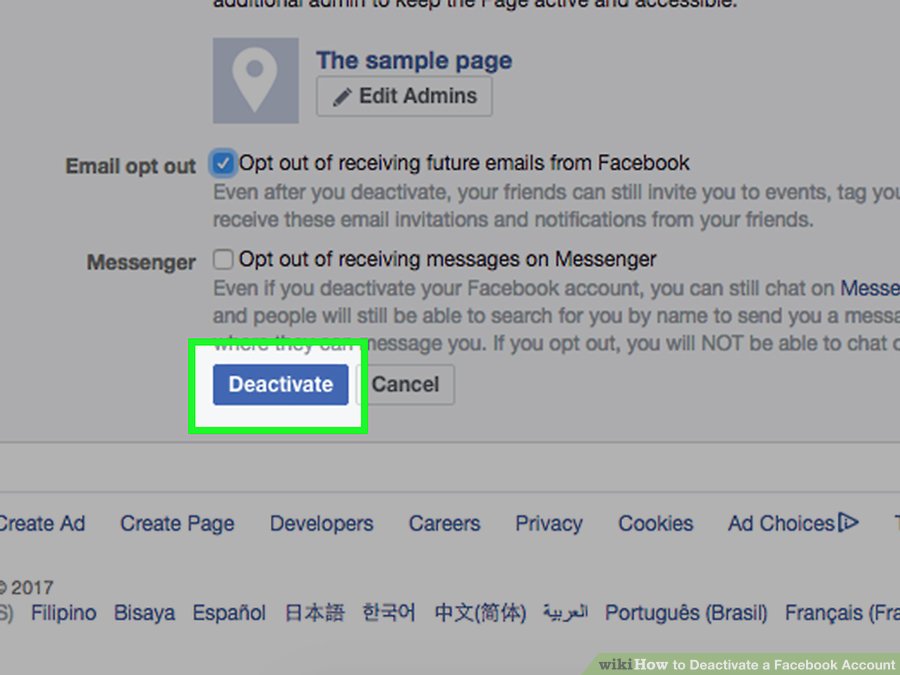
After you create a Facebook page, you'll be the only person who can edit the page information and post updates to the page's Timeline. However, if you'd like to give other people permission to do these things, you can add them as page administrators. To add a page administrator, click Settings near the top-right, then select Page Roles.
While there are many ways to manage a page, these tips should help you get started.

If you want even more information on Facebook pages, we recommend these resources:
Previous: Facebook Groups
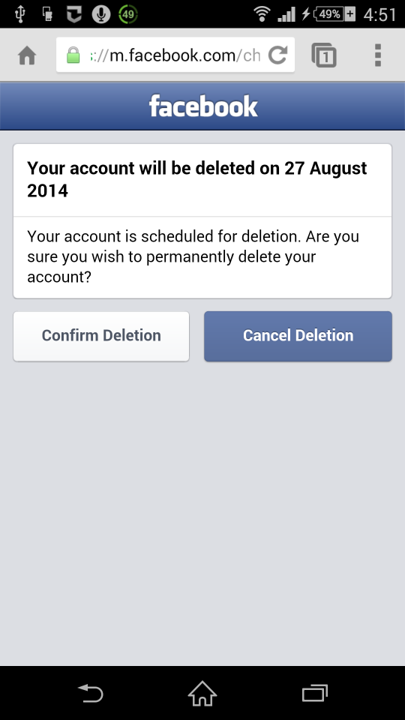
Next:Locked Out of Your Facebook Account?
/en/facebook101/locked-out-of-your-facebook-account/content/
Help Center
Using Facebook
Pages
We're updating the mobile version of Facebook. com. More
You can manage the classic or new version of Pages. The new version is not yet available for all Pages.
New version of Pages
If you have a new version of a Facebook Page and have full control over it, you can control what people can access and perform certain tasks on the Page. You can grant access rights to a person at any time, as well as change or revoke them. Learn more about access rights in the new version of Pages.
Cannot grant access to the Page to a gray account. If you want to grant access to a Page to a person using a gray account, they will need to access the Page from their personal Facebook account or create a new one. You can then grant that new account access to the Page.
Note. To manage access to a Page, you need to switch to it.
How do I grant access to Facebook?
How do I grant access to perform certain tasks?
How do I change access rights to perform certain tasks?
How do I revoke access to a Facebook Page or permission to perform certain tasks?
Classic Pages
Only page administrators can manage roles on a Page. A Role on a Page can be assigned to any number of people. Learn more about how to find out your role and what the powers of roles are.
In some cases, gray accounts cannot be made Page admins. If you have a gray account and want to become a Page admin, create a new account.
Mobile Classic
How do I assign a role?
If you are an administrator:
Click the icon in the upper right corner of the Facebook window.
Click Pages.
Go to your Page and click More.
Click Edit Settings > Roles on the Page.
Click Add Person to Page. You may need to enter a password to continue.
Start typing a name and select the person from the list that appears.
Click a username to select a role, and then click Add.
Note. People who aren't on your friends list must accept your invitation before they can manage a Page.
How to remove a role?
If you are an administrator:
Click the icon in the upper right corner of the Facebook window.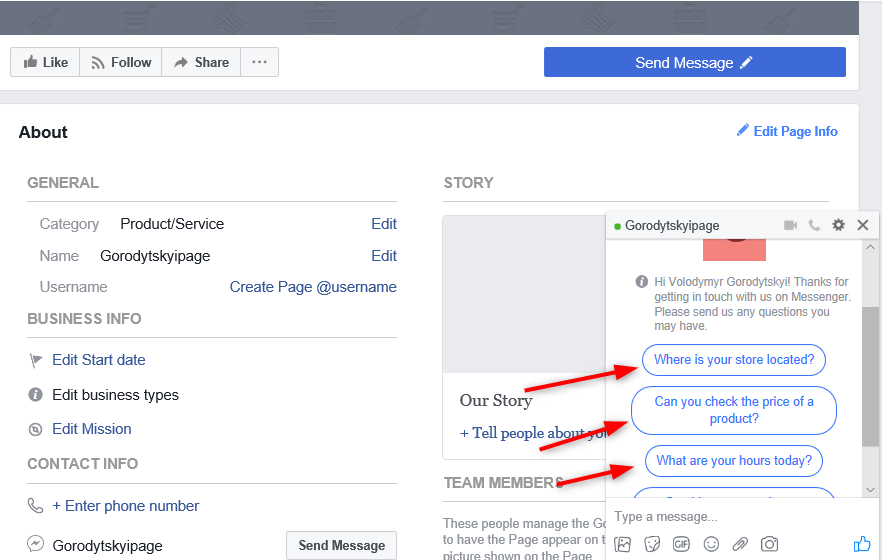
Click Pages.
Go to Page and click More.
Click Edit Settings > Roles on the Page.
Click next to the name of the person you want to remove. You may need to enter a password to continue.
Click Remove and then confirm your choice.
You can remove yourself from the Page at any time, but if you're the only admin, you'll need to add another admin first.
How to change your role
If you are an administrator:
Click the icon in the upper right corner of the Facebook window.
Click Pages.
Go to your Page and click More.
Click Edit Settings > Roles on the Page.
Click next to the name of the person whose role you want to change. You may need to enter a password to continue.
Select a new role and click Save.
New version for mobile browser
How to assign a role?
To add a new user who is not your Facebook friend, log in to Facebook from a computer.
If the user is your Facebook friend:
Click the icon in the top right corner of the Facebook window.
Click Pages.
Go to the Page and click the icon in the upper right corner of the screen.
Click Page Roles and then Add User.
Find the friend you want to add, or select a friend from the recommendations and click Choose a role on the Page. You may need to enter a password to continue.
Click a username to select a role, and then click Add.
Depending on the settings selected, the user may receive a notification or an email that they have been assigned a new role.
How to change the role?
If you are an administrator:
Click the icon in the upper right corner of the Facebook window.
Click Pages.
Go to the Page and click the icon in the upper right corner of the screen.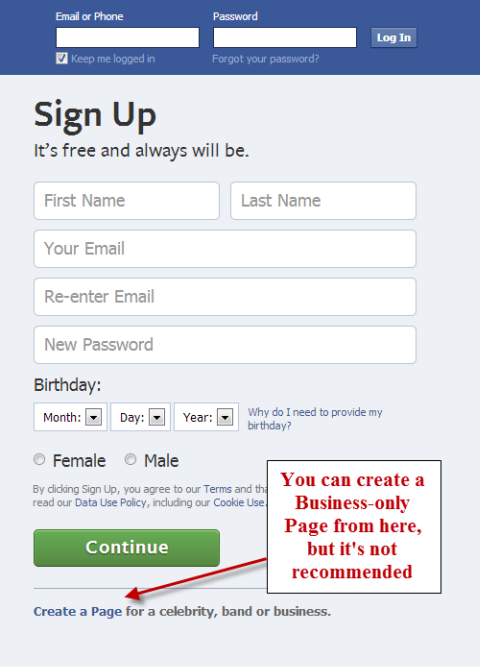
Click Roles on the Page.
Click next to the name of the person whose role you want to change. You may need to enter a password to continue.
Select a new role and click Save.
How to remove the role
If you are an administrator:
Click the icon in the upper right corner of the Facebook window.
Click Pages.
Go to the Page and click the icon in the upper right corner of the screen.
Click Roles on the Page.
Click next to the name of the person you want to remove. You may need to enter a password to continue.
Click Delete and then click Delete again to confirm the action.
Note. You will not be able to remove or remove the roles of other administrators until seven days after gaining the administrator role.
Was the article helpful?
Related articles
Creating and editing a Facebook avatar
About and accessing Page roles
Selecting an audience on Facebook
How do I add a restaurant menu to a Facebook Page, or edit or remove it?
How do I manage tours on my Facebook Page?
Information
Privacy
Terms and Conditions
Advertising Preferences
Jobs
Cookies
Create an Ad
Create a Page
How to Bypass a Second Facebook Social Page networksHome » Social networks » Facebook
Author Admin Read 3 min Views 2.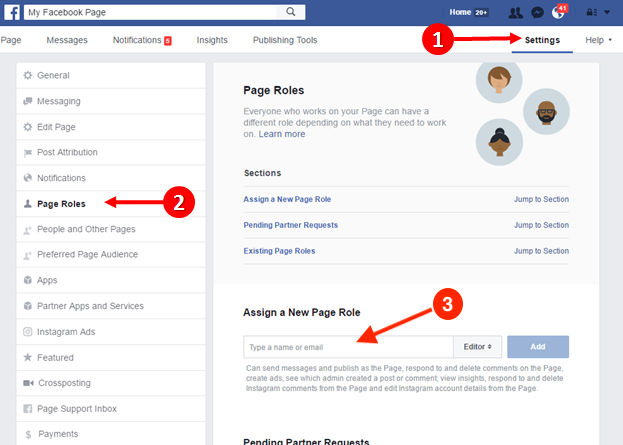 6k Updated
How to create a new Facebook account if you have another ? Everything is not so simple here. According to Facebook rules, each user can have only one account. The rest will be blocked. But there are several ways to get around the limitation. And now we will tell about them.
Contents
This is the easiest and most affordable way for everyone. After all, if there is at least some difference in the name and surname, then Facebook will consider it a completely different account. But you will need an alternative mailbox or a different phone number.
After all, registration takes place via telephone or e-mail. However, now we will consider this process in more detail. Here is an instruction that tells how and what to do in this case.
 And you can copy the code, return to the verification page, enter it in the appropriate box and click "Continue" .
This is how you create an account on the social network Facebook. Just make sure that the data you enter does not really match the information from the old account. Otherwise, the system will block the newly created account.
If you used your phone number to register, you will receive a message with a verification code on your number. You will need to enter it in the appropriate field on the verification page. So the phone number must be working and used. Otherwise, such registration will not be possible.
This is not really an account. Rather, it is a public or a group. But in some cases it can be used for personal purposes. It will be a little weird. But if you do not have a backup mail or phone, then this is the only option.
The process itself is not particularly complicated. But Facebook's confusing interface can cause some problems. Therefore, here is a detailed instruction telling about what and how to do it. It will save you from mistakes.
After that, the page will be available to users. It will be possible to gather your friends in the community and communicate with them using public messages and its wall. Not very convenient, but no one will delete this page for sure.
As part of this article, we talked about how to create a Facebook account if you already have one. The rules of the social network do not allow this, but there are several ways to get around the ban.