Facebook cover photo is important if you want to create a complete impression of your online profile.
Your profile and cover photos are how hundreds or maybe thousands of people recognize you. They make the first impression when someone searches for you on Facebook or when you send a friend request. Facebook has specific guidelines for their sizes. So to make the best first impression, it's important to know how to resize pictures for Facebook profile, your photos and optimize them for this platform.
Facebook has set standards for profile pictures. When you upload a photo, the website automatically crops it to fit in the available space. While this is handy, the cropping isn’t always accurate and can lead to some unusual framing. Remember that a profile photo is what introduces you to other people, so you want it to look good. Therefore, you should make resize for Facebook profile pictures, before uploading them.
Before discussing options for resizing you should know that the sizes of Facebook cover and profile photos are 851×315 pixels and 170×170 pixels, respectively.
The ideal resolution for a Facebook photo is 826×462 pixels for a computer or 640 by 360 for a smartphone. It's better to edit cover photos on Facebook in this way before uploading them.
Now that you understand why it’s important to resize your photos for Facebook cover and profile pictures, let’s take a look at some simple ways to do that:
If you don’t generally edit photos, then you might want to use an online tool to resize your image to fit the Facebook cover photo or profile photo guidelines. There are quite a few online Facebook cover photo resizers to help you do this, but we recommend PicMonkey or Canva.
If you want to know how to make Facebook profile picture fit, read below. To resize a photo with PicMonkey, simply go to the website and follow these steps:
But how to scale to fit Facebook profile picture for 2022 if you don’t like PicMonkey? Then you can go with Canva instead to design your very own custom cover photos:
If you already have editing software or are open to downloading software in order to resize photos for Facebook, then, current instruments like Photoshop and Luminar Neo are the best options. Before using them, it is advisable to find a tutorial on the Internet.
Of the two, Luminar Neo is by far the easiest as it comes with a streamlined interface and simple controls that don’t require you to spend weeks learning them. Luminar Neo isn’t only a quick and easy way to edit original images; it has also established itself as a powerful RAW converter. This is why it might be the one photo editor that fits all your needs, whether you want. You can create amazing photos from RAW files, design pretty collages, change color, aspect ratio, and brightness or use another method to improve your pictures.
Here’s how to resize a photo for Facebook with Luminar Neo:
And you know the best thing about giving Luminar Neo a shot? You can download a free trial to check it out before you spend any money.
If you already have Photoshop on your system, then you can follow these steps to resize your photos for Facebook cover or profile pictures:
If you wonder how to fit Facebook profile picture in the circle, read below. Click on the icon in the upper right corner of the Facebook display and select “My Name”. Upload the original photo in the “Profile Photo” menu, then click “Change Profile Photo” and add a frame, then click “Save changes”.
Before you resize any photo for Facebook, you should know what's matter in a good cover photo. It is especially important for all types of pages, including business pages, creative, or media accounts. If you provide any sort of service to your visitor, you need to attract the viewer to your content. For example, if you have a Facebook photography page, then you need to showcase your best photos at the top of your page. A great way to do this is to create a collage of your images, so people can see at a glance the different kinds of photos you take.
You should also change your cover photos now and then to put new content in front of people. Keeping the same image on your page for a long time makes people think that you aren’t very active and might not be the best when it comes to providing quick customer service. As you can see, a Facebook cover photo is more important than people usually think. If you're wondering how to make a full picture fit on Facebook profile, read below.
When creating an album, select “High Resolution”. You will find this button in the settings panel or under the images. Make sure that you saved the results.
Facebook is generally thought of as a great platform for people to connect with family and friends, and it definitely is that.
But it can be so much more if you use it effectively. We’ve written this guide on how to resize a photo for Facebook not only to help you make your profile look good but also to help you create an efficient business profile.
Creating a successful business page on Facebook requires posting regularly, sharing content that’s relevant to your readers, and resizing your photos to fit Facebook profile guidelines.
If you’re ready to supercharge your Facebook profile, then take the first step and resize your photos for Facebook!
Your Quick Answer:
To upload your full-size Facebook profile picture, first of all, upload a profile picture on your Facebook from mobile, then proceed by tapping onto the ‘Use This Photo’ option and that picture will be set as your Facebook profile picture.
The profile picture will be fully visible in lower pixels but that will be totally uncropped version of the original image.
If you’re on a PC, then just visit m.facebook.com and upload and click on ‘Use This Photo’ to set the image as your profile picture.
When you set a photo to your Facebook profile picture then it will display as in a circle, you can zoom in to crop it or leave it as it is to skip cropping the image.
If you upload a full-size higher pixels image on your Facebook profile then upon uploading you will see the marker on the image asking you to crop the image, but you can ignore the cropping option.
Facebook recently made an update where you would not see the skip cropping as the marker will not force crop your image now, rather that is optional now if you don’t want to crop the image.
You can also follow this,
1️⃣ Open the Facebook Image Resizer online on your browser.
2️⃣ Upload an image there and resize it accordingly.
3️⃣ Now, download the image to upload on Facebook.
The online tools there can work in the same methods mentioned here in order to resize the image.
You can use Facebook profile picture resizer tools in order to scale the images to set fully on the profile.
To skip cropping your Facebook profile picture,
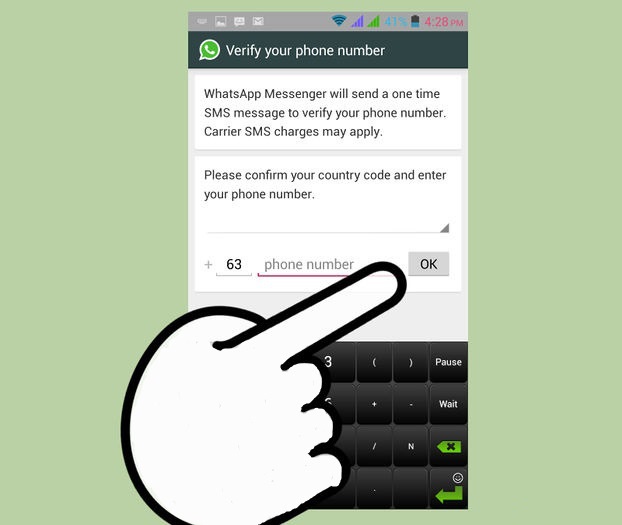
Step 1: First of all, go to m.facebook.com, then tap on DP to upload an image.
Step 2: Next, just tap on the ‘Upload a New Photo‘ option and finally upload one.
Step 3: Once uploaded, tap on the ‘Use This Photo’ option and this will be set without the crop.
Contents
Follow the steps of the apps below:
⭐️ Features:
◘ Easy-to-use app that is free and uses ads.
◘ Allows you to change aspect ratios according to the requirements of different social media apps, so you don’t have to crop photos.
◘ Safe app that only asks for permission to download photos.
🔴 Steps To Follow:
Step 1: Go to Play Store and type “No Crop Profile Pic Customizer” or Go to: https://play.google.com/store/apps/details?id=com.tppm.nocrop.profile.pic.customizer&hl=en_US&gl=US. Click on Install.
Step 2: Open the app and click on “Gallery” and select an image file that you want to upload.
Step 3: Change the aspect ratio of the photo and edit it in a way that fits into your profile photo without asking you to crop it. Click on the download icon at the top to save the photo.
Step 4: Upload the photo as your profile photo by going to your profile and “Edit profile” and clicking on “Edit” beside Profile Picture. Select a photo and click on “SAVE”.
⭐️ Features:
◘ It has a trial period of 3 days, offering weekly and monthly subscriptions after that.
◘ Allows you to resize images without cropping but also offers a range of options to edit.
◘ You can add text and stickers to the profile photo. Easy to use app that works best on iOS 12.2 and above.
🔴 Steps To Follow:
Step 1: Go on to the App Store and search for No Crop or go to: https://apps.apple.com/ky/app/no-crop-video-pictures-fit/id1333491559 and click on “GET” to install the app.
Step 2: Click on the option to upload, and select a photo.
Step 3: Resize the photo and edit it using the tools provided and click on the tick mark option at the top right. Then click on “Save” to download the photo.
Step 4: Go to your profile on Facebook; click on “Edit Profile”, and “Edit” and select a photo. Click on “SAVE” and upload the profile picture.
Try the following online tools:
⭐️ Features:
◘ Allows you to paste the links of photos as well as upload them.
◘ The image is automatically edited to fit your cover photo without cropping.
◘ Allows easy downloading of photos. Does not use ads.
🔴 Steps To Follow:
Step 1: Open your web browser and click on search and paste this link: https://promo.com/tools/image-resizer/.
Step 2: You have to click on the white “Upload Image” option. Select a photo from your gallery and click on “Done” to upload it.
Step 3: Select the image below “Facebook cover photo” and select “Download”. Then log in to finish the download.
Step 4: Go to Facebook, to your profile, and tap your cover photo. Select “Upload Photo”, choose a photo and then click on “SAVE” without resizing it.
⭐️ Features:
◘ Although the changing of size to fit Facebook is automatic, you can change the width and height to your liking.
◘ Allows you to change the format of the photo to jpeg and png.
◘ You can rotate and reverse the image before downloading.
It is ad-free.
🔴 Steps To Use:
Step 1: Go to your browser and search for: https://retoucher.online/image-resizer.
Step 2: Click on “Upload Image”; select a photo from your gallery.
Step 3: Choose the width and height to resize it to. Select the photo format and click on “Download” to save the resized image.
Step 4: Navigate to your profile on Facebook and click on your cover photo and then on “Upload Photo”. Select the photo and click on “SAVE”.
Sometimes it becomes a lot difficult when you frequently keep changing your Facebook profile picture. To fit the requirements of Facebook before uploading your profile picture you have to make sure that your profile picture is of perfect size or pixels.
But if you are looking for ways to skip this cropping of image feature of Facebook all you have to do is follow the requirements given below:
If you want to avoid cropping image features on Facebook make sure that the image of the photograph that you want to upload as your profile picture should be of the perfect size of pixels.
Before you finally upload your profile picture make sure that the edges of your selected picture fit the area provided for your profile picture.
You can even directly proceed with uploading a profile picture by clicking on the ‘Skip cropping’ feature.
You can do this by using the classic Facebook interface present on the desktop when uploading a profile picture. However, this feature has been removed from the new Facebook interface.
To upload a profile picture for your Facebook ID when using your personal computer, or laptop then you can just upload and ignore clicking on the ‘Crop Photo’ option.
These steps will guide you to upload your Facebook profile picture by skipping the cropping option and quickly uploading your Facebook profile without cropping it in two different ways.
If you don’t want to crop the image of your Facebook profile picture,
Step 1: First of all, go to Facebook. com from your PC Chrome browser.
Step 2: Now, upload an image using the ‘Upload Photo‘ option.
Step 3: You will have an option, just don’t tap on the ‘Crop Photo’ option, it will not be cropped.
That’s all, also there is another option…let’s try this one.
To skip cropping the Facebook profile picture,
Step 1: Firstly, open https://mbasic.facebook.com/ from your browser and open the classic mode.
Step 2: Once you are logged in to your Facebook account click on your profile picture to go to the main page of your profile. Click on the small camera icon that you see at the right bottom of your profile picture. Next, click on the ‘Change Profile Picture‘ and then select the photos that you wish to upload as your profile picture.
Step 3: Select the photo and you will see it in the profile circle. Just below your profile photo, you can see two options: ‘Make temporary’ and ‘Skip cropping’. Click on the ‘Skip cropping‘ option and simply proceed by saving it as your profile picture.
Note: The new version of Facebook would not show the option. To make sure that you get the option of ‘Skip cropping’ when uploading a profile picture on Facebook you need to use the classic Facebook interface on the desktop which by default gives you the option of ‘Skip cropping’.
There are particular sizes to upload whether you are on PC or mobile, let’s follow the pixels:
These other required sizes for a profile picture on Facebook. Show that your profile picture is displayed within the limits of the sizes.
The size of your profile picture that you wish to upload on Facebook should not be more than these above-mentioned sizes depending on the devices you use be it desktop or mobile.
If you are using your personal computer or your laptop, your selected photo for your profile picture should not exceed more than 180 pixels in size.
Similarly, If you are using your mobile phone to update your profile picture on Facebook the size of the selected photograph should not be more than 128 pixels.
If you follow the above-mentioned sizes for your photographs to be uploaded as your profile picture, avoid cropping the image. This site will make sure that your photo fits the profile circle space exclusively given to update or set a profile picture on Facebook.
If you’re on mobile then you will be able to upload and use the photo as a profile picture from m.facebook.com through any browser (Chrome is recommended). You can do this in a few steps but first, make sure your image is under 180 pixels in order to add it without cropping.
To skip cropping your Facebook profile picture,
Step 1: Firstly, open the chrome browser and go to m. facebook.com.
Step 2: Now go to profile and tap on the cam icon on DP.
Step 3: Next, tap on the ‘Upload Photo’ option and then select one.
Step 4: Now, on the next screen, tap on ‘Update‘ without crop.
That’s all you’ve to do. Your profile picture is now set without cropping from your mobile device.
Also Read:
Your Facebook cover photo is the first thing people will notice when they see your page. When you're looking to create the best first impression, everything matters: size, content, text, mobile readability, etc.
In this guide, we'll look at Facebook photo and video size rules, templates, and examples. Let's talk about what to do and not to do, and much more, which will help you create the most effective and impressive cover photo and video.
In order for everyone to be on the same wavelength and understand what will be discussed, it is necessary to go through the basic terminology that will be used in this article. You won't find a lot of technical information, but there are some terms you still need to know. So:
A pixel (px) is a constituent element of a digital image, as well as the smallest unit of information. For example, an image might be 640px wide by 512px high, which is easy to see when you zoom in.
PNG (portable network graphics or “portable network graphics format”) is one of the most commonly used formats in which image compression is lossless.
Facebook cover photo is a large high resolution image. But with such a huge number of rules and sizes (covers, avatars, links to photo publications, etc. ), it's hard not to get confused. Here are some specifications:
For desktop users, your cover photo is displayed at 820px wide by 312px high. For those using the mobile version, the photo will be limited to 640px wide and 360px high. If the photo does not fit within the designated frames, it will be automatically resized to fit.
Luckily for Facebook users, all photos are scaled to fit the cover space. Depending on the original dimensions of the image, it will be stretched or cropped. Automatic correction does not distort the image. However, the image may become slightly blurry if it is small and has a low resolution.
The cover photo is the largest image on your page. It can make a good impression of you when you first visit the page, but it can also destroy it. If the selected image does not meet the requirements, then you may experience some difficulties. For example, an image can be "pixelated" as discussed earlier. Also, part of the text may be “cut off” during correction, or the entire layout may look awkward.
As shown in the picture below, both the mobile and desktop versions cut off significant portions of the original image. Therefore, it is best to position the main part of the image and text closer to the center. Then you will avoid the risk of losing important information.
Some users are annoyed by the inability to upload different images for mobile and desktop versions. To avoid this problem, you need to choose an image that will fit both formats. The generally accepted size is 820 x 360 px. In the images below, you can see how Facebook automatically resizes the same image that was already created with this fact in mind.
”
There are more reasons to make your pages mobile friendly. For example, 71% of website visitors are mobile users. Thus, it is very useful to make your content available to all users.
All these rules and sizing requirements make the process of creating a Facebook cover photo very intimidating. To make your task easier, we have collected practical recommendations and the most important tips. There's plenty of room for creativity - all you need to do is make sure that your cover image follows three basic principles:
Text - A short slogan can play an important role in attracting attention. Small text serves as an additional way to interact with users and allows you to effectively promote your brand message.
Emotions - if you get an emotional response from visitors, they are more likely to remember the content they viewed. For example, creating a connection between a brand and feelings of friendliness, inspiration, warmth, and happiness has a positive effect on users' purchasing decisions.
Relevance – Your cover photo should be relevant to your audience as well as your brand message. Find a balance between making the cover useful for searchers and reinforcing your company's interests.
Once you've mastered these basic principles, you can move on to the rest of the helpful tips. Let's explore practical tips on how to create relevant and visually memorable Facebook covers:

 It also doesn't mean that you have to conform to minimalism. The overall impression should be such that your image becomes recognizable - so the less details it has, the easier it is to remember.
  However, remember that the layout for mobile versions is different.
  Once you've settled on a particular image, test it on different devices to see how it performs on different layouts and screen sizes.
 As long as you feel free to put any image on your Facebook cover, some decisions can have a detrimental effect on your page's performance. Here are some common mistakes and reasons why you should avoid them:
 Make sure the text is fully visible in both versions and that the cover does not repeat the image from
 Many brands are already following the above guidelines. Here are some examples of great Facebook covers you can use.
The first is a graphic design tool that uses its cover image to encourage users to create posts with their hashtag. It combines mutually beneficial colors, elegant design and a clear brand logo. Active buttons with text attract the attention of visitors, but do not put pressure on them with an excess of information.
Next is a TV network that is promoting one of their most popular shows right now. This poster adds relevance to the page and can be used in other social media posts. networks to complement the entire marketing campaign. The colors are very bright and prominent, and there is no detail around the edges, which helps users concentrate better.
Finally, here is an example of how to arrange an image so that it displays correctly on all devices. The cover is right-aligned, which emphasizes the avatar on the left and balances the overall picture. The company specializes in retro style accessories, and the photo suits the concept and atmosphere of the brand.
Suppose you have an image that you want to crop according to Facebook's requirements. Here's what you need to do.
Step 1. Open the free online editor pixlr.com .
Step 2. Load the image into the workspace.
Step 3. Change the "Borders" box to "Output Size" and set the width and height to 820 and 360 respectively (this is the optimal image size for both desktop and mobile versions). Drag the cropping tool according to how you want to crop the image and hit enter.
Step 4. Go to "File" - "Save As..." and change the format to PNG. Save the image to your computer.
Step 5. Go to your Facebook page. Click "Add Cover" or "Change Cover" in the top left corner and select "Upload Photo".
Step 6. Click on the desired image and save the new cover. Ready!
Instead of a cover photo, Facebook business pages now have the ability to upload a video cover. The main purpose of this feature is to increase the number of interactions with users. The video format opens up a lot of possibilities for what a brand can share: provide useful information, showcase your product/services, show you behind the scenes, etc.
The Facebook cover video needs to be at least 820 x 312 px, but the recommended dimensions are 820 x 462 px. The resolution can be up to 1080p and the file size must be no larger than 1.75 GB in .mp4 or .mov format. Video length must be between 20 and 90 seconds.
Keep in mind that all videos play in a loop, which means that the video will play continuously until the user leaves the page. Thus, you need to make sure that it starts and ends with a smooth loop, that is, the moment of merging the end of the video with its beginning passes naturally.
The video should not contain anything annoying or too bright, so as not to cause discomfort during repeated viewing. This can create the exact opposite effect of what you would like your cover to achieve. Instead, try to create balanced and engaging content without being too intrusive. Just like with images, brands can present and promote their products, add clickable buttons, add some text, and share their messages with the audience.
Since the ability to add a cover video is a recent addition to Facebook, there aren't too many examples. Nevertheless, we have collected some of the most interesting ones that demonstrate the possibilities of this format.
This monthly magazine uses a cover format to draw attention to its upcoming issue. The video zooms in smoothly enough so that the text remains legible and all the colors used are pronounced. At first glance, it doesn't look like a magazine cover at all, which encourages readers to take the extra time to look closely and figure out what it is.
The following example is an online training platform. The motivational component fits perfectly with the main message of the brand. You can also easily post the video to any other social network. networks. The animation is very simple and at the same time creative, it contains enough elements to keep users interested and make them take a closer look.
The most minimalistic example is a scalloped pattern and a clothing brand. This calm movement is exactly what we meant when we said "don't be too intrusive." It captures the essence of the brand and conveys the feeling that the customer will experience in the process of using their product.
Master these tricks and create professional posts oes hows $
General khaki on Instagram
khaki for publication photo and video
stories
Hacks for profile description
Hacks for hashtag ov
Hacks for private messages in Direct
Disable the posts of users that annoy you without risking offending them by unsubscribing.
Bring frequently used filters forward for faster publishing.

Looking for inspiration? Why not take another look at what has already inspired you.
How to do it:
Don't let anyone with access to your phone know how obsessed you are with fake friends.
How to do it:
Permanently remove certain searches (accounts, hashtags, places, etc. ) so they don't appear in searches.
Never miss the posts of your favorite people and brands!
If you change your mind, the option to turn off notifications is in the same place.
On Instagram, you can add up to 5 accounts under the same email address. And you don't have to sign in and out of the app to switch between them.
To switch between accounts you have added:
Pinterest is not listed as one of the app options where you can post an Instagram post, but there are workarounds for both the Instagram mobile app and desktop.

If you need to hide an offensive comment or erase a typo, deleting comments is easy.

Dealing with a troll? Comment controls allow you to filter and block comments containing certain keywords.
When you enable filtering, it applies to both new and existing comments in your posts. When you disable comment filtering, hidden comments on your posts will be restored.
Note . You can change this setting even after publishing. Navigate to the post by clicking the three dots icon above it and select Enable commenting . You can also disable comments on a previously posted post by following the same steps.
 Reply to comments faster
 Do your followers ask a lot of the same questions? For example: “When will the item be back in stock?” Or “What days do you not work?”
For iOS users, there is a feature that will help you quickly and conveniently answer these questions.

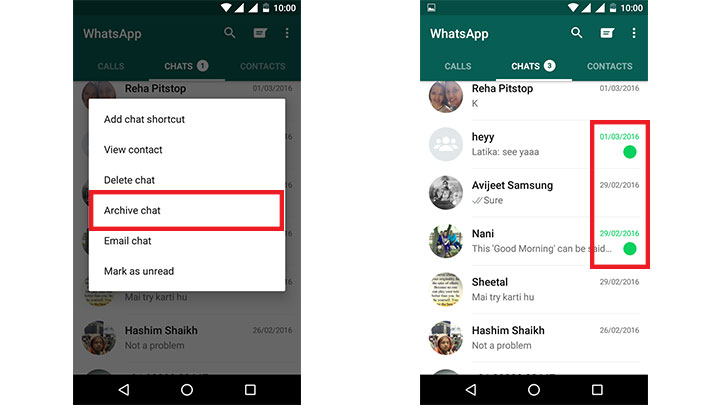
The perfect way to draw inspiration. You can also use this feature to keep an eye on competitors.
This is possible thanks to the archiving function.


If you prefer long National Geographic captions, this hack will make your text more readable.
Note . Typing will start a new line, but will not create a gap in the text that you want to separate one paragraph from another. Create a caption in the notes app and copy it to Instagram. To break lines further, you can use punctuation, such as a bullet or period, to leave room for a blank line.
How to do it right - watch the video in the original article on the Hootsuite blog.
Get creative and enjoy Instagram's grid format.
 So that they occupy the entire line in a single unified form.
Image from reynoldkitchens Instagram account
For those who want a photo that looks like the real thing, but not quite #nofilter.
These are Instagram Stories that will never disappear!

If the sound is bad and/or unimpressive, you can also remove it so it doesn't distract your audience.
This can also be done in stories. To mute the sound, after recording a video, tap the volume control icon at the top of the screen.
You've taken the perfect shot and edited it to perfection, but the perfect caption never comes to mind. Save the post as a draft with all your edits and come back to it later.
Note . To remove a post from saved drafts, select Manage to go to drafts, then press Edit . Select the posts you want to delete and click Unpublish at the bottom of the screen, then click again to confirm the action.
26. Blur the background of the portrait
This feature is only available on select Android devices, iPhone SE, 6S, 6S+, 7, 7+, 8, 8+, and X.
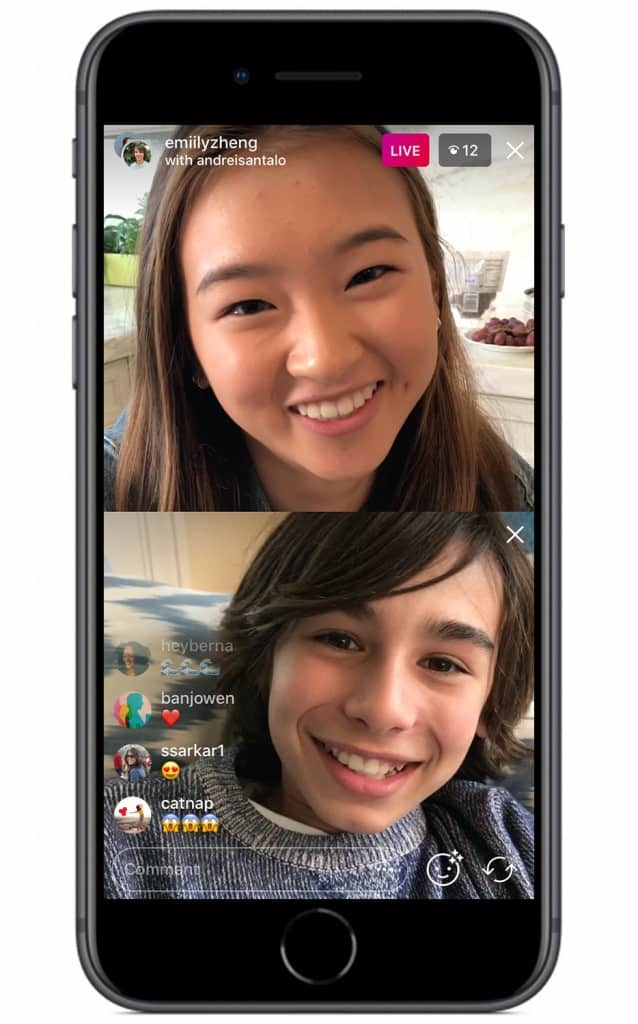
Companies can use this feature to partner with other companies or influencers, for announcements, joint projects, etc. You can invite your subscribers to join the Q&A session you host.

 ー and stop at the recording option Hands free .

You can only share posts from public accounts. If you don't want your content to appear on other people's Stories, you can check it in your settings.
You can choose from thousands of songs!
Whether you want new music to get you into the holiday spirit or new tunes to help you get through your last weeks of school, your friends have the perfect track for you.
If you want to publish it on another channel later.
You can also save individual posts from your history by downloading them by clicking the down arrow icon in the lower left corner of the screen. If you've posted, go to the photo or video you want to save, tap the three dots icon in the bottom right corner, and select Save Photo .
If your story ー is fire and you want everyone to see it ー even those who haven't been on Instagram in the 24 hours it's showing ー post it on your profile.
Want to know how your stories are doing? Take a look at this little-known feature to find out who has viewed posts.

Method 1
Method 2
You can also select the people your story will be hidden from when you view the list of people who saw your story.
Hiding your story from a person is different from blocking and does not prevent them from seeing your profile and posts.
Make a "best friend list" to share private moments with a small group of your choice.
You can safely update the list and remove people from it. They will not know that you have added or removed them.
People on your list will know they're on it, but won't be able to see who else is on it. If someone has added you to their list, you will see a green badge when viewing their stories and a green ring around their profile photo.
Whatever the reason, we are all subscribed to at least one account, the content of which we may not like, but for some reason it is impossible to unfollow the account. What is the solution? Switch his stories to silent mode.
A picture is worth a thousand words, but sometimes you only want to say a few words.

Now you can share a large-format photo of a group of colleagues without cutting Gary out of accounting.
Businesses can keep their best stories forever with Instagram Stories Highlights.
Eternal stories remain on your profile until you delete them. You can post as many pinned stories as you want. Check out how to create timeless story cover icons for free so that your icons really stand out from the crowd.
You can do this for a single post, or you can set the app to automatically post all your Instagram Stories to our Facebook page.
Another feature available to business accounts.
After the live broadcast ends, click Share at the bottom of the screen and the video will be added to your story.
Note . The recording will be available within 24 hours. During playback, all comments and likes from the original broadcast will be displayed. Companies will also be able to know exactly how many people watched the video ー both live and recorded in stories.
Want to encourage your audience to watch the rest of your account's stories? We have a simple trick for this.
If you just created an IGTV account, let your followers find your new content ー share it in stories.
Now your followers can go to the video on IGTV by scrolling through the story on Instagram.
In your profile description, you can link to a hashtag page or other account.
Note . When you mention someone else's profile in the description, their owner receives a notification and can remove the link. The account will remain in your description, but without an active link.
Has your company been tagged in an image you don't want to be associated with? There are ways to remove it from your profile.
Pro Tip: If you don't want tagged photos to appear on your profile, go to the three-line menu, section Privacy > Tags and toggle the Automatically add toggle to inactive.
If you want to break up a block of description text about yourself, this hack is for you. Line breaks are a great way to add information and enhance the visual experience.
Note . It does not matter if the profile was edited from a mobile device or from a PC, when viewed from a desktop computer, the information will be displayed without paragraphs.
Profile Description ー A great place to link and drive traffic to your website or other social network.
How to:
Pro tip: include UTM parameters in your URL to track the amount of traffic coming from your profile link.
You can search for a person in the profile description by field Name . If you mention keywords related to your business in your name, you will appear more often in the search results of people who are looking for companies in your industry.
Tired of left alignment? There is a way to align the profile description to the center or even to the right.
Note: you only have 150 characters to describe the profile and each space counts as a character.
On some Instagram profiles you will see symbols such as hearts, stars and pencils. You can do that too!
If you represent a business and still don't have an Instagram business profile, you're missing out on useful features and insights. Switch now.

Because with the right hashtag, your content will be found more often, and this will allow you to expand your audience.

Great way to get inspired to create content!
If you often use the same hashtags for every post, save them in a note to save time.

Don't pollute signatures. Hide hashtags so the reader can focus on what's important.
You can include up to 10 hashtags in a single story, which will greatly increase the number of people who see it. To keep your story from looking cluttered, there are two easy ways to hide hashtags and maintain a neat appearance.
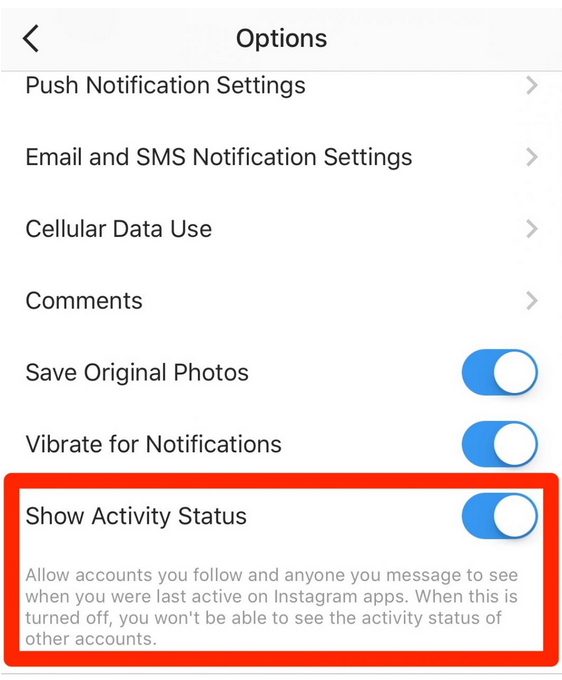
 Disable activity status
 If you don't want your followers to know when you last logged into the app, you can disable your activity status in Instagram Direct Messenger.
You can send a disappearing photo, video, or boomerang to another account or group of friends using Instagram Direct Messaging.
If you select multiple recipients without creating a group, the same message will be sent to each user.
You can send your live video or the video you are watching to a user or group.