By David Weedmark Updated June 10, 2019
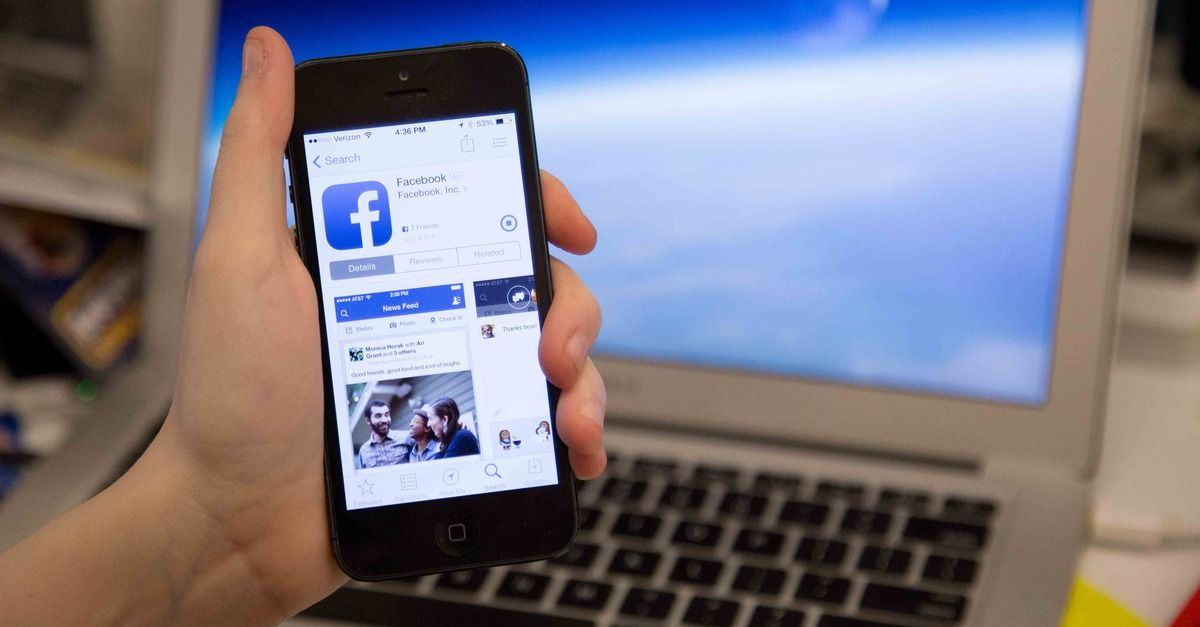
Whether you are adding pictures to your personal Facebook account or a business page, Facebook gives you an assortment of options and features. This can be a bit overwhelming if you have not used Facebook in a while. You can edit the pictures, tag people, add text and apply stickers. You can also control the quality and size of your pictures so that Facebook does not automatically edit them for you.
Adding photos to your news feed is quick and easy. The process for adding them to your personal news feed is similar to adding them to a business page.
If you have the Facebook app on your smartphone, you can also add photos directly from the phone's photo gallery.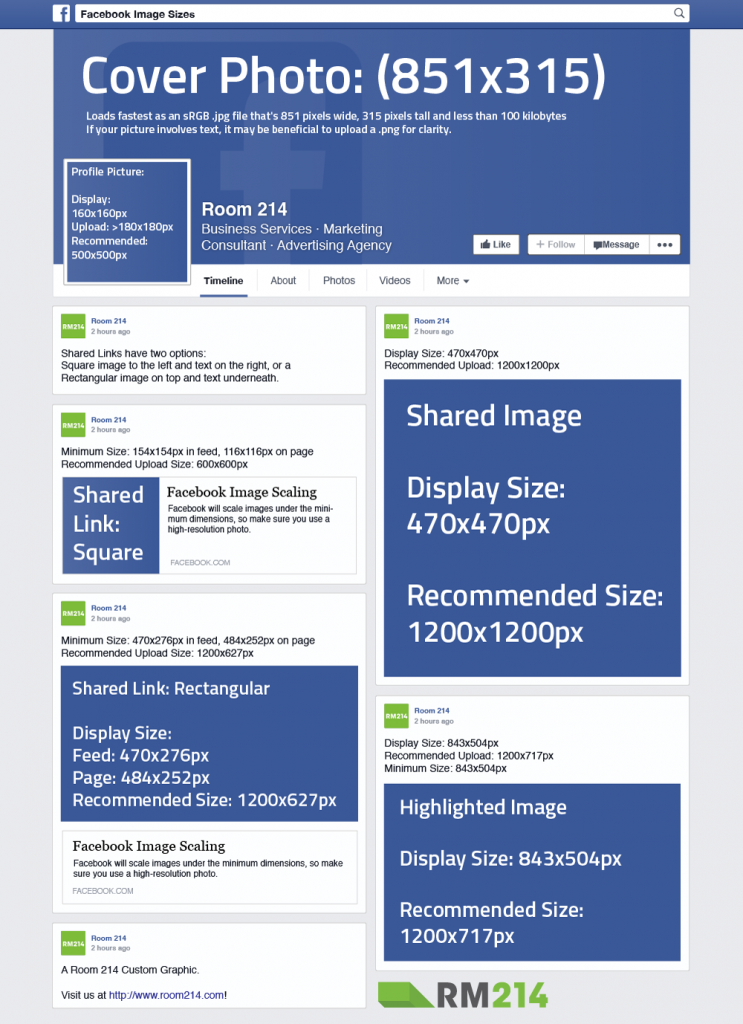
Before uploading a photo, Facebook gives you the option to edit it. You can do this by hovering over the photo and selecting Edit before you click the Share button. When the Edit window opens, you have several options:
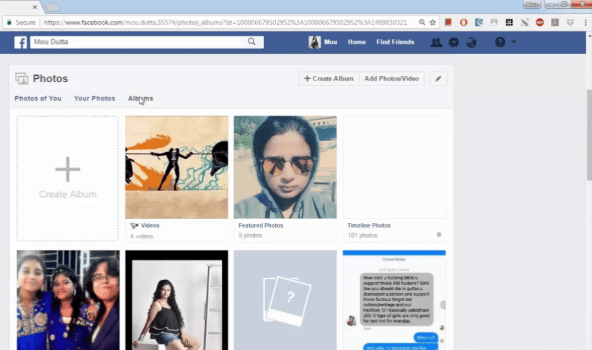
Facebook albums are the best way to organize photos, particularly if you want to restrict who can see sets of photos. Both photos and videos can be added to albums.
Whenever you want to add a new picture to the album or edit its contents, go to your Photos and select the album.
At its default settings, Facebook automatically resizes and reduces the quality of photos when you upload them. You can keep this from happening if you upload pictures that are already optimized for Facebook.
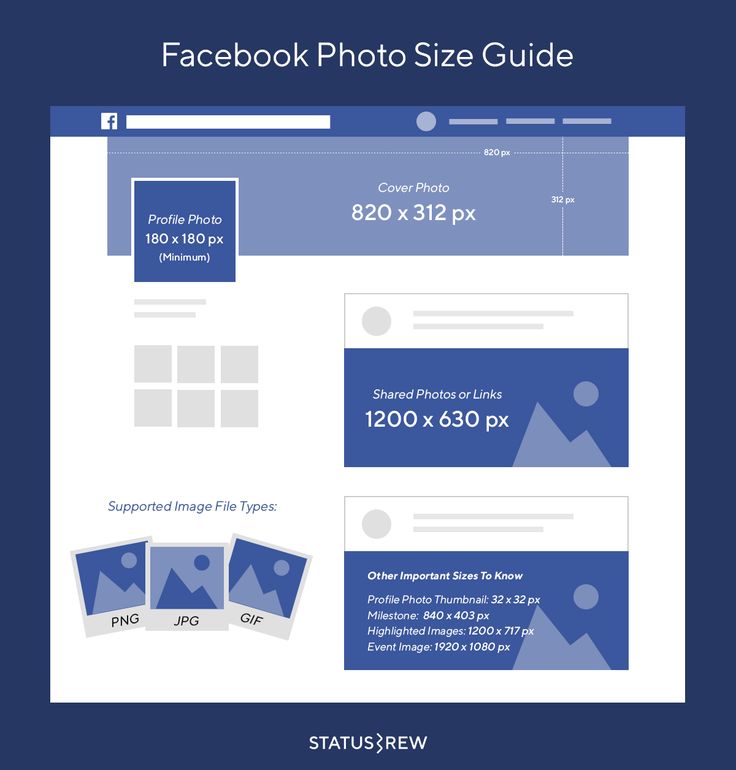
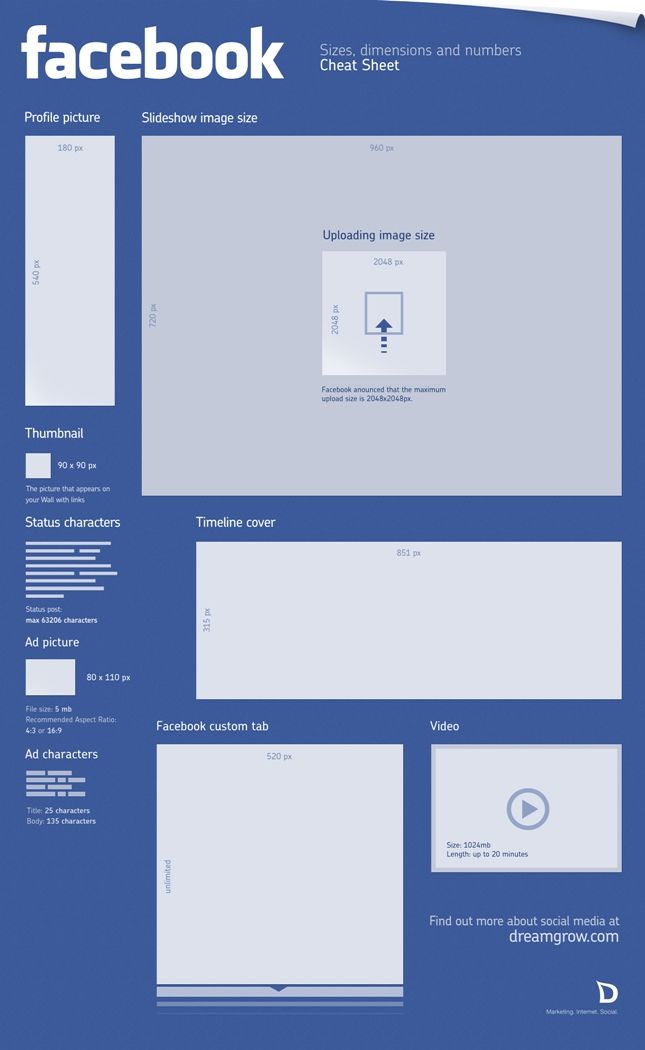
All photos should be saved as JPEG files, using an sRGB color profile. Cover photos should be 851 pixels wide and 315 pixels tall, with a file size less than 100KB. All other photos should be 720 pixels, 960 pixels or 2048 pixels wide.
References
Warnings
Writer Bio
A published author and professional speaker, David Weedmark has advised businesses on technology, media and marketing for more than 20 years. He has taught computer science at Algonquin College, has started three successful businesses, and has written hundreds of articles for newspapers and magazines and online publications including About.com, Re/Max and American Express.
Facebook is a great tool for sharing your images online with friends and family. Many of us do this on a regular basis, but photographers will often find their images heavily compressed. You’ve probably uploaded a photo that looked fine on your computer, but once on Facebook it looked soft and not as good!
This guide will give you all the top tips for uploading images to Facebook and retaining as much quality as possible. I will cover optimum sizes, file types and other tips for getting the most out of your image.
Want to improve your social media presence? Try The Photographer’s Guide to Social Media Marketing
To assist fast webpage loading times for its users, Facebook compresses all images uploaded to it. As this is done automatically, your images are subjected to a default compression, which more than likely does not suit them.
Facebook supports photos that are either 720px, 960px, or 2048px on their longest edge. Any other sizes will have their dimensions reduced automatically, and this inevitably results in visually poorer images. Reducing the dimensions of an image decreases its sharpness, especially if it is a drastic resize.
We’ve got a free PDF for you!: The Photographer’s Guide to Facebook
Facebook will always compress your images, there’s no getting around that. However, there are some tricks to reducing the amount of compression that occurs.
The most important factor is the dimensions of your image. Make sure you upload your photo at exactly 2048px on its longest edge. Facebook won’t change the dimensions of your image, so there is a lot less file compression required and your photo remains sharp. If you aren’t comfortable uploading such a large file, then ensure that you upload a 960px longest edge photo instead.
Once you’ve resized the image, look to see if it appears sharp enough. Make sure you are viewing the image at 100% size in your editing software. If it looks soft having been resized, sharpen it a little.
Then, use Adobe Photoshop’s “Save for Web” function. Ensure that the image is selected to compress to a JPEG file at 70% quality, whilst also converting it to an sRGB colour profile. More detail about using this function can be found in our article “Preparing a Photo for Web Use“.
Yes it does, and I was surprised at the degree to which it improves image quality. Here is a comparison of a photograph uploaded at two different set of settings.
I’ve cropped in on the puffin that is part of a larger photo so that you can see the details. The sample on the left was uploaded at an obscure size of 1096px longest edge using a colour profile of Adobe RGB (1998). You can see that the colours are lost slightly, especially around the eye. The image loses sharpness drastically, too.
The image on the right, however, was uploaded at 2048px longest side with an sRGB colour profile. I also used the save for web function, as mentioned above, saving at 70% JPEG quality.
As you can see, the image looks a lot better for it. The colours are stronger, and reflect those of the original file. You can see red details around the eye and beak more clearly. The clarity and sharpness of the image is also still there.
What Facebook won’t tell you, is that you can upload a PNG file at any size you wish and achieve a similar effect. Don’t forget to convert it to sRGB as well, but you aren’t restricted on your dimensions this way.
To do this, just save your photo as a PNG file using your editing software. You can also use the “Save for Web” function in Photoshop for this by selecting PNG-24 from the drop down list.
If you want to export PNG files straight from Lightroom, we have written a tutorial that shows you how to enable that function.
Some photographers argue that PNG produces even better results than JPEG. So, try it out! Facebook doesn’t mention this, strangely enough, but it is another great way to get your images looking good online.
Further Reading: “How to Use Facebook to Promote Your Photography“
One thing that you need to keep in mind is that viewers haven’t seen your original, high-resolution file. You, on the other hand, have.
This means that you are of course going to be comparing how your image looks to how the very large, full resolution original looks on your computer. Consequently, things appear to be worse than they actually are (most of the time).
Ensure that you are giving yourself some tolerance for the fact that you’re uploading a compressed image in the first place.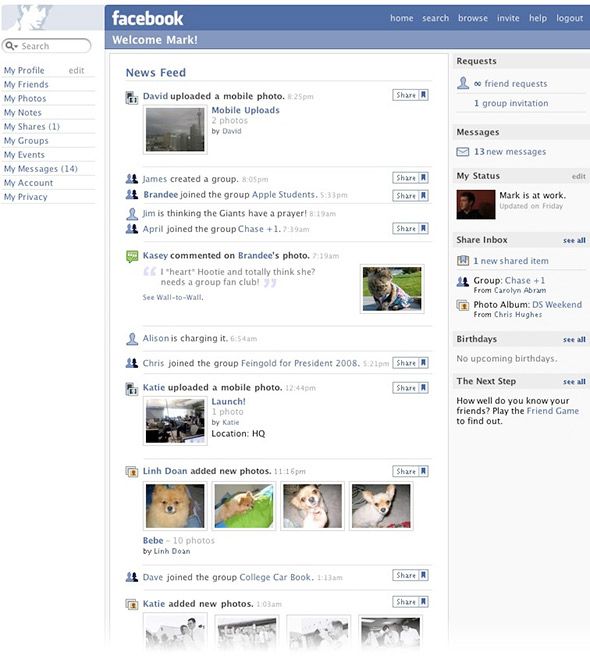 Think about how you look at other photographers’ images online – they are most likely feeling just like you about online compression.
In reality, though, you view their images thinking they look great. They may argue otherwise, but on social media websites it’s all about how the viewer perceives the image in the first place.
So as you can see, images don’t have to look horribly compressed as soon as you upload them to Facebook. Just follow the steps above, and you’ll be wishing you knew this earlier!
Here is a summary of what I’ve covered, in 4 quick and easy steps.
Or, try using PNG files, as mentioned above!
Remember, if you’re uploading images online you may want to protect them. We’ve written instructions for how to find websites that are using your photos without permission – make sure to read this! It can throw up some very interesting results.
Don’t forget to download our free PDF: The Photographer’s Guide to Facebook.
Help Center
Using Facebook
Your profile
We are updating the mobile version of Facebook.com. More
How do I add or change my profile picture on Facebook?
For a clear image, select a photo that is at least 320 x 320 pixels.
Mobile Classic
Click the icon in the upper right corner of the Facebook window, and then select your name. nine0003
Click on your profile photo and select Edit profile photo.
Select a new photo or add a frame to an existing one.
Select the desired image and click Use this photo.
New version for mobile browser
Click the icon in the upper right corner of the Facebook window, and then select your name.
Click on your profile photo.
Select Take photo, Upload photo, Add frame, or View profile photo. nine0003
Click Save.
Learn how to edit your photo before posting.
What if I can't change my profile picture?
If you can't change your profile photo:
Make sure you're using the latest version of the Facebook app or restart it.
Make sure your device is connected to a reliable data network or Wi-Fi.
Refresh the page and try again.
If you are still unable to change your profile picture, please report the issue. nine0003
Note. The current profile photo is visible to everyone. Learn more about who sees your profile photo and cover photo, and how to delete your profile photo.
Was the article helpful?
Related articles
How do I add or change my cover photo on Facebook?
How do I add or change my Facebook Page's profile picture?
How do I add a temporary Facebook profile photo?
How do I change my Facebook name?
© 2022 Meta
Information
Confidentiality
Conditions and rules
Advertising preferences
Vacancies
COOKIE
Creation
Create page
to post photos in Facebook from the phone, the user needs to give the application access to the internal storage. Through a smartphone, you can create separate albums, upload pictures to History and Chronicle. nine0003
Tables
1 via phone to Facebook
The profile owner can upload videos to Facebook using "Albums" or publications. In the second case, the entries will be added a separate section: "Downloaded from the phone." Photo albums can be edited, moved pictures, add privacy options and captions. nine0003
How to upload a picture from a smartphone:
The photo will be seen by subscribers and page visitors. An author can specify privacy settings before posting to the public.
![]()
The maximum number of photo cards that can be added to an entry is 80 and after the first ten they will be published as a separate album. In addition to photos, short videos are added to publications, lasting no more than two minutes. nine0003
Up to ten photos can be added to choose their display format: tile or single view. There is also editing of each card separately, if you select the "List" format.
On the PC version, you have access to uploading photos to the Tape: up to 80 photos and with an additional description. When creating a text publication, a function will appear below: “Attach a photo”, clicking on which will open the storage locations of media files on the computer.
Adding photos to communities should be considered separately:
After uploading one snapshot, a new tab will appear in the toolbar: "Media Files". Through it, you can view a list of previously uploaded photos, videos.
There are separate rules for pictures added by subscribers:
Any downloaded content will be available on the tab: "Media Files". Posts can be moved between albums as an editor or administrator. nine0003
To separately add a photo on Facebook to a group or personal page, you need to create a photo album. In this way, editing is available, organizing files that are uploaded to the profile.
How to make an album from the mobile version:
Next, to fill the photo album: open it - click on the button: "Upload photos". In albums, there is editing of the description of the entire collection, deletion. If you hold down on the picture, you can move among other files.
Make from the computer version:
In the same section, the user can upload pictures and videos separately. To do this: go to the tab: "Photo" and select: "Add photo". The picture will be loaded outside the album if the author does not specify its path. nine0003
There are standard problems why pictures may not be uploaded to a social network. The main reason is non-compliance with technical requirements.
Rules for posting pictures on Facebook:
Disallowed according to usage policy:
If the picture has not been blocked by the administration, you can file a complaint against it. For example, if a picture appeared in some community without the consent of the author. You need to go to the image and select in the additional menu: "Send a complaint", select the reason and send. nine0003
There are technical problems why the photo is not added to Facebook. The list of main problems includes:
For example, if you upload up to twenty identical photos to a profile or group within a period of up to 5 minutes, the system will send a notification: “You often send posts.” The placement limit works if the user performs a series of similar actions in a short time.