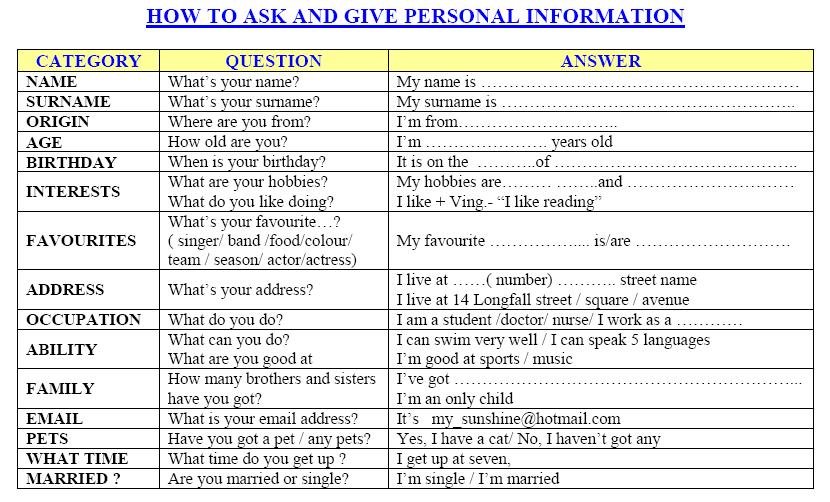
Facebook group owners can delete a group by first removing all members. Once the owner is the only person in a group, then they will have the option to delete it.
Group admins can archive a group, meaning that the group will no longer appear in Facebook search to non-members, and no new members can join. Admins can only delete a group if the original owner first leaves the group.
Here's how to delete a group on Facebook.
Facebook groups can be deleted when you're done with them both via a web browser and the Facebook mobile app.
1. Go to Facebook.com and navigate to Groups on the home page.
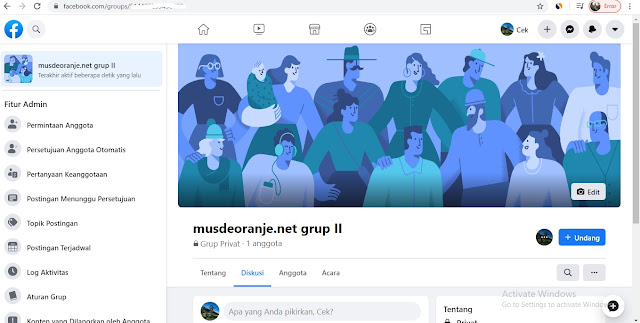
Click on Groups. Kyle Wilson/Insider2. Select the group that you wish to delete.
3. Navigate to Members.
Click on Members to view the members list. Kyle Wilson/Insider4. Click the three dots next to each member's name and then select Remove member." Hit Confirm.
Quick tip: You can delete a member's previous 7 days of comments and posts in your group by clicking the Delete recent activity toggle before clicking Confirm.
5. One all members are removed, click the Joined button next to your name. Select Delete group and then Delete Group again.
Click Delete Group twice. Kyle Wilson/Insider1.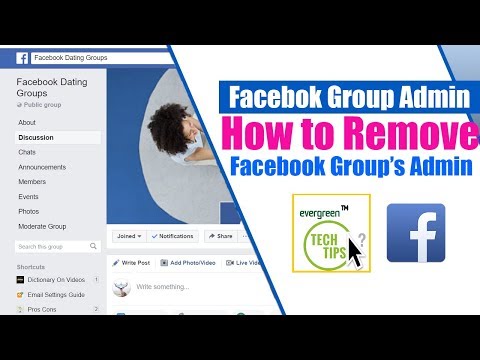 Open the Facebook app on your iPhone or Android phone. Select the Menu tab and then select Groups.
2. Select Your groups, and locate the group that you wish to delete under the Groups you manage section.
Select Your groups. Kyle Wilson/Insider3. Open the group that you want to delete.
4. Tap on the name of the group, and then tap See All to view all of the members.
5. Tap on each person's name and select Remove from group" to remove them from the group; this option will include their name as part of the button.
6. Once everyone is deleted from the group, go back to the front page of the group and select Manage.
Tap Manage. Kyle Wilson/Insider7. Scroll down and tap on Delete Group and then press Delete Group again.
Group administrators can pause a Facebook group – pausing all posts, comments, and reactions – if they need a break from maintaining it.
1. Click Groups and select your group.
2. Click the three horizontal dots below the cover photo.
3. Click Pause group.
Click on Pause group. Kyle Wilson/InsiderQuick tip: You can set when the group will automatically resume by clicking the Edit button below the cover photo, adjusting the date and time, and clicking Confirm.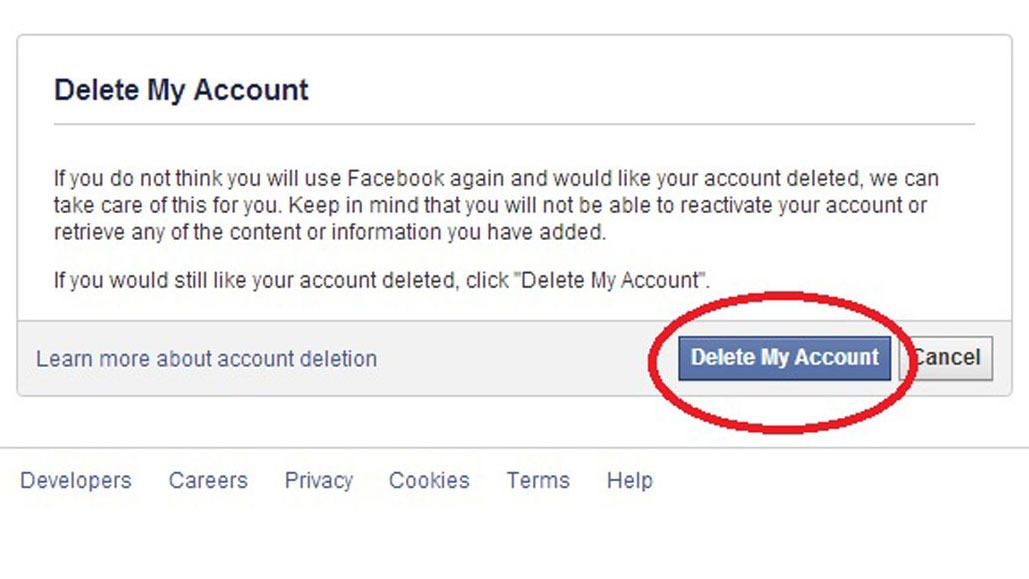
Edgar Cervantes / Android Authority
Facebook groups are great for creating small communities of similar-minded individuals, or getting together for a common cause. It’s not always wise to keep them forever, though. Regardless of your reasoning behind it, sometimes it’s better to delete a Facebook group. Let’s teach you how it’s done!
Related: Are you having Facebook issues? Try these fixes
QUICK ANSWER
Delete a Facebook group by going to Facebook.com and logging in. Head to the column on the left and go into Groups. Find the group you want to delete and go into it. Move on to Members, click on the three-dot button next to every member and select Remove member. Do the same for yourself and select Leave Group.
JUMP TO KEY SECTIONS
 deleting a Facebook group
Edgar Cervantes / Android Authority
Deleting a Facebook group altogether may be a bit of an extreme solution. Another alternative is not as finite; you can pause a Facebook group. What’s the difference between pausing and deleting a Facebook group?
Deleting a Facebook group is a permanent solution. Everything will be permanently trashed, and only the group creator can do this.
On the other hand, pausing a Facebook group is a much more temporary option to stop activity on a specific group. After being paused, the group will still appear in searches, but it won’t be fully functional. When you pause a group, multiple actions will be halted. This includes the ability to add new posts, comments, and reactions. Additionally, no new members can join, but Admins can still approve old join requests.
Admins can still do quite a bit after a Facebook group is paused. They’ll be able to manage older posts and content. They can also change the cover photo, manage members, and access their own information.
Also: How to permanently delete a Facebook account
Edgar Cervantes / Android Authority
Let’s show you how to pause a Facebook group, which is a less extreme solution to most problems you may face while managing a community.
Pause Facebook group using a PC browser:

Pause Facebook group using the smartphone app:
Edgar Cervantes / Android Authority
If you’re sure you want to delete a Facebook group, then here are the instructions to do so.
Delete Facebook group using a PC browser:
Delete Facebook group using the smartphone app:
No. Facebook is very clear about this. Once a group is deleted, the action is irreversible. You can’t retrieve it. You would have to create the group again.
Facebook claims group members aren’t notified when a Facebook Group is deleted.
While most activity is halted when a Facebook Group is paused, there are some actions members can still take. They can delete posts or comments, access their own information, or leave the group.
There are a few reasons why your Facebook group isn’t showing up on search results. The most common one is that you may have set your group as a hidden one. It may have also been removed for violating community standards. Additionally, the group won’t show up if you were blocked from it.
Group is one of the most popular types of Facebook account. A group or community is an opportunity for users to unite on various grounds: work at the same enterprise or in the same organization, living in the same house (microdistrict, residential area, district, settlement). Facebook groups are also created by people who share interests or hobbies. Due to the democratic nature of the social network, any user can create a community. But sometimes it becomes necessary to delete a group, and not everyone knows how to do it. Therefore, we will analyze this issue in the article. nine0003
Content:
in the Facebook, one user, creator and administrator, creator and administrator , and it is also possible to manage the community by several users at once. Users managing groups are subdivided into:
In some cases, all administrator and moderator positions are vacant in groups. Then any user in the community has the right to appoint himself to a free position. nine0003
If a user wants to close a group on Facebook, he must first make sure that his role in the community allows this. The best option for this case is to be the creator or have administrator rights.
There are three main ways to delete a Facebook community:
The recommended method is send to archive. It involves the community being in a state of temporary suspension of activities. When a group is archived:
 nine0010
In order to transfer a community to the archive, the user must have administrator rights. You must have the same rights to resume the activation of an archived group.
How to archive a group:
In an archived group, the administrator will be able to edit some settings, delete posts and comments, block members. All other activities within the community are unavailable. nine0003
In order to delete a Facebook group, all members with moderator functions must log out of it. The community creator can then delete the community. But if the creator left the group earlier, then any of the users with administrator rights has the right to liquidate it.
To permanently delete a group:
 nine0010
In some cases, the group is liquidated by mutual agreement of users. They simply agree to leave the community in an organized manner. When the last user does so, the system will liquidate the group. nine0003
They bring people together by their interests, publishing thematic entries and giving them the opportunity to discuss certain issues. They are also used for advertising purposes. Of course, this also applies to Facebook. But it happens that the administrator or owner of the community no longer makes sense to develop it, for example, due to lack of time or desire. In that case, you should know0026 how to delete a group on facebook .
Contents
The whole procedure is divided into three simple steps: “Change Status to” 9009
That is, unfortunately, one button is not enough here. In this regard, the developers of the social network Facebook are very categorical. But the option proposed above is quite simple to implement. Let's analyze everything in turn. nine0003
Of course, this procedure will not work if you are not an administrator or a community creator.
This instruction is intended to be carried out through a browser on a computer and laptop. But you can also use the mobile application, although it will be much less convenient.
Note that this action cannot be undone.
This is done so that in the future no person can join the public while it is erased. The procedure here is as follows:
The bottom line is that the group is automatically deleted when no one has been in it for a certain time. By the previous action, we forbade new people from joining it. And this will erase all the participants.
Procedure:

Make sure there is only one member left in the group, and that is you. If everything is correct, then on the same page, click LMB on the icon next to your own name and select "Leave" . Now in the form that appears, click on the blue button that says "Leave and delete" .
This completes the procedure and cannot be undone. You deleted a Facebook group that you created yourself or became its owner, while all its posts, media data and other information have already been erased.