If you are new to Telegram bots, we recommend checking out our Introduction to Bots first.
You may also find the Bot API Manual useful.
General
Getting Updates
Handling Media
Broadcasting to Users
Creating Telegram bots is super-easy, but you will need at least some skills at computer programming. In order for a bot to work, set up a bot account with @BotFather, then connect it to your backend server via our API.
Unfortunately, there are no out-of-the-box ways to create a working bot if you are not a developer. But we're sure you'll soon find plenty of bots created by other people to play with.
Here are two sample bots, both written in PHP:
Many members of our community are building bots and publishing sources.
We're collecting them on this page »
Ping us on @BotSupport if you've built a bot and would like to share it with others.
The bot API is still pretty young. There are many potential features to consider and implement. We'll be studying what people do with their bots for a while to see which directions will be most important for the platform.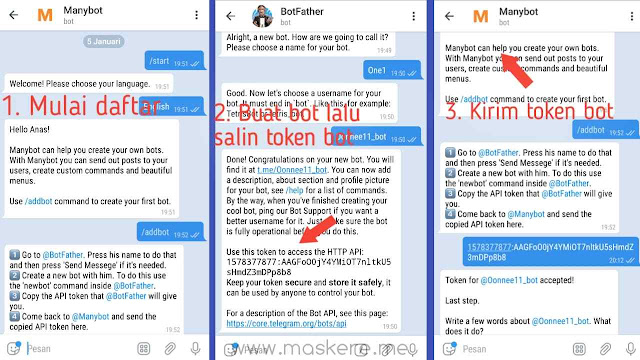
All bot developers are welcome to share ideas for our Bot API with our @BotSupport account.
1. All bots, regardless of settings, will receive:
2. Bot admins and bots with privacy mode disabled will receive all messages except messages sent by other bots.
3. Bots with privacy mode enabled will receive:
Note that each particular message can only be available to one privacy-enabled bot at a time, i. e., a reply to bot A containing an explicit command for bot B or sent via bot C will only be available to bot A. Replies have the highest priority.
Bots talking to each other could potentially get stuck in unwelcome loops. To avoid this, we decided that bots will not be able to see messages from other bots regardless of mode.
There are currently two ways of getting updates. You can either use long polling or Webhooks. Please note that it's not possible to get updates via long polling while an outgoing Webhook is set.
The getUpdates method returns the earliest 100 unconfirmed updates. To confirm an update, use the offset parameter when calling getUpdates like this:
offset = update_id of last processed update + 1
All updates with update_id less than or equal to offset will be marked as confirmed on the server and will no longer be returned.
If you've set up your webhook successfully, but are not getting any updates, please remember:
Please check out this new WEBHOOK GUIDE to learn all there is to know about webhooks!
Please take a look at this self-signed certificate guide we made just for you. If you've read it and still have a question, ping us on botsupport.
If you'd like to make sure that the Webhook request comes from Telegram, we recommend using a secret path in the URL you give us, e.g. www.example.com/your_token. Since nobody else knows your bot's token, you can be pretty sure it's us.
This is possible if you're using webhooks. The upside is that you need less requests, the downside — that in this case it's not possible to know that such a request was successful or get its result.
Whenever you receive a webhook update, you have two options:
1. Issue POST to https://api.telegram.org/bot<token>/method
2. Reply directly and give method as JSON payload in the reply
You may also want to look at our sample HelloBot, it offers a PHP implementation of this.
Use the getFile method. Please note that this will only work with files of up to 20 MB in size.
Bots can currently send files of any type of up to 50 MB in size, so yes, very large files won't work for now. Sorry. This limit may be changed in the future.
Yes, file_ids can be treated as persistent.
When sending messages inside a particular chat, avoid sending more than one message per second. We may allow short bursts that go over this limit, but eventually you'll begin receiving 429 errors.
If you're sending bulk notifications to multiple users, the API will not allow more than 30 messages per second or so. Consider spreading out notifications over large intervals of 8—12 hours for best results.
Also note that your bot will not be able to send more than 20 messages per minute to the same group.
Unfortunately, at this moment we don't have methods for sending bulk messages, e. g. notifications. We may add something along these lines in the future.
In order to avoid hitting our limits when sending out mass notifications, consider spreading them over longer intervals, e.g. 8-12 hours. The API will not allow bulk notifications to more than ~30 users per second, if you go over that, you'll start getting 429 errors.
See also: How to avoid hitting limits?
If you've got questions that are not answered on this page, ping us at @BotSupport in Telegram.
We welcome any suggestions for the Bot Platform and API.
We currently support two ways of processing bot updates, getUpdates and setWebhook. getUpdates is a pull mechanism, setwebhook is push. Although the concept of a webhook is fairly simple, the setup of the individual components has proven to be tricky for many. This guide provides some extra information for those of you brave enough to venture into the art of the webhook.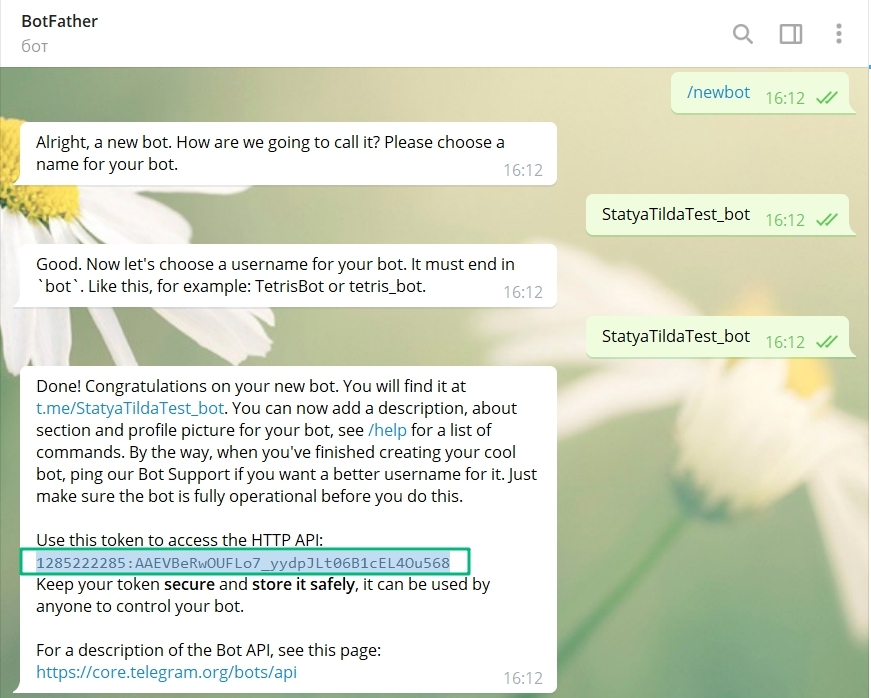
There are some advantages of using a webhook over getUpdates. As soon as an update arrives, we’ll kindly deliver it to your bot for processing.
This:
1. Avoids your bot having to ask for updates frequently. 2. Avoids the need for some kind of polling mechanism in your code.
Other advantages may include saving some potential CPU cycles and an increase in response time, these things however depend heavily on the usage pattern of your bot.
Setting a webhook means you supplying Telegram with a location in the form of a URL, on which your bot listens for updates. We need to be able to connect and post updates to that URL.
To ensure that we can do that, there are some basic requirements:
You'll need a server that:
149.154.160.0/20 and 91.108.4.0/22 on port 443, 80, 88, or 8443.
That’s almost all there’s to it.
If you decide to limit traffic to our specific range of addresses, keep an eye on this document whenever you seem to run into trouble. Our IP-range might change in the future.
Setting a webhook needs a URL for us to post to. For that you'll need a server with a domain name. If you don't have one, you'll need to obtain one first. Telegram currently doesn't offer hosting or domain name services. There are quite a few VPS/Web hosting providers around the internet, feel free to pick one to your liking.
If you're using a self-signed certificate, you may use the IP as a CN, instead of the domain name.
How do I get a server with a domain name?
A webhook needs an open port on your server. We currently support the following ports: 443, 80, 88 and 8443. Other ports are not supported and will not work. Make sure your bot is running on one of those supported ports, and that the bot is reachable via its public address.
If you want to limit access to Telegram only, please allow traffic from 149.154.167.197-233 (starting July 2019 please use: 149.154.160.0/20 and 91.108.4.0/22). Whenever something stops working in the future, please check this document again as the range might expand or change.
How do I check for open ports or limit access to my bot?
A webhook requires SSL/TLS encryption, no matter which port is used. It's not possible to use a plain-text HTTP webhook. You shouldn't want to either, for the sake of your bot and users.
SSL/TLS, why do I have to handle this for a webhook?
We support any SSL/TLS version TLS1. 2 and up for your webhook. This means that SSLV2/3/TLS1.0/TSL1.1 are NOT supported, due to security issues associated with those older versions.
How do I check that I’m handling the right version?
The common name (CN) of your certificate (self-signed or verified) has to match the domain name where your bot is hosted. You may also use a subject alternative name (SAN), that matches the domain for your webhook. Server Name Indication (SNI)-routing is supported. If you're using a self-signed certificate, you may use the IP as a CN, instead of the domain name.
A certificate, where do I get one, and how?
A certificate can either be verified or self-signed. Setting a webhook with a self-signed certificate differs a little from setting a webhook with a verified certificate. Ensure you're using the correct setup for the type of certificate you've chosen for your webhook.
How do I set a webhook for either type?
Not all verified certificates are supported. Certificates are based on a network of trust and come in a chain. Trusting your verified certificate means we have to trust the provider of that certificate, the Certificate Authority (and hence its root certificate). Before you pick a certificate provider, Check this list to make sure that we actually trust their root certificate.
What if my root certificate isn’t on that list?
Ok, so you already had a certificate installed and just discovered it’s not on our list.
Start by ignoring it, and just try to set it. We occasionally add extra root certificates to keep up with popular demand, so the list isn't always exhaustive. Unlucky after all? We'll allow you to supply an unsupported root certificate when setting the webhook. This method is nearly identical to setting a self-signed certificate webhook. Instead of your self-signed certificate you'll be sending us the root certificate as inputFile.
Setting a verified webhook with an untrusted root
Some verified certificates require an intermediate certificate. In this construction the provider of your verified certificate has used their root certificate to sign an intermediate certificate. This intermediate certificate is then used to sign your verified certificate. You'll need to provide the intermediate certificate for us to be able to verify the chain of trust. CA's that use this type of chain supply an intermediate certificate.
Supplying an intermediate certificate
Since we know webhooks can be a tad overwhelming, we’re working on a little digital assistant that’ll try and help you with the most common problems, it's not nearly perfect, but you may try using @CanOfWormsBot to check if your chain of certificates is installed correctly before contacting support.
We took the liberty of adding a set of example updates. They come in handy when testing your bot, no matter which method of getting updates you might be using.
If by now you're looking for your fishing gear because we've mentioned ports and hooks or you're about to Google what kind of bait URL and TLS exactly are, this guide might not be completely for you. You’re quite likely still a brilliant bot programmer, don’t worry. Perhaps this whole webhook thing is just new to you, not all is lost. If you currently have a working getUpdates situation, it's a good idea to pick up this guide again on a rainy Sunday afternoon and take your time to read up on some subjects around the internet. This guide can only contain a finite amount of information after all.
If you use a webhook, we have to deliver requests to your bot to a server we can reach. So yes, you need a server we can connect to. It can be anywhere in the galaxy, if you ensure we can reach the server by domain name (or at least via IP for a self-signed certificate), it will work just fine.
There are quite a few ways to get this done, as a novice however it's likely that you're not directly jumping at the chance of crafting this from scratch. Actually, as a novice, we recommend you don't. It's likely to be a complex and long ride.
If you got stuck here, make a choice:
You use getUpdates at the moment and it works, keep it that way. Especially if you're running your bot from a nice machine that does well. There is nothing wrong with using getUpdates.
Go with a hosted service and let a bunch of professionals worry about things like registering a domain, setting up DNS, a web server, securing it and so on.
If you're going with a hosted service, make sure to look for a hosting provider that not only supports your code’s needs, for example: support for your PHP version, but one that also handles SSL and allows you to create/deploy certificates.
So you have the hosting thing down and all is good so far, however, when you enter the address of your bot in your browser it seems unreachable.
Explaining every firewall or web server solution in detail isn't possible for us, which we hope you understand. If you’re running a hosted solution, you’re more likely to have a nice UI where you configure these settings. Head to your configuration panel and check all of them. If you’re on a Linux based VPS with shell access, we have some tips for you:
netstat –ln | grep portnumbersudo lsof -i | grep process name(your public IP), it can also listen on all addresses (*: or 0.0.0.0).netstat and lsof-commands mentioned above assist in checking this. If nothing shows up, it is time to check your configuration and fix it. Set the correct IP, make sure it’s listening on a supported port and fire away! Just use a Web Browser to check if you’re reachable. The problem can be in the configuration of your bot, your web server virtual host configuration, or the servers binding configuration.
If you still can’t reach your address, check your firewall.sudo iptables –L
ORsudo ufw status verbose (Ubuntu)
Gives you some insight in the current firewall settings.
If it looks like you’re blocking incoming traffic, let’s fix that.sudo iptables –A INPUT –p tcp –m tcp –dport portnumber -j ACCEPT
ORsudo ufw allow portnumber/tcp
Allows incoming traffic on all interfaces to the specified tcp port.sudo iptables –A INPUT –i interfacename –p tcp –m tcp –dport portnumber -j ACCEPT
ORsudo ufw allow in on interfacename to any port portnumber proto tcp
Allows incoming traffic to a specific interface and a specific port from everywhere.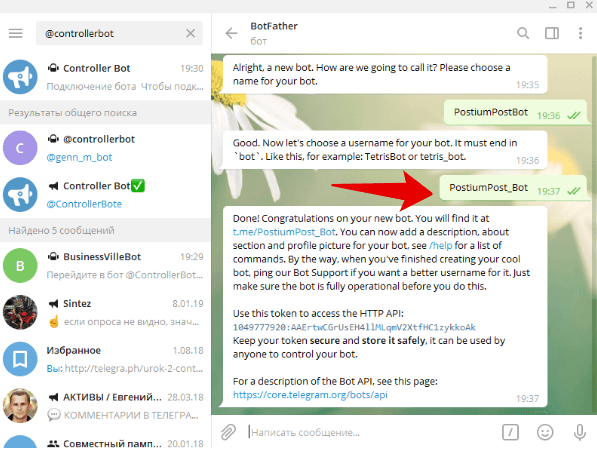
sudo ifconfig
Helps you find the interface with the public address you’re going to use.
If you use iptables, make sure to actually SAVE after changing the configuration. On a Debian based system the iptables-persistent package is be a good option. RHEL/CentOS offers a service iptables save -command. A quick online search for "YOUROPERATINGSYSTEM save iptables" also helps.
sudo iptables –A INPUT –i interfacename –p tcp –m iprange –src-range 149.154.167.197-149.154.167.233 –dport portnumber -j ACCEPTsudo ufw allow in on interfacename to any port portnumber proto tcp from 149.154.167.192/26That’s all for our examples. More information on best practices for setting up your firewall, on whichever operating system you prefer for your bot, is best found on the internet.
You’re already familiar with it in some form or another. Whenever you see that (nicely green) lock in your browser bar, you know it’s reasonably safe to assume that you’ve landed on the site you actually wanted to visit. If you see the green lock, that's SSL/TLS in action. If you want to learn more about how SSL/TLS works in general, it's best to search the internet.
The main difference between getUpdates and a webhook is the way the connection takes place. getUpdates means you'll connect to our server, a webhook means we'll be connecting to your server instead. Connecting to your server has to be done secure, we have to know for sure it's you we're talking to after all. This means you'll have to handle all that server side encryption stuff, virtually presenting us with a green lock. If you use a web server for us to post to, you need to support SSL/TLS handling on the port/virtual host of your choice.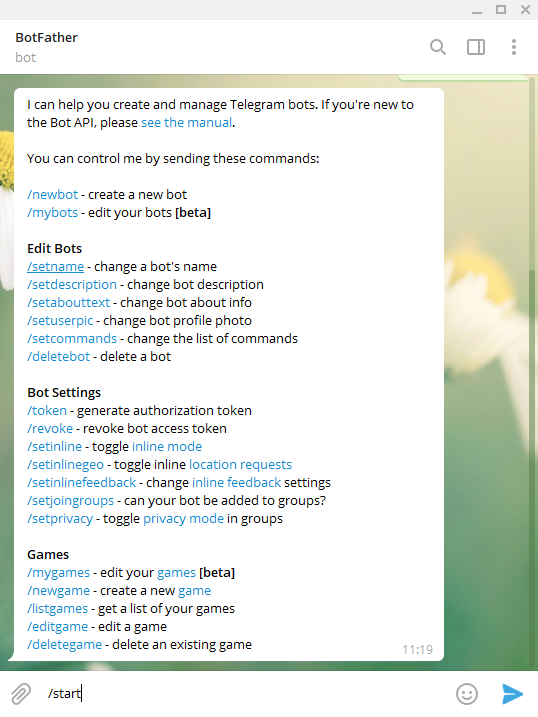 An online search for “YOURWEBSERVER enable HTTPS” will help you.
Not using a regular web server? Have a look at our example page, most examples there include code for handling SSL/TLS in a webhook setup.
You just read up on the whole SSL/TLS stuff, figured out that it’s not all that bad to setup and we add some more requirements. Here are some tips to check if you’re indeed supporting at least TLS1.2.
Several online services exist that allow you to check your certificate installation,
They give you an overview of your supported TLS versions/Cipher suites and other details. Search online for Symantec crypto report or Qualys ssl. Both supply tools to verify your setup.
Checking locally can also be done, in several ways, here are three options,
Go simple:
Using Chrome as a browser? Open up the URL to your bot and inspect the certificate details.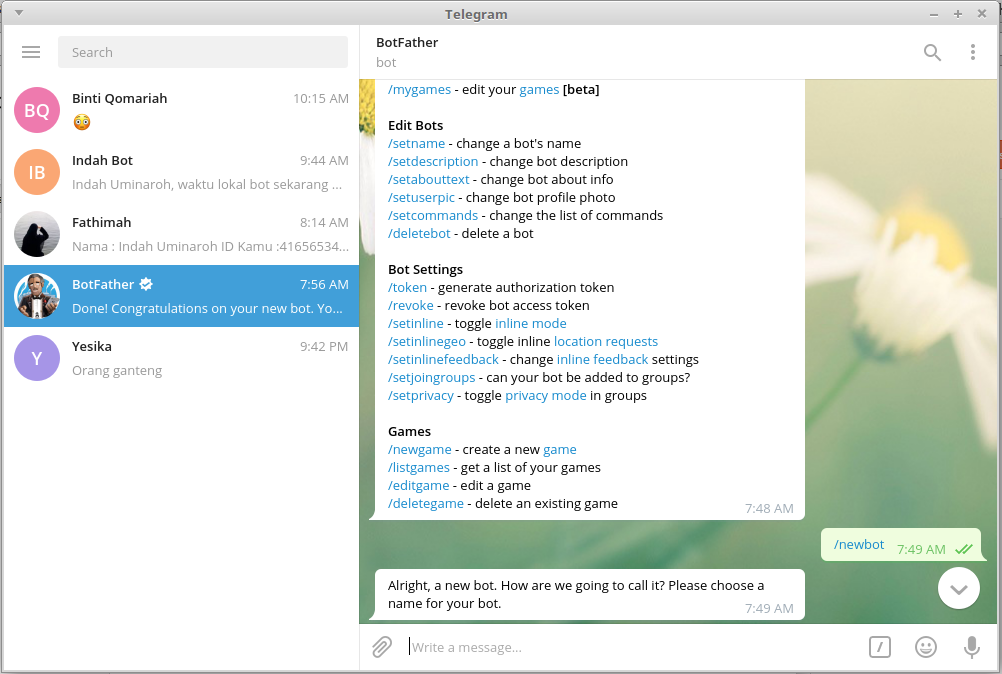 If you’re supporting TLS Chrome tells you so in the security overview tab. Other browsers are likely able to give you similar basic information.
Using curl:curl --tlsv1.2 -v -k https://yourbotdomain:yourbotport/
You can add --tlsv1.2 to force curl into using TLS1.2 when trying to connect. -k is optional and used to check against a self-signed certificate. yourbotdomain is the public hostname your webhook is running on. For local testing purposes you can also use the IP. yourbotport is the port you’re using.
Using OpenSSLopenssl s_client -tls1_2 -connect yourbotdomain:yourbotport -servername yourbotdomain
You can add -tls1_2 to force OpenSSL into using TLS1.2 when trying to connect. yourbotdomain is the public hostname your webhook is running on. For local testing purposes you can also use the IP. yourbotport is the port you’re using.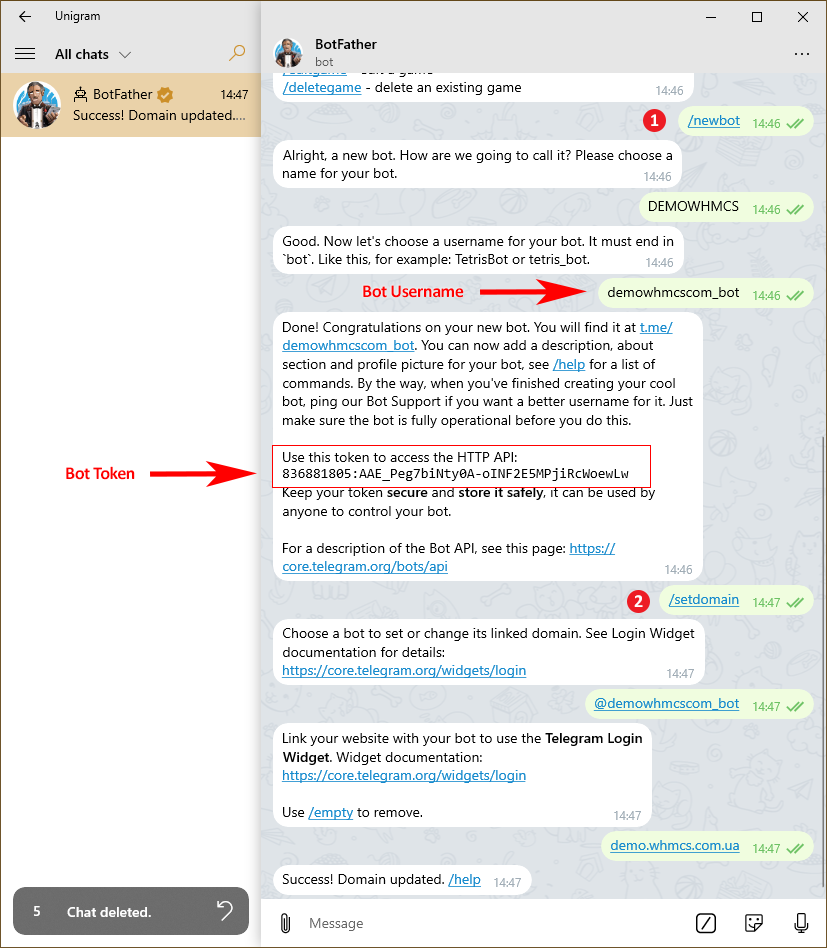 Note that https:// isn’t used for OpenSSL.
 -servername is optional, and included here for some shared hosters, which use SNI to route traffic to the correct domain. When SNI is used you’ll notice that your server appears to be returning a certificate for a different domain than your own. Adding -servername yourbotdomain ensures that SNI negotiation is done, and the correct certificate is returned.
Some additional configuration pointers
SSLProtocol -all +TLSv1.2ssl_protocols TLSv1.2;-Dhttps.protocols=TLSv1.2 -Djdk.tls.client.protocols=TLSv1.2-Djavax.net.debug=ssl,handshake,recordOther tools that may help in debugging issues:
You need a certificate, pick on of these types;
A self-signed certificate
Using a verified certificate means you already have, or will obtain, a certificate backed by a trusted certificate authority (CA).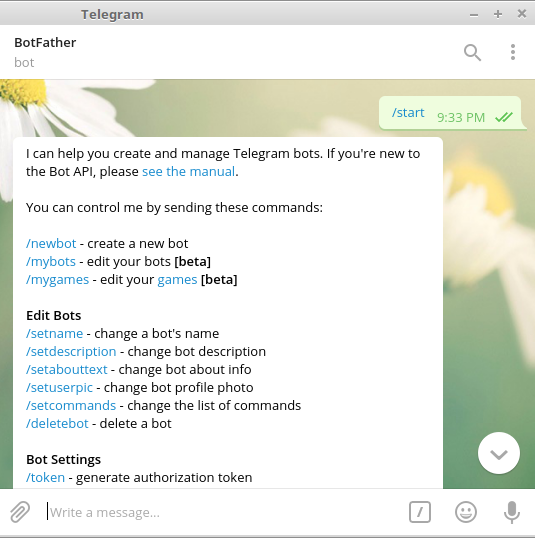 There are many ways to acquire a verified certificate, paid or free. Two popular examples of free suppliers are StartSSL and Let’s Encrypt. You’re welcome to pick another. Just make sure first the supplier is likely to be supported.
Check this list before selecting a CA.
Once you’ve picked a CA and validated your identity with them, you can craft your certificate. This frequently starts by generating a CSR (Certificate Signing Request). Generating a CSR is done either through your host machine, or online via the tools provided by the CA.
Here is an example (PEM format output).
openssl req -newkey rsa:2048 -keyout yourprivatekey.key -out yoursigningrequest.csr---- Generating a 2048 bit RSA private keywriting new private key to yourprivatekey.key Enter PEM pass phrase: enter a password for your key here Verifying - Enter PEM pass phrase: confirm the entered password ----- You are about to be asked to enter information that will be incorporated into your certificate request.What you are about to enter is what is called a Distinguished Name or a DN. There are quite a few fields but you can leave some blank For some fields there will be a default value,If you enter '.', the field will be left blank.----- Country Name (2 letter code) [AU]: State or Province Name (full name) [Some-State]: Locality Name (eg, city) []: Organization Name (eg, company) [Internet Widgits Pty Ltd]: Organizational Unit Name (eg, section) []: Common Name (e.g. server FQDN or YOUR name) []: yourbotdomainname Email Address []: Please enter the following 'extra' attributes to be sent with your certificate request A challenge password []: An optional company name []: ---
Another example:
keytool -genkey -alias yourbotdomainname -keyalg RSA -keystore yourkeystore.jks -keysize 2048--- Enter keystore password: Re-enter new password: What is your first and last name? [Unknown]: yourbotdomainname What is the name of your organizational unit? [Unknown]: What is the name of your organization? [Unknown]: What is the name of your City or Locality? [Unknown]: What is the name of your State or Province? [Unknown]: What is the two-letter country code for this unit? [Unknown]: Is CN=test.telegram.org, OU=Unknown, O=Unknown, L=Unknown, ST=Unknown, C=Unknown correct? [no]: yes Enter key password for yourbotdomainname (RETURN if same as keystore password): ---
This generates the initial keystore, from which you can then create a CSR like this:
keytool -certreq -alias yourbotdomainname -keystore yourkeystore.jks -file yourbotdomainname.csr
--- Enter keystore password: ---
To validate your certificate the Common Name (CN) has to match your webhook domain. Example, if you’re using https://www.example.com/example.php as a webhook address, the certificate CN has to be www.example.com.
So you need an exact match of the FQDN you’re setting for the webhook
There is an exception, if you’re using a SAN (Subject Alternative Name) the webhook address can either match the CN of your certificate, OR one of the SANs provided in the certificate. In most cases you’ll be using the CN.
Create your CSR and supply the contents of the file to your CA. Most CA’s are kind enough to give you an example command of the input format they expect.
cat yoursigningrequest.csr or cat yourbotdomainname.csr
Lets you have a look at the CSR we just generated:
That doesn’t seem to informative, but we can deduce that the file is in PEM format (ASCII base64 encoded) and contains a certificate signing request. Luckily it is possible to look at the human readable contents of the CSR. Use the following commands to double check if all fields are set correctly.
Verify your CSR and supply it to your CA to get a certificate. We’ll use StartSSL as an example here. StartSSL allows you to set up to 5 names (SAN), Their intermediate certificate is also needed for a webhook to work, which makes for a nice complete example.
Go to the certificates wizard, enter the required hostname(s) for your SSL certificate (this is the CN you’ve also set in the CSR and an optional SAN).
In the example above we’ve chosen to set a CN (test., but also a SAN  telegram.org)
(sanexample.telegram.org) The CN given has to match the CN used for generating the CSR.
Set your CN (and optional SAN) and copy the contents of the yoursigningrequest.csr file.
Paste the contents, submit and you’re done.
Now you can download the created certificate directly. In the example used above you’ll receive a zip file with several PEM certificates. The root, intermediate and yourdomain certificate.
You need the intermediate and yourdomain to set a webhook with a StartSSL certificate.
You can inspect the set of certificates you’ve just downloaded.
With your fresh certificates at hand, you can now continue setting your webhook.
Using a self-signed certificate means you’ll forfeit on the chain of trust backed by a CA. Instead you are the CA. For this to work, a slight difference in setup is required. Because Telegram will have no chain of trust to verify your certificate, you have to use the generated public certificate as an input file when setting the webhook.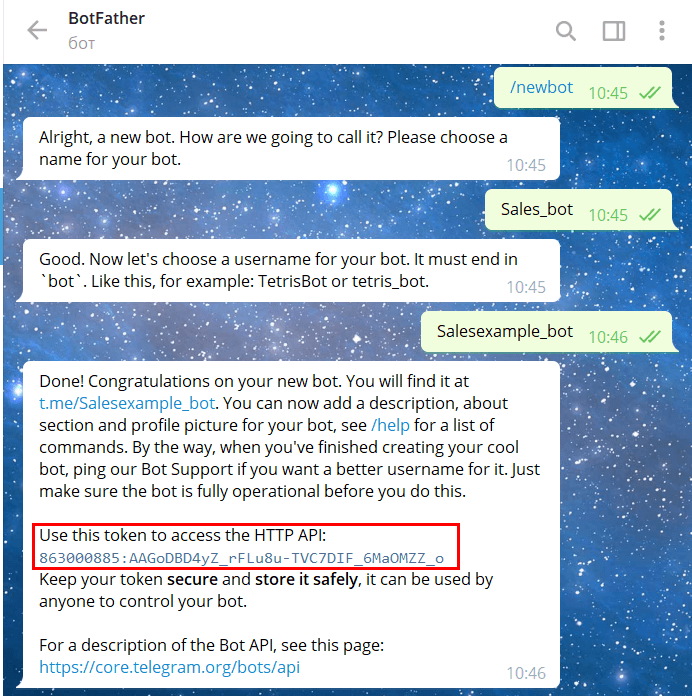 Keep in mind that the certificate file has to be uploaded as multipart/form data in PEM encoded (ASCII BASE64) format.
First let’s generate some certificates:
Using OpenSSL:openssl req -newkey rsa:2048 -sha256 -nodes -keyout YOURPRIVATE.key -x509 -days 365 -out YOURPUBLIC.pem -subj "/C=US/ST=New York/L=Brooklyn/O=Example Brooklyn Company/CN=YOURDOMAIN.EXAMPLE"
You’ll end up with 2 files, a private key and the public certificate file. Use YOURPUBLIC.PEM as input file for setting the webhook.
Using Java keytool:keytool -genkey -keyalg RSA -alias YOURDOMAIN.EXAMPLE -keystore YOURJKS.jks -storepass YOURPASSWORD -validity 360 -keysize 2048
What is your first and last name? [test.telegram.org]: What is the name of your organizational unit? [Unknown]: What is the name of your organization? [Unknown]: What is the name of your City or Locality? [Unknown]: What is the name of your State or Province? [Unknown]: What is the two-letter country code for this unit? [Unknown]: Is CN=test.telegram.org, OU=Unknown, O=Unknown, L=Unknown, ST=Unknown, C=Unknown correct? [no]: yes
Once done you’ll need 2 more commands to export the public certificate file from the generated store (you’ll be using the store for your JVM and the PEM for setting the webhook)
Convert the JKS to pkcs12 (intermediate step for conversion to PEM):keytool -importkeystore -srckeystore YOURJKS.jks -destkeystore YOURPKCS.p12 -srcstoretype jks -deststoretype pkcs12
Convert PKCS12 to PEM (requires OpenSSL)openssl pkcs12 -in YOURPKCS.p12 -out YOURPEM.pem -nokeys
Using Windows:
Creating a self-signed certificate using Windows native utilities is also possible, although OpenSSL binaries for Windows are available online.certreq -new TEMPLATE.txt RequestFileOut generates a CSR.
TEMPLATE.txt example file:
[NewRequest] ; At least one value must be set in this section Subject = "CN=DOMAIN.EXAMPLE" KeyLength = 2048 KeyAlgorithm = RSA HashAlgorithm = sha256 ;MachineKeySet = true RequestType = Cert UseExistingKeySet=false ;generates a new private key (for export) Exportable = true ;makes the private key exportable with the PFX
A self-signed certificate is generated and installed, to use the certificate for a self-signed webhook you'll have to export it in PEM format.
After following the above you'll end up with a nice self-signed certificate. You’ll still have to set the webhook, and handle SSL correctly.
The setWebhook method is needed for both types. For a verified certificate with a trusted root CA, it’s enough to use the setWebhook method with just the URL parameter.
curl -F "url=https://<YOURDOMAIN.EXAMPLE>/<WEBHOOKLOCATION>" https://api.telegram.org/bot<YOURTOKEN>/setWebhookFor a self-signed certificate an extra parameter is needed, certificate, with the public certificate in PEM format as data.
curl -F "url=https://<YOURDOMAIN.EXAMPLE>/<WEBHOOKLOCATION>" -F "certificate=@<YOURCERTIFICATE>.pem" https://api.telegram.org/bot<YOURTOKEN>/setWebhookThe -F means we’re using the multipart/form-data-type to supply the certificate, the type of the certificate parameter is inputFile. Make sure that you’re supplying the correct type.
Both parameters for the setWebhook method are classed as optional. Calling the method with an empty URL parameter can be used to clear a previously set webhook.
curl -F "url=" https://api.telegram.org/bot<YOURTOKEN>/setWebhookKeep in mind that the URL parameter starts with https:// when setting a webhook. By default that means we’re knocking at your door on port 443. If you want to use another port (80,88 or 8443), you’ll have to specify the port in the URL parameter.
url=https://<YOURDOMAIN.EXAMPLE>:88/<WEBHOOKLOCATION>If you already have a verified certificate and our servers don’t trust your root CA, we have an alternative way for you to set a webhook. Instead of using the setWebhook method without the certificate parameter, you can use the self-signed method. Your CA's root certificate has to be used as an inputFile for the certificate parameter.
curl -F "url=https://<YOURDOMAIN.EXAMPLE>" -F "certificate=@<YOURCAROOTCERTIFICATE>.pem" https://api.telegram.org/bot<YOURTOKEN>/setWebhook
You can use these commands to quickly convert a DER formatted root certificate to PEM:
Using OpenSSL:openssl x509 -inform der -in root.cer -out root.pem
Using Java keytool:keytool -import -alias Root -keystore YOURKEYSTORE.JKS -trustcacerts -file ROOTCERT.CER
The root certificate needs to be imported in your keystore first:keytool -exportcert -alias Root -file <YOURROOTPEMFILE.PEM> -rfc -keystore YOURKEYSTORE.JKS
Once done, set your webhook with the root-pem-file and you’ll be good to go. If you need more pointers, have a look at the self-signed part of this guide.
Once you’ve crafted your certificate, your CA might present you with a nice bundle. Most bundles contain a root certificate, your public certificate and sometimes an intermediate certificate. StartSSL is one of many CA’s that’ll supply such an intermediate beast..jpg) This certificate has to be supplied in the chain of certificates you’re presenting to us when we connect to your server. If an intermediate was used to sign your certificate but isn’t supplied to our servers, we won’t be able to verify the chain of trust and your webhook will not work.
This certificate has to be supplied in the chain of certificates you’re presenting to us when we connect to your server. If an intermediate was used to sign your certificate but isn’t supplied to our servers, we won’t be able to verify the chain of trust and your webhook will not work.
If your webhook isn’t working and you’re wondering if the chain is complete:
Here’s an example of a complete chain, note that in this case 2 intermediate certificates have been supplied.
Even though your browser might not complain when visiting your page, an incomplete chain will not work for your webhook. If your chain is incomplete we have some tips to add them to your current setup:
Apache:
Add the intermediate certificate to the end of the file configured in the SSLCertificateFile directive of your virtual host configuration. If you’re using an older version than Apache 2.4.8, you may use the SSLCertificateChainFile directive instead.
Nginx:
Add the intermediate certificate to the end of the file configured in the ssl_certificate_key directive of your virtual host configuration.
A quick command for doing this correctly:cat your_domain_name.pem intermediate.pem >> bundle.pem
Make sure the order is correct, expect failure otherwise.
Java keytool:keytool -import -trustcacerts -alias intermediate -file intermediate.pem -keystore YOURKEYSTORE.jks
The end result of all this is a complete certificate chain, backed by either a root certificate we trust or, in the case of an untrusted root, a root certificate you're supplying to us. Make sure to verify your setup again after adding the intermediate, once done, you're good to go!
Update examples
A set of example updates, which comes in handy for testing your bot.
Message with text using curl:
curl --tlsv1.2 -v -k -X POST -H "Content-Type: application/json" -H "Cache-Control: no-cache" -d '{ "update_id":10000, "message":{ "date":1441645532, "chat":{ "last_name":"Test Lastname", "id":1111111, "first_name":"Test", "username":"Test" }, "message_id":1365, "from":{ "last_name":"Test Lastname", "id":1111111, "first_name":"Test", "username":"Test" }, "text":"/start" } }' "https://YOUR. BOT.URL:YOURPORT/"
 --tlsv1.2 will force using TLS1.2.
Message with text using Postman:
More examples in curl:
curl -v -k -X POST -H "Content-Type: application/json" -H "Cache-Control: no-cache" -d '{ "update_id":10000, "message":{ "date":1441645532, "chat":{ "last_name":"Test Lastname", "id":1111111, "type": "private", "first_name":"Test Firstname", "username":"Testusername" }, "message_id":1365, "from":{ "last_name":"Test Lastname", "id":1111111, "first_name":"Test Firstname", "username":"Testusername" }, "text":"/start" } }' "https://YOUR.BOT.URL:YOURPORT/" curl -v -k -X POST -H "Content-Type: application/json" -H "Cache-Control: no-cache" -d '{ "update_id":10000, "message":{ "date":1441645532, "chat":{ "last_name":"Test Lastname", "id":1111111, "type": "private", "first_name":"Test Firstname", "username":"Testusername" }, "message_id":1365, "from":{ "last_name":"Test Lastname", "id":1111111, "first_name":"Test Firstname", "username":"Testusername" }, "forward_from": { "last_name":"Forward Lastname", "id": 222222, "first_name":"Forward Firstname" }, "forward_date":1441645550, "text":"/start" } }' "https://YOUR.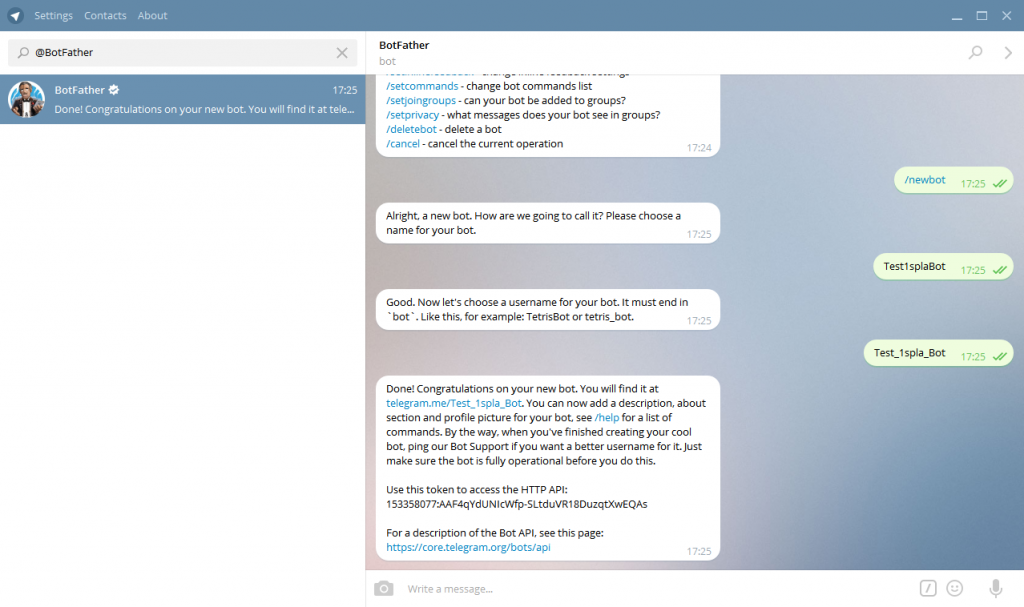 BOT.URL:YOURPORT/"
 curl -v -k -X POST -H "Content-Type: application/json" -H "Cache-Control: no-cache" -d '{ "update_id":10000, "message":{ "date":1441645532, "chat":{ "last_name":"Test Lastname", "type": "private", "id":1111111, "first_name":"Test Firstname", "username":"Testusername" }, "message_id":1365, "from":{ "last_name":"Test Lastname", "id":1111111, "first_name":"Test Firstname", "username":"Testusername" }, "forward_from": { "id": -10000000000, "type": "channel", "title": "Test channel" }, "forward_date":1441645550, "text":"/start" } }' "https://YOUR.BOT.URL:YOURPORT/" curl -v -k -X POST -H "Content-Type: application/json" -H "Cache-Control: no-cache" -d '{ "update_id":10000, "message":{ "date":1441645532, "chat":{ "last_name":"Test Lastname", "type": "private", "id":1111111, "first_name":"Test Firstname", "username":"Testusername" }, "message_id":1365, "from":{ "last_name":"Test Lastname", "id":1111111, "first_name":"Test Firstname", "username":"Testusername" }, "text":"/start", "reply_to_message":{ "date":1441645000, "chat":{ "last_name":"Reply Lastname", "type": "private", "id":1111112, "first_name":"Reply Firstname", "username":"Testusername" }, "message_id":1334, "text":"Original" } } }' "https://YOUR.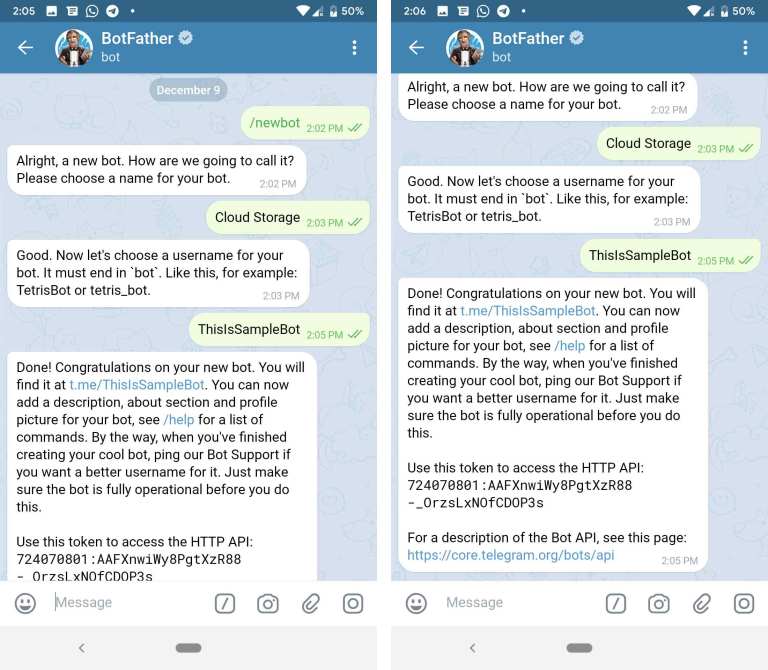 BOT.URL:YOURPORT/"
 curl -v -k -X POST -H "Content-Type: application/json" -H "Cache-Control: no-cache" -d '{ "update_id":10000, "edited_message":{ "date":1441645532, "chat":{ "last_name":"Test Lastname", "type": "private", "id":1111111, "first_name":"Test Firstname", "username":"Testusername" }, "message_id":1365, "from":{ "last_name":"Test Lastname", "id":1111111, "first_name":"Test Firstname", "username":"Testusername" }, "text":"Edited text", "edit_date": 1441646600 } }' "https://YOUR.BOT.URL:YOURPORT/" curl -v -k -X POST -H "Content-Type: application/json" -H "Cache-Control: no-cache" -d '{ "update_id":10000, "message":{ "date":1441645532, "chat":{ "last_name":"Test Lastname", "type": "private", "id":1111111, "first_name":"Test Firstname", "username":"Testusername" }, "message_id":1365, "from":{ "last_name":"Test Lastname", "id":1111111, "first_name":"Test Firstname", "username":"Testusername" }, "text":"Bold and italics", "entities": [ { "type": "italic", "offset": 9, "length": 7 }, { "type": "bold", "offset": 0, "length": 4 } ] } }' "https://YOUR. BOT.URL:YOURPORT/"
 curl -v -k -X POST -H "Content-Type: application/json" -H "Cache-Control: no-cache" -d '{ "update_id":10000, "message":{ "date":1441645532, "chat":{ "last_name":"Test Lastname", "type": "private", "id":1111111, "first_name":"Test Firstname", "username":"Testusername" }, "message_id":1365, "from":{ "last_name":"Test Lastname", "id":1111111, "first_name":"Test Firstname", "username":"Testusername" }, "audio": { "file_id": "AwADBAADbXXXXXXXXXXXGBdhD2l6_XX", "duration": 243, "mime_type": "audio/mpeg", "file_size": 3897500, "title": "Test music file" } } }' "https://YOUR.BOT.URL:YOURPORT/" curl -v -k -X POST -H "Content-Type: application/json" -H "Cache-Control: no-cache" -d '{ "update_id":10000, "message":{ "date":1441645532, "chat":{ "last_name":"Test Lastname", "type": "private", "id":1111111, "first_name":"Test Firstname", "username":"Testusername" }, "message_id":1365, "from":{ "last_name":"Test Lastname", "id":1111111, "first_name":"Test Firstname", "username":"Testusername" }, "voice": { "file_id": "AwADBAADbXXXXXXXXXXXGBdhD2l6_XX", "duration": 5, "mime_type": "audio/ogg", "file_size": 23000 } } }' "https://YOUR. BOT.URL:YOURPORT/"
 curl -v -k -X POST -H "Content-Type: application/json" -H "Cache-Control: no-cache" -d '{ "update_id":10000, "message":{ "date":1441645532, "chat":{ "last_name":"Test Lastname", "type": "private", "id":1111111, "first_name":"Test Firstname", "username":"Testusername" }, "message_id":1365, "from":{ "last_name":"Test Lastname", "id":1111111, "first_name":"Test Firstname", "username":"Testusername" }, "document": { "file_id": "AwADBAADbXXXXXXXXXXXGBdhD2l6_XX", "file_name": "Testfile.pdf", "mime_type": "application/pdf", "file_size": 536392 } } }' "https://YOUR.BOT.URL:YOURPORT/" curl -v -k -X POST -H "Content-Type: application/json" -H "Cache-Control: no-cache" -d '{ "update_id":10000, "inline_query":{ "id": 134567890097, "from":{ "last_name":"Test Lastname", "type": "private", "id":1111111, "first_name":"Test Firstname", "username":"Testusername" }, "query": "inline query", "offset": "" } }' "https://YOUR. BOT.URL:YOURPORT/"
 curl -v -k -X POST -H "Content-Type: application/json" -H "Cache-Control: no-cache" -d '{ "update_id":10000, "chosen_inline_result":{ "result_id": "12", "from":{ "last_name":"Test Lastname", "type": "private", "id":1111111, "first_name":"Test Firstname", "username":"Testusername" }, "query": "inline query", "inline_message_id": "1234csdbsk4839" } }' "https://YOUR.BOT.URL:YOURPORT/" curl -v -k -X POST -H "Content-Type: application/json" -H "Cache-Control: no-cache" -d '{ "update_id":10000, "callback_query":{ "id": "4382bfdwdsb323b2d9", "from":{ "last_name":"Test Lastname", "type": "private", "id":1111111, "first_name":"Test Firstname", "username":"Testusername" }, "data": "Data from button callback", "inline_message_id": "1234csdbsk4839" } }' "https://YOUR.BOT.URL:YOURPORT/" That's all we have for now!
Interesting in TG
Author Evgenia A. Reading 4 min Views 2.9k.
Understanding what a bot token in Telegram is is simple - it is a unique alphanumeric program identifier that is uniquely associated with it. Used when working through the bot-API interface for accurate identification. nine0003 Bot token in Telegram is used for precise identification.
Content
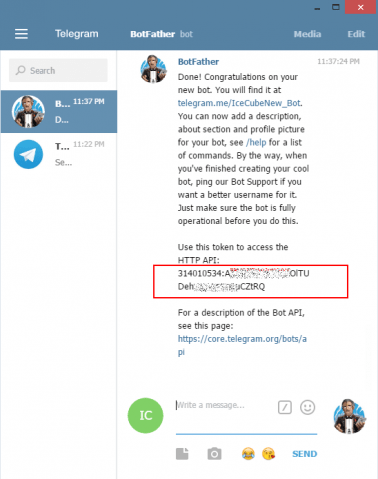
When a new bot is formed, it is assigned a unique code called a token. nine0003
Its function is to uniquely identify the application that has accessed the Bot-API service of the messenger. In the future, calls to the robot are made using a unique number.
All robots receive a unique identifier of the form 635421:DJQ-GSJ4321gh3v3-zyx15W1v3u321ew22 upon registration. All calls to the Bot API are made by requests like //api.telegram. org/bot/method_name. The API call string for this token will take the form //api.telegram.org/bot635421:DJQ-GSJ4321gh3v3-zyx15W1v3u321ew22/getMe. nine0003
There are several ways to find out the bot token, such as: may take decades;
For an ordinary user, the probability of taking possession of a bot is small. It follows that the offer of services and software for hacking appears to be an attempt to sell low-quality goods or unfulfillable obligations, i.e. fraud.
Obtaining someone else's token is tantamount to hacking it, and may be prosecuted under administrative or criminal law. Attempts to find out the code fraudulently are also punishable by law. Scripts have been written to deceive Telegram-bot, the main task of which is to try to confuse the program and break the scenario of its work. I will pay attention to the precautions that reduce the likelihood of an account being hacked:
Despite the statements and the $300,000 bonus promised by the creator of the messenger, no one has yet been able to find a solution to the problem.
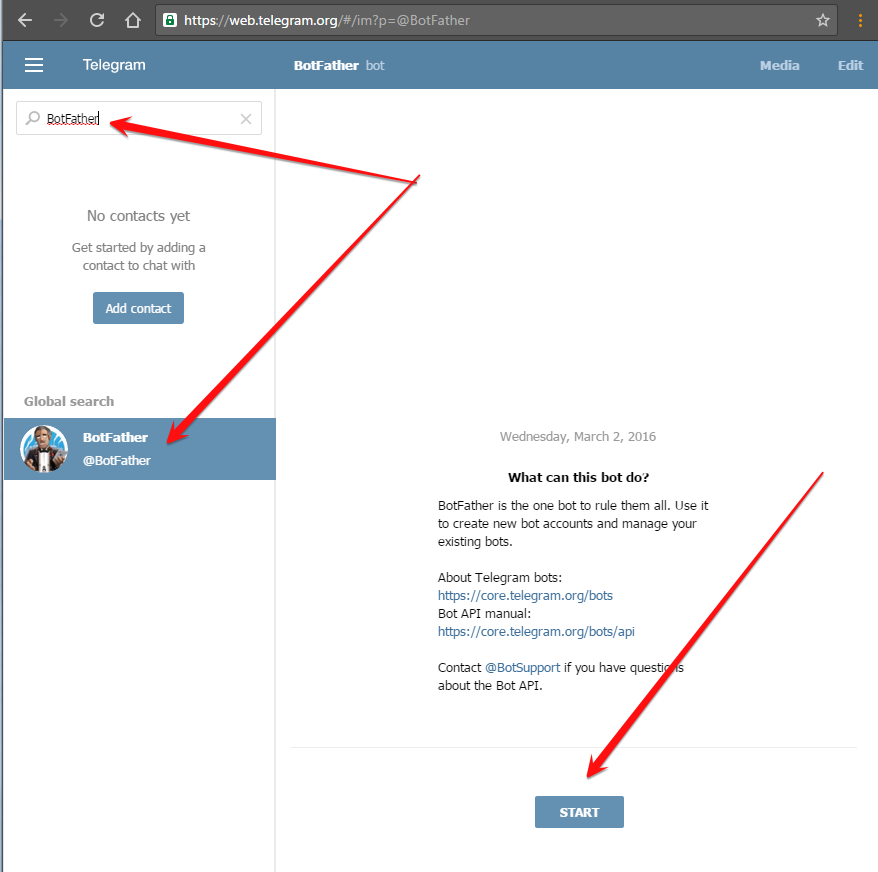
It is convenient to get a robot token using @BotFather.
@BotFather allows you to get a robot token.Log in to your account and do the following:
A simple and quick way to get a token in Telegram is to use specialized programs, information about which is posted on the official website of the messenger. Steps to get the ID:
If there are no registered robots in the account, the identifier is not displayed. You can check the correct functioning of the system by creating a new robot with the /newbots command. Successful execution of all instructions will end with the output of the token in the messenger window.
Bots are special Telegram accounts created to automatically process and send messages. Users can interact with bots using messages sent through regular or group chats. Bot logic is controlled by HTTPS requests to our Bot API.
Here are some examples of how bots are used:

As mentioned earlier, robots are special accounts that do not require a phone number when created. In fact, these accounts play the role of an interface to your service that runs on a remote server. nine0003
The most interesting thing about robots is that you don't need to learn low-level methods of working with MTProto and encryption to create them - communication with the robot is organized using the usual HTTPS interface with simplified Telegram API methods. We called it Bot API.
Note We also recommend that you read the detailed description of the Bot API.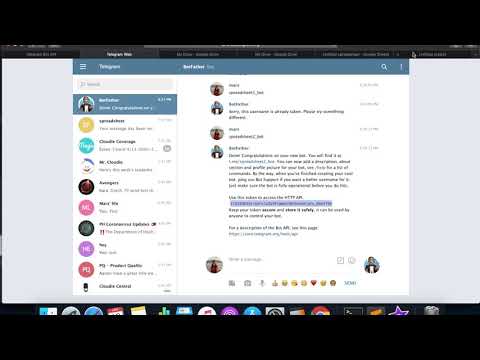
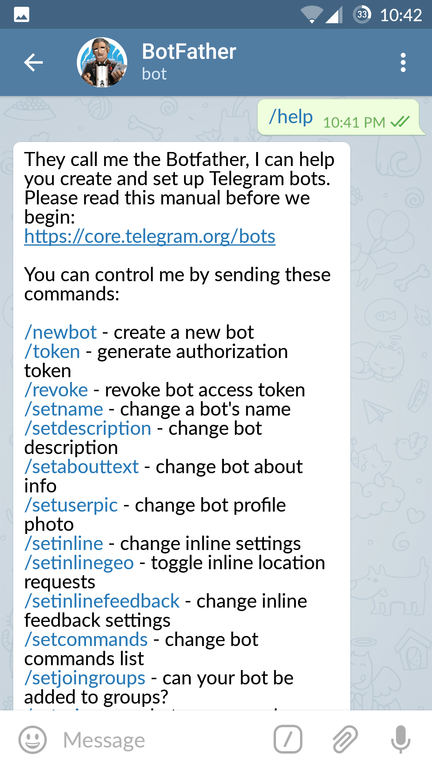
There is a... Bot for this. Just email the user @BotFather and follow their instructions. Once you have created a bot and received your authorization key (token), go to the Bot API documentation section to start configuring your bot. nine0003
t.me/ or search by username. 
Telegram bots have many unique features, such as customized keyboards, additional interfaces for default commands, external linking, and special privacy modes for groups. nine0003
Users can communicate with your bot directly from the message input field - from any chat or group. To do this, you just need to type your bot's username and search query. After receiving a request, the bot can return any results. As soon as the user clicks on one of them, he will immediately go to the chat. In this way, you can request content from the bot in chats, groups, or channels.
Read more about inline mode on the blog »
Bots allow users to play HTML5 games in groups or private chats. The Telegram gaming platform will help to compile a table of records and notify users about rating changes.
Games have HTML5 under the hood, so you can create games of any complexity. At the moment, the Telegram team has created several demo games:
More about games in Telegram »
One of the most unusual features of the Bot API is custom keyboards . When the server sends a response, it is possible to send a command to display a special keyboard with predefined response options (see ReplyKeyboardMarkup). The Telegram client, upon receiving the message, will display your keyboard to the user. Pressing the key will immediately send the corresponding command to the server. Thus, the interaction of the robot with the user can be greatly simplified. Currently, emoji and text can be used to display on the key. Here are some examples of such keyboards:
For more information, see the description of the sendMessage method.
Commands are a more flexible way to communicate with the bot. The following syntax is recommended:
/command [optional] [argument]
The command must begin with a forward slash "/" and cannot be longer than 32 characters. Commands can consist of letters of the Latin alphabet, numbers and underscores. A few examples:
/get_messages_stats /set_timer 10min Alarm! /get_timezone London, UK
Messages starting with a slash will always be delivered to the bot (just like replying to bot messages and @mentions in chat). Telegram apps will be:
If there are several bots in the group, you can add the bot name after the command to avoid collisions in common commands:
/start@TriviaBot /start@ApocalypseBot
This happens automatically if you select a command from the list of available commands. nine0003
To make it easier for users to work with bots, we ask all developers to implement support for a few simple commands. In the Telegram application interface there will be shortcuts (quick links) for these commands.

When trying to start communication with the robot, the user will see the button START . Links Help and Settings will also be available on the bot profile page.
Bots are often added to groups to receive various information - news, notifications, etc. However, when adding a bot, you probably asked yourself: “What if this little asshole forwards all group correspondence somewhere “to the left”?” That is why robots have privacy modes .
A robot with privacy enabled will not receive all messages, but only messages that meet these conditions:
 )
) This is good in every way: first, some people will sleep soundly (in their tinfoil hats) without fear of being bugged. Secondly, the privacy mode saves developers from having to process hundreds of unnecessary messages from group chats.
nine0002 Privacy mode is enabled by default in all bots. It can be turned off - then the bot will start receiving all messages, just like a regular user. All participants in the conference can see the current status of the privacy mode in the list of group members.We recommend disabling privacy mode only when absolutely necessary. In the vast majority of cases, requesting a forced reply to a bot message will be sufficient.
Bots have an external binding mechanism that allows you to pass additional parameters at startup. For example, to transfer the user's authorization token in order to connect his account with some external service. nine0003
Each robot has a link with which you can start a dialogue with it - https://t. . You can add parameters * start or startgroup to this link with a value up to 64 characters. Example:  me/
me/
https://t.me/triviabot?startgroup=test
Valid characters are A-Z , a-z , 0-9 , _ and - . We recommend using base64url to encode parameters. nine0003
Following the link with the parameter start will start a chat with the bot, while the START button will be displayed in the text input field. When clicking on the link with parameter startgroup , the user will be prompted to add the bot to one of the available groups. As soon as the user confirms his action (presses the START button or selects a group), the bot will receive a message in the following format:
/start PAYLOAD
In PAYLOAD will be parameter value start or startgroup which was passed in the reference.
Suppose the site example.com wants to send notifications to the user using a Telegram bot. Below is a description of the sequence of actions to implement sending notifications to a user with ID 123 .
$memcache_key = 'TESTKEY' 123 with key $memcache_key to Memcache for 3600 seconds (one hour) https://t.me/ExampleComBot?start=TESTKEY /start . If the key exists, write the chat_id passed to the webhook to telegram_chat_id for user 123 . Delete the key from Memcache.
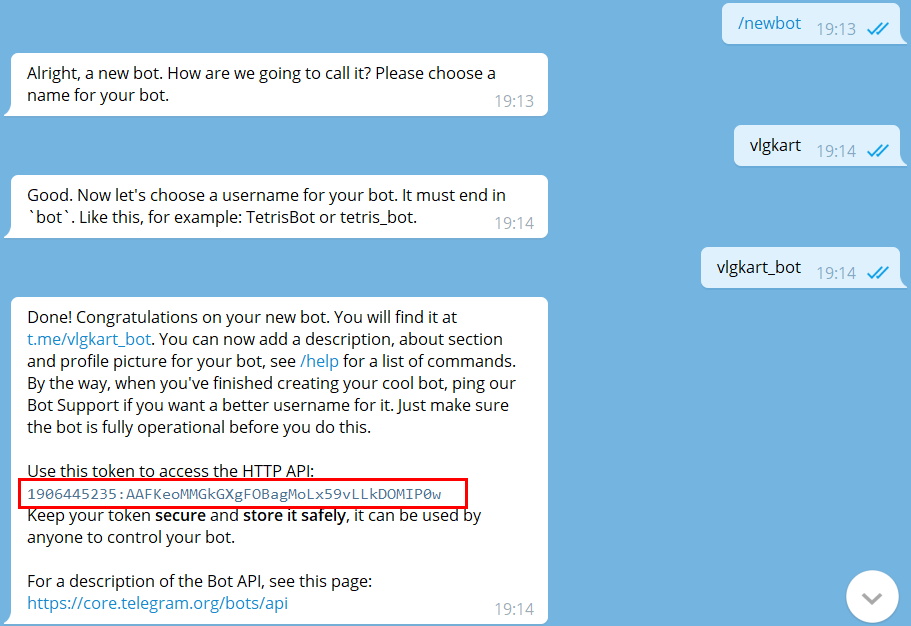
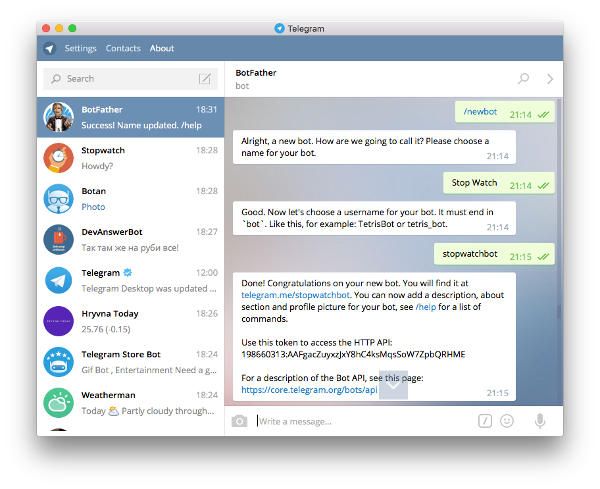
123 , we first check telegram_chat_id . If it exists, we use the sendMessage method to send a message to the user. BotFather - one bot to rule them all. With it, the settings of existing bots are changed and new ones are created.
Write the command /newbot to create a new robot. BotFather will ask you for the name of the new bot and offer to come up with a username.
Name (name) will be displayed in contacts and chats.
Username is a short name in Latin that is used for bot mentions and in profile links in telegram.me. Username must consist of Latin letters, underscores and numbers and be from 5 to 32 characters long. Also, the username must end with "bot", for example: "tetris_bot" or "TetrisBot". nine0003
The key (token) is a character set of the form 110201543:AAHdqTcvCh2vGWJxfSeofSAs0K5PALDsaw , which is needed to receive and send messages using the Bot API.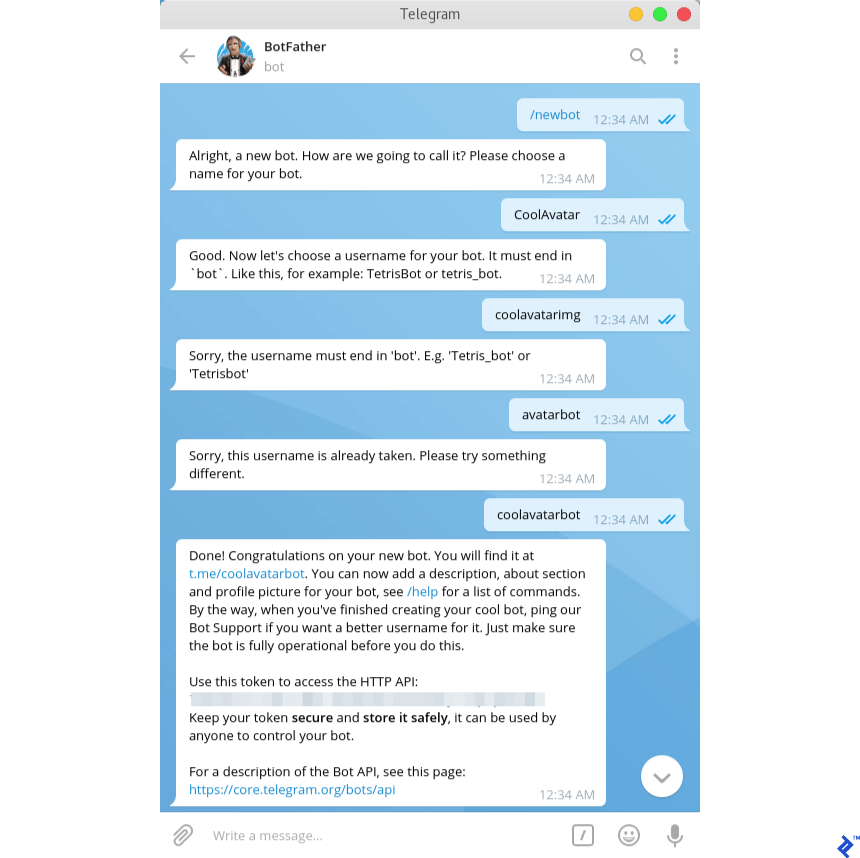
If you have lost or lost access to the token, send the command /token to generate a new one.