4 min
This article shows you how to fit the whole picture on Instagram. If you have a full portrait (9:16) image or video or a landscape (16:9) image or video, you can fit the whole picture in your Instagram post by following this tutorial.
Instagram has a maximum aspect ratio of 4:5 on portrait posts (four pixels wide for every five pixels tall). Instagram’s restriction reduces the number of very tall images that take up a lot of vertical space in the feed. Although it’s nice that Instagram keeps users from publishing massive, obtrusive posts, the 4:5 limit makes it difficult to post a whole vertical picture or video that you shot on your phone.
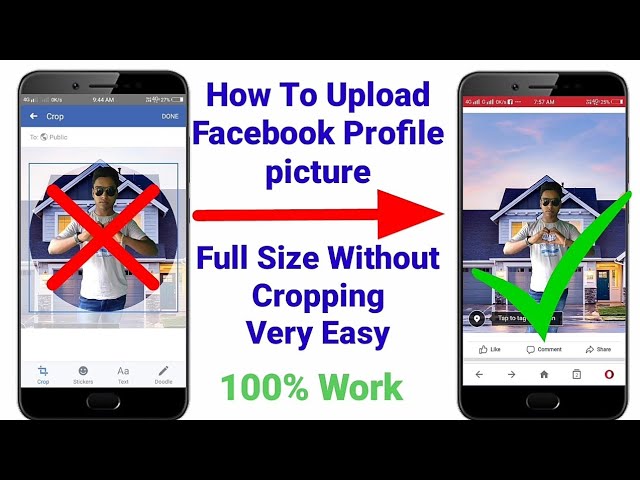
Here's what your tall photos will look like on Instagram without added borders.If you want to fit your whole picture on Instagram but it is taller than the 4:5 aspect ratio, you need to modify your image before posting. Otherwise, Instagram will automatically crop your image to a maximum of 4:5. I recommend the Kapwing resizer as it allows you to add white space on either side to bring your image to the required aspect ratio. In this article, I’ll explain how to fit the whole picture on Instagram in three simple steps:
Start by opening the Kapwing’s Resizer tool on your phone or computer. Upload your image file from camera roll or import it from a URL. Kapwing supports images, videos, and GIFs, so you can use it to resize for any kind of media.
The video resizer tool in KapwingOnce your picture loads into the editor, you’ll be taken into the Kapwing Studio Editor where you'll see a preview of your image in the center of the screen.
In the Output Size section, select the 4:5 option. This allows your photo to take up maximum vertical space in the Instagram feed without getting sized down. There is a resizing option for Instagram, 1:1, but this shrinks your image to fit in the default square shape.
Resize the image to 4:5 using the button in the Output Size listOnce you have selected the size option, Kapwing adds white padding to either side of your image to make it fit the 4:5 aspect ratio. You can change this white background to any color you want so that it stands out in the Instagram feed.
Click the red Export Image button at the top of the screen. After a few moments of processing, Kapwing makes your resized 4:5 picture or video available for download. Whether you're using a desktop computer, iPhone, Android, or tablet you'll be able to instantly download the image to your photo gallery once published.
If you're not signed into a Kapwing account, sign in or sign up using your Google or Facebook account – once you've signed into a Kapwing account, the watermark in the lower right corner will be removed from your final image.
Open the Instagram app and upload your picture. You’ll notice that Instagram crops the picture to square by default, but you can click the expand arrows or pinch the image in the lower left to fit the whole picture on Instagram. When you publish it, Instagram will resize to image width to fit the screen, the white image background will blend in with Instagram’s white background, and your whole picture will appear on Instagram with no cropping.
Note: You can also choose a black background, if you and your followers use Instagram in Dark Mode.
This tutorial shows you a workaround for posting full portrait pictures and videos on Instagram. You can use Kapwing’s Resizer to post multiple images with different sizes on Instagram, add a thin white border around your media, and publish TikTok and Snap videos. I hope that it helps speed up your social media workflow and enables you to post your beautiful and fun candid moments to Instagram.
For more information on how to resize a video for Instagram, check out this video tutorial (we give you the best sizes for each type of video too!):
Check back in at the Kapwing Resources page or our YouTube channel for other content creation tips and tutorials! And remember to tag us @KapwingApp whenever you share your content on social media– we love to see what our creators are passionate about!
Related Articles:
/
By Ariha Setalvad
|
Visit the Eiffel Tower in Paris, as I did last year, and you’ll see tourists contorting themselves to try and fit the length of the monument into Instagram’s iconic square frame. Even after Instagram began letting you shoot in landscape mode, you could still only share your work as a square. That all changes today: Instagram is updating its Android and iOS apps to enable native support for full-size landscape and portrait photos and video inside the app. They'll run alongside the traditional square photos, which will remain the default for photos shared on Instagram.
When you access your photo gallery from within the updated app, you’ll now see a format button above the camera roll. You can use this button to toggle between square and full-size images. From there, you can zoom in and out to choose the best crop for your photos.
Instagram used square photos to distinguish itself
Initially, Instagram adopted square photos as a way of distinguishing itself from other photo-sharing apps. But they were also a practical choice. They helped provide a more consistent look as you scrolled down the feed, and they also looked better on smaller phone screens.
But as screen sizes have increased, and the platform has evolved to host more serious photography, the restrictive format has left many of the app’s 300 million monthly users frustrated. According to Instagram’s own research, 20 percent of uploaded photos have been modified to fit into the square frame, often using a third-party app that adds a "letterbox" effect to enable the sharing of landscape pictures. "For the average person, one in every five stories in their feed looks like it's natively supported in our app," says Ashley Yuki, an Instagram product manager. "Which is not great."
Even as third-party apps like Square Sized and Squaready have gained popularity, they leave dead space on the edges of photos, making them smaller and harder to see. It can also be annoying and time-consuming to have to use a separate app to prep your photos beforehand.
It's annoying to have to use a separate app to prep your photos beforehand
Members of Instagram’s large fashion community will likely be among those celebrating the freedom this update brings, as will anyone who has experienced the trauma of having to choose whether to crop out either their new haircut or their new shoes. But square photos, as the signature of Instagram, will remain the default mode.
The update also unifies Instagram's photo and video filters, so now any filter can be applied to your post regardless of its format. It will be available to both iOS and Android users today.
Most Popular
There are many reasons why Instagram crops photos. Saving space on servers, the desire to fully adapt content to vertical screens of mobile technology (the key goal is to put users on an equal footing when scrolling pages is the same on the iPhone, and on Samsung, Xiaomi or Huawei), maintaining proportions for non-standard shots with a strange ratio sides.
Posting a full-size photo on Instagram without prior preparation is difficult. The social network diligently crops the edges of the picture, other people's and not only arms and legs, heads and parts of the landscape. Previously, it was necessary to avoid difficult situations with the help of separate software, but now several local solutions have appeared that allow you to publish entries with almost no additional processing in graphic editors.
When trying to combine several photos in a post, the application will offer to download the Layout program, which is provided to users for free. During its operation, a change in the full size is almost inevitable. This is due to the peculiarities of the work of Layout and the disadvantages of creating collages in general.
Contents
Usually, posting an image in full original size does not require specialized applications. However, it is possible to use programs to edit future posts. Among the most functional and convenient:
There are also filters and other editors inside Instagram. In addition, you can post posts not only in the feed, but also in direct and Stories. In this case, you can also achieve publications without a white background.
When trying to combine several photos in a post, the application will offer to download the Layout program, which is provided to users for free. During its operation, a change in the full size is almost inevitable. This is due to the peculiarities of the work of Layout and the disadvantages of creating collages in general.
Without special additional programs, the built-in “Portrait” and “Landscape” functions help to change the image format inside Instagram. You can use them at your own discretion, but if the question arises of how to post a photo on Instagram in full, they are also available. In order to take advantage of the innovations, you need to open the program in the post mode (“+”) and use the “” button to change the format. The social network does not suggest other editing methods (with the exception of applying filters).
This Android app has paid features, but free features are enough to download a full size photo. Run the program, select the required picture. A light frame will be displayed - you can either leave it as it is, or set the Instagram dimensions for the photo. In any case, all parts of the photo will remain in place.
For a social network, a small size of a photo is a significant plus, but for users it is not always good. Often, pictures lose clarity, dark pixels appear on them, and colors are distorted. To upload a photo without reducing the quality, pay attention to the following recommendations:

If Instagram severely degrades the quality of a photo, you need to check if the picture meets the required conditions:
Online communication, viewing content through Instagram is a great way to spend your leisure time. Using the social network will be even more comfortable if you understand its functionality. The order of uploading photos without cropping is something that anyone who plans to post their pictures on a social network frequently should know.
In order to upload a photo in full size to Instagram and not degrade it, you need to prepare the image in advance, fit it to the dimensions required by Instagram. For this, the “No Crop” program is suitable, which is available both in the Play Market and in the App Store. Working with it is easy:
To upload a full-size photo to Instagram and not degrade it, you need to prepare the image in advance, fit it to the dimensions required by Instagram. For this, the “No Crop” program is suitable, which is available both in the Play Market and in the App Store. Easy to work with:
The insta app deliberately degrades photos by compressing them. This is necessary to save space on the server. The result is low-quality images, lower resolution than it was originally.
Early versions of the insta app on Android had a feature to turn off compression, but this was later removed. However, it's okay. If you publish pictures in a resolution that Instagram supports, the pictures will not be compressed and, accordingly, will not deteriorate. To do this, you need to process the image before publication:
All these programs work on the same principle - they change the image format in gif or video.
You can upload an image to the page from your smartphone or tablet. Instagram is a program designed for mobile devices. The PC version has significantly fewer features.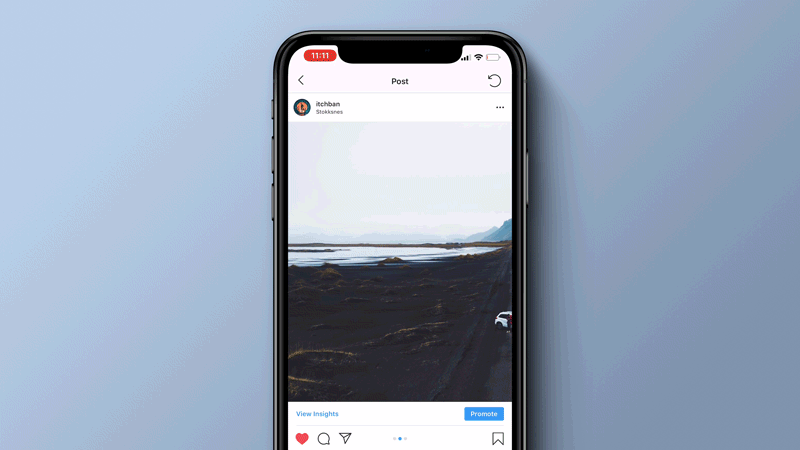
You can add a new post in the following way:
It's no secret that Insta has long allowed users to post only square pictures. At the same time, the aesthetics of the images suffered, because the original backgrounds and beautiful landscapes simply did not fit into the frame completely.
The latest version of the application allows you to post a long photo.
To fully enjoy the ability to upload vertical frames, you must:
If you have a desire to share the surrounding landscape with subscribers, then a horizontal shot will be a great way to show it.
Posting a panoramic photo so that it is not cropped can be guided by the same principles as when posting a vertical photo.
Click on the “ ” sign in the lower left corner of the selected image. After adjusting the size, click "Next" and continue editing.
The days when Instagram only allowed users to post square photos are long gone. Now the desire to publish a picture of a non-standard size arises very often.
Additional applications will help to decorate the page with a similar photo:
Some of the listed programs have editing capabilities, others will only add a frame, but all of these applications will allow you to achieve insta-format.
If you have any questions - let us know
Ask a question
Static photos on social networks can be very beautiful and high-quality, but they cannot convey movement.
Previously, this problem was solved by publishing video files. Now iPhone7 and subsequent models of phones allow you to take life-photos. They convey dynamics, but weigh less than video recordings. You can also apply filters to them and edit them to your taste.
Insta allows you to post a live photo, but after posting the image will stop moving. To convey all the charm of a life-frame, applications that convert detailed pictures to gif-format allow:
All these programs work on the same principle - they change the image format in gif or video.
Now you can upload a live photo to a social network according to the standard scheme.
We found out that you can post images of different sizes on Instagram. It is easy to add a publication if the picture was taken recently, but what to do if the footage has been in the smartphone archive for a long time, we will find out now.
After pressing “+”, the application automatically offers to publish the latest photo from the phone's memory. If the plans were to share another snapshot from the story, then you can swipe up from the bottom of the screen, open the Gallery and select the desired image.
There is a way to find a frame faster. After clicking “+”, pay attention to the upper left corner. It can be seen that by default the application opens the largest folder "Gallery". By clicking on it, you can view all the folders on the device and select the one you need.
Social networks are created to share moments of your life here and now. Insta allows you to take pictures directly in the application, edit pictures there and show them to subscribers in a matter of minutes.
To take a picture online in the application:
Show the photo to as many people as possible with hashtags. This tag will allow you to attribute your picture to any topic and make it possible for interested users to find it.
You can correctly put the hashtag as follows:
In addition to the fact that the social network changes their resolution when uploading photos, it can significantly degrade their quality. This is primarily due to technical failures on the service. After all, in order not to waste time, the program compresses the file and also quickly downloads it. The number of pixels is reduced. Therefore, the quality becomes different.
The file format also matters if it is loaded correctly. For Insta, the PNG format is preferred, not JPEG, like many mobile devices.
What is the best way to keep the quality of uploaded photos? For gadgets with the Android operating system, you can customize the download so that the photos are no longer cloudy and deformed. This is done as follows:
Why doesn't Instagram upload full videos? Newbies who have just signed up for the photo network cannot understand why Instagram crops the video. The thing is that the length of the video on the social network is strictly limited. The user has the right to upload a video to his profile, the duration of which does not exceed one minute. You can download the rest with the following file. Thus, while watching a video, subscribers will be able to watch its continuation by simply flipping the page with the video.
As I wrote above, inside the square the photo can be rotated.
To get started, select the photo you want from your phone's gallery or a cloud service (such as Dropbox or Google Drive). The fact that you can select an image from the storage on the Internet is very convenient. So you can upload photos taken with a camera that are stored on your computer to Instagram.
The main window of the application in which the photo is processed looks like this.
Using the buttons in the upper left corner you can move your image on the canvas a little. You can click on them multiple times. The result of the first.
The result of working with the second.
The top right buttons will help you rotate the photo and fill the background with color.
You can choose any color, the palette is attached.
For example, I chose blue.
As I wrote above, the photo can be rotated inside the square.
The result can be saved to the phone's memory, sent to Instagram and other social networks. The bottom control panel will help you with this.
In general, I liked InstaSquareMaker more than InstaSize. To post rectangular photos on Instagram, I will use it now.
The thing is that Instagram only allows square photos. And their size should be 1080 by 1080 pixels. If you want to post a rectangular photo, the application will automatically cut it into a square for you. And he will not care what kind of photo you get in the end. Therefore, before publishing, you have to crop the photo to the desired square parameters. This can be done using Photoshop or any other photo editor.
Have you ever come across a situation when you take a great photo, add it to Instagram, and it crops you and in the end it turns out not at all what you wanted?
The thing is that Instagram only allows square photos. And their size should be 1080 by 1080 pixels. If you want to post a rectangular photo, the application will automatically cut it into a square for you. And he will not care what kind of photo you get in the end. Therefore, before publishing, you have to crop the photo to the desired square parameters. This can be done using Photoshop or any other photo editor.
We figured out the publications, but what to do when the photo is cut off in the story? The aspect ratio for Instagram Stories is exactly 9:16. This is the format of most smartphones. That is, content for stories should be 1080 x 1920 pixels, and the smallest size allowed is 600 x 1067.
You can use the recommendation above and simply move the photo with your fingers or using the arrow icon. But then it turns out that your story will be displayed differently for those who view it from a tablet and from a phone.
To prevent this from happening, first crop the photo for stories to 1080 by 1920. In this form, everything will be displayed correctly and beautifully. Now you know how to post a photo on Instagram in a rectangular form without cropping.
2. Sign in to your Google account or create a new one (this action will be prompted when you go to the Instagram search in the app store)
without an application, for example, from a laptop, is somewhat more difficult.
In our article, we will tell you how to post photos using the official Instagram application and share the most affordable ways to upload photos to this social network directly from your computer.
How to upload photos to Instagram from your phone?
1. Download and install the official Instagram application
2. After entering or registering, press the button in the middle with the sign +
on the main screen 3.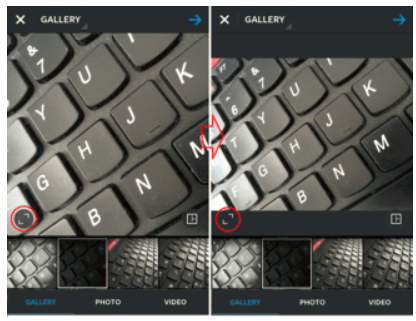 In the window that appears, select the photo you want to upload and click the “Next” button
4. In the new window, you can use the suggested filters or skip this step by clicking “Next”.
5. You can then add a caption, tag users, and indicate the location where the photo was taken. Then click "Share" and the photo will appear in your profile!
How to post photos to Instagram from a computer?
There are several ways to post a photo to Instagram without using the mobile app.
Method 1: Posting via Bluestacks
Bluestacks is an Android operating system emulator. That is, by installing this application on your computer, you can download applications and use them in the usual way, as on your phone. The same applies to Instagram: you can post photos, like, reply to comments, etc. What you need to do for this:
1. Download and install Bluestacks by downloading it from the official website http://www.bluestacks.com/
2. Sign in to your Google account or create a new one (you will be prompted to do this when you go to the Instagram search in the app store)
3. Launch Instagram and sign in to your account
4. Drag and drop your desired photo to post in the emulator window; You don't even need to be running Instagram to do this. Bluestacks will prompt you to choose where to upload the photo.
5. Now you can edit the photo, add a description and publish the post.
Method 2: Upload photos with the Gramblr application
Gramblr is designed specifically to upload photos from your computer. The program for Windows or Mac can be downloaded from this site: http://gramblr.com/
1. Download and install the program, this is how the interface will look after you log in with your Instagram account login and password:
2. Following the instructions of the program, drag or click in the center to select a photo. After that, you will be asked to edit the photo, apply filters and add a description.
3. Click the "Send" button and the photo will appear in your profile! The photo can also be published later: to do this, select the “Upload at another time” option (the computer must be turned on at the time you planned to post the photo: the program works only online).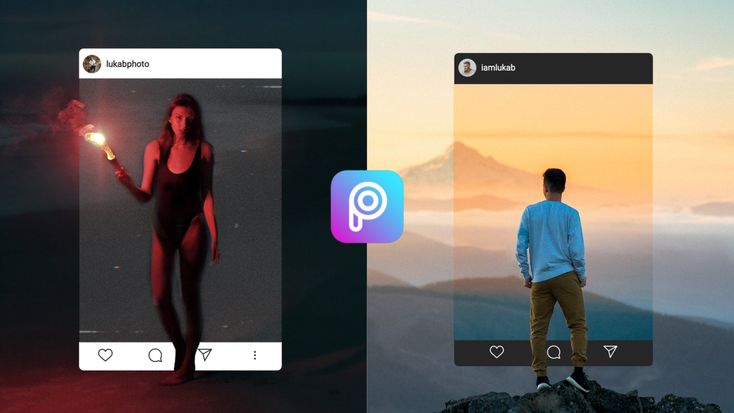
Method 3: delayed posting service
Is it possible to post photos on Instagram without using any applications at all? Auto-posting services can save a lot of time, and they do not need to be downloaded to your computer. Popular are https://onlypult.com/ and https://smmplanner.com/
The principle of operation of these sites is approximately the same: you connect an account and set a certain time when posts (photos or videos) should be published. That is, you can schedule publications a month in advance at a time and no longer waste time on it. Also, for example, smmplanner has a built-in image editor and a free plan is available.
But be careful: if you use mass following or mass liking, then using delayed posting services may attract attention from Instagram and your account may be temporarily blocked.
Method 4: using the official application for Windows 10
If you have Windows 10, then you can install the Instagram application on your computer, however, so far the functionality is limited: you can make a post only if you have a tablet or a computer with a touch screen or a camera - you will not be able to upload photos directly from the computer.
We hope you found our article useful! Now you know how to post photos on Instagram from both your phone and personal computer.
We know that many Instagram users often ask the question: “How many photos can I post on Instagram?”
The question is fair, because Instagram imposes restrictions not only on the number of likes, subscriptions and comments, but also on the number of posts per day. And subscribers will not appreciate it if they see only your publications in the feed all day long. The safe limit for young accounts will be 2-4 photos per day, for the rest - no more than 9-12 photos.
Also frequently asked: “Why can't I post a photo on Instagram?”
There can be many reasons, we will look at the main ones:
- check your Internet connection: when the signal is very weak, photos may not load
- restart your device: Instagram often crashes when trying to upload a photo is often memory of your phone
- close the application and start it again
Step 3 : Click the button to post photos and videos. By default, Instagram suggests a square format. To use the original photo or video format, click on the arrow icon in the lower left corner.
On Thursday, Instagram added the ability to upload photos and videos in rectangle proportions in addition to square. Now they can publish, in particular, landscape (horizontal) and portrait (vertical) shots.
This decision was made due to the fact that approximately one in five photos posted on Instagram is not square. According to the service’s own research, users often refuse to publish photos if they cannot fit all the necessary content in a square area (in the case of shooting group photos or tall objects). At the same time, most of the audience used third-party tools to publish pictures of non-standard proportions.
Instagram profile frames will continue to be displayed as square frames, while photos and videos will appear in the subscriber's news feed in the format in which they are posted by the user. The proportions of the width and length of the added content can range from 1. 91 to 1 to 4 to 5.
Step 1 : Make sure you have the latest version of the Instagram app installed on your device. To do this, check for an update in the App Store, Updates tab.
Step 2 : Launch the Instagram app.
Step 3 : Click the button to post photos and videos. By default, Instagram suggests a square format. To use the original photo or video format, click on the arrow icon in the lower left corner.
Step 4 : Click next to apply filters and post to social media.
Instagram was launched in October 2010. Since the advent of the social network, photos in it have been only square. Rectangular photos had to be cropped or, with the help of third-party applications, “draw” fields to them.
The update also affected color correction. In particular, photos and videos now have the same set of filters, while the intensity of the video overlay can be changed.
Instagram will not be able to take an animated * gif file and make it move after posting. It will look like a static picture. To make the photo move, you will have to convert the gif to mp4 or avi, or to another supported video format.
Format: photos, videos, boomerangs, collage. The user in the collage mode is offered 6 different formats - you can place from 2 to 6 photos in a vertical and horizontal arrangement.
Full-size and vertical with a ratio of 9:16
Image quality : 1080 px × 1920 px
SMMplanner has a new tool available - Story Editor, where you can easily create beautiful stories for Instagram. With it, you don't have to think about image formats and styles. The functionality of the editor is constantly updated.
Sources
http://oinste.com/kak-vylozhit-foto-v-instagram-v-fulnom-size-chto-delat-kogda-obrezaet/
http://smm-wiki.com/kak- vylozhit-foto-v-fulnom-razmere-v-instagram.html
http://instaplus.me/blog/big-photo/
http://vinstagrame. ru/foto/kak-vylozhit-foto-v-instagram -v-fulnom-size.html
http://insta-helper.com/kak-vylozhit-foto-v-instagram/
http://instalogiya.ru/insta_nav/pochemu-instagram-obrezaet-foto
http: //i-4-u.ru/prilozheniya/kak-vylozhit-v-instagram-pryamougolnuyu-fotografiyu-prilozhenie-instasquaremaker/
http://instasoft.ru/blog/114-kak-vykladyvat-foto-tak-chtoby-instagram-ikh-ne-obrezal
http://ru.doinsta.com/blog/kak-bystro-vylozit-foto -v-instagram-do-insta/
http://www.digger.ru/news/kak-publikovat-v-instagram-pryamougolnye-foto-i-video
http://smmplanner.com/blog/rukovodstvo- po-formatam-publikacij-v-intagram/
Share:
×
Recommended view
Adblock
detector
Posting a photo on Instagram in full size without prior preparation is difficult. The social network diligently crops the edges of the picture, other people's and not only arms and legs, heads and parts of the landscape. Previously, it was necessary to avoid difficult situations with the help of separate software, but now several local solutions have appeared that allow you to publish entries with almost no additional processing in graphic editors.
There are many reasons why Instagram crops a photo. Saving space on servers, the desire to fully adapt content to vertical screens of mobile technology (the key goal is to put users on an equal footing when scrolling pages is the same on the iPhone, and on Samsung, Xiaomi or Huawei), maintaining proportions for non-standard shots with a strange ratio sides.
Together, these factors make us look for ways to get around the restrictions so that Instagram does not cut off the excess.
You can add a full photo in the following ways:
It has long been possible to take a picture and immediately upload it to Instagram without a white background, previously used to get into standard proportions. An automatically arranged transparent margin will now appear around the edges. It is better to immediately follow the proportions of 16 d9and choose a resolution of 1067x600 pixels.
A full-length photo on Instagram is now added without much experimentation. Finally, a separate button appeared in the interface that allows you to stretch out a vertical shot and add everything in full size, but with frames on the sides.
You can upload a rectangular photo to Instagram, stretched horizontally and designed as a panorama, experimentally - using separate software. SwieablePanorama and InSwipe help you cut the image into pieces and load the pieces into a grid of 3 or 6 frames that are easy to scroll from left to right. The combination looks unusual and even advantageous against the background of the usual publications in the news feed.
Adjusting the original image to the proportions of a social network is a task, although annoying, not at all difficult - it is easy to find a bunch of software on the network that simplifies the task at times:
even the graphic editors pre-installed in Windows or MacOS operating systems will help to achieve a full display of the image on the pages of the social network (Microsoft's Paint allows you to resize in pixels or percentages). If Photoshop or Lightroom was at hand, then there will be no problems either.
It is important to remember only about the proportions - 16 to 9, and about a resolution of no more than 1067x600 pixels for publications that fall into the feed, and up to 1920x1080 for Stories.
An alternative to Paint, Photoshop and Lightroom is a tried and true tool that has been on the web for a long time - Canva. To upload a photo so that Instagram does not cut anything superfluous (and at the same time change some details, such as captions, filters, or even frames), Canva helps with the help of special templates pre-selected for different social networks.
In the realities of Instagram, there are special sets for publications, Stories, covers for the eternal "Stories", avatars and even grids.
As soon as you enter a suitable option in the search, the system will immediately select the missing details and help you move on to experiments, and also tell you what things you should not forget about, and what else is easy to impress the public with.
Special recommendations help you get inspired in minutes.
A whole collection of graphic editors - NoCrop, Square, Whitagram - can automatically adjust the proportions to the size of the Instagram news feed. The listed assistants adapt the content to both classic publications and Stories, and at the same time they will help with a superficial change in individual details. They will add text and effects, non-standard geometric shapes and visual elements that can emphasize the theme of the picture.
Posting a photo on the Instagram social network without cropping details around the edges will help both special software and manual adjustment of the resolution of photos or images downloaded from the network.