Social media image sizes seem to change constantly.
One moment you have the perfect cover page for your account. The next, it’s been resized and looks all pixelated and wrong.
It doesn’t help that information about official dimensions and image sizes is harder to find than a civil discussion on politics on Facebook.
But, it’s not difficult if you consult this guide to social media image sizes on all important social media platforms!
Below are the most recent social media image dimensions, as of January 2023.
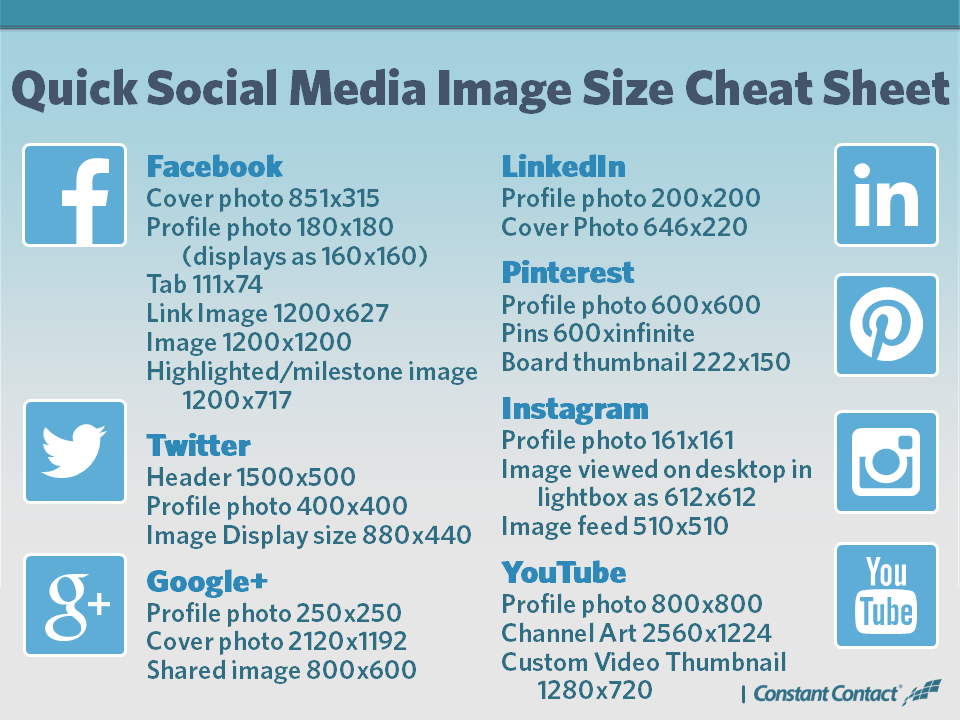
Quick social media image sizes
Instagram image sizes
Twitter image sizes
Facebook image sizes
LinkedIn image sizes
Pinterest image sizes
Snapchat image sizes
YouTube image sizes
TikTok image sizes
Why is it important to get social media image sizes right?
Bonus: Get the always-up-to-date social media image size cheat sheet. The free resource includes recommended photo dimensions for every type of image on every major network.
We go into more detail for every single network below, but this image includes the social media image sizes you probably look up most often.
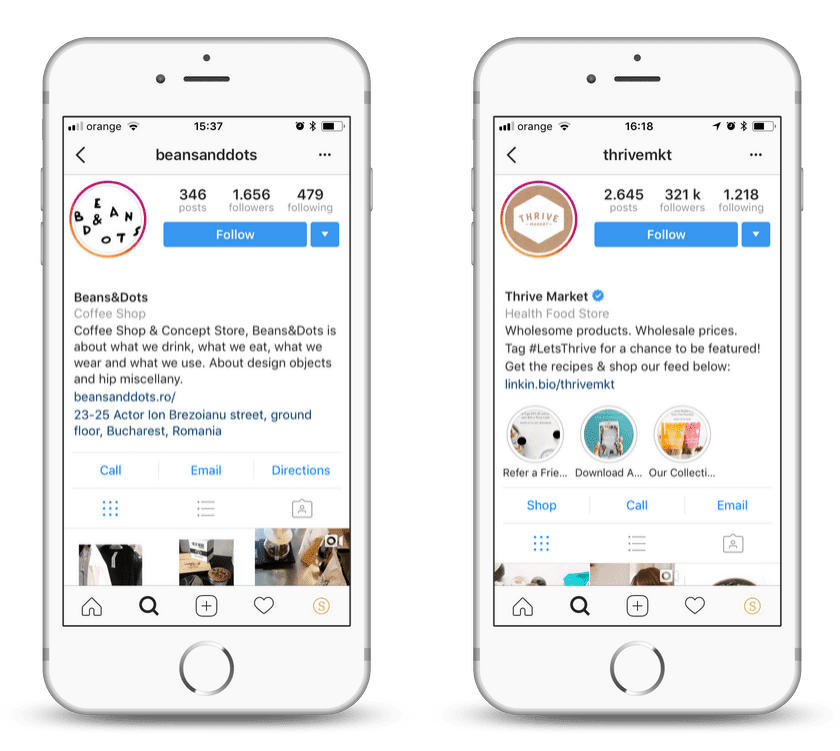
Instagram supports horizontally and vertically oriented images. It also still supports square images, which was what the platform was known for when it first launched.
This increases your brand’s options. But it also makes image dimensions a little trickier to get right. Follow these guidelines to make sure your images end up looking their best.
Instagram profile photos are displayed at 110 x 100 pixels, but the image files are stored at 320 x 320 pixels, so make sure to upload an image that’s least that big.
Even though the dimensions are in a square format, Instagram profile photos are displayed as a circle. Make sure any elements you want to focus on in the photo are centered so they don’t get cropped out.
 91:1 and 4:5 (a height between 566 and 1350 pixels with a width of 1080 pixels).”
Resource: Learn how to edit Instagram photos like a pro.
Resource: Take your Instagram Stories to the next level with these free templates.
 91:1 and 4:5
The formula for going viral
Everything you need to make engaging content. Post templates, an AI hashtag generator, and access to Canva and Grammarly Pro in Hootsuite.
Get 60 days for $0
Tweets that include images consistently get more click-throughs, more likes, and more Retweets than non-image Tweets.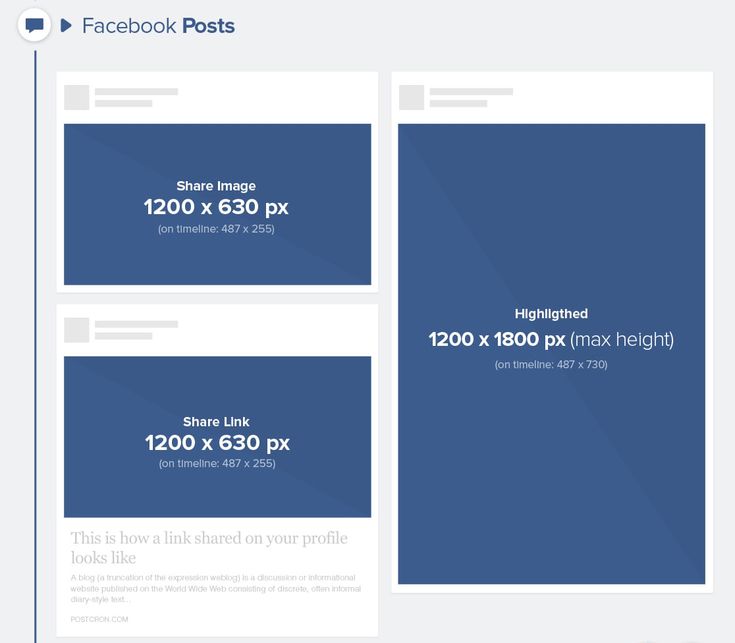 In fact, Tweets with visual content are three times more likely to get engagement.
So, choosing the right images and creating great visual content for Twitter matters. And, of course, that includes getting Twitter image sizes right.
 Up to 15MB on the web.
Twitter recognizes when a Tweet includes a URL. Twitter then crawls that website, pulling in content, including a Twitter image for the summary card. (This is how it all works, by the way.)
 800 x 800 for 1:1 aspect ratio. Max file size of 20MB.
Resource: Find more information here on how to advertise on Twitter.
Facebook updates its design and image dimensions constantly. The best strategy to future-proof your brand’s content is to always upload the highest-quality image you can. Stick to Facebook’s recommended file formats for the best results.
Your Facebook profile picture will display at 170 x 170 pixels on desktop. But it will display as 128 x 128 pixels on smartphones.
Resource: Get more tips on creating great Facebook cover photos.
Facebook automatically resizes and formats your photos when they are uploaded for the timeline to be 500 pixels wide and to fit the 1.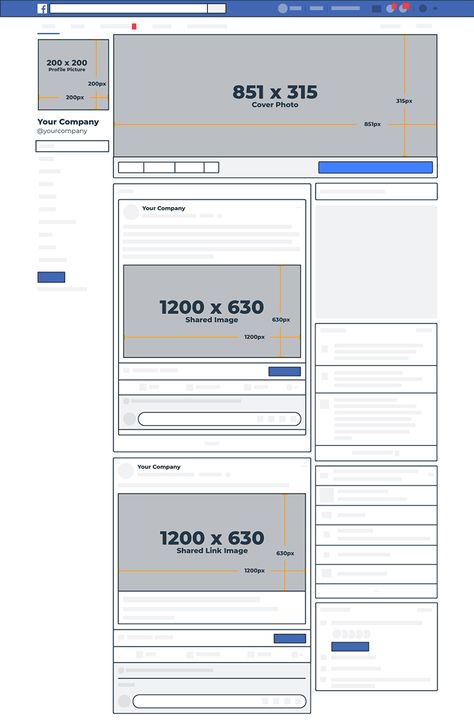 91:1 aspect ratio.
But avoid pixelation or slow load times by remembering these sizes:
 ”
” )
)Resource: Here’s more info on how to advertise on Facebook.
When you use LinkedIn for business — whether it’s via your personal profile or a company page — pairing your LinkedIn updates with images has consistently been shown to increase comments and sharing.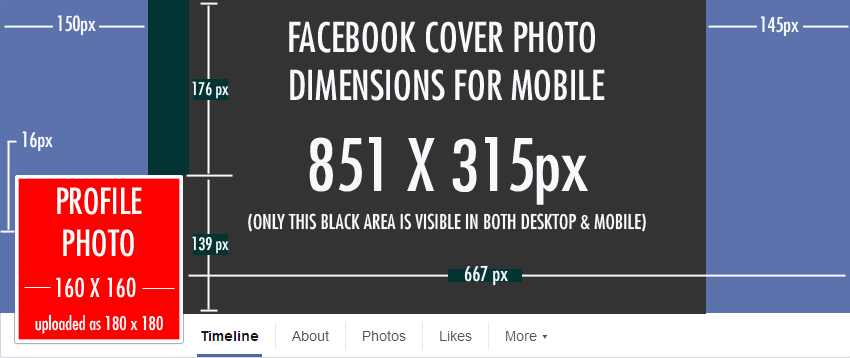
Stick to the recommended sizes below for best results. And always make sure to look at your profile and content on multiple devices before finalizing.
When pasting a URL into an update, an auto-generated thumbnail image may appear in the preview if one is available, along with the article or website title.
But, you can customize it by clicking the Image icon below the text box and selecting a photo from your computer.
 91:1 aspect ratio)
Resource: Get some advice on how to use Pinterest for business.
Resource: How to Create a Custom Snapchat Geofilter
Resource: How to make the best YouTube channel art (plus 5 free templates).
Social media marketers need to get many things right when creating visual content for social media.
You’ve got to make sure any images you use don’t defy copyright laws. If you don’t have original imagery, you’ve got to find high-quality stock photos. And you’ve got to figure out which tools out there can help elevate your social media images.
On top of that, you’ve got to get your social media image sizes right. And getting that right is really important because:
When building posts in Hootsuite, you never have to worry about getting the image size wrong. You can upload and refine your images using Canva’s editing tools right inside the Hootsuite dashboard. And the very first step of the process is selecting a network-optimized size for your image from a drop-down menu.
Here’s how it works:
Start your free 30-day trial. You can cancel anytime.
Don’t feel like memorizing all this info? Easily resize your social media images for publication through Hootsuite Compose, which includes up-to-date image dimensions for every social media network.
Get Started
Better content in half the time
Boost engagement and save time with a hashtag generator, post templates, Canva, and Grammarly Pro in Hootsuite.
Free 60-Day Trial
Back in mid-2020, as if we didn’t have enough going on, Facebook started rolling out a new desktop layout for its site.
The new design is cleaner, with much more white space, and brings it closer in line with the mobile version. But it’s also quite different. And judging by the number of people who flocked to my guide to switch back to the Classic Facebook layout from New Facebook, an awful lot of people don’t like the changes.
But it has since rolled out to everyone, like it or not, and Facebook has removed the ability to switch back. If you happen to still be using the old layout (or Classic Facebook, as they’re calling it) through a plugin or CSS layer, you can find the previous version of the Facebook size guide here.
So this is a revised version of my unofficial Facebook image size guide to account for the latest layout, which they’re calling New Facebook (the old version is being called Classic Facebook). 1
Images are an important part of using Facebook–it’s one of the world’s most popular places to share photos–but if you’ve come across this page, you’ve no doubt found out for yourself that working out what image sizes to use on Facebook isn’t as easy as it could be. It involves some wrangling to get the results you want. Each type of image on a page, profile, and the timeline has its own size and quirks. And Facebook never has been very good about making its help pages easy to find.
Keeping things even more frustrating interesting is that Facebook changes things from time to time, usually without any warning. Sometimes it’s a small, incremental tweak. Sometimes it’s an entire overhaul (such as when timelines were introduced and again when they were changed from two columns to one column). So it’s always a bit of a moving target. And there always seems to be a new system just around the corner, just as we get used to the old one.
So whether you’re using Facebook pages for social media marketing or simply trying to post photos for friends and family, here’s my latest version of the unofficial guide for the sizes of Facebook photos on the various parts of the site.
This is a preliminary effort, and things change. If you come across different display behavior, do let me know so I can investigate and update as necessary.
Recommendation: Use an image that’s at least 940 pixels wide by 352 pixels tall. But if you want better quality, use an image that’s at least 1880 pixels by 704 pixels.
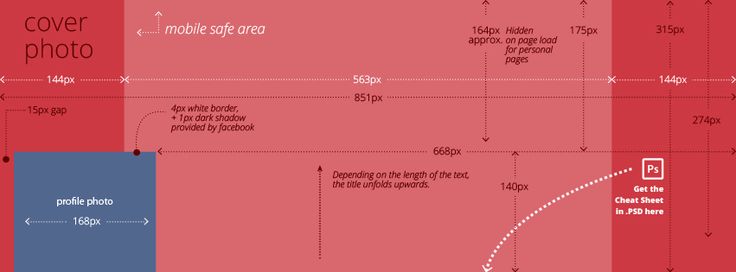
The Facebook Cover Photo is the large panoramic image space at the top of the timeline. It’s also sometimes called the banner image or the header photo.
Its display is responsive. Put another way, the size it’s displayed on-screen varies by the size of the browser window or device screen. You can see this effect if you change the size of your browser window while viewing the page.
With the previous layout, trying to figure out what would display correctly in the Facebook cover photo was a bit complicated, because not every part of the image would display at all sizes. There were safe zones and strips being trimmed off on the desktop display.
The new version has simplified things. The whole image is displayed and resizes in a much simpler way.
That said, there are some issues to watch out for.
Firstly, they’ve gone back to having a narrow band of graduated shading at the bottom. It’s an overlay, which means it sits in a layer on top of your image. So you won’t want to include any important text or detail in that bottom strip.
Secondly, it’s taking the color of the outermost pixels from the image and using them to create a shaded color section on the blank section behind the image. Here’s an example of what I mean, with it taking the red from the outside border of the image and applying it to the white section behind. (I’ve cropped out the profile pic here to simplify things.) Brands with a specific color palette will want to take particular note to include the desired colors at the very edge of the image.
Thirdly, the bottom corners get slightly rounded (or border-radius, to be technical). It’s not very aggressive, though, so it is unlikely to cause issues for many users. But if you’re using a stroke line around your image or other detailed framing, it might cause problems. It’s applied automatically, and there’s no way to turn it off.
Fourthly, the profile picture is now back to overlaying the cover photo. Although it’s only subtle in this version, and only a sliver obscures the cover photo.
If you’ve just set up a new Facebook profile or page and don’t yet have a cover photo, just click on the “Add a Cover” button at the top of the page where the Cover Photo will go.
Once you’ve added your photo, you can replace it easily. When you’re logged in to your account and viewing your page, click on the Edit button at the bottom right.
Clicking on that opens a drop-down menu from which you can choose the source for the new photo. This is also the same menu to use if you want to remove or reposition an existing photo or use a Video Cover or Slideshow Cover.
In terms of types of images, panoramas are ideal. Simple crops also work, although the effectiveness is obviously going to vary based on what it’s the image. And there’s nothing stopping you from assembling multiple photos into a collage in your imaging software, saving it as a single image file, and uploading that. Like these, for example:
Until fairly recently, it was only possible to choose one photo to act as your static cover photo. But a new feature has been added: slideshows. You can now select up to 5 photos that rotate. Access this feature through the same menu that lets you add or change the cover photo (i.e., the camera icon at the top left of the cover image section).
When you create a slideshow, you’re given the option to select up to 5 images that will be used. Use the filmstrip at the top to choose the images either from existing images or upload new ones. You can then click on the thumbnail and get a preview of how it will look in the larger space below the thumbnails. You can click and drag in that section to reposition the image in the viewport.
You can also have a dynamically generated version that lets Facebook choose the photos based on what’s performing well and based on the activity on your page. You can turn this feature on or off using the switch at the top right of the slideshow editing screen.
If you’re using the slideshow cover, your visitors can navigate through the slideshow using the arrows on each side (the previous layout had position indicators at the bottom, but they’ve gone in the new version).
There are a few things that I find odd about the way the slideshows currently display to visitors. The first is that the slideshow doesn’t advance automatically. So to see more than one image in the slideshow, your visitors will have to know to manually advance through using the arrow buttons at the side of the image. I suspect only a very small percentage will do so. The second thing is that if you turn off the option for Facebook choosing the images, it displays the images in the same order every time rather than randomly. The upshot of both of these things is that, at least in how it’s currently implemented, the vast majority of your page’s visitors are likely to only ever see the first image. The third oddity–at least to me–is to accommodate the new shaded color highlight in the background section. Because that’s drawn from the displaying profile image, it changes along with the profile image. That’s not necessarily a bad thing, but it is something worth knowing.
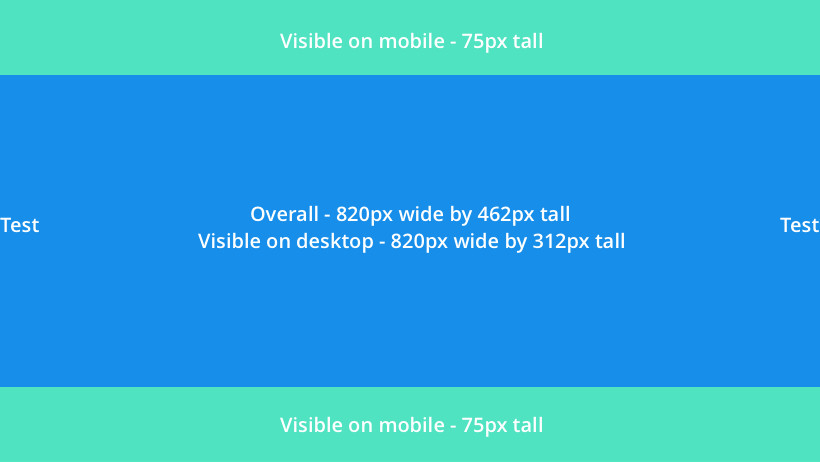
You can now also use video files for your banner area. They must be between 20 and 90 seconds and measure at least 820 by 312 pixels. The recommended size is 820 by 462.
If you’re shooting a video clip for this using a camera that lets you choose the video resolution, the 720p mode would be a good place to start because that measures 1280 by 720, which comfortably has enough resolution.
I have more detailed guide on Facebook video covers separately.
I have a more detailed post on Facebook profile picture size separately, but here’s the gist.
| Display Type | Dimensions |
|---|---|
| Desktop/Laptop web browser | 132 pixels |
| Smartphones | 128 pixels |
| Feature Phones | 36 pixels |
The Facebook profile picture is now at the bottom left of the cover photo, overlapping slightly with the bottom of the cover photo. It has been shrunk slightly from the previous versions, down to a circle of 132 pixels diameter.
It has a thin white line around it that’s applied automatically—you can’t remove that or control it.
The good news is that you don’t have to upload a circular image, something that would be a bit of a pain to create. Instead, you can upload any regular rectangular or square image. Whatever shape the image is that you upload, it will be cropped to a circle when it is displayed.
Desktop/laptop web browser. In a regular Page view, such as when someone is checking out your profile, it displays in a desktop’s web browser as a circle with a 132 pixels diameter.
Phones. The size the profile picture displays on mobile phones varies by the type of phone. On modern smartphones, it displays as a circle with 128 pixels diameter. On older phones, it displays at 36 pixels diameter.
When up select a photo to add a profile picture, you’ll get the option to move the focal area around (assuming it’s not square) as well as zoom in and out (so long as it exceeds the minimum resolution).
The profile image that appears next to your name on comments and posts in the timeline is the same image and is still a circle, but it’s automatically scaled down to a diameter of 40 pixels.
Because it displays so small, you’re unlikely to run into an issue with image sizes. So long as your image is at least 132 pixels on its shortest size (which is pretty tiny), you should be good to go.
The thumbnails for shared links display in a web browser at 500 pixels wide and 261 pixels tall.
For a while, it was possible to choose a different shared link image, but that feature has been removed. For now, at least, there is a workaround if you share the links using a social media management service such as Buffer, but you can’t choose a different image to use from within Facebook anymore.
If you’re sharing links from your own site, it is possible to specify which image you want to use as the image thumbnail, but that’s something that you’ll need to set up on your site and is beyond the scope of this post. But if you’re looking for what terms to Google on this, what you’re trying to do is set the “og:image” property in the page’s Open Graph metadata. Here’s Facebook’s documentation, and if you’re using a CMS like WordPress for your site, there are plugins that can handle it for you.
What you can still do is add more thumbnails that are in addition to the original (not in place). When you go to share a link, use the bottom section of the popup to add more images. But you can’t deselect the original image anymore like you used to be able to.
The size and layouts of thumbnails on the timeline vary according to how many images you’re sharing in the same post, as well as what orientation-specific images have.
Here’s how various combinations display. All images get a 1pix white stroke around the border.
When you upload an image to the timeline, a thumbnail is generated automatically to fit within a box that is 500px wide and up to 750px tall. So if you want to use the maximum space available, upload an image in portrait orientation (vertical) that is in the ratio of 3:2. This is an example of using the maximum available space:
If you upload a landscape (horizontal) image, it will be scaled to 500px wide and retain its shape. The full area of the image appears without any cropping.
This is another rectangle in landscape orientation, but it’s a much narrower aspect ratio like a banner or panorama. The width is again 500px, and the image is scaled so that the entire image area appears.
If you upload that same image rotated 90 degrees, so that it’s tall rather than wide, it will be cropped to the maximum available area of 500px by 750px.
And if you upload a square, the whole image will be displayed, with the width at 500px.
You can upload multiple photos at once to the timeline. How they’re displayed depends on how many images you’re uploading and the orientation of what I will call the primary image.
The primary image is what I’m calling the one that displays first in the uploading popup, and it also displays larger in some of the layouts. So far as I know, there’s not an official name for it, but I’m going to go ahead and use “primary image.” So that’s what I’m referring to in the section below.
As well as displaying first, the primary image has another important role. It determines the layout you get. If you upload three images with a square primary image, you’ll end up with a different layout than if you upload three images with a rectangular primary image.
The easiest way to select which image serves as the primary image is to drag it to the left in the upload dialog.
Here’s an example of what I mean. In this one, I’m uploading two images, an orange square and a green vertical rectangle. If the orange square is in the first position in the upload dialog, like this:
it posts like this:
Uploading exactly the same two images but reversing them, so that the vertical rectangle is first, like this:
displays like this:
The same principle applies if you’re uploading two, three, or four images–the layout will always take its cue from the primary image.
The full width becomes 500px. The top image is 250px high; the bottom is 249px high. There’s a 2px white line between them.
Because the layout takes its cue from the primary image, you can mix and match the orientations of the non-primary images–they’ll still display the same.
You can mix and match the orientations of the non-primary images–they’ll still display the same.
It will display the first five images in a kind of mosaic pattern, like this. If you include more than five images, you’ll get a small button overlay plus symbol to display the others.
You’ll get the same display whether the primary image is a square or a vertical rectangle.
Yes, they were cool. The image spanned both columns. But Facebook did away with them in their redesign in mid-2014. Your updates now only show in a single column, and there’s no way to make photos wider than that column.
No matter what shape image you upload as a header image for an event post, it’ll be cropped to an aspect ratio of 16:9. For best results, upload an image that’s 1920 by 1080 pixels. But something to watch out for is that in the main event view, it’s scaled-down quite a lot, so don’t use fonts that are too small (people can click on the image to open a larger version, but not everyone is going to do that).
When it’s displayed on the main event page it’s scaled to 500 by 262 pixels, like this:
Something to be aware of is that Facebook compresses some images pretty aggressively when you upload and display them.
It makes sense–naturally, they want to speed page loads and reduce bandwidth by applying as much compression as they can get away with. I’m not the only one to wish they’d be less aggressive with their compression, but how noticeable it is will depend on whether things like the range of colors in your image and the amount of detail in your photo.
In the examples above, the JPG compression is far more noticeable in the montage version than in the Sydney Harbour Bridge version. I set the quality and sharpening settings the same for each in the originals before they were uploaded. Some users have reported that images with lots of reds and oranges seem to show the effects of the compression more than ones with blues and greens, but it depends on the actual image.
It also seems to depend on what kind of image you’re displaying. Photo gallery images seem to have less compression applied in displaying than do design elements like the cover photo and profile picture.
There are some things you can do in prepping the images before uploading that can help reduce the chances that your image will come out looking crappy.
Upload images that are 99KB or less in filesize. Facebook should leave images less than that untouched, which gives you control over how the compression is applied.
Upload images that don’t have a lot of compression already applied. For JPGs, for example, try keeping the quality setting at 80 or above–Facebook is going to compress it again anyway. If you’re using software that factors in colorspace (like Lightroom or Photoshop), use sRGB colorspace. And uploading images that are already resized to close to or at the target display size and not overly sharpened seems to work well.
If none of these work, take a look at my post on how to get sharp text on Facebook images.
If you’re including text, a logo, or watermark and finding that it’s ending up fuzzy and unclear due to the JPG artifacts, I’ve got a separate post detailing how to fix it: How to get sharp text on Facebook images.
While not specifically related to image sizes, it is worth knowing that Facebook strips out all metadata from your images. That includes all GPS, camera type, and other data that your camera might embed, as well as anything like keywords or copyright information you might have added. (An exception is if you’re in Germany).
| Width | Height | Notes | |
| Cover Photo / Cover Slideshow | 820px | 360px | |
| Profile Picture in Header | 172px | 172px | Must be at least 180px by 180px |
| Profile Picture on Timeline | 40px | 40px | Same image as main Profile Picture, automatically downscaled |
| Shared Link Thumbnail | 500px | 261px | Only for single thumbnails. Multiple thumbnails are cropped. |
| Uploaded Timeline Photo Thumbnail | 500px max | 750px max | See exceptions above for multiple images. |
| Event Header Image | 500px | 262px | 16:9 aspect ratio only. For best results, upload 1920 x 1080 px image. |
Facebook has been used by many for many years. Admit it or not, visiting this social media platform has become a part of our daily lives. If you're aiming for likes and reactions, you want your photos to appear all over your FB profile so they're great. In this post, you will learn how to resize photos correctly for Facebook . Resizing a photo for your FB profile is not as difficult as you might think. You may be wondering what are the best photo sizes and quality for your image. Please continue reading below.
How to resize photos for Facebook
Facebook used to be filled with text and links. However, photos are now integrated into the app to reflect the changing trends across our favorite social media platforms. In addition, images can effectively convey our thoughts to each other. According to this, you can think about what sizes can make your photos more presentable. Of course, the constant changing of Facebook photo formats can overwhelm you. Worry no more because in this part you will find the best sizes for your Facebook photos.
It is very important to have the best size for your FB profile picture. Remember that your profile photo is the only image that identifies your face. In addition, the image often appears whenever you share a post, in a comment, on someone's timeline, in FB search results, and finally in chat messages. It can be quite small, but it is important to choose the best size that suits you.
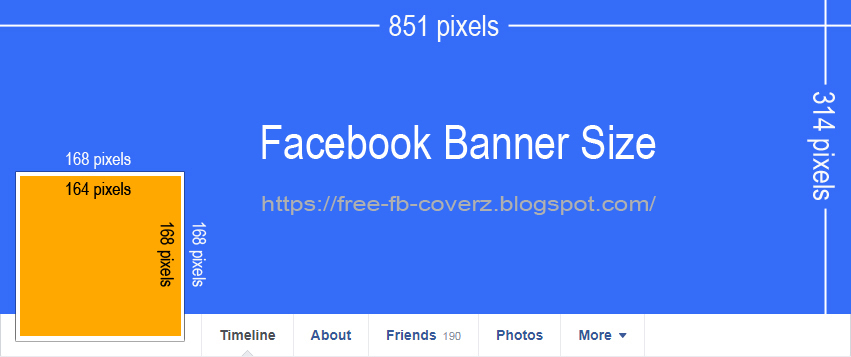
FB profile picture is 168 by 168 pixels. However, the FB profile photo format is cropped to a circle shape. If you want the logos to be included in the circle, make sure they are not cut off. However, your photo resolution profile varies in many situations.
For example, Facebook reduced the resolution of your photo in the comments section by 40 by 40 pixels. Whereas in other situations, when someone clicks on your profile photo, Facebook displays it at 850px by 850px. Finally, the highest image quality and size that Facebook supports is 2048 by 2048 pixels. A 1:1 aspect ratio is also recommended. So achieving that resolution for your profile photo will be your biggest advantage.
Your Facebook cover photo is what gives you personality. It's located at the top of your profile picture. Also, it seems wide enough and more visible to others visiting your profile. The timeline cover is 851 by 315 pixels. This is the maximum size required by Facebook. The recommended aspect ratio is 2.7:1. However, Facebook's high resolution for covers is 2037 by 754 pixels. The cover photo is like an extension of your profile photo. It adds items to your profile.
Facebook is currently a marketplace for various businesses. Facebook has introduced a Fb page where you can showcase the company's product and ads. Also, Facebook pages are not limited to businesses; some use FB for celebrities. For businesses, an incredible way to promote is a good FB cover photo. You can come up with a suitable size and resolution for it. The minimum size for a Fb page cover is 820 by 312 pixels. While the maximum size that Fb supports is 1858 pixels by 745 pixels. Also, the recommended aspect ratio is 2.63:1.
Now Facebook trends are changing and getting better. The cover photo of a Facebook group contributes a lot to the purpose of the group. In this case, Facebook requires you to crop some areas and adjust the cover vertically. The maximum size and resolution that Fb requires is 1640 by 922 pixels. While the minimum dimensions are 820 pixels by 461 pixels. Also, the aspect ratio is 1.78:1.
Facebook events have been trending in recent years as well. If you have an exciting announcement or conference to attend, this serves as a digital invitation for everyone. That's why it's so important to choose the optimal page size for your event. Also, it would be nice if the maximum photo size was 1000 pixels by 524 pixels. But on standard displays, you can have a height of 500 by 262 pixels. Also, a suitable aspect ratio is 1.91:1.
When you upload photos to Facebook, you may be worried about the quality of the image you get. There are certain orientations that your photos can have. In Square, the maximum size is 492 by 492 pixels. In portrait orientation, the maximum size is 492 by 738 pixels. Finally, in landscape orientation, the maximum size is 492 by 276 pixels.
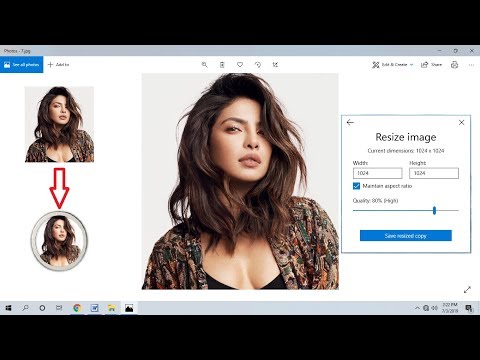
AnyMP4 Image Upscaler Online is an online tool that can scale and resize Facebook photos for free. It features artificial intelligence (AI) technology to increase resolution when you resize your Facebook profile and photo covers without cropping. In addition, it helps to reduce noise and improve image sharpness. In addition, it can enhance the lines, edges, and other details of photos. According to this, you can use this tool to resize images for Facebook. It will really make your Facebook photos smoother and less grainy. You can zoom in on them by selecting zoom levels from 2X, 4X, 6X, up to 8X.
1 Visit AnyMP4 Image Scaling online through its official website.
2 To resize a photo for Facebook, click Upload Photo to import the selected photo.
3 To resize the photo you want to post on Facebook, you can choose any zoom level from 2X, 4X, 6X, and up to 8X.
4 If you've finished resizing your Facebook photo, you can now click Save to save and upload the final image.
For more photo editing effects, you can use photo editing software to do it.
Adobe Express free photo resizer is an online tool from Adobe. It can easily resize your images. In addition, it comes with preset sizes that are suitable for various social media platforms such as Facebook. With a few clicks, you can resize the photo you want. Moreover, the tool also has free templates to add to your photos. In addition, you can adjust your Facebook profile picture with suitable sizes and proportions. According to this, you can instantly edit Facebook covers with the correct preset size and resolution.
1 Visit the Adobe Express Free Photo Resizer on the official Adobe website.
2 To resize your Facebook photo, on the main interface, click Upload your photo to import the image into the tool.
3 You will then be prompted to drag and drop an image file or find an image to resize it for Facebook.
4 In this part, you can select a social media platform such as Facebook. The preset photo size for Facebook will be displayed. You can also adjust the image scale according to your preference.
Why does Facebook reduce the quality of the images I upload?
Facebook compresses and downgrades images to optimize images for the web because this can speed up the web page loading process. Other sizes not included in the publication may be subject to automatic image compression by default.
How does AI technology help with images?
This facilitates image recognition functions. It has been integrated into photo editing tools to use an algorithm that can organize and accumulate raw data in images. Moreover, it can high quality video with Powered AI technology.
What is the ideal size for a Facebook cover photo?
The ideal Facebook cover photo size is 851 by 315 pixels.
In conclusion, you can easily resize your Facebook photos with the tools recommended above. You will save time and bring you convenience. In addition, it is guaranteed that you will be able to achieve the best possible dimensions for images uploaded to Facebook. Now that you know how to resize your photos, you are free to try it.
From time to time Facebook users love this platform more and more because of the updates, information, link content and visual media publishing that we usually do. According to reliable sources and statistics, almost 72% of Facebook posts are usually images; next to them are videos and other information. Although we are free to post images on this platform, there are still limitations that you should be aware of before posting them here. This means that not all images are loaded. So, if you don't know the requirements we're discussing, you should keep reading this article to find out what they are. In addition, we will show you different approaches to Facebook photo resizing if needed.
Most of us don't care about the size of an image, especially when publishing it. However, it is important to know the requirements of each before uploading images as a profile picture, feed, stories, instant articles, and marketplaces. To help you figure this out quickly, we'll use a table to help you quickly identify the requirements you need before resizing your Facebook image.
| Image placement as… | Image size requirements |
| facebook thread | ◆ The desktop link image must be 479 × 246 pixels. ◆ The minimum resolution on mobile devices should be 479 × 320. ◆ Recommended: 1080 × 1350 pixels. |
| Facebook right column | ◆ 254 × 133 pixels ◆ Recommended: 1200 × 1200 |
| Facebook Instant Articles and Marketplace | ◆ Recommended: 1200 × 1200 pixels. |
| Facebook Stories | ◆ Recommended: 1080 × 1920 |
| Facebook profile picture/ad (carousel)/catalogue picture/ | ◆ 400 × 400 pixels |
| Facebook event cover and group cover | ◆ 1920 × 1005 pixels |
| Facebook profile cover | ◆ 1125 × 633 pixels |
| Facebook Photo Post/ Linked Images/ Ads (Single Image) | ◆ 1200 × 630 pixels |
The best Facebook profile picture resizer tool you should use is Aiseesoft Image Upscaler is online because of the new features you can use. This online tool is best for resizing images on your device to fit the platform. Once you upload a photo, you can use its AI super resolution technology to fix the blurry image. The tool is completely free to use. Can retouch low quality images into unimaginable high resolution once it's done. So, are you ready to use the software and the next guide we're adding here? In that case, keep reading to resize your Facebook cover photo like a gust of wind.
Step 1:
You can click this link to open Aiseesoft Image Upscaler online to open the official website. There is no need to worry because this website has no malware or ads in the interface.
Step 2:
On the website, click Upload Image to import the image you want to scale with this software. Once you've clicked on it, select the image in the folder and click Open.
Step 3:
After uploading the image, you can choose the type of magnification you want; there are available options here with pixels in the bottom right corner.
Step 4:
To start the image scaling process, click Save to download it to your desktop.
Is it possible to resize a Facebook cover photo without cropping? You can use ResizeImage.net and its cropping functions if needed, for free. This tool is available and you can use it for free without downloading it on your device. It has a simple interface so you can quickly learn how to use this tool. But there's a problem with it, not the resizing feature it supports; it's an annoying ad. If you don't mind ads, follow these steps.
Step 1:
Search for its name in a search engine, then click on it to open it.
Step 2:
Click Upload Image, and make sure the file format is less than 100MB and 100MP.
Step 3:
Go to the Resize section and adjust the slider to your preference.
Step 4:
Click Resize Image to resize the image you upload here.
Ezgif is a robust image resizer tool that you can use to resize your Facebook photo if you need it. Although it is a well-known GIF solution, an online tool can handle the task of resizing your photo for free and GIF. It supports more image formats than ResizeImage.net; however, the maximum file size it can handle in a single image file is 50MB or less. To help you complete the task with this tool, follow the steps we are adding.
Step 1:
Open the web tool by searching for Ezgif image resizer in your browser.
Step 2:
Click Select File, add the image file you have, then click Upload.
Step 3:
dd measure the width and height in the blank box, then click Resize Image when you're done.
Why are the images I post low resolution on Facebook?
Facebook compresses the image you upload here to save server space, especially if the image is large. Because of this, the image quality has deteriorated. So, if you want to avoid image compression, it's better to know the platform requirements.
Is the image blurry after resizing?
The image you resize will not degrade the quality of the image you have. However, if you stretch the image, the image will become blurry in some areas. If you don't know what to choose for image resizing, check out the robust tool we add to this article to make your job easier.
Is Facebook the best social network?
Although Facebook is a well-known social network in the Meta, it is not in the top 1. However, it is considered to be one of the 5 most popular social networks you know on the internet. And many articles on the internet will tell you that it is at least in the top five.
Conclusion
The tools we add to this article decide how to resize a photo for Facebook, but which tool would you use? Which online image editor do you prefer? We'll leave a simple tip if you haven't decided what to use.