Free Download
Category: iOS Data Recovery
3 mins read
Your Viber account no doubt contains a lot of memorable photos that you may want to save to your Camera Roll so you can share on other applications. If a friend on Viber has sent you a particularly memorable or important photo and you are wondering how you can save it to your iPhone's camera roll, you've come to the right place. This article will share with you two different ways to save photos from Viber on iPhone, even you are using iOS 12/13/14/15/16 on your iPhone. Read on to find out how to do it.
In this article:
To save Viber Photos to your Camera Roll, you have to turn on the option in Viber. Follow these simple steps to do it.
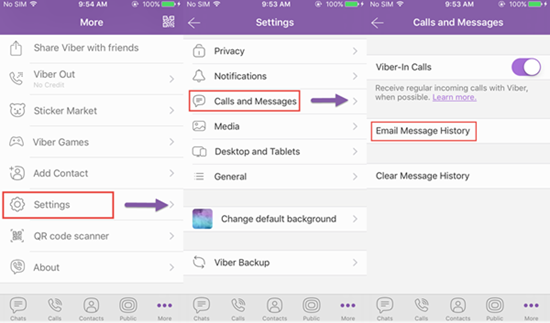
Step 1: Open the Viber app and then tap on "More" from the menu at the bottom.
Step 2: Tap on "Settings" and then "Media" and switch on "Save to Gallery".
Step 3: Now head on over to the Settings app on your iPhone at tap on Privacy > Photos and the make sure that Viber is turned ON.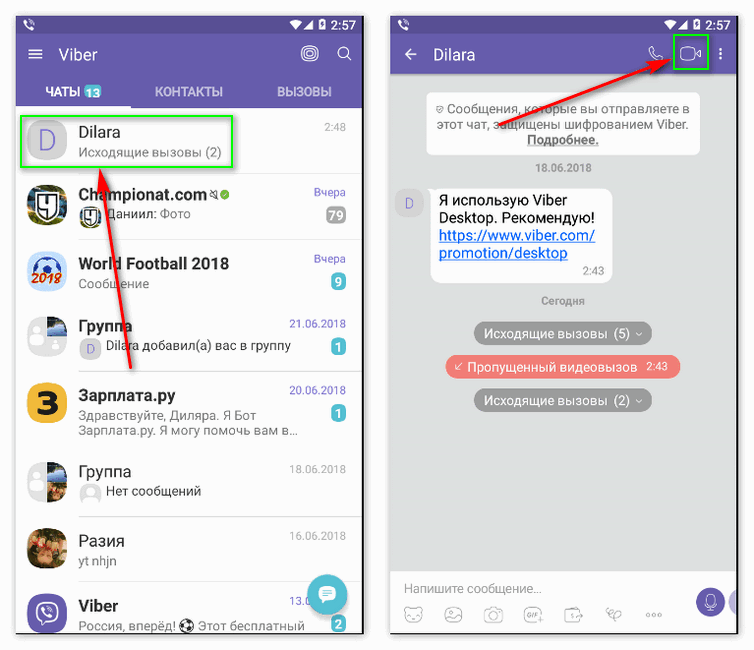
All your photos should now appear on your camera roll automatically.
A better way to keep your photos safe is to save them to your computer. As a matter of fact, we have a solution that allows you to not only save your Viber photos to your computer but all your messages and call history as well. This is a good way to have a backup of your Viber activity just in case you lose some of the messages.
This solution comes in form of an iPhone data transfer tool known as iMyFone D-Back that also comes in handy when you want to backup all your Viber messages and their attachments to your computer. Some of its features include the following.
Key Features:

Try It Free
Here's how to use iMyFone D-Back to save your Viber messages and their attachments to your computer. The steps work for iOS 16, also.
Step 1: Download and install the program to your computer and then launch it. On the main window, click on "Recover from iOS device" and then click "Start" to begin.
Connect the iPhone to the computer using USB cables and then click "Next" once the program recognizes the device.
In the next window, select "Viber" and then click "Next." to start the scan process.
When the scanning process is complete, select the Viber messages and their attachments that you want to save to your computer and then click "Recover" to choose a location.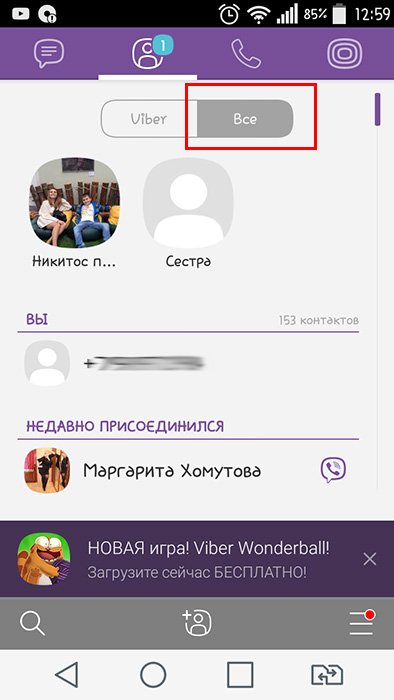
iMyFone D-back is a highly recommended data recovery software that helps you easily recover all the deleted viber data from iPhone. It can help you recover or save photos from viber in one-click. Just download iMyFone D-Back to save all your Viber data including photos, messages, call history to your computer! The latest iOS 16 can be supported, also!
Try It Free
(Click to rate this post)
Generally rated 5 (256 participated)
Rated successfully!
You have already rated this article, please do not repeat scoring!
Home > iOS Data Recovery > Two Ways to Save Photos from Viber on iPhone
Boasting over 1 billion users worldwide, Viber is undoubtedly one of the most accomplished alternatives to WhatsApp. Features like video/audio calling and fun-loving group messaging make it spot on for seamless communication.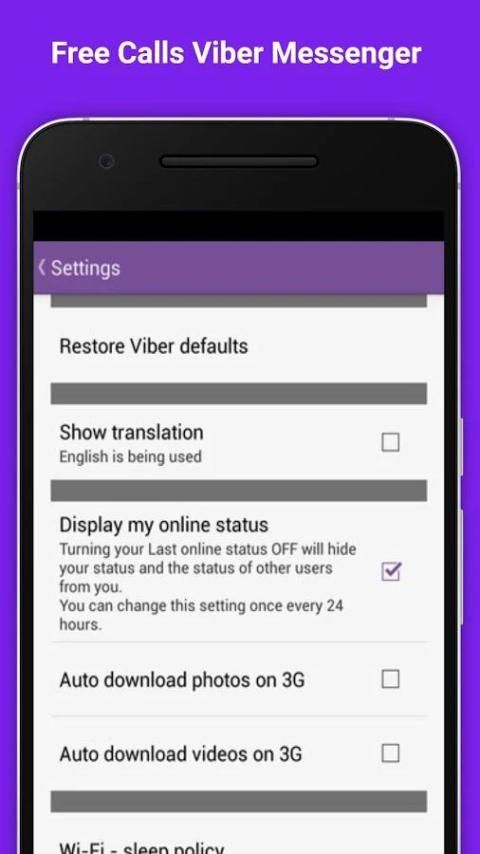
To prevent your photo library from being cluttered, Viber doesn’t automatically save media on your iPhone. However, if you like to store the shared stuff for a keepsake, you may want to download photos and videos shared through Viber chat threads on your iOS device. Let’s learn how to get it done!
Step #1. Launch Viber on your iOS device.
Step #2. Now, tap on More button at the bottom right corner → tap on Settings.
Step #3. Next up, tap on Media.
Step #4. Up next, you need to turn on the switch for Save to Gallery.
That’s pretty much it! Going forward, clips and pics will be automatically saved to your photo library on your device.
Later, if you wish to stop downloading media to your photo library, come to this same setting and toggle off Save to Gallery option.
On this same screen, you can choose to automatically delete media after a preferred time. Simply tap on Keep Media and select the time period.
Besides, you also have the option to prevent the app from auto-downloading photos on the cellular network and even restrict data usage. If you are using limited bandwidth, make sure to take advantage of these features.
Wrapping Up…
Of course, Facebook Messenger and WhatsApp are more popular. However, Viber is not too far behind and does have almost all the tricks to entice users.
One of my favorite features of this app is the Dark Mode (More button → Settings → Appearance) as it makes chatting with friends more convenient in the night. I wish WhatsApp also offered this feature (pretty much like Messenger ) sooner than later.
Explore the following articles as well:
What’s your take on Viber and what are the features you want to see in it? Share your feedback with us in the below comment section.
Author
Jignesh
Jignesh Padhiyar is the co-founder of iGeeksBlog.com, who has a keen eye for news, rumors, and all the unusual stuff around Apple products. During his tight schedule, Jignesh finds some moments of respite to share side-splitting content on social media.
In this article we will tell you how to send a photo via viber from phone to phone or from PC to phone. Depending on the situation, you can send a photo taken by the camera directly in the messenger at the moment or share a picture from the smartphone gallery.
You can send a photo to any Viber user or to a group you belong to.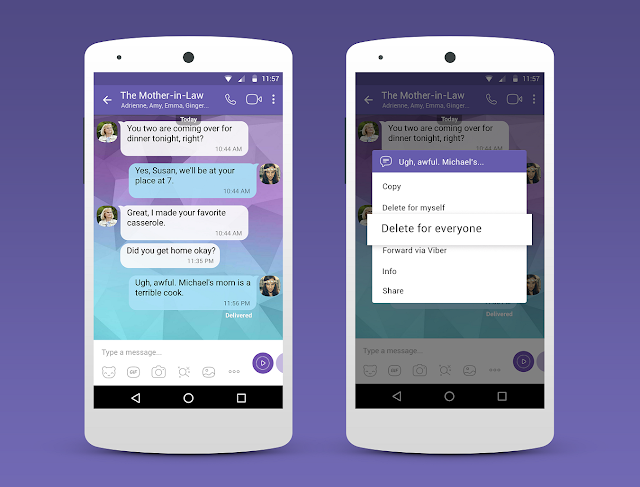 In the latter case, your photo will be seen by all members of the group.
First, let's figure out how to send any photo or picture from the smartphone gallery.

Your photo has been sent to a friend.
In Viber, it is possible to take a photo immediately in the messenger and send it right there.
If you use the desktop version of the Viber messenger on a PC, you can also send a photo from here.

Your photo has been sent to the other party.
You can download the PC version of Viber here .
In Viber, you can send not only photos from your gallery to your friends, but also share images that were posted in a group or sent to you by another interlocutor.
The selected photo will be sent to the contacts you selected.
You can send images to Viber not only from the gallery or chats. For example, a search engine has given you an interesting photo that you want to share with a friend. You can send a picture without even opening the messenger, just use the "Share" option.
The photo will be sent to the selected contact.
Similarly, you can send a photo, for example, from a letter that came to your e-mail.
Using the instructions above, you can easily send a photo or picture via viber from your phone or PC. This is a useful option that can make communication more interesting, as well as greatly simplify the work routine.
Read also how to transfer viber history to another phone .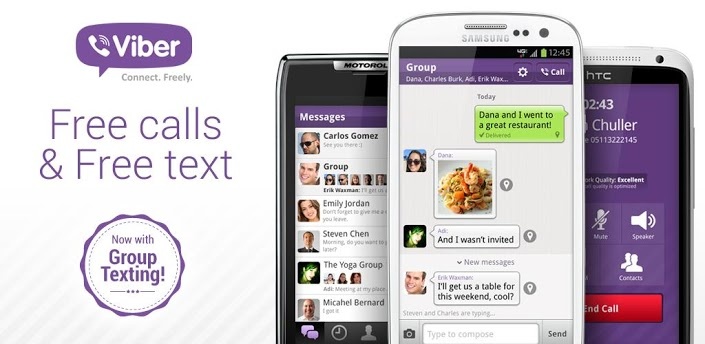
( 1 ratings, average: 5.00 out of 5, you have already rated )
Loading...
Nina Arman
In my spare time I read and study. My hobby is editing books of various genres. I easily find a common language with a variety of people. Passionate about technology and gadgets.
Author Juli To read 8 min Views 10.2k. Posted by
Photo messages have become an integral part of modern communication. Jokes and pictures from celebrations, congratulations and wishes - all this today can be easily shared in instant messengers. Today we will look at different ways to send media in Viber.
More recently, in order to send a photo to relatives, people selected the best pictures at a family council, and then carefully put the image in a postal envelope, which the interlocutor awaited with trepidation on the other side of the world. With the advent of the Web, the world has changed dramatically: it is difficult for modern people to imagine correspondence without the use of pictures, photos and gifs.
Every day we send jokes to each other, send photos from events, send postcards and videos. Fortunately, messengers that are not “greedy” for Internet traffic allow you to do this with minimal loss of funds. In this article, we will figure out how to send a photo via viber.
Content

Sending your favorite files to friends and classmates is not difficult at all.
In order to send a photo via viber from an android phone, follow the simple instructions:
The procedure for iPhones is about the same.
Step by step it looks like this:
By the way, many phone models, such as: Samsung, Alcatel, Honor, Redmi, Lenovo automatically use file compression. The quality of the pictures thus suffers. You can avoid this like this: after selecting a photo near it, click on the “Menu” (three dots) and select “Send without compression”. Now your picture will be safe.
Send photos without compression.By the way, you can send a photo to Viber not only from your phone, but also from a computer version. This method can be useful for students to send notes. It is also easy to send a file from viber to e-mail.
Sometimes this method is also used to transfer photos from Viber to a computer.
Or businessmen wishing to send a draft contract.
This is done like this:
If you use a tablet, then you can send a photo via viber like this:
You can send many photos at once, to do this, hold down the picture and select a few more.
Important: after sending a picture to a Viber file, you cannot delete or rename a file on the device before the recipient opens it. Otherwise, the opponent will not be able to see the document. To send a picture to Viber itself, the device must have an uninterrupted Internet connection. If the connection is lost even for a second, the procedure will have to be repeated again. In this case, the system will highlight the image with a red square, and the device will receive a “File not delivered” notification.
By the way, you can send not only a photo, but also your geolocation. In order for your friends to know where you are, you need to open the chat, click on the three dots at the bottom of the screen and select "Send Location". The program will send data about your location with an error of several meters, and after a while it will automatically delete this information.
The application allows you to share for free not only frames from your gallery, but also those pictures that were sent to you. You can easily send any photo or video.
On an Android smartphone, this is done like this:
 Done, the message went to a friend.
 The scheme for the iPhone is the same: the arrow on the side of the picture - select a contact - the “forward” arrow.
Tip: Make sure the correct image is selected before doing the procedure. "Electronic friend" will not ask for confirmation.
If the oversight still could not be avoided, then while the interlocutor has not viewed the file, you can delete the letter (hold down the picture, wait for the pop-up menu, select "Delete everywhere"). In this case, instead of a snapshot, the subscriber will see the inscription "This file has been deleted."
You can send documents with pictures directly from the gallery.
Android owners need:
 Select the viber icon.
 The scheme for the iPhone is identical.
There are situations when you like a picture on the Web and want to share it with your friends. To do this, you do not need to download the file, you can send it without leaving the site.
The forwarding scheme will look like this:
Open the photo, hold it with your finger, select "Share" / Viber in the pop-up menu.
Press the picture / "Share" / Viber.
Open the file, right-click on it, select "Copy image", open the chat and click on the "Paste" option. An image will appear in the chat field, after which you just have to click on the "Submit" button.
Do you want to share a landscape with a friend or demonstrate a successful make-up? Then pay attention to sending a photo during a conversation.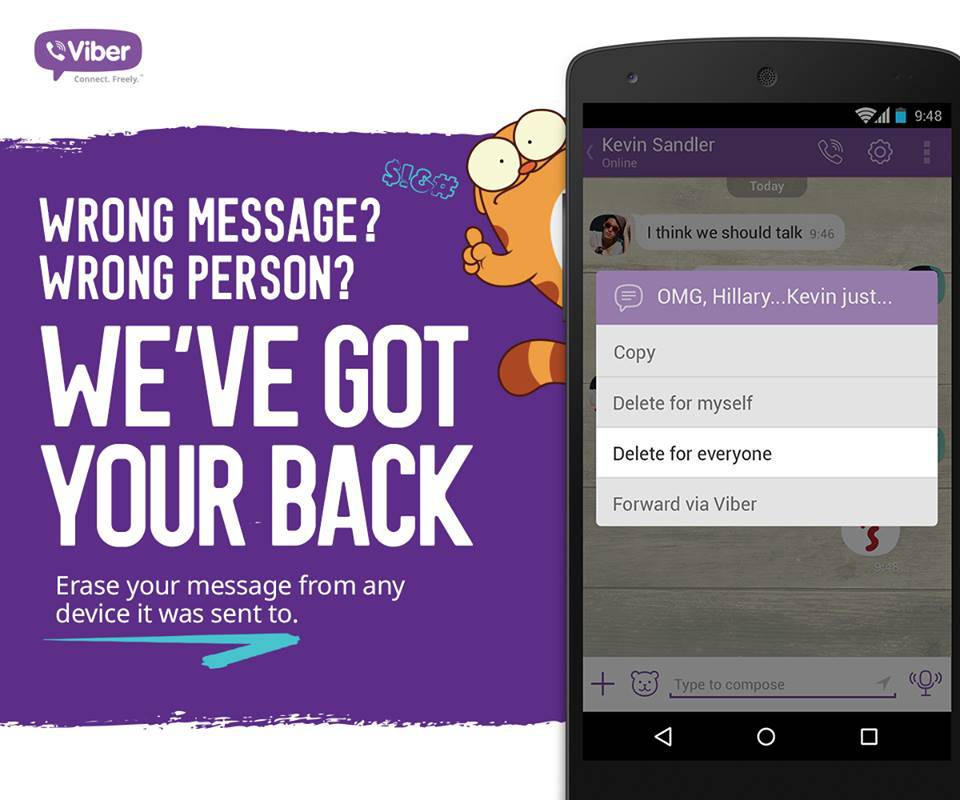 So that the question does not arise: “why photos are not sent in Viber”, we enclose instructions.
To do this, you don't need to go to the "Camera" menu, snapshots are taken as follows:
In the same way, you can send a video, for this, the circle sign, which is responsible for the camera click, must be held down with your finger. Selfie failed?
We use the auto-delete function by sending the frame to the trash from above, and try to take a picture again. Please note that the picture will be one. You can't do it multiple times.
If it happens that you want to send the sent photo to someone else, remember these two methods: we look for the desired number and confirm the intention.
Go to the gallery, where all received files are automatically saved. We select the necessary one and perform the manipulation described above for the photo gallery.
In order to send a message to another application, select a photo in the chat. The "Submit" button will appear at the top. Click on it, select the desired program from the list (for example, whatsapp) and click on it. Done, your interlocutor will receive the usual personal SMS with a photo. In the same way, you can send a postcard in Viber.
Alas, they are available. The size of the sent file should not exceed 200 MB. This rule also applies if you decide to send a whole photo report.
When an attachment exceeds the required size, you should split the files into parts by sending them in several messages.
It is advisable to do this via Wi-Fi, as large media "eat" a lot of Internet traffic.