As social commerce gains popularity for online shoppers, it will be an advantage for retailers to learn how to sell on Facebook on top of having an online store. To sell products on Facebook, you first need a dedicated Facebook page for your business (not your personal page). Next, either connect your ecommerce platform to Facebook or manually build a Facebook Shop. Finally, you’ll want to market your products through ads, contests, and boosted posts to maximize sales.
Selling on Facebook can be done through Facebook Shops and Facebook Marketplace.
Start selling products through a Facebook Shop in six steps:
Before you begin setting up your Facebook Shop, make sure that:
 Learn how to set up a business account on Instagram.
Note: If you already have a shop on Facebook or Instagram, it will automatically convert to the new Shops experience. You can also set up Instagram Shopping in a similar way but on a different platform.
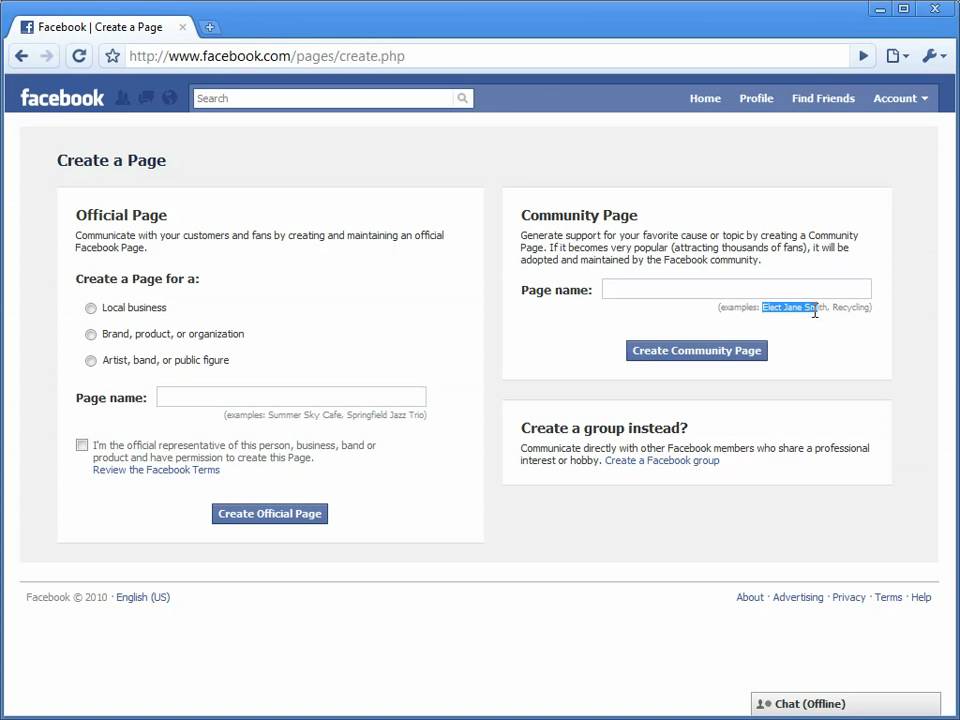
To set up a Facebook Shop, you’ll need to create a free Facebook Page for your business. You can’t create a Facebook Shop from a personal Facebook account because it’s available only on Pages.
Creating a Facebook page is easy; click on the dotted Menu icon at the top of your Facebook account and select Page.
Having a separate Business Page is required for creating a Facebook Shop. Having a Page offers many marketing advantages over personal accounts, including:
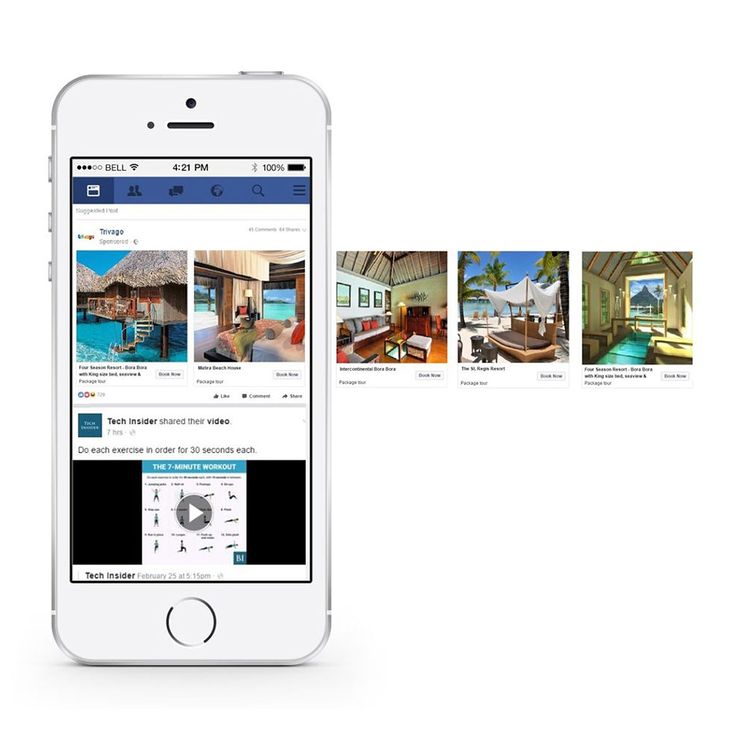
 9 billion Facebook users right from your Facebook page
Whether you have an existing online store on a different platform or plan to use Facebook Shop exclusively, you need to set up your Commerce Manager. This is where you will initially set up your Facebook Shop or connect your ecommerce platform.
You can choose to create your Facebook Shop exclusively in the Shop feature or connect your existing online store. (Source: Facebook)
Follow the steps below:
When customers click the button on an item’s detail page, it will trigger a direct message with your business, where you and the customer can arrange payment.

Now that you’ve created your shop, you need to evaluate your options for selling on Facebook. You can choose between two methods: selling via the fully integrated Facebook Shop, or by connecting your existing online store to Facebook and syncing your products.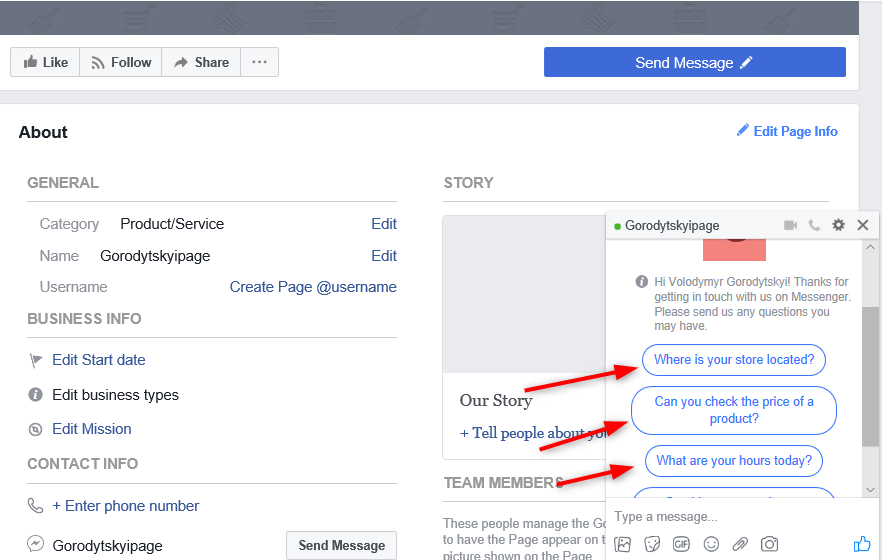
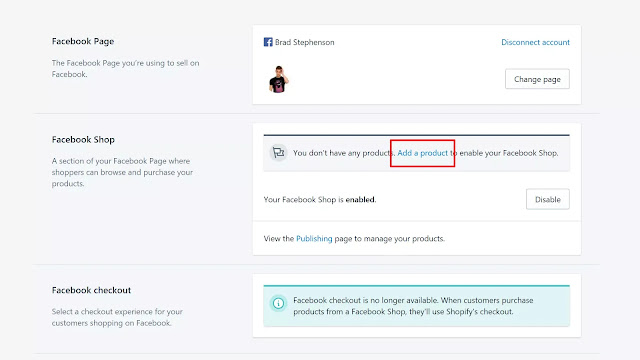
You can enter products for sale directly to your Facebook Shop for free. Facebook has clear instructions that walk you through every step. If you sell just a few items or only want to sell through a Facebook Shop, this might be all you need.
One downside is that you have to manually manage orders, and this can be time-consuming if you move a lot of products. Another con is that you can only sell your products on Facebook, so you’ll have no other sales outlets. The ecommerce platform option gives you many more selling opportunities—plus a suite of time-saving order management tools.
Top ecommerce platforms like Shopify and BigCommerce let you list and sell products in a Facebook Shop (plus many other places if you wish). What these platforms offer over the Facebook-only option is a full suite of product listings as well as automated order and shipping management tools designed to save you time.
Time-saving benefits aside, the biggest plus is that you can sell just about anywhere using an ecommerce platform—such as with your own website, Amazon, eBay, Pinterest, and blog posts. Even if you don’t want to start your own website or sell on places like eBay or Amazon at first, the option is there if (and when) the time comes.
If selling online is a priority, you need to extend your reach beyond the Facebook audience, and ecommerce platforms let you do just that. They also make every ecommerce task as quick and automated as possible, from product entry to shipping updates. Plus, if you ship—or hope to ship—more than 10 orders per day, you should consider this time-saving option.
The biggest downside is cost. In most cases, you’ll need a monthly paid account with an ecommerce provider such as Shopify or BigCommerce. However, there are free options with providers like Ecwid.
To sync an online store/ecommerce platform, add a new commerce account for your business and select ‘Sync a partner platform’, as shown below.
Once you’ve set up your Commerce Manager account and connected your Facebook Page, you can start adding products to your catalog.
There are multiple ways to add products to your catalog. The method you choose depends on several factors—your inventory size, inventory type, and how frequently it changes.
Inventory Size | Small, doesn’t change often | Medium to large, changes often | Medium to large, changes often | Small to large inventories, changes often and have multiple selling locations |
Inventory Type | Products, flights, destinations (hotels), vehicles | All inventory types | Products only | Products only |
Effort to Set Up | Low | Medium | High | Medium to high, depending on ecommerce platform |
Recommended If | Your inventory is small and doesn't change often | You want to set up scheduled uploads hourly, daily, or weekly | Your inventory is large or changes often or you already have a pixel installed on your ecommerce website | You have multiple selling locations and inventory sync is crucial |
Best For | Small business with few products | Direct to consumer (DTC) retail selling | Businesses that run dynamic ads on Facebook | Businesses that already have an existing online store |
Expand the sections below for more detailed information on catalog setup methods:
Make sure to enter as much information as possible in the product fields to set up your store items.
For more information, read Facebook’s step-by-step guide on adding products to a catalog manually.
A data feed enables bulk uploading of items using a spreadsheet file.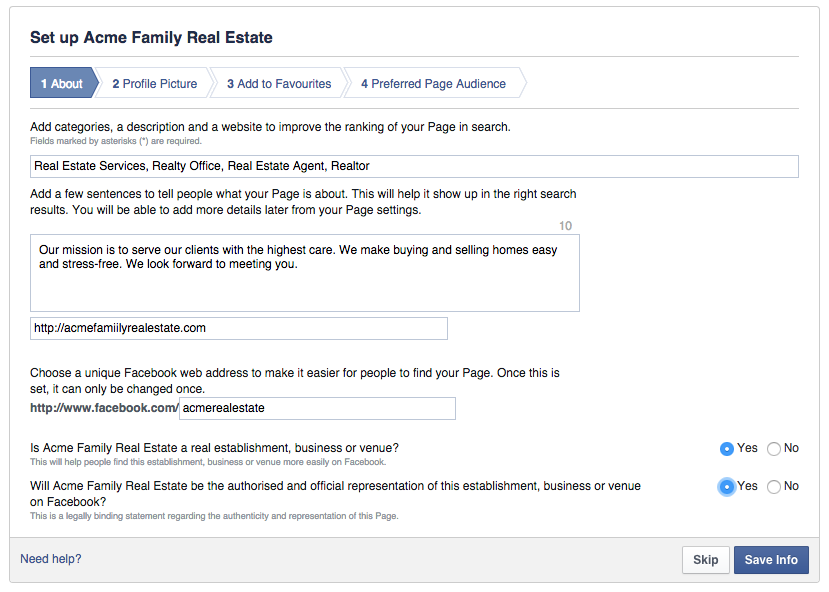 You can upload a file once or set up a schedule to update your catalog automatically on a regular basis.
If you need a template, follow Facebook’s guide on how to download a data feed template.
This guide covers uploading items in bulk for the first time. If you need to update your data feed, read Facebook’s guide to updating an existing feed file.
Meta pixel (formely Facebook Pixel) is an analytics tool that enables you to measure the effectiveness of your advertising by understanding the actions people take on your website.
When installed, you can run ads and make sure it is shown to the right people depending on your campaign. You can target new customers or people who have visited a specific page or taken a desired action on your website.
To connect an existing pixel to your catalog to add items from your website:

Your connected pixel will then appear in Data Sources. It may take up to 24 hours to be ready.
For more information, read Facebook’s step-by-step guide on adding products with a Pixel.
If you already sell online, you’ll be glad to know that Facebook has partner platforms that can sync with your Facebook Shop.
If you host your products on a partner platform like Shopify, BigCommerce, or WooCommerce, you can import them to a Facebook catalog and continue managing your products on your partner platform. Your updates will sync to Facebook on a regular basis.
With these partner platforms, you can easily integrate your Facebook shop to sync items.
Facebook has different steps for each provider. Follow the steps on your partner’s website to connect your account with Facebook. You’ll be directed to complete the setup based on the platform you use. If you have an existing store that’s not on an ecommerce platform listed above, contact your platform’s support team to ask if they have a Facebook integration, or check its Help Center.
If you’re looking to launch a Facebook Shop with a standalone website from the get-go, you’ll want to consider the following full-featured ecommerce store platform plans. You can see a more detailed comparison in our article on the best ecommerce platforms.
After all of the above is complete and your Shop section appears, you probably won’t see your products immediately. Facebook reviews all new Shops to make sure images and content meet Facebook Shop guidelines. Essentially, the guidelines state that you need images and accurate descriptions for each product.
It can take 24 to 48 hours for your Shop to be approved and populate the Shop section. Once approved, as you add new products, they should appear within 20 minutes or so. If not, you can re-synchronize your listings from your store dashboard to send new items to Facebook.
Now your Facebook Shop products are primed and ready for promotion to your Facebook followers and countless potential customers.
With your products already housed on Facebook, you can easily and quickly select certain products or groups of products to promote via Facebook posts and ads. Then, you can market your products organically and through paid advertising.
Starting an online store can take some time, but it’s relatively easy to do. You’ll need to not only brand your store, but you’ll also have to market it.
Most search engines pull in your product descriptions when a user searches for a particular product. This means you’ll also need to create accurate, detailed descriptions.
To create your product listings, you’ll need to assemble four key components:
 It’s optional but can be useful.
There are many ways—both free and paid—that you can market your Facebook Shop products to followers and larger audiences, including:
Consider Facebook’s paid advertising opportunities to give your business maximum exposure for a relatively small investment.
After you have a Facebook Shop, boost your store visibility by adding Marketplace as a sales channel. According to Facebook data, more than one in three US Facebook users buy and sell on Marketplace each month. Facebook Marketplace used to be a peer-to-peer shopping marketplace, but has expanded to include merchant selling.
Marketplace’s main draw is that you can increase your store’s reach in your local community. You can also get buyers on Facebook where they’re already browsing products, and use Facebook’s real-time messaging to answer inquiries and give useful information such as price and product description. Lastly, you can target more people with mobile-friendly listings.
Easily add Marketplace as a sales channel by following the steps outlined below. Note that some steps may vary depending on the ecommerce platform you are using. We recommend that you check your partner platform or connector for instructions as well.
Before you begin, set up a checkout on Facebook for your shop. If you have a Shopify store, set up a checkout on Facebook on Shopify first so that customers can complete purchases directly from Marketplace.
Note: Store inventory and order management will still be managed through Shopify but payouts will be processed and sent from Facebook.
After these simple steps, you’re all set! Listings get approved and usually start to show up in Marketplace within 24 hours. As with Facebook Shop products, all listings must comply with Facebook’s Commerce Policies and Community Standards.
Once you add Marketplace as a sales channel, consider advertising to reach more people—even if you don’t plan to post directly on Marketplace.
Simply listing an item for sale isn’t as effective as creating a paid ad to appear when people shop on Marketplace. Marketplace ads are seen when people use the Facebook app on their phones to shop on Marketplace.
To create an ad for Marketplace:
 Follow the recommended video and image specifications.
You can also boost your Marketplace listings.
Selling products directly to your Facebook audience is easy using the Shop feature included with every free Facebook business page.
Online store platforms that integrate seamlessly with Facebook offer the easiest Facebook Shop solution, especially if you’re new to ecommerce. From there, Facebook provides many free and paid marketing opportunities to promote your Shop. With a solid ecommerce platform and a good marketing plan, you’ll start to see your Facebook audience grow and, more importantly, start making sales.
Using an ecommerce platform is recommended for businesses selling products on a Facebook Shop and is all but necessary for businesses selling on multiple channels, such as Facebook, Amazon, Google, and through their own websites. Shopify and BigCommerce are Facebook partner platforms that are included in our top picks for the best ecommerce platforms. You can find out which tool is a better fit for your business in our BigCommerce vs Shopify review.
The first step to selling products on Facebook Shops is to become the admin of your business page. Then, add your products, and read through and agree to Facebook’s Merchant Terms. If you’re starting from scratch then not to worry – we’ll guide you through the process.
If you already have a Facebook Page Shop, this is a simple four step process.
Don’t have a Facebook Page Shop yet? That’s great – we’ll show you how to set up one of those, too.
Facebook Shops is an extra feature that’s currently being rolled out by Facebook to make existing Facebook Page shops more shoppable.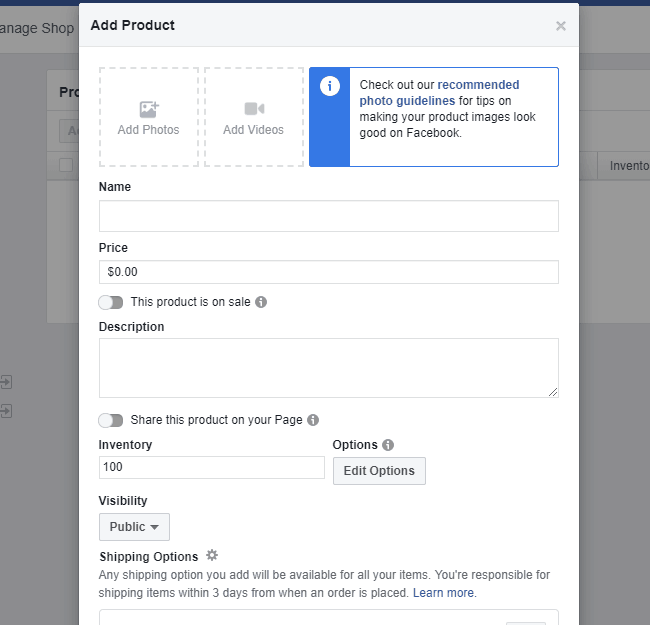 Facebook aims to create an online shopping experience tailored for mobile phones and working alongside builders like Shopify to give businesses extra support.
Facebook Shops gives your store a ‘storefront’, so you can make it look more like your own site, rather than a Facebook page. As with a Facebook Page Shop, customers can check out directly with Facebook, rather than be redirected to the business website. That said, it’s likely many will still use Facebook to browse, and come to the site to buy. The same feature is being made available for Instagram.
Keep in mind that Facebook Shops as a feature is only just starting to be rolled out now. Facebook will actually get in touch with you if it’s ready for your store.
To get yourself in the running, you’ll need to create a Facebook Page shop. We know we’ve thrown in a few similar terms at this point (we blame Facebook for their rather unoriginal names), so let’s quickly cover these:
Facebook Page shop – Existing Facebook feature which allows you to display products on your Facebook Business page. When customers click on the products, they’re given the option to check out on your website.
Facebook Shops – New feature which provides a storefront to existing Facebook Page shops, offering customers a more seamless experience and the chance to check out without leaving Facebook if they wish.
Given that Facebook Shops is only available to those with a Facebook Page shop, let’s look at what you need to set one of those up:
Facebook Marketplace is a great alternative to setting up a Facebook store if you’re just looking to sell on a few items you don’t need anymore. It works in a similar way to sites like Craigslist, but is accessed via your Facebook account.
To get started, go to Facebook Marketplace and hit the button in the left menu that says + Sell Something, then follow the onscreen instructions.
If you already have a Facebook Page shop (and if you don’t, we’ll cover how to set that up below), here’s how to set up Facebook Shops once you get the go-ahead from Facebook.
Let’s take a look at exactly what’s involved in each step:
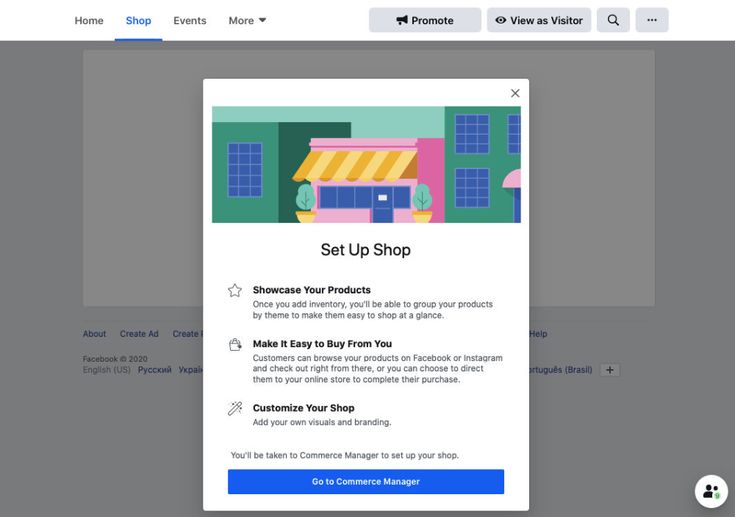
 Set up an account with Facebook’s Commerce Manager
You may already have an account with Commerce Manager, but if you don’t, here’s how to set one up.
Head to Facebook’s Commerce Manager, and you should see a screen that looks something like this:
Click the blue Start Selling button. You’ll then see this option:
We’ll cover using an ecommerce platform later on, but to set up a Facebook Shop, hit Get Started for Facebook on the left. You’ll then see this recap of requirements for Facebook Shops:
The rollout of Facebook Shops is starting in the US, which is why you need US bank details and tax info. Non-US readers, don’t despair; Facebook Shops is on its way to you soon, and in the meantime, you can skip to the section below to set up a simple Facebook Page shop.
Clicking Next takes you through to the following screen:
Start by clicking Set Up for your business information. You’ll then be walked through the process of choosing a name for your store, linking your Commerce Manager to an existing page (or creating a new one), and checking you have a Business Manager account.
We won’t go through each of these stages here – Facebook does a brilliant job of guiding you through adding products and payment details to your account, so as long as you follow this guidance, you won’t go too far wrong!
Your products need to be grouped together into ‘collections’ in order to get the most out of Facebook Shops. To create a collection, log in to your Commerce Manager and click Create Collection.
For each collection, you’ll need to add:
 This should be at a 4:3 ratio and 1080 x 810 pixel size.
Once you’ve finished, you can add more collections (click Create Another Collection), or move on to the next stage – customizing your storefront.
This is where Facebook Shops really comes into its own! You have the chance to personalize your store, making it look more ‘you’ and less ‘Facebook’.
When customizing your shop to get it ready for publishing, jump back into the Commerce Manager (if you’re not already there). Click on Shops, and select the Shop you want to edit (if you have more than one). Click Edit.
You’ll see two tabs within your chosen shop:
Check out how your page will look by using the Shop Preview, and when you’re happy with everything, click Publish. Facebook will then review and approve your collections within 24 hours – you can select whether you’d rather they go live as they’re approved, or all at once.
Until Facebook Shops is more widely available, setting up a Facebook Page shop is still your best bet. This way you can start selling straight away, and easily link up with the Facebook Shops feature once it’s available to you. You can also create a Facebook Shop directly from your Shopify account if you already have a business set up on the platform (we’ll explain how later on!).
We’ll walk you through the process of setting up a shop for our fictitious brand, Testing Tshirts. Again, we’re assuming here that you already have a Business Page ready to go. You also need to be working from a laptop or desktop computer in order to set this.
You’ll find this down the left hand side (you may need to expand the menu to see it).
You’ll then be prompted to read and agree to Facebook’s Merchant Terms and Policies.
This is where things start to split off a little depending on where you are in the world:
Nice! In that case, you’re in luck – customers can buy products directly from your Facebook page! This is a huge pro, but just requires a little more admin at this stage.
Over the course of a few steps (which Facebook will guide you through), you’ll be asked to provide:
In terms of shipping policies, Facebook has a few of its own rules you should be aware of:
After agreeing to the Merchant Terms and Policies, you’ll be prompted to select a checkout method. Businesses based outside of the US can’t currently link up payment details to their Facebook store, so they’re relying on one of two methods to complete a sale:
Message to Buy – A more labor-intensive option, but the obvious choice if you don’t currently have a website to link to. It could also be helpful if you offer highly tailored/customized products.
Check Out on Another Website – Customers will be redirected to your website to complete their purchase. This is the option we’ve selected for now.
You’ll then be prompted to select what currency you’d like to use.
Now we’re all back on the same track, and whether you’re based in the US or elsewhere in the world, you should see a screen similar to this one:
To start adding products, hit the blue Add Product button.
To add a product, you’ll need to have product images, a product price, a product description and name, as well as a link to where the customer can check out (normally the product listing on your own website). If you opted to sell over Messenger, you won’t have to add a link here.
This is how we’ve filled ours out:
If you want to share the product straight to your page as a post, select this option. This is great for new releases later down the line, but we’ll leave this off for now as we’re going to be adding all our existing products at once. Once you’re done, click Add Product.
A note for our US-based readers! You’ll have a little more info to add at this stage, including:
Once you’ve added a product, it will display as ‘Processing’ while Facebook checks that your product complies with their policies. It should be approved and on display in your shop within 24 hours.
Your new item will then appear here, and you can click + Add Product again to add more.
Once you’ve added your products, you’ll want to organize them into collections to make it easier for customers to find what they’re looking for. It’s up to you how you want to do this – go for whatever feels right for your brand!
We’re going to add these two products into a ‘Men’s Tshirts’ collection. You’ll see the option to add a collection below your new products:
Click Add Collection, then + Add Collection.
Give your collection a name (this will be the name it’s displayed under in your shop), then add the relevant products:
If you’re based outside of the US, you’re basically done at this point in terms of logistics. You can continue to add and remove products depending on stock levels, and any sales will happen either over Messenger or on your own website (whichever you selected at the start).
Even if you start out using Messenger for your sales, we recommend you build a website at some point and switch to this option. We promise it’s not as daunting as it may seem!
If you’re setting up a Facebook Page shop in the US, adding and grouping your products is only the beginning – you need to know how to actually manage and deliver the orders that are coming in!
You can manage your orders by going to Publishing Tools (along the top menu):
Next, select Pending Orders from the menu down the left hand side:
When orders come in, you’ll be able to see them here, and update the order status as you go through the process of sending them:
You can also schedule and review posts in the Posts section. This is useful for arranging posts ahead of time, and for checking how much people have engaged with them:
If you have an ecommerce website, we recommend syncing this up with your Facebook shop as soon as possible. This will allow you to control your inventory across both platforms from one place, and for any updates to carry across to both stores – thus halving your admin time.
We’ll give you a quick rundown of how to sync up Facebook Shops with two of the most popular ecommerce platforms: Shopify and BigCommerce.
Shopify is one of the top ecommerce builders out there because its an all in one platform. Shopify has advised that if you’re already able to use product tags on Instagram, you’ll be first up to gain access to Facebook Shops.
Either way, to make sure your store is ready for when Facebook Shops is available to it, make sure you add Facebook as a Sales Channel.
Shopify will then walk you through the process of syncing up your Facebook Page Shop and your Shopify site.
Shopify was ranked our #1 ecommerce builder, as it has a great depth of sales features and is a customer favorite.
Let's Get Started!
Shopify Review – see our comprehensive discussion about the pros and cons of using Shopify
Shopify Pricing Review– find out about Shopify’s price plans and value for money in our in-depth pricing review
It’s a similar story with BigCommerce. To get yourself in the best position for when Facebook Shops does become available to you, you’ll want to integrate your Facebook Page shop into your BigCommerce store now.
To do this, download BigCommerce’s Facebook Shop app, which will walk you through the process of syncing both stores.
BigCommerce is more ideal for larger enterprises and clothing stores due to it’s great inventory systems, check out our reviews to learn more about it!
In this article, we’ve walked you through Facebook’s new feature, Facebook Shops, and shown you how to install it. If Facebook Shops has been made available to you, getting set up with it is as easy as:
In the meantime, you need to get a Facebook Page shop set up so you’ll be ready to switch over to Shops straight away. We’ve outlined the best way to do that depending on where you’re based.
Now the only thing that’s left to do is wish you good luck! Facebook Shops is going to be a real game changer for small businesses, and we’re so excited to see what you create.
If you choose Shopify as your online store builder, all you have to do to create your Facebook Store is add their free app and you’re good to go! Your products will update automatically, plus your customers can even checkout directly on Facebook.
You can find out more about Shopify in our in-depth review.
Having a Facebook store is a great way to grow your business, allowing you to tap into new audiences and gain more customers.
It makes sharing your content really easy, so it’s a great way to market your store and products, increase sales, and boost your bottom line!
To increase your conversions from your Facebook Store, you need to grow your Facebook audience. This can be done through promoting Facebook posts – if you have the budget – or simply through increasing your Facebook activity.
You could also try searching for Facebook groups related to your store and post about your store in those, which may help increase your traffic and boost your conversions.
This feature is being rolled out globally, but in stages. If you have a Facebook Page Shop and have received a notification from Facebook that the Shops feature is ready for you, you’re good to go! In the meantime, set up a Facebook Page Shop if you don’t already have one.
Do you have a small business with big ambitions?
Selling through Facebook is an opportunity you should not overlook if you are looking to sell.
Facebook may seem like an old school platform by today's standards, but it has incredible reach. It is the third most visited site in the world after Google and YouTube.
If you don't know where to start, we'll show you how to sell on Facebook and how to do it successfully.
If you're just starting out selling on Facebook, it's easy to get lost or confused.
The platform offers several options for profiting from goods.
Depending on who you are and what you are selling, you can use either the Facebook Marketplace or the Facebook Store. In the future, you will also be able to use Facebook Stores.
Yes, there is a Shop, and there are Shops.
Although all options are available to commercial sellers, not all are the same.
Let's take a look at the differences between the Facebook Marketplace, Store, and Stores before deciding which path is right for you.
The Facebook Marketplace feature, launched in 2016, is sometimes referred to as the answer to Craigslist.
Facebook has gone to great lengths to open up its marketplace to entrepreneurial sellers, but the feature is essentially a garage sale.
Don't be scared - the Facebook Marketplace can be the perfect model for your business.
Selling with this feature you get potential benefits:
If you have big ambitions, you are probably just reading between the lines looking for cons.
However, in the spirit of balance, here's why you might not want to sell on the Facebook Marketplace:
Facebook has had an iteration of the Store tool for some time. If you've downloaded the app for personal use, you've probably noticed it on the pages of your favorite store.
The Store feature is available to businesses of all sizes and is located in the navigation bar on the business profile page.
In terms of getting your business noticed on social media, the Store feature has a number of real benefits.
Although the sellers seem a little more passive than on the Facebook Marketplace, the Store in turn offers:
Shop is a great feature, but it has its drawbacks. Think about them before you get carried away with sales:
So, Shop and Shops: what's the difference?
Introduced in 2021, Shops is an e-commerce platform developed by Facebook for small businesses.
Although the Stores are so new that they are still in development, it is very likely that they will take over the existing Store functions in a larger and better way.
Offering a much more personalized shopping experience, the new Stores update puts Facebook on a really solid footing in the world of e-commerce.
If you're new to using Facebook as a small business owner, the Stores feature gives you all the tools you need to be successful:
While it seems like a better business proposition than the Facebook Marketplace and the more established Store feature, the Stores feature is still obscure:
Top tip
If you haven't noticed that Facebook loves the word "shop", there's something else we should mention.
You'll notice that some of the business pages already have the word "Stores" in the navigation bar. This directs users to physical stores rather than an e-commerce platform.
Users will be able to access your shiny new "Shops" e-commerce feature by clicking the button at the top of your business profile.
Before you start selling on Facebook, make sure your business is ready.
Millions of people sell in this application. Eye-catching visuals, a cool backstory, and tons of prepared information will help your business stand out from the start.
Make sure you're all set up to start selling on Facebook with ease.
Of course, you can sell on Facebook without an online store. If you're only planning on making some money on his Marketplace, then all you really need is an account.
Otherwise, having an online store will be critical to your success:
If your online store looks good and delivers a compelling message, you've done your job well.
Make sure you're ready to do the same when you start selling on Facebook. Remember that consistency is the key to growing your brand.
A strong brand identity is the backbone of any successful business.
Do you want your followers to trust you and be loyal to your brand? Of course!
Make sure you look the same on all channels you sell on, including Facebook. You should have a clear understanding of:
Although Facebook is not the most visual social media platform, you still have to deal with short attention span .
Like a storefront in a mall, your business page or Marketplace ad should grab attention right away.
However, unlike a regular store, you sell things to people that they can't touch yet. Interest in your images as follows:
When customers find your store on Facebook, they want to know everything about it.
Although you shouldn't overwhelm users with information, it's annoying to have to search and figure it out when you just need to buy a product.
Get ready to prepare:
Are you satisfied with the look of your brand?
The next step is to create your Facebook business page, which will serve as the entrance to your Store.
From here you can manage everything related to the promotion of your business among Facebook users.
If you are still not convinced that the Facebook Marketplace is the only way to sell products, this page will form the basis of your store in this application.
Check out our detailed guide on how to create a Facebook business page.
Once your Facebook page is ready, it's easy to add the Store feature.
You can upload your entire product catalog or a selection that Facebook users want to see.
Select filter options for products that reflect those on your site, or that seem most intuitive to users browsing on their way to discovery.
Now that your Store is open, you are ready to get started.
Despite the ease of listing items for sale, Facebook users won't get to your Store if you don't put in the effort to promote it.
Therefore, the Facebook Marketplace has an undeniable advantage when it comes to visibility.
In the Facebook Marketplace, if you have what people want, they will find your ad.
However, with the Store, this process takes much longer.
One of the benefits of selling through Facebook is that you can have a more personalized approach to your customers.
We don't say invite them to dinner, but feel free to give them a little more information about your brand.
If you're going to sell on Facebook using the Shop feature rather than the Facebook Marketplace, it should be easy to retain customers through consistent posting.
Show your followers that they don't buy products from faceless robots.
If a team of people helps you sell, show it. It's a great way to personalize your brand and also add value to what you're selling.
You can tell about your colleagues in:
No command? This will not prevent you from interacting with users.
Think about how much you want to show about yourself on your business page. This may be overkill, or it can help build your personal brand.
If you're selling handmade items, sharing your personality in messages is a great way to interact.
In a world obsessed with efficiency, people like to see small businesses that still find time to do things right.
We are all naturally curious. Social media is the best way for people to peek into other people's lives.
Take advantage of this by posting regular updates, for example:
If you're using dropshipping or working in a poorly lit warehouse, get creative with your posts.
You will always have to think about what to sell next, so share what inspires you. Try not to be another faceless dropshipping store.
Opinions. Facebook is full of them.
With over 2.6 billion monthly active users, you're sure to get feedback on your posts on your Facebook page.
Encourage people to share their opinions in your store by posting your products on the home page. It's fast, free, and will help you better understand your customers.
Users first learn about your store on your business page. Don't hide items in the Store tab and expect people to stumble upon them naturally.
With a little effort, you will likely find that placing items on the front page will affect what you sell in the future.
Make your job easier and advertise your products:
If the thought of it tires you, plan ahead.
As with any other social networking application, there is a optimal time to post content on Facebook. If these moments do not coincide with your free time, plan publications in advance.
This is a simple action available in the app if your Facebook page is set up for business. You can also use a third party app or hire a freelance social media manager to do the scheduling for you.
If you have a personal passion for the products you sell, tell your followers about your industry.
Chances are if you sell smartphone accessories, your followers will be interested in an article about the latest ways to take selfies.
Do you sell jewelry in a specific location? Buyers would probably like to know about local jewelry crafts.
You can also share:
Don't forget to link your social media accounts to each other.
Does your store have an Instagram account? Are your products popular on Pinterest? Share your latest posts across all platforms.
This way you will be consistent and let your Facebook followers see that you are also active on other platforms.
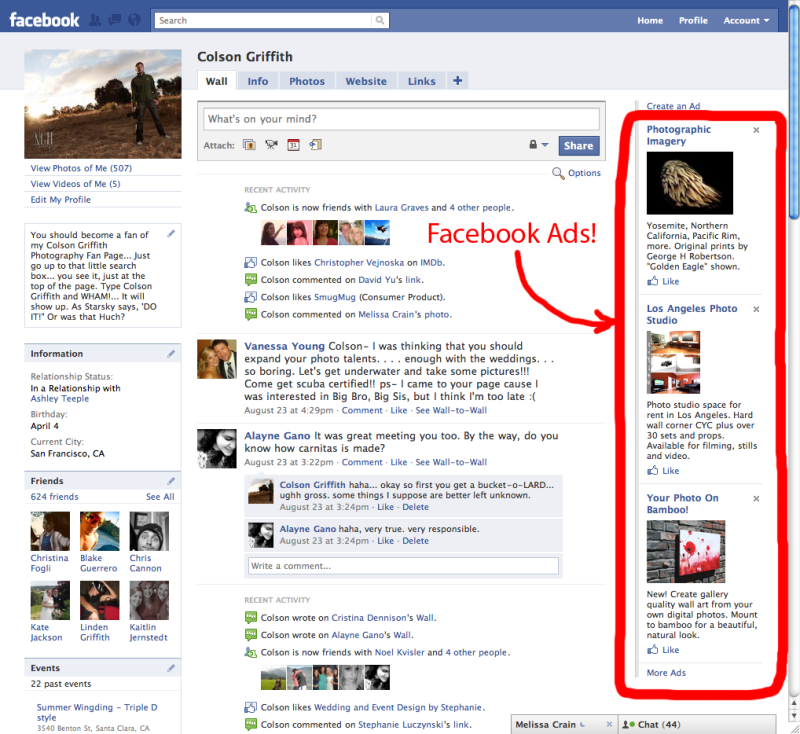
Facebook gets most of its revenue from advertising. You have to figure out their complex ad setup if you want to promote your brand and increase sales, but tread carefully.
You will be able to advertise your page, posts on it or your website through Facebook. The purpose of advertising is to generate interest, not to make instant sales.
Ask your users to provide an email address to sign up for your newsletter first, instead of pressuring them to buy something right away.
Using advertising is another great way to build trust and credibility. Selling through Facebook requires a long-term strategy.
As you would expect from a multi-billion dollar revenue stream, Facebook ads have many levels.
Before you start using advertising, decide which tools are right for you in the first place.
While the Business Manager account is best for agencies and large businesses, you'll probably want to start with Ads Manager.
This tool is purely for launching campaigns. It's powerful and fully manageable, so there's nothing to worry about.
In Ads Manager, you can set goals, find your audience, and get creative with your ads.
Facebook has developed comprehensive guides for every aspect of Ads Manager, so take the time to learn as you go.
Unless you're running advertising campaigns for entertainment, use this service.
The Facebook pixel is a snippet of code that essentially tells you the ratio of revenue to ad spend.
You put code on your website so that every time someone makes a purchase through Facebook, you can track that conversion in a report.
If you don't know how to add a Facebook pixel to your site, find someone to help you. This is an invaluable resource for optimizing your ad experience.
Facebook has billions of users and it can be tempting to target them all.
But you will need a clear understanding of the target market of your store, and most importantly - to focus on it. Facebook has also made it much easier to set up ad targeting options.
You can start targeting by:
You can also target broad categories or make it more specific to interests, which will bring more accurate results.
Interest-based targeting allows you to find people based on what they say they like, which Facebook groups they follow, and what they talk about the most.
You may feel like a spy, but interest-based targeting will increase your sales.
Make sure you don't spend too much targeting on a terrible image.
Proper visualization of your ads is the key to their success on Facebook. You want your store to stand out for the right reasons, right? Then think carefully about how to attract attention.
There are many types of Facebook ads. You can create videos, use canvas ads, or even GIFs if it suits your brand.
Although it might be better to start simple. Keep doing the same ads as for your site and:
You don't have much time to sell your store with words.
At first, the attention of users will be attracted by the image in your ad, but you will still have room for text. If you don't know how to express yourself beautifully, find a friend who can help you.
With a short, attention-grabbing headline and a short line of text, you'll need to engage the viewer, generate desire, and complement the ad with a call to action.
Your Facebook shop is full of products. You create great content. You have launched a successful advertising campaign.
What's next?
After all this hard work, you are definitely ready to start selling on Facebook. But don't forget communicate directly with your subscribers .
Unlike the Marketplace, where you are in direct contact with customers, using the Store requires a more dynamic way of communication.
User-generated content is any content created about your brand by someone not associated with it.
So if a customer tags your Facebook page with their photo or posts a review on one of your products, this is considered user generated content.
And your store can profit from it.
User-generated content gives your store something traditional marketing can't achieve: credibility.
No one cares if your ads say that 9 out of 10 buyers love your products (that's really a cliché, by the way).
Customers trust other customers . User-generated content influences the buying decisions of the majority of people surfing the Internet, and it all starts with visual elements:
If user posts give you more credibility than ads, you know what to do.
Integrating user-generated content into your Facebook ads is a smart move. You prove that your store is authentic and demonstrate that your products are already benefiting other people.
Could you:
Example - Toyota
Driving user-generated content can make your store a huge success.
Car brand Toyota created an entire Facebook ad campaign in which musicians posted videos or photos of their performances using the #feelingthestreet hashtag.
Viewing the original posts, followers voted for their favorites to form the Feeling the Street Band.
The winners were given the opportunity to tour and play all over Australia.
This Facebook campaign increased Toyota's engagement by 440% - the campaign was well worth the effort.
Encourage your subscribers with prizes from time to time.
There are many ways to get people to enter the Facebook contest that will benefit both you and them.
Subscriber engagement will skyrocket, as will your brand reputation. This move may sound like the opposite of Facebook sales, but it will pay off indirectly:
Now that you know how to sell on Facebook, start by increasing those sales.
Whether you decide to stick with the Facebook Marketplace listing or see the need for your own store, Facebook offers many dynamic ways to sell products.
Keep active, and sales will not keep you waiting.
Meta Platforms Inc., which owns the social networks Facebook and Instagram, was recognized as an extremist organization by a court decision dated March 21, 2022, and its activities in Russia are prohibited.
Facebook is the largest social network in the world. According to 2021 data, it is in the top 10 most popular in Russia: Brand Analytics counted 2.9 million active authors on the site. In total, according to Statista.com, almost 3 billion people use the social network, which is more than a third of the world's population. If you are targeting an international or adult solvent audience in major cities, Facebook Ads Cabinet will help you reach them.
Contents:
For a quick start
How Facebook advertising works
Opening an ad account
If you need a new ad account
Setting up a campaign
Setting up an ad group
Making an ad
Moderation
Payment
For those who want to figure out which ad Facebook determines
show
Campaign goals
Monitor campaign effectiveness
Facebook Pixel
Loaded audience
Catalog
Work with bids and budget optimization
Walking records
Automatic rules
Dynamic creatives
Rules for the site
We summarize
Read also:
Guide for the launch of advertising
from creating an advertising cabinet to launching an announcement in VKontakte
| Read
For a quick start How does Facebook advertising work? Thanks to this, you can show your ad not to everyone in a row, but only to those who are most likely to be interested in the offer. Facebook has wide ad placement settings. You can run ads not only within this social network and in Messenger, but also on Instagram and in applications that are connected to Facebook's Audience Network. You can choose exactly where you want to place ads on each of the sites, for example, show them in the main Facebook and Instagram feeds, but not show them in Stories. Facebook Advertising Account allows you to fine-tune the audience for advertising. Install the Facebook pixel on your website to show ads to those who have visited product pages or added them to the cart. If you have a customer base, for example, their email addresses, you can upload them to your advertising account and show them ads on social network pages. This will help make advertising more accurate: work with the most interested audience. Let's explore these possibilities in more detail. In this material, we will first go from the first hit in the advertising account to the launch of the ad. To run your first ad, you need: Set up an ad account. Create a campaign and select a target. Set up the audience and placements for the ad group. Place an ad. Pass moderation. Let's take a look at the steps. We will launch advertising on Facebook together with entrepreneurs - Ivan, Olga and Alexey. Ivan is the author of an online course, Olga is the owner of a beauty salon, Alexey sells home plants through an online store. For advertising, they use different settings, this will help to pay attention to the details of the Facebook account. Opening an advertising account The instruction will be in the interface in Russian. If you have Facebook in English, you can change the language: Settings → Language and region → Facebook language → Edit. Please note: Facebook is constantly experimenting with the interface, the location of the buttons and the text on them may change. We want to show the general principles by which Facebook advertising works. They do not depend on the location of the buttons or the text on them. If you have not tried running ads on Facebook before, then click on your avatar in the upper right corner → "Advertise" link → "Create ad" in the upper right corner. Facebook will ask you to create a page, for this you just need to specify the name and category. Then click Create Page → Create Ad. On the new page in the lower left corner, click on "Go to Ads Manager" and accept the non-discrimination policy. You will be in the interface for creating an advertising campaign. Let's launch the first ad from here and finish setting up the account along the way. If you have already tried running ads, then click on the Plus sign in the top menu → Create Ads → Go to Ads Manager. You can go to Ads Manager in the future via a direct link Facebook will serve ads on behalf of the page you just created. This means that the user will see its name and avatar in the feed. So it's better to add a brand logo, your photo or product image, and make the name clear. In addition, the user may immediately open the page, and if it is completely empty, this may confuse or disappoint him. We recommend adding information about the company and at least a couple of posts about your products. If you need a new advertising account . For example, in one you plan to pay for advertising with a bank card, and in the other - using PayPal. To create a new ad account, you need Business Manager, an ad collaboration tool. You can create up to 5 additional accounts using Business Manager. The number is individual: if you have recently registered on the social network and have not yet launched ads, you can create only one additional account. The more you spend on advertising, the more accounts you can add. Instructions from Facebook on how to create a Business Manager and add a new account to it. Setting up the campaign The first thing to do to launch the campaign is to set up the goal. Decide what you want to achieve from the company. There are three types of goals: awareness, consideration, and conversion. How to choose a campaign objective A visibility objective suggests that you want to introduce your audience to a company, product, or service. A goal from the “consideration” group is a way to reinforce interest in an offer. For example, if you want to attract people to a site or application, to interest the materials that you publish on your page. A goal from the "conversion" group helps to persuade users to take a targeted action: register on the site or add a product to the cart. These goals can be thought of as stages in a funnel. Customers first learn about your offer for the first time, then they want to learn more and, as a result, buy. Facebook will help you set up ads for potential customers at every stage. Flowers from Alexey's shop are a product of impulsive demand. It is important for an entrepreneur to attract a client to a landing page and try to sell immediately before the wow effect has evaporated. For the first campaign, Alexey uses the "Traffic" objective from the Consideration group, but in the future he will switch to "Conversions". Olga is actively developing her Facebook page, which helps her retain loyal customers. The salon often appears in their feed with beautiful photos, so they remember it when it comes time for procedures. Olga uses the Engagement objective from the Consideration group to drive more audience to her page. Ivan knows that his course is rarely paid during the first visit to the landing page, he needs to do a few warm-up touches first. Therefore, he sets up the first campaign in order to get maximum coverage. Click "Continue". Choose whether you plan to run an A/B test. In this case, Facebook will offer to create two variations of the ad that will differ in design, placements, ad delivery method, or audiences. Select whether you plan to optimize the budget at the campaign level. If not, then the optimization will be at the ad group level. We will also analyze this point in the second part. Working with bids and budget optimization Setting up ad group There can be multiple ad groups within a campaign. For example, you launched an advertisement for a new product and want to show it to different segments of the target audience: some ads for residents of large cities, others for residents of regions. Then you create two ad groups in the campaign. Ads in the same group have the same target audience, placements, and total budget. Add a name for the ad group and indicate where we want to get traffic: to the website, to the application, to Messenger or WhatsApp. This is necessary to set up ad impressions - Facebook will select those users who are most likely to take the desired action: go to the site, download the application or write to you. You can create dynamic creatives for an ad set, where the content of the ads will change to appeal to different users. You can also prepare a special offer - a promotion that users can save and use in the future. For example, a promotional code for the next purchase. Dynamic creatives In the "Budget and schedule" field, specify the budget for the day or the budget for the entire duration of the campaign. A daily budget is fine if you have a perpetual ad and want to constantly spend a steady amount on it. If you have specific start and end dates for your campaign, it's best to use a lifetime budget. Facebook in this case will spend the funds evenly throughout the campaign. Alexey and Anna are always happy to meet new clients, so they have constant campaigns and there is a daily budget limit. Oleg knows the dates of the new stream, so he set a budget for the entire duration of the campaign and chose the date when the ads will turn off. Setting up the audience. Specify the geography, age and gender of potential customers. For geography, you can specify additional parameters, for example, select only those who permanently live in this territory and exclude travelers. You can specify the names of settlements or specify points on the map and the radius around them. Detailed targeting allows you to specify audience interests, behaviors, and specific demographics. For example, you can select small business owners, those who actively shop on Facebook, have traveled recently, or are interested in politics and business. Click Edit to open a row for additional settings. You can start entering parameters in text and the system will tell you if it finds something suitable. For example, type "Music" and you'll see many interests related to music. Below you can specify the desired connections of the target audience with your page, application or event. For example, you can choose to only show ads to friends of people who have used your app, or not show ads to your followers. To do this, click "Show advanced options" → "Links" → "Edit" and select the appropriate option. Aleksey set up ads for women from Moscow of the target age who are interested in gardening. Olga attracts those who live near the salon, so she set up the audience by geography. Ivan is looking for students who live in large cities and are interested in management. Click Save Audience if you want to use the same settings in the future. In the pop-up window, add the name of the audience and click "Save". When setting up an audience, you can use the information that the Facebook pixel collects on your site or upload your own customer base. More on this in the second part. Facebook Pixel Loaded Audience Selecting placements. If you leave "Automatic", then Facebook will select the sites on which to show ads. If you know exactly where you want to show ads, select "Manually select places" and check the boxes in the places that interest you:
Specify the budget: select the key action, set the reference price. We determine how much we are willing to spend on advertising and on what schedule we want to show it. In the "Optimize for displaying ads" field, select the main action that we want to achieve: viewing an ad, clicking on a link, or viewing a page. Facebook will show ads to users who are more likely to take that particular action. The benchmark price is the average cost you are willing to pay for a target action. For example, you expect that a click will cost you no more than 15 rubles, then you can put 15 in this field. If you don’t know, you can leave the field empty, conduct a small test and estimate how much the desired result will cost you. If you set a price limit, you can choose between two bid strategies: Price Limit or Bid Limit. By default, the first option is used, it helps to get the most targeted actions. We will tell you more about this later. Working with bids and optimizing the budget In Advanced settings, you can set when you will pay - after each impression or each click on an ad. And also specify the schedule by which you want to show the ad, for example, only on weekdays during business hours. Some of the advanced options depend on other ad settings and may not be active. For example, you can only set a schedule if you have set a budget for the entire duration of the campaign. Click Next. Designing an ad One ad group can have several creatives with different text, different formats, or different images. Over time, we can keep only the most profitable ones. Choose ad format: gallery, single image or video, selection.
Instant Experience can be used for both Gallery and Single Image or Video. Then, when you click on the link, the mini-page that you create will open. For a test run, let's focus on the "Single image or video" format. Let's add media objects, text and a link. Click the "Add media file" button, upload a suitable image or picture. Please note that multiple images can be uploaded for a single ad: square for feed, vertical for Stories, and rectangular for banner ads and search promotion. To do this, upload several images, then click on one of them. The "Recommended aspect ratio" field will appear in the right part of the window, activate it and replace images for different sites. To do this, click on the button with two arrows next to the format, and then select the desired image. Add up to five options for the body text and titles for the ad, a description for the link, the link itself, select a call to action on the button. The recommended length of the text is 125 characters, the title is 40 characters. If you're targeting an international audience, you can translate your ad yourself or have Facebook do it. This feature is only available if the ad has the same title and body text options. In the right part of the window, you can immediately see how the ad will look in different places. If you have uploaded square, rectangular and vertical images, you will immediately see how the ad adapts to different formats. Ivan chose the "Single image or video" format for advertising. Alexey - Gallery. Olga uses the Engagement objective, so the system prompted her to select one of the posts in her group to promote it. Here's what their ads look like: Click Publish. If you are running Facebook ads for the first time, the system will ask you for the country of your account, the currency in which you will pay for ads, and the time zone. In the next window, select a payment method. Here you can also enter the TIN, but this is optional. In the next window, you need to enter the card details, the system will write off and return 100 rubles. Your account is fully set up and the first ad campaign has been moderated. Moderation When your ad passes moderation, you will receive a notification. The campaign's status will change from "Pending" to "Active" if everything is fine with the campaign, or to "Errors in ad groups" if there are problems. Site Rules If your ad didn't pass moderation, go to the "Ad Groups" tab and hover over the group's status to see where it's having trouble. Or go directly to the "Ads" tab - the problematic one will have the "Rejected" status. Next, we will analyze the rules due to which an ad may not pass moderation. Payment Advertising on Facebook is turned off "on credit": the system first shows ads, and then issues an invoice and debits money. At the same time, for each user, it determines its own account threshold. For new accounts, the starting limit is usually between $2 and $25 in local currency terms. In Russia, the initial threshold is usually 125₽, 600₽ or 1290₽, but it may be different for your account. If you want to increase or decrease the threshold, click on the menu in the upper left corner and go to the "Billing" section. Click "Payment Settings" in the upper right corner. In the new window, click "Manage" and enter a new billing threshold. Facebook will tell you what range your personal limit can be. In this case, even if you specify a high threshold, at first the bills will still be for small amounts. This is necessary for the social network to be convinced of your solvency. Facebook does not automatically include VAT in advertising costs.
For those who want to figure it outFacebook Advertising Account is a flexible but complex tool with a lot of possibilities. If you understand them, you can significantly increase the effectiveness of advertising campaigns. Let's analyze some of them. How Facebook decides which ad to show When you run an ad on Facebook, you describe the people you want to show the ad to. For example, men from Moscow aged 20 to 30 who are interested in sports. Many other advertisers are competing for the attention of these same people. When one of the eligible users opens Facebook, Instagram or Messenger, the system chooses which of all possible ads - yours and competitors - to show him. To do this, she holds an auction. Facebook strives to show not the ad that will simply earn more, but the one that will bring the greatest benefit to all participants: the system, the advertiser, and the user. Therefore, ads are evaluated according to three criteria: bid, action frequency prediction, and ad quality. As a result, the user sees the ad that gets the highest score based on the sum of the criteria. Campaign Goals The system stores information about the behavior of billions of users and can try to predict how they will react to your ad. Some users are more likely to be involved in event advertising, others are more likely to be involved in advertising, after which you need to write in WhatsApp or Messenger, still others in videos or galleries, and still others are willing to interact with Instant Experience. This data helps Facebook determine which users are more likely to be interested in the ad, and which ones are better off not showing it. The first step in creating an advertising campaign is to choose its goal. There are 11 goals in total, they are divided into 3 blocks: The Awareness block is suitable for outreach campaigns when it is important for you to reach as many users as possible, but sales are not a priority.
In practice, these two goals are very close and you can use Reach.
The "Conversions" block is aimed at more specific goals - leads and sales.
Tracking the effectiveness of the campaign Campaign launched, Facebook shows your ad to users. Now we need to evaluate whether the ad is working effectively. To do this, monitor ad metrics and ad quality scores in the campaign list, or use automatic rules. Automatic rules Ad metrics are the number of impressions and results. From them, you can understand whether Facebook often shows it and whether it interests the audience. If your ad doesn't get even hundreds of impressions in an hour, then either you've set up a too narrow audience or you're losing most of the auctions. Try to expand the audience - remove some of the restrictions or add parameters. If you are just trying out Facebook advertising, we recommend working with an audience of 50,000 or more people. If the audience is wide enough, increase the reference price by 2-3 ₽. If your ad is quickly gaining thousands of impressions, your audience is probably too wide or you are winning most of the auctions. To evaluate whether an ad is achieving its goal, look at the number of results. “Result” is the action you set up your ad for, such as a click, conversion, like. If the number of impressions grows, and the "Results" remain at zero, then the ad is not of interest to users. By default, the ad account does not show the clickability of the ad, but this parameter can be added. Scroll the statistics on the page to the last column and click on the small plus icon → "Add more columns ...". In the new window, check the "Click-to-Impression Ratio" checkbox and save. Now the statistics will display CTR - click-through rate - the percentage of clicks on the link from all impressions. Click-through rates vary across niches, for example, ads for clothing or cosmetics are clicked on average more than ads for jobs or personal services. Focus on the average CTR corridor: from 0.5% to 1.5%. If your ad is clicked much less often, then it looks like you made a mistake with the audience or unsuccessfully designed the ad: users do not want to interact with it. It is worth comparing not only ads, but also groups of ads. Their main difference is that they are tuned to different audiences. And if one ad group performs significantly better than another, it means that more successful audience parameters have been chosen for it. When you launch a new ad, Facebook first learns which people and where to show ads to get the most clicks, conversions, or app installs. Let's say you run ads for men and women over 18. It may turn out that women actively respond to the announcement, while men do not. Then the system will start showing the ad more often to the more active segment and less often to uninterested users. During training, the performance of the ad is unstable, the cost per action has not yet become optimal. This is not scary: the system continues to look for a suitable segment and placement sites. As a rule, after 50 results, the indicators stabilize, and until this time it is better not to rush to conclusions. Here's what Facebook recommends during the learning phase:
Quality Score is Facebook's internal criteria by which it compares ads to each other. There are three of them: Quality Score, Engagement Rate Score, and Conversion Rate Score.
These indicators are approximate and relative: they do not say whether your ad is good or bad. But from them you can understand how it compares with the advertising of other products for the same audience. If your ad was below average on these criteria, you probably didn't reach the audience well or didn't communicate your unique advantage well. This quality rating also affects the number of auctions you win. The higher the quality, the higher the overall ad score and the more likely the ad will be shown. We talked about this in more detail in the instructions for launching advertising on Vkontakte. If you have several advertising campaigns in different advertising accounts, then you can compare their effectiveness using UTM tags. These are special parameters in the links that will show in the site statistics where the users came from who performed the target action. Tags will help you notice if more traffic is coming from some ad network or campaign, but there are no targeted actions - purchases or requests - at all. Tilda's free UTM tag generator How to track UTM tags in Tilda's interface Facebook Pixel The ad pixel is a small script. It collects information about users who visited your site and sends information to the advertising account: which pages the user opened, which buttons he clicked and filled out forms. This information can be used to trigger retargeting. Retargeting is advertising that catches up with users who have been to your site. They are already familiar with your products or services, so advertising can be more effective. Retargeting works automatically. The user flipped through your site, the pixel transmitted this information to the advertising account. If you have an active advertising campaign for the audience that the pixel collects, then this user will see it when they go to Facebook. The pixel can collect information not only about visits, but also about specific actions. For example, to remember which product the visitor added to the cart. Set the pixel. Click on the menu button in the top left corner, scroll down and go to the Events Manager. Click "Connect Data Source", select "Internet" → "Facebook Pixel". Set a name and specify the site where you will place the pixel. Copy the code from the next window and paste it between the and tags on your site.If you have a site on Tilda, follow these instructions. As soon as you install the pixel, a notification will appear in your account. After about 20 minutes, the first events collected by the pixel will begin to be displayed here. Provided that during this time someone visits the site. Set up events. The Facebook pixel collects information about everyone who has visited your site. But in order to use all the capabilities of the pixel, we recommend adding your own events that the pixel needs to capture: page transitions, link clicks, form fillings. There are two ways to set up events: use the Facebook setup tool or add events using code. The first one is better if you don't want to burden developers. The second is if you have a large site and automatically markup it will be faster than adding all the events one by one through the Facebook tool. Set up an "Add to Cart" event using Facebook's automatic tool. In the upper right corner, click "Add event" → "From the new site". In the new window, select "Use the event setup tool", enter the site address and click "Open site". Make sure you don't have pop-ups blocked, otherwise the site won't open. The site will open in a new tab with the Facebook events widget on top. We want to assign an event when a button with the text "Add to Cart" is clicked, which is located in the product card. Open the card, click on the "Track new button" widget and select our button. In the widget, specify that when clicked, the "Add to Cart" event occurs. If you prefer to work manually and want to add events by code, use the instructions from Facebook If you have a site on Tilda, then information about visiting pages and filling out forms is already in your pixel - Tilda configures these events automatically. Creating an audience. Now the Facebook pixel collects not only information about visits, but also about certain user actions on the site. You can use this to target ads to them. To do this, you need to create an audience. Let's say we want to run an ad for everyone who puts a product in their cart. Click "Create" → "Create Custom Audience". Change "All site visitors" to the AddToCart event we created in the last step. Let's say that after paying, customers land on the /checkout page. We can show ads only to those who put the product in the cart, but did not pay, that is, did not get to the /checkout page. This audience can now be used when creating an ad set. In the settings of the "Audience" section in the "Create a new audience" tab, click on the "Custom audience" field and select the audience that you created there. Run an ad with this audience. Now, when a site user adds a product to the cart and forgets to pay, he will automatically be in the right audience and start receiving ads. Loaded audience If you have a database of email addresses or phone numbers of your customers, you can upload it to your Facebook advertising account. The system will check if these addresses and phone numbers are associated with some users and will create an audience from them. Open the menu and go to the "Audiences" section. Click "Create Audience" → "Custom Audience" → "List of Clients". Facebook will ask you to create a new company - Business Manager. Click "Create a new company" and on the new page - "Create an account". We fill out the form. When you have a company account, you can upload your database. Go back to "Audiences" → "Create Audience" → "Custom Audience" → "Client List". Upload the file and wait for it to be processed. This audience is now available for advertising. Catalog The "Catalogue" function allows you to upload your assortment to your Facebook advertising account in order to use it when creating ads. This is convenient if you have a lot of positions: you don’t have to add an image, description, and price of the product separately for each ad - you just need to do it once. The catalog also requires a Business Manager account, which we set up when we uploaded our audiences. Go to the menu, scroll to the item Commerce Manager → click "Create catalog" → select the category to which the products belong. Click "View catalog". Opening a directory. In the right panel, select "Products" → "Add Products". Select the way to upload products to the catalog. If you are using the Shopify, BigCommerce, Magento, OpenCart, or WooCommerce platform, select "Use Partner Platform".
One of the features of the catalog is dynamic advertising. To run it, let's connect a pixel to the catalog. Facebook Pixel Select "Events" in the left menu and connect our pixel. Go to the "Advertising" section and click "Create Ad" in the "Dynamic Ads" section. Fill in the information about the campaign and the ad group, select "Catalogue sales" as the goal. On the ad group setup screen, we choose to whom we want to show ads: only to those who interacted with our site, or also to people who are similar to them in behavior and interests. In the second case, the audience will be wider, but less warmed up. Here we select after which action we want to show the user an ad: when he just looked at the product, added it to the cart and did not pay, or bought something, and we want to offer him an additional product. For these rules to work correctly, you must have pixel events configured. The ad setup screen will load a carousel of catalog items. You can add a different version of the text to the post or additional options in the title, such as a price. Post an ad at the end. Now users will see exactly the products they were interested in in advertisements. Working with bids and optimizing the budget Immediately after launch, Facebook's advertising system offers 4 main strategies for managing the cost of a target action - how much you are willing to pay for a click, conversion or other result: the minimum price, the cap price, the cap bid and the target price. For price cap, bid cap, and target price, you can set a target price for the cost of an action that you are counting on. Let's take an example to understand how different strategies work. Let's say our budget is 1000 rubles, we want to get as many clicks as possible. At the same time, we expect that we will pay about 20 rubles per click, this is our reference price. Let's assume that the system sees the following placements: 10 placements with a click of 10₽, 10 placements with a click of 18₽, 10 placements with a click of 22₽, 10 placements with a click of 50₽. Here are the results we get, depending on the strategy: The floor price assumes that Facebook will look for the cheapest placements, while focusing on spending the entire budget for the day or duration of the campaign. The disadvantage of this strategy is that you will not be able to set the price you are targeting. In our case, the system first uses all placements at 10₽, then all at 18₽, then all at 22₽, and then a few more at 50₽ until the total budget runs out. We will get more clicks, but the cost will be higher than what we expected. Low cost strategy: most results, spent all budget, high CPC (cost per click) Price limit strategy assumes that the system will start by looking for the cheapest placements. When they run out, they will switch to more expensive ones, and so on, until the average cost of placements becomes approximately equal to the control rate. It turns out that some placements will cost more than the control rate, but due to the fact that others cost less. In our example, the system first uses all placements of 10 rubles. The average cost per click will be 10₽, but our benchmark bid is 20₽, so this is a signal to the system that you can look for more expensive placements. Price cap strategy: optimal number of results, CPC close to the control price Bid cap strategy means that at the beginning the system will also look for the cheapest placements, but in each auction it will bid no higher than the control price. In our example, it will turn out that the system uses all placements of 10 rubles and 18 rubles. Placements at ₽22 will not be used - this is more expensive than the reference price. It turns out that we will save money, but we will get few clicks. Limit bid strategy: lowest CPC, spent the least amount of budget but least clicks In the case of a target price strategy, the system will look for placements whose cost is close to the control bid - within ±10% of it. In our example, the system uses placements of 18₽ and 22₽. As a result, we will pay as much per click as we planned, but there will not be very many clicks. Target price: less results, CPC close to target price Let's put the results together and see what happens with each of the strategies. Recall that the system sees 10 $10 click placements, 10 $18 click placements, 10 $22 click placements, 10 $50 click placements: lead to high costs. The cap price will help you get more results while staying within the benchmark price. A bid cap is a way to control your bid in each auction: you won't overspend, but you may miss out on profitable placements. The target price is suitable if you want to predict the budget and the result very accurately. Not all strategies are available for some targets. For example, the target price strategy is not available for the Traffic and Reach goals. You can set the strategy both at the ad group level and at the campaign level. In the first case, the system will distribute the budget of one group among all its ads. If at the same time the entire ad group works inefficiently, then the budget for it will still be spent. If you optimize the budget at the level of the entire campaign, then the system will redirect the budget from a less successful campaign to a more effective one. Post promotion If you are an active Facebook community, you can promote the posts you post there. For an advertising post, you can add a button to go to the site, in Messenger or WhatsApp, otherwise it will look like a regular post in the user's feed. To run this ad, click "Promote Post" in the bottom corner of the desired post. In the pop-up window, set up the button options, audience, placements, and budget. At the end, click Promote Post. Setting up an audience works the same way as when creating a regular ad. Automatic rules Over time, you may end up with dozens of campaigns, ad groups, and ads themselves. Monitoring their effectiveness manually is inconvenient - it takes a lot of time, and it's easy to miss something. Facebook has automatic rules for this task. With this tool, you can create rules that will automatically fire when certain events occur. For example, disable the ad if the conversion becomes more expensive than 500₽. Or increase your daily budget if your cost per conversion is less than $300 to get more results. In this case, the system will automatically execute the rule when the condition occurs. You don’t have to constantly monitor ads and campaigns. To set up automatic rules, click on the menu button and scroll to "Automatic rules", click "Create rule" in the upper left corner. The rule can be applied to all campaigns, ad group or ads. Let's say we want to disable the ad if the cost per result is more than 500₽. Select "All active ads" → "Disable ad" → Cost per result is more than 500₽. Please note that in this case, Facebook will automatically add the condition “Impressions for the entire period > 8000”. This is due to the fact that with a small number of impressions, the statistics may be inaccurate and it is inappropriate to include the rule. Rules can be combined. For example, disable the ad if less than three days have passed since the launch and the price of the result has risen above 500 rubles. Let's add the condition "Cost for results > 500₽" and "Hours since creation > 72". The meaning of this rule is as follows: for example, at launch, we are ready for the price of the result to grow, but we hope that during the first five days it will not exceed 500 rubles. You can also set up rules to turn off all ads at the right time. Let's say that on Monday, May 18, your course stream starts and you need to turn off all ads at 22:00 on May 17. Doing it manually for a long time, and you can forget, saves the rule: Dynamic creatives Facebook allows you to run ads with dynamic creatives. You upload several versions of images, headings and text, and the system shows them in different combinations. Users see different creative options and react differently, which helps the system choose the most effective options. Dynamic creatives have limitations: the ad format can only be "Single image or video" and you can't direct customers to Messenger or WhatsApp - only to the site or app. They also cannot be translated into other languages: if you want to run an ad in multiple countries, you will have to create a separate ad for each language. To create a dynamic creative, in the ad group settings window, enable the "Dynamic creatives" option. Then, when designing your ad, upload multiple images or videos and add up to 5 options for body text, title, and link description. Site Rules Facebook is zealous about its advertising policy. Here are a few rules to consider and recommendations that will help you pass moderation without any difficulties: Facebook evaluates not only the advertisement itself, but also the page or application to which it leads. If the landing page does not comply with the ad or social media rules, the ad will be disapproved. It is forbidden to make references to the user's personal characteristics in advertising. That is, you cannot indicate gender, race, religion, orientation, or age. For example, the ad "Counseling for depression" will be moderated, and "Tormented by depression? Seek help" - no, because it potentially refers to a characteristic of a person. Advertising must comply with local laws. The ad must not contain clickbait, aggression or misleading statements. Discrimination, threats, fraud and profanity are unacceptable. Sexually provocative content is prohibited in advertising. Images of nudity may not be used, even if nudity is only implied. The same goes for photographs of people in obscene poses or images with obscene overtones. Facebook is also picky about the spelling of its name. You can only write Facebook - with a capital letter and in Latin, in the same font and size as the rest of the text. The only exception is when facebook is part of the site address. Read the detailed rules for advertising on Facebook.
Let's sum it up Facebook advertising account allows you to run ads on the social network platform, as well as on Instagram, the Messenger application and on the Audience Network. Launching an advertising campaign consists of three steps: setting up a campaign, setting up an ad group, and designing an ad. One campaign can have multiple groups, and one group can have multiple ads. When setting up a campaign, we select its goal, when setting up a group - the audience and placements, when designing an ad, we add media files, texts, links. Advertising works on the principle of an auction. The system takes the bid for each ad as a basis, evaluates the quality of the ad, and predicts the likelihood that the user will interact with it. As a result, each ad receives an overall value score. The user sees the ad with the highest overall value. Facebook allows you to work with your audience flexibly. You can customize it according to the internal parameters of the network: demographics, interests, and behavior. You can upload your customer base or automatically gather website visitors into an audience using a pixel. Facebook Pixel is a script that collects information about your website visitors. You can send information about button clicks, page transitions, and other actions to a pixel. This information is used to create more personalized ads. You can upload a product catalog to your Facebook account and use it in conjunction with a pixel for dynamic ads. For example, show ads for other products to those who bought something, or show the user a product that he put in the cart but did not pay for. Facebook allows you to manage your budget at the campaign level and at the ad group level. There are several bidding strategies that determine how you spend your budget, how many targeted results you get, and how accurately you can predict ad spend. You can set up dynamic creatives on Facebook. If you don’t know which image or call to action will work best for your audience, trust the system: upload several options, Facebook will show them to users in different combinations and choose the most effective ones. |