Learning how to schedule Instagram posts in advance is the easiest way to save time on the platform so that you can focus on what matters.
The more complex your Instagram marketing efforts are, the more helpful a scheduling tool becomes. This is true whether you own a small business or manage a global team. Consistent, high-quality content is easier to plan, craft and share when you automate some of the grunt work.
In this article, we’ll go through how to schedule posts on Instagram, including the best Instagram scheduling tools for Business, Creator and personal accounts.
1. Add your Instagram Business account to your social media management platform
2. Compose your Instagram post
3. Find the best time to post
4. Schedule your post
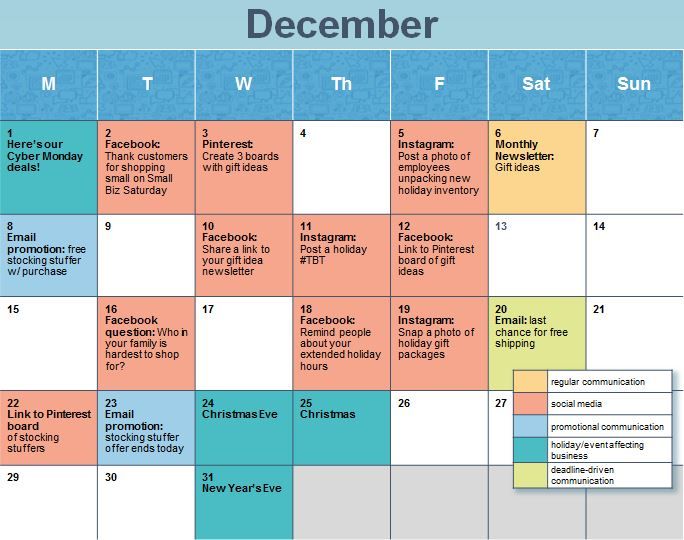
Bonus: Download our free, customizable social media calendar template to easily plan and schedule all your content in advance.
Can you schedule posts on Instagram Business? You sure can!
Visual learners: Watch this video for demos of how to schedule Instagram posts and Stories with Creator Studio and Hootsuite. Everyone else: keep reading.
Brands with business profiles can use third-party apps like Hootsuite to schedule posts across multiple social media platforms, including Instagram, Facebook, TikTok, Twitter, LinkedIn, YouTube and Pinterest.
You can schedule feed posts, Stories, carousel posts, and Instagram ads with Hootsuite.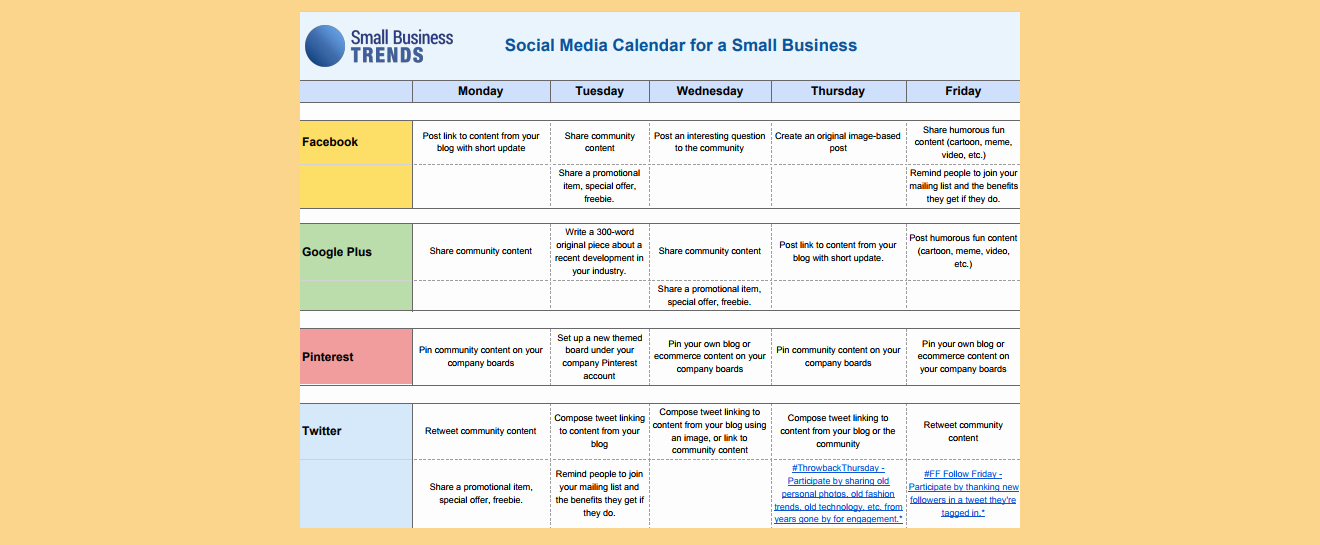
Before you start, make sure to switch to an Instagram Business or Creator account — it’s free, and it only takes a minute. If you’d rather stick to a personal account, we have a section for you coming up.
If you’re using Hootsuite, it’s easy to link your Instagram account. From the Hootsuite dashboard:
For more details on this process, check out our very thorough help article.
In your Hootsuite dashboard, click the Create icon, then select Post.
In the Post To field, choose your preferred Instagram account from the list.
Now go ahead and upload your visuals (or select them from your content library). You’ll also want to write an engagement-driving caption, add your hashtags, tag relevant accounts, and add your location.
Your draft will show up as a preview on the right.
Start your free 30-day trial
If you haven’t already prepared your image for Instagram, it’s easy. Click Edit Image to crop your visual to the required aspect ratios (that is: 1.91:1 or 4:5), filter it, and otherwise perfect it.
Bonus: Download our free, customizable social media calendar template to easily plan and schedule all your content in advance.
Get the template now!
You can also edit your image using Canva’s editor inside the Hootsuite dashboard. No more switching tabs, digging through your “Downloads” folder, and reuploading files — you can seamlessly create beautiful visuals from start to finish without leaving Hootsuite Composer.
To use Canva in Hootsuite:
Start your free 30-day trial
Posting at the right time can help you reach your audience when they’re online. Plus, early engagement tells the Instagram algorithm that people like your content (a.k.a. gives it a nudge to surface it in more users’ feeds).
Hootsuite’s Best Time to Publish feature shows you your best time to post on Instagram based on your posts from the past 30 days. It groups posts by weekday and hour to identify when your posts had the highest impact, based on average impressions or engagement rate.
To find your best times to post, save your post draft and follow the instructions below:
You will see a heatmap highlighting your best times to post (based on your account’s historical performance). You can switch between two tabs: “Build awareness” and “Boost engagement” to find the time that will work best for your specific goals.
Start your free 30-day trial
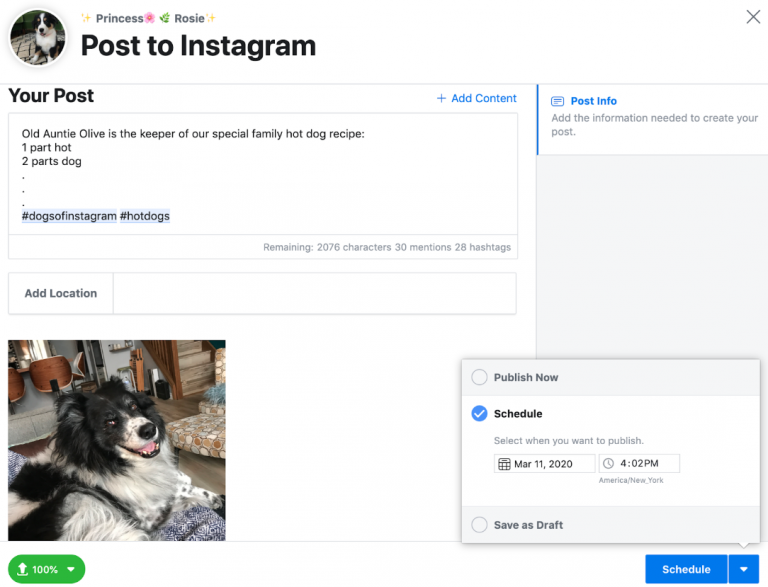
All right, now comes the easy part. Click Schedule for Later in the bottom right, and select the date and time you’d like your post to go live.
If you skipped the step above and didn’t go to analytics to look up your best times to publish, you will see a couple of recommended posting times once you select a date. You can pick one or manually set a time.
That’s it! You can review your scheduled posts in the Hootsuite Planner, and edit them there before they go live, as well.
Start your free 30-day trial
Finally, let’s take a look at how to schedule an IG post for those of us using personal profiles.
If your Instagram profile is neither a creator nor a business account, don’t worry. You can still schedule your posts; there are just some extra steps involved. In short: Hootsuite sends you a mobile push notification at the scheduled time, which reminds you to log in and tap publish.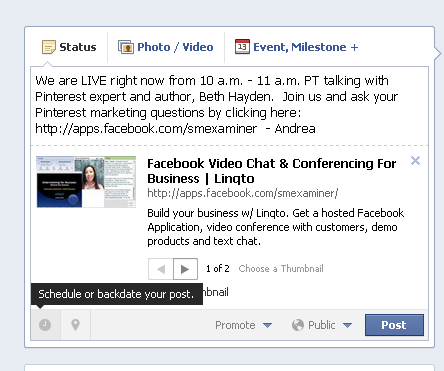
For self-evident reasons, we’ll pretend that your preferred management platform is Hootsuite. From the Hootsuite dashboard:
You’re also going to want to set up the ability to use mobile push notifications. Follow these steps on your phone:
 Compose your post
You know the drill: write a good caption, use the right hashtags, tag relevant accounts, and add your location.
If you want to level up your posts, check out our list of Instagram marketing tips. Or else read up on the latest Instagram trends in 2023.
The key difference between business and personal accounts? Posts scheduled for a personal account don’t publish automatically. Instead, you’ll get a mobile notification.
You’ll still want to check your Instagram analytics and make sure you select the best time to post.
Go ahead and pick your time and date, then click Schedule.
When the time comes, you’ll receive a push notification on your phone to remind you to post to Instagram. Note that this is essentially the same process for scheduling your Instagram Stories (no matter what kind of account you have).
The process for posting looks something like this.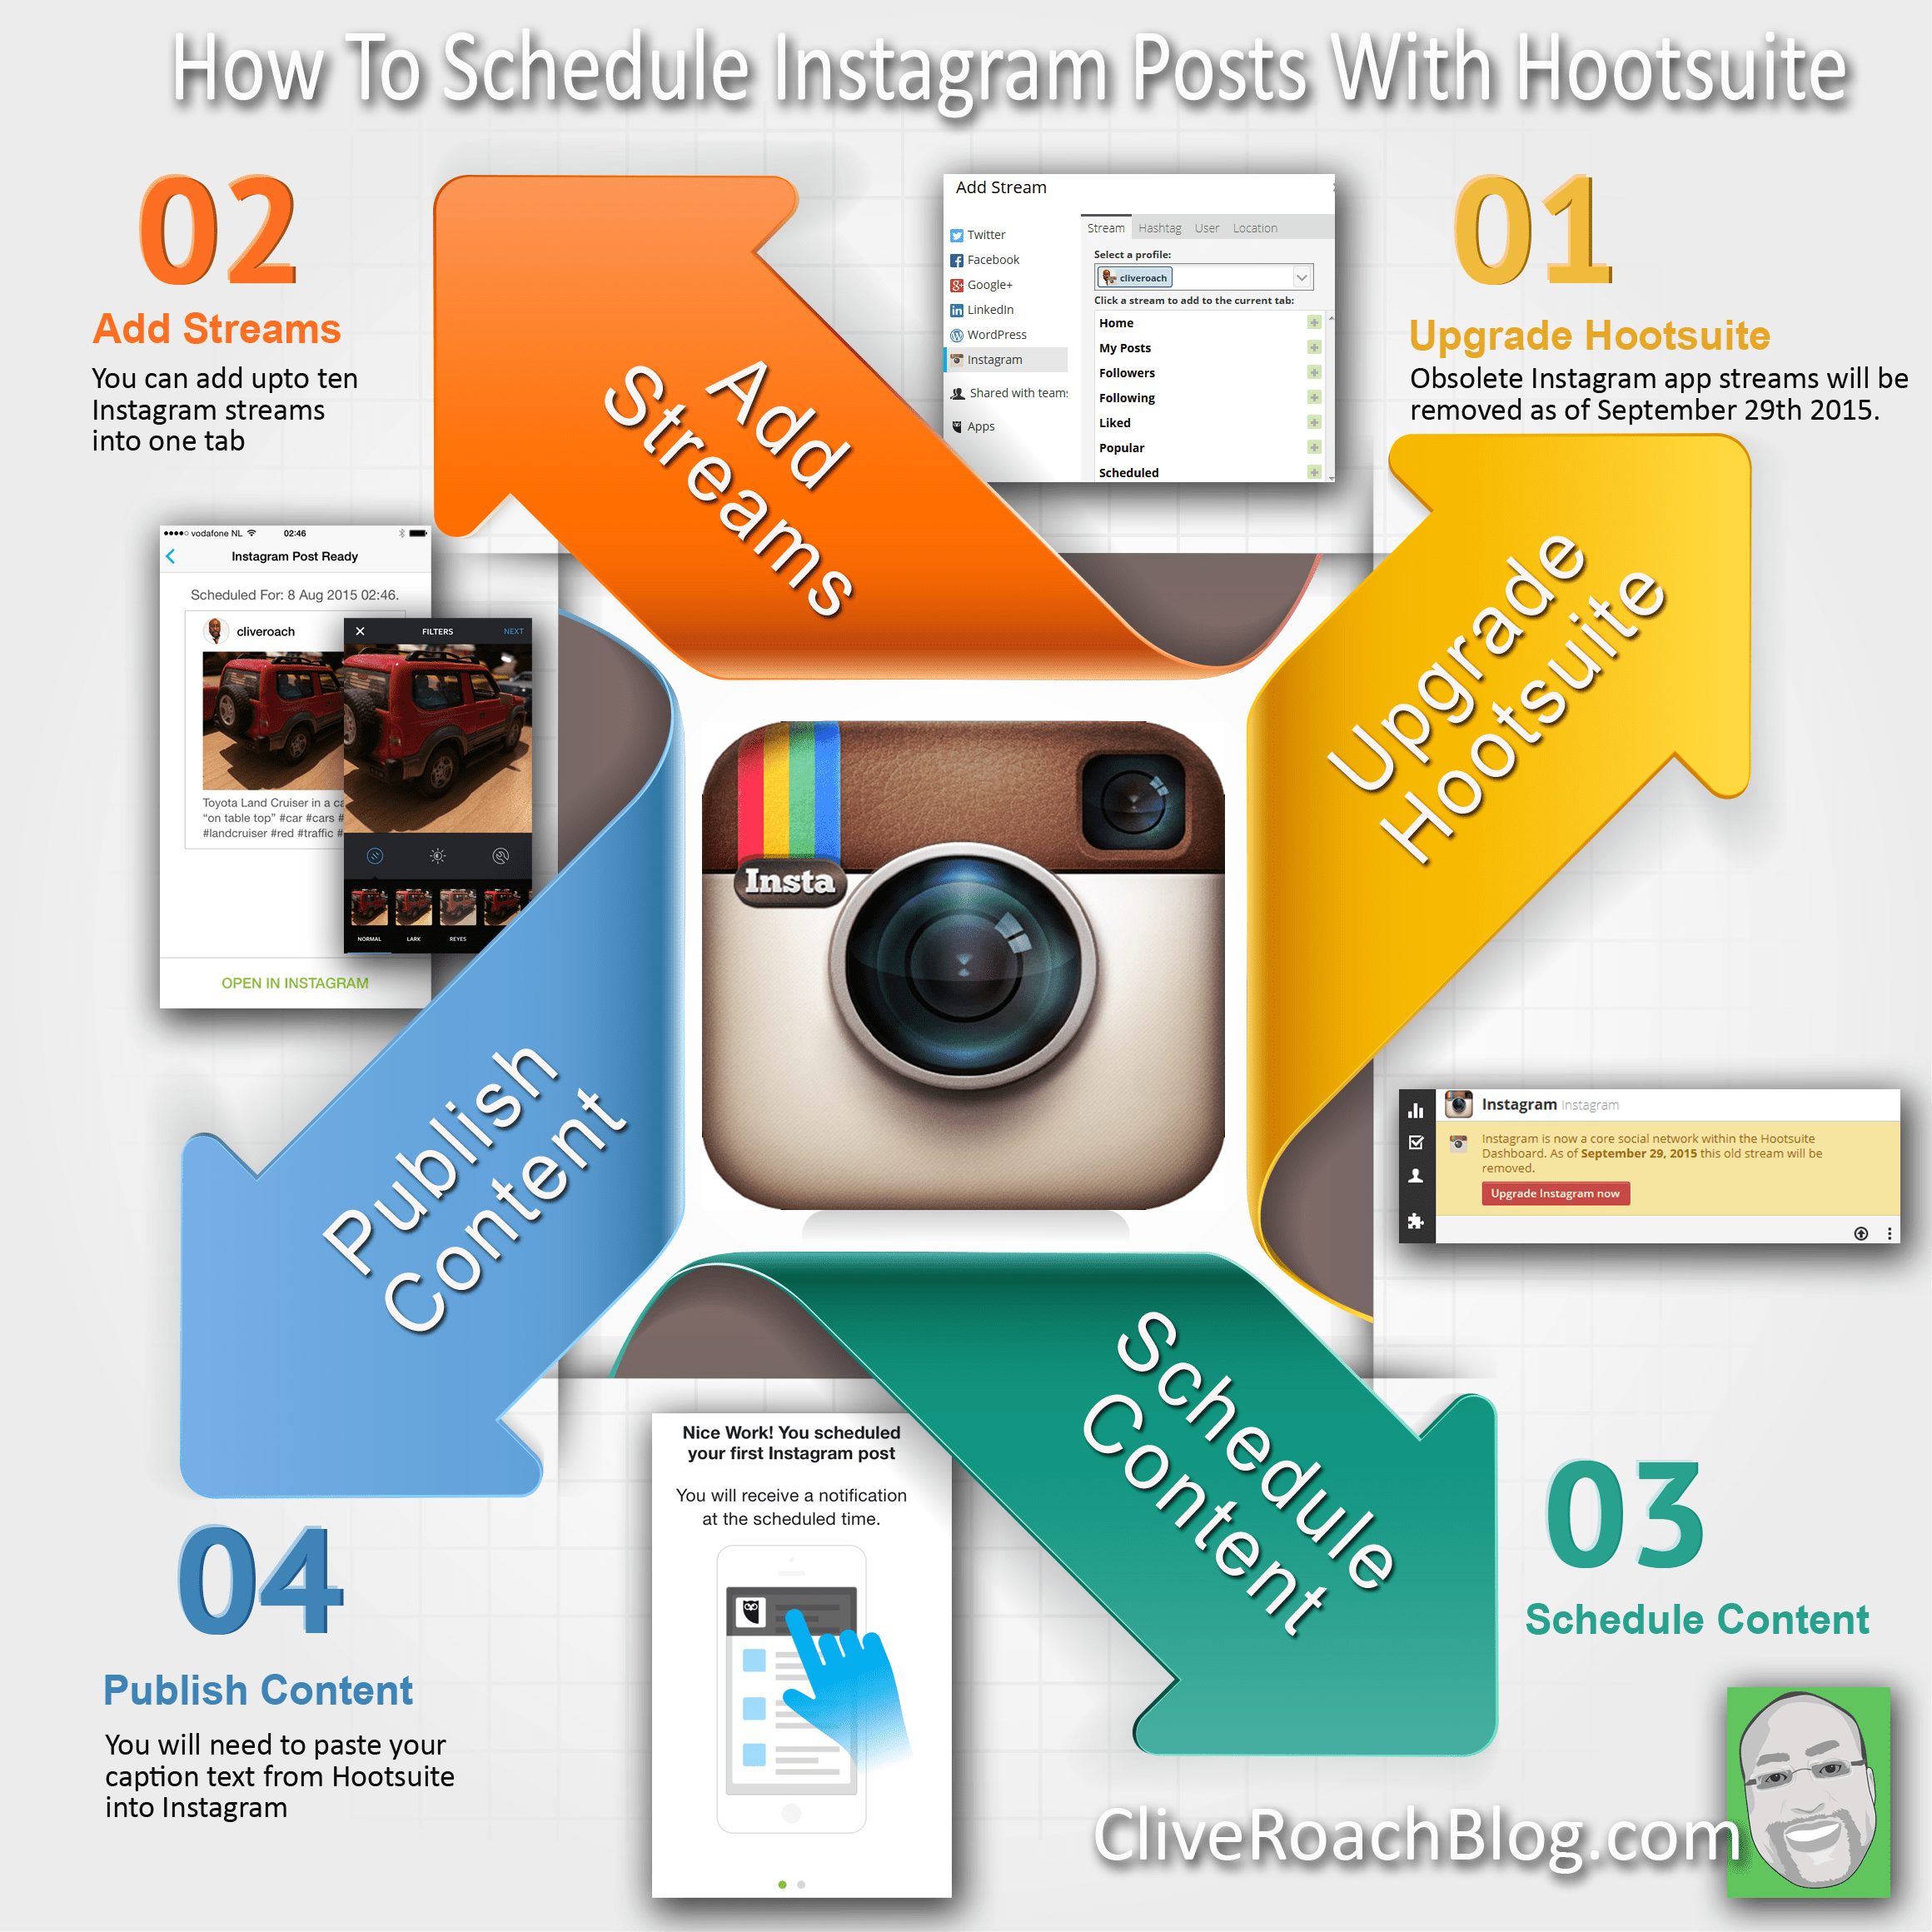 The Hootsuite app will take care of most of the work, but you need to open Instagram, paste your caption in, select your photo, et cetera. Not tough brain work, but give yourself five minutes to triple-check that everything’s right.
And voila! You’ve done it!
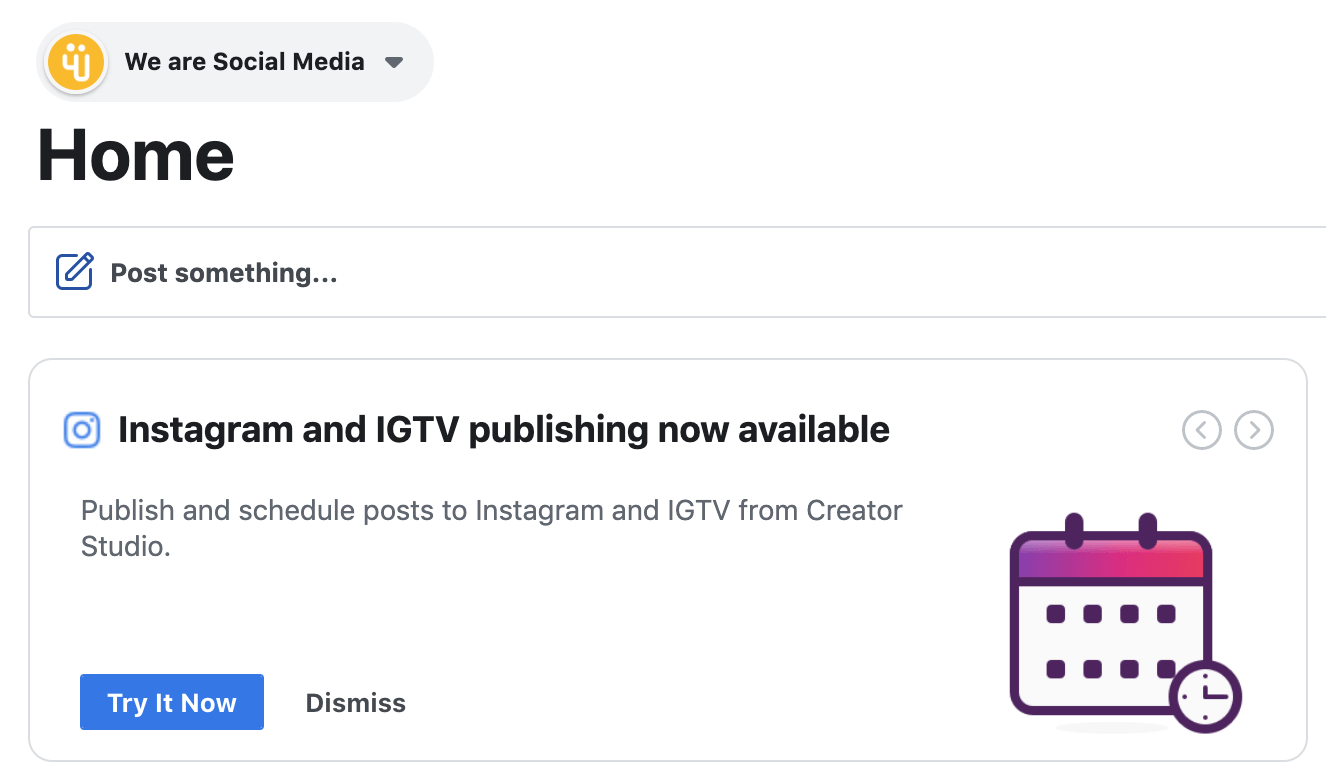
Can you plan your Instagram feed on Facebook? You sure can — if you have a Business or Creator profile on Instagram. Facebook’s native Creator Studio allows you to craft and schedule Instagram posts from your computer.
Note that while Creator Studio is a handy Facebook scheduler for Instagram, it’s currently not possible to post or schedule an Instagram Story from Creator Studio. To do that, you’ll want to check out our post on how to schedule Instagram Stories.
In general, Creator Studio is a good tool if you only want to schedule Instagram and Facebook posts (and don’t mind not being able to schedule Stories). But most social media pros can save a lot of time and energy using a social media management tool and handling all social channels from a single dashboard.
A tool like Hootsuite will help you schedule content to Instagram and Facebook pages, as well as TikTok, Twitter, LinkedIn, YouTube and Pinterest, all in one place. Here is how Creator Studio compares to Hootsuite:
To schedule Instagram posts from your computer using Creator Studio, follow these steps:
That’s it! Now you can lean back and check your DMs.
If you’d like to streamline your process even further, you can also consider cross-posting.
Cross-posting is the process of sharing similar content across multiple social media channels. It’s a handy choice for businesses with smaller budgets and less time to personalize content.
You can use cross-posting (via Hootsuite or Facebook Creator Studio) to set Facebook to post to Instagram. It’s not always the best choice for truly engaging content, though.
We’ve got more details in our in-depth guide to cross-posting. If you’re serious about scaling your Instagram marketing efforts, you’ve got better options.
If you’re ready to take the plunge and get real efficient with your posting habits, these tips will help keep you ahead of the game.
In general, posting when your followers are online is key. That’s because the Instagram algorithm prioritizes recency. This means that, generally, a newer post will show up higher on your followers’ newsfeed than an older one.
That’s one reason why simple cross-posting may not work. Your audience on Facebook may be active from 6-10PM on weeknights, but browsing Instagram from 1-4PM.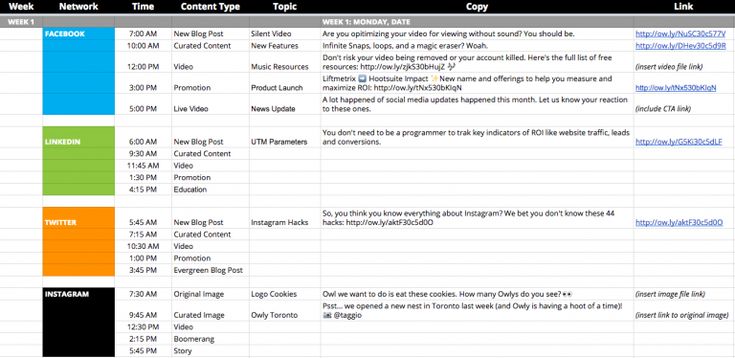
The right Instagram analytics tool will tell you when your audience is most likely to be online and/or engage with your post.
For the Hootsuite social media team, that time is 8AM-12PM PST, or 4-5PM PST on weekdays. For you, it might be different.
Luckily, Hootsuite’s Best Time to Publish feature can show you your best time to post on Instagram based on your posts from the past 30 days. It groups posts by weekday and hour to identify when your posts had the highest impact, based on average impressions or engagement rate. Then it suggests the best times for you to post moving forward.
It will also suggest time slots that you haven’t used in the last 30 days so that you can shake up your posting habits and test new tactics.
If we learned anything in 2020, it’s that the world is changing faster and faster. That’s why automating Instagram posts is a little more nuanced than “set it and forget it. ”
”
When it comes to Instagram scheduling, going much farther than a week in advance can start to increase the risk of something going sideways. You don’t want to cause a social media crisis for your brand by posting something insensitive. If something unexpected happens, you may need to pause your posting calendar entirely. You might even need to use your social channels to communicate through a crisis.
Our advice: keep your finger on the pulse, and stay nimble.
#1 Social Media Tool
Create. Schedule. Publish. Engage. Measure. Win.
Start free 30-day trial
If you do schedule your posts far in advance, it’s not the end of the world. Sometimes you need a full two weeks of vacation!
Just make sure you’re using an Instagram scheduler that allows you to press pause on all upcoming content if a crisis or emergency suddenly occurs.
With Hootsuite, pausing your scheduled social media content is as simple as clicking the pause symbol on your organization’s profile and then entering a reason for the suspension. (This is actually one of our favorite Hootsuite hacks.)
Source: Hootsuite
Yes, the miracle of Instagram scheduling means you can now increase your quantity of posts without sacrificing quality. But should you?
The short answer is “maybe.” The long answer is “maybe, if you can maintain consistent quality at that pace over the long term.”
Consistency matters more than frequency when it comes to engagement. Remember that the algorithm prioritizes good relationships: if your followers are engaging with your Instagram content, the algorithm will show more of it to them.
No matter how busy you are, make sure you take a fresh look at that copy before it goes live.
And for big teams with a lot of moving parts, an internal multi-stage approval system is ideal for preventing a gaffe.
But though words are important to any social media post, visuals are key on Instagram. Get yourself an Instagram scheduler that allows you to edit your photos in the same dashboard you publish from. It’ll save you much more time and ensure that your images are fully optimized before posting.
Shout out to Hootsuite’s image editor, which can crop your image to the correct size for any social network. It also has an extensive filter library (useful for those of us who would rather leave photo editing up to the professionals). Watch the video below for a preview of the tool.
Now that you know how to schedule posts on IG, you’ve got time to take a look at the big picture.
Are you creating content that works for your audience? What’s earning likes? What’s falling flat? Choose your preferred Instagram analytics tool and start exploring.
Use Hootsuite to schedule Instagram posts at the best time, respond to comments, track competitors, and measure performance—all from the same dashboard you use to manage your other social networks. Start your free trial today.
Get Started
Grow on Instagram
Easily create, analyze, and schedule Instagram posts, Stories, and Reels with Hootsuite. Save time and get results.
Free 30-Day Trial
If you’ve ever scrambled to get regular content published to your brand’s Facebook Page, you’ve probably wondered if there’s a way to schedule Facebook posts ahead of time. Well, there is!
Managing a social media content calendar becomes far more efficient when you schedule Facebook posts. Scheduling in advance can help your brand post more consistently and stay on schedule. That way, you can avoid long gaps between posts with little effort.
There are two ways you can schedule posts on Facebook:
Why schedule Facebook posts?
How to schedule a post on Facebook using Facebook Business Suite
How to schedule a post on Facebook using Hootsuite
Hootsuite vs. Facebook Business Suite
5 tips for scheduling Facebook posts
Bonus: Download our free, customizable social media calendar template to easily plan and schedule all your content in advance.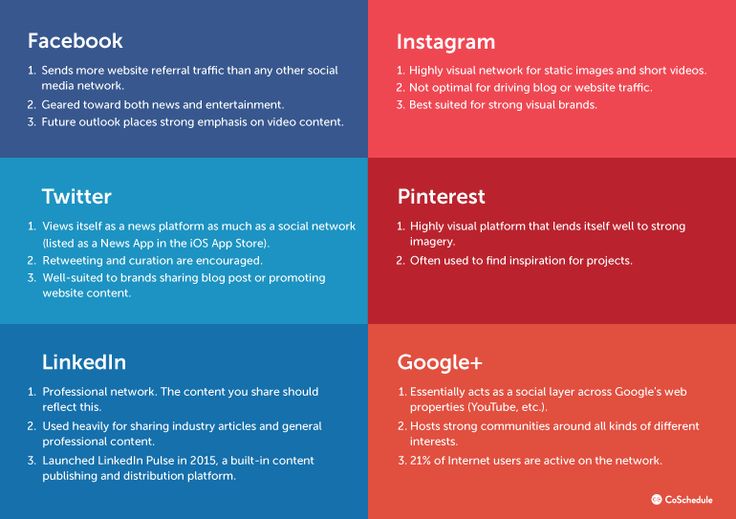
In a nutshell, scheduling Facebook posts can help your business:
First things first: You need to have a Facebook Page to schedule posts.
(Don’t have one? Find out how to create a Facebook business page in just a few steps.)
Once your Page is set up, follow this step-by-step guide to learn how to schedule future posts.
Step 1: Write your post
After opening Facebook to your timeline, click Pages in the top left corner of your dashboard to navigate to your business’s Facebook Page.
Then, navigate to Business Suite in the menu:
Now, click Create Post:
Need a little inspiration? We’ve got your back. Here are some tips on creating an engaging Facebook post.
Step 2: Preview the post
In the Placements section, select where you want your post to be published. You will be able to publish it to your Page and the connected Instagram account at the same time.
As you draft the post, you’ll be able to preview what it will look like on desktop and mobile. If anything looks off, make changes to optimize the post. This is the time to make sure those link previews are pulling correctly.
Step 3: Select a date and time
If you don’t want to publish your post right away, click on the arrow next to the Publish button at the bottom of the page.
Then, choose the day you want the post to be published, and the time it should go live.
Finally, click Save.
Step 4: Schedule your post
Click the blue Schedule Post button, and that’s it! Your post is now in the publishing queue. That means it’s ready to go live on the day and time you set.
You might want to edit, delete or reschedule the Facebook posts in your queue. Here’s where you can find the queue and edit it.
It’s that easy!
How to schedule a post on Facebook using HootsuiteOnce you’ve connected your Facebook Page to your Hootsuite account, this is how to schedule Facebook posts using the app.
Step 1: Click Create Post
Navigate to the content creation icon in the menu on the left side of the dashboard. Then, click Post.
Step 2: Select the Facebook Page you want to publish to
Check the box next to the correct Facebook account.
Step 3: Create your post
Write the text, add and edit your image, and add a link.
Step 4: Schedule a publication time
Tap Schedule for later. This will bring up a calendar. Choose the date and time you want the Facebook post to be published.
Hootsuite’s Facebook scheduling app makes it easy to post at the best times to generate high engagement.
The Best Time to Publish looks at your past engagement data to suggest optimal times to post on every network, not just Facebook!
(If you’d like to learn more, check out how the Best Time to Publish feature works for Hootsuite’s own social channels. )
)
Step 5: Schedule your Facebook post
Click the Schedule button, and your post will be published at the exact time you set.
How to schedule multiple Facebook posts at once in HootsuiteHootsuite’s bulk schedule tool makes handling a busy posting schedule more efficient. The tool lets you schedule a maximum of 350 posts at once.
To schedule multiple Facebook posts, save your Facebook content as a CSV file.
Include these details for each post:
Note that you can’t add emojis, images or videos to bulk posts. But you can include those afterward by editing each individual scheduled post in Hootsuite.
After you upload your CSV file, the Bulk Composer asks you to review all the posts. Once you’ve made your edits and uploaded any additional media files, select Schedule.
Don’t forget that you can edit individual posts afterward in Hootsuite’s Publisher (in the Planner and Content tab).
Learn more about Hootsuite’s bulk scheduling tool here:
How to auto-schedule Facebook posts in HootsuiteWith Hootsuite’s AutoSchedule feature, you can avoid gaps in your social media calendar. The tool will automatically schedule your posts for publication at optimal, high-engagement times. Instead of manually testing different post times when scheduling your Facebook posts, let us do the math for you!
Bonus: Download our free, customizable social media calendar template to easily plan and schedule all your content in advance.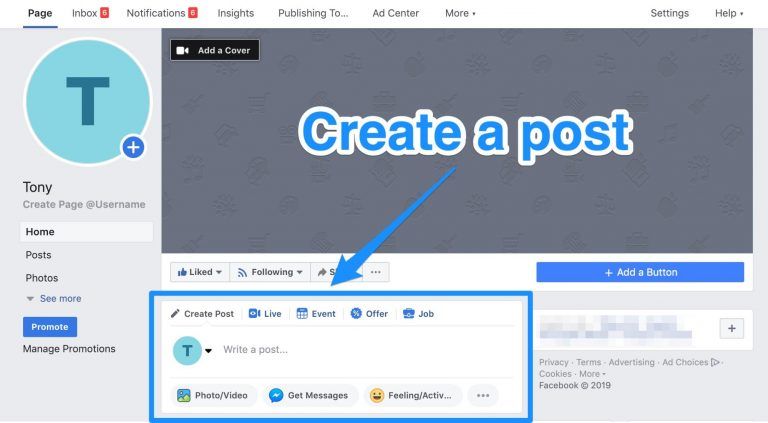
Get the template now!
Here’s how to use the auto-scheduling feature:
Step 1: Compose your post
Create your post as usual: write a caption, add and edit your image, and add a link.
Step 2: Click Schedule for later
This will bring up the scheduling calendar. Instead of manually selecting when your post should go live, navigate to the AutoSchedule option just above the calendar.
Step 3: Turn the AutoSchedule toggle to On
Then, click Done. You can sit back and relax — AutoSchedule is enabled!
How to view and edit scheduled Facebook posts in HootsuiteStep 1: Navigate to the Publisher
Head to the Publisher section of your dashboard (use the calendar icon in the left-hand side menu).
Step 2: Go to the Planner or Content tab
Both tabs will take you to your scheduled posts.
If you’re a visual person, Planner offers a handy way to get a sense of your upcoming content. It gives you a calendar view of your scheduled posts:
The Content tab shows you the same information but uses a list. Both views work for editing and rescheduling posts. The one you choose is up to your personal preference.
Step 3: Click on the post you want to edit
Here’s how this looks in the Content tab:
Step 4: Edit your scheduled post
At the bottom of the post, you have the option to either Edit or Delete your post.
To open your post and make edits, click Edit. Here, you can reschedule your post or edit its contents. Once you’re done, just click Save Edits.
The Delete button will erase the post from your content queue.
If you want to schedule and automatically post content to Facebook and Instagram, as well as TikTok, Twitter, LinkedIn, YouTube and Pinterest, Hootsuite is a great choice. It’s easy to use, and it comes with many useful collaboration features for teams. You can also use Hootsuite for social media analytics, social listening, and answering all of your comments and DMs from one place.
Here’s how Hootsuite compares to Facebook Business Suite:
Hootsuite’s Facebook scheduler also has a Best Time to Publish feature that gives you personalized recommendations for when you should post based on your account’s historical performance. Just choose the goals that matter most to you (building brand awareness, boosting engagement or increasing sales). Then, Hootsuite’s scheduler suggests post times that can help you boost visibility and performance.
With Hootsuite, you can also bulk-schedule up to 350 posts at once. Think of all the time this could save you!
5 tips for scheduling Facebook postsWhether you schedule Facebook posts on an app like Hootsuite or directly on the platform, you should follow these best practices:
1. Always stay on brand
When scheduling posts, the pressure to post immediately is off. So take the time to craft relevant content that will land with your audience.
Scheduling posts can also give you time to make sure your brand guidelines are followed when composing weeks or months worth of content. Make sure that your campaigns across Pages and even social networks are aligned with yours and your audience’s values.
2. Carefully choose the publication date and timeAvoid posting when your audience isn’t online. Hootsuite’s Facebook scheduler comes with a Best Time to Publish feature that will help you schedule Facebook posts on days and at times when your audience is active on the platform.
The more people see your Facebook updates, the more opportunity there is to generate engagement, drive traffic and gain potential new followers.
3. Know when to pause your Facebook postsDon’t forget about the posts you’ve scheduled. Sometimes current events can change the impact of posts you may have scheduled months ago. That means a post may become irrelevant or insensitive in ways you simply could not have predicted.
Regularly check in on your scheduled posts to track what’s coming up. That way, you can pause or delete scheduled posts before they’re published and avoid any potential backlash.
4. Remember that you can’t schedule everythingSome things you have to post about in real-time. And some types of posts cannot be scheduled at all. On Facebook, these include:
If you want to schedule Facebook messages, you may want to look into an automation tool. Facebook messenger bots use conversational AI to send messages that reach customers even if your support team is offline.
5. Track analytics and engagementA good posting schedule shouldn’t be based on guesswork. You’ll know what works best for your Facebook audience by monitoring your performance in a social media analytics tool.
Historical data will show you what posts perform well and where you could make improvements.
Use Hootsuite to schedule all of your social media posts, engage with your followers, and track the success of your efforts. Sign up today.
Get Started
Grow your Facebook presence faster with Hootsuite. Schedule all your social posts and track their performance in one dashboard.
Free 30-Day Trial
The social network itself still does not have special mechanics. But there are at least three suitable solutions. Detailed instructions on them were compiled for Pressfeed by the author of the blog SMMplanner Alexey Edakin.
There is no built-in function for delayed publications in the Instagram application and on the website, as is done in VKontakte or Odnoklassniki. But on the other hand, Facebook, which owns Instagram, offers two tools at once - Creator Studio and Business Suite, where this function is available. nine0003
Creator Studio is the official Facebook posting tool. It is simple: you need to go to your Instagram account, click on the "Publish" button, set the release date. Everything, the post will go to the "future"!
Change account type on InstagramFor delayed posting, your Instagram account must be switched to a business profile. To do this, go to Settings → Account → Change account type.
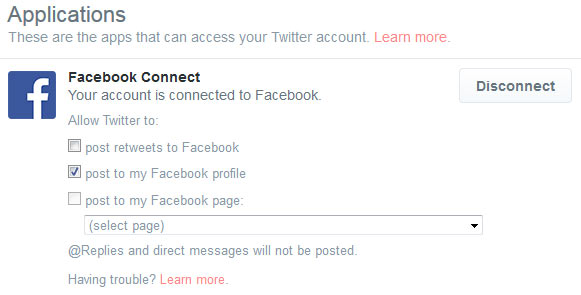
Link the page to Facebook immediately: Edit profile → Page → Create or connect a page.
Associating an account with FacebookNow let's start delayed posting.
Step 1. Go to the Facebook Creator Studio home page. Select the tab to enter Instagram. You will need to enter your username and password on a new page.
Log in via InstagramIf you have linked pages on Facebook and Instagram, then log in via Facebook - this way you can send posts to both social networks.
nine0003
Step 2 . Click "Create Post" and select "Instagram Feed".
You can also make a delayed video in IGTVStep 3. Create a post. Add a photo or upload several at once to make a carousel. There is no built-in editor, but you can mark an account and crop images to 1:1, 1.91:1 and 4:5 formats.
You can add a geotag to a postThe maximum amount of text is 2200 characters. You can make 30 mentions and post 30 hashtags. All indents and paragraphs will be preserved - you do not need to use services to create invisible spaces. nine0003
In advanced settings, you can disable comments for a post and write alternative text for uploaded images.
Post advanced settingsStep 4. Making a delayed post. Click on the arrow next to the "Publish" button and select "Scheduled Post". We set the time and day.
A delayed post cannot be released immediately to the feed - the minimum time is +10 minutes from the current one. Planning for later dates is unlimited - you can set any day and time. nine0003 We plan to release a post on Instagram
As a result, the delayed post will appear in the profile exactly at the specified time, with all tags and a breakdown by paragraphs in the text.
A delayed post is no different from a posted one from the applicationYou can view all posts in the "Content Library" section - the first in the list will be scheduled publications. In the same section, you can see the number of likes and comments for each post that appeared on your account.
Where to see the release date of postCreator Studio has a publication calendar - this is a visual content plan. A scheduled post can be edited or its deadline can be shifted - this helps to flexibly change the order of posts.
Publication calendar In the "Statistics" section, you can see the audience and study the dynamics of likes, coverage. The data is available for a week and a month and is no different from the statistics from the application.
Creator Studio has apps for iPhone and Android, but delayed posting is only available for Facebook. If you want to make scheduled posts on Instagram from your phone, you will need to install Business Suite. nine0003
Business Suite is a marketing platform for managing advertising and commercial accounts on Facebook and Instagram. The service has an online version and applications on the phone. The functionality is wider than that of Creator Studio, so you can also do delayed posting on Instagram.
Advertising no longer leads to the target audience?
Tell the media about your product for free
How it works
You need to transfer your Instagram account to a business profile and link it to Facebook - the Business Suite can only be accessed through this social network. See instructions above.
After that, install Business Suite on the phone.
Step 1. Download Business Suite to your Android phone or iPhone.
Download Business Suite to phoneStep 2. Login to Facebook by email and password. Click the "Publish" button in the center. We switch in the post editor to the Instagram profile. nine0003 If you do not switch, the post will be sent to both social networks at once
Step 3. Create a post. We write the text, add an image, mark people and put a geotag. We click "Next".
Writing a post. Limitations are the same - 2,200 characters maximumStep 4. Set the exit time. Click "Publication scheduling options" → "Schedule for the future". Specify the date and time. Click "Schedule" and go back. Click "Publish".
We plan the release time of the post on InstagramThe post went on hold. You can find it in the "Publications" → "Scheduled" section. You can edit the post, change the posting time, or delete it.
Guide "How any company can start publishing in the media"
How to choose media, make friends with journalists and what to check in the text before sending.
Watch for free
How to delete a scheduled post for InstagramBusiness Suite, like Creator Studio, has access to profile statistics and a number of advanced features: you can reply to direct messages and run targeted ads. The only downside is that you can’t schedule stories in both services. But there is a solution. nine0003
To do this, we will use one of the delayed autoposting services with the ability to edit stories - SMMplanner.
Step 1. Go to the SMMplanner website. We enter the account, create a new one or do it through any social network.
Step 2. Enter the menu. Go to the menu tab and select "Accounts".
To enter the menu, click in the upper left corner - a list will openStep 3. Connect your Instagram account. Select "Advanced API SMMplanner". Enter login and password.
What does it mean: publishing through the Instagram API will not allow you to create delayed stories - its functionality is the same as Creator Studio.
Step 4. Planning stories. We return to the "Posts" section and click "Schedule a story."
Planning a StoryStep 5. Creating a Story. First, select an account, then make a background - you can upload a photo or video. All stickers from the application are available, but if you need text, you will first have to add it to the image. You can use the Canva or Crello editors that are built right into SMMplanner. nine0003 Edit and set the timer
Step 6. Plan the time. Click "Schedule", set the date and time. After that, the story will appear in the "Posts" list - it can be edited or rescheduled for another time.
Instagram is in no hurry to introduce delayed posting directly into the application - apparently, it considers that this function is only needed by SMM-boxes and commercial accounts. Therefore, you have to use Business Suite, Creator Studio or SMMplanner. On the other hand, it is more convenient to create publications in these tools: the functionality is wider, it is possible to save drafts and plan a content grid. nine0003
Creator Studio is one of the official Facebook business page tools. It was introduced by the developers at the end of August 2018. The main task of this tool is to combine all the functionality of the platform that page administrators need to work with content. In fact, Creator Studio is the official "competitor" from Facebook for all delayed posting services.
Initially, the service worked only with content for Facebook. And since July 2019, the ability to schedule posts for Instagram has been added. In this article, I will introduce you to the main features of Creator Studio and show you how to schedule an Instagram post. If you are already familiar with this tool, but you are interested in how to schedule posts on Instagram, then go straight to the desired item.
In fact, the main advantage of this tool is that it is official and free compared to 3rd party delayed posting services. Scheduling posts and looking at their statistics directly on the Facebook page has never been a problem. But after the launch of Creator Studio, life became easier for page admins. The tool allows them to have everything they need “at hand”: the full functionality of delayed posting for an unlimited number of pages + analytics in one bottle, so to speak. And all this is completely free. When Instagram was connected to Creator Studio, all the SMMs were delighted. Facebook, of course, did not “invent the wheel for the people”, because many have long since learned to publish posts directly from a computer to Instagram. By the way, here is a step-by-step instruction for this process. But it made life easier for administrators. nine0003
Once again, you can use the Creator Studio service to work with both Facebook and Instagram. Let's look at all the features of the tool for each social. networks separately.
I hope I convinced you to try this service.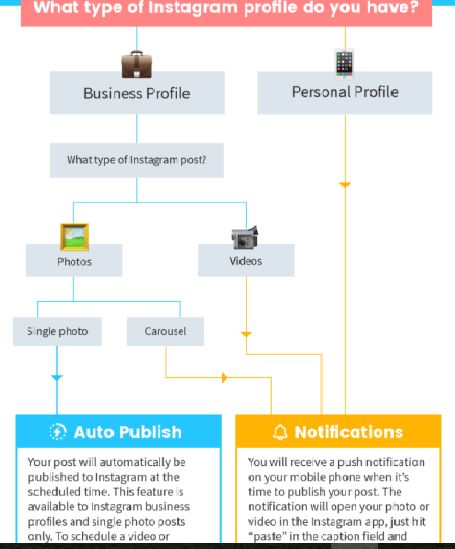 And now let's get acquainted with its functions in more detail.
There are two options for logging into Creator Studio. You can simply follow the link from your computer, or on your Facebook business page, click on the Publishing Tools section ⇒Creator Studio (on the left side of the menu).
How to access Creator Studio The service is only available for Facebook and Instagram business pages. If for some reason you do not have it or it is limited in function, then there are 2 explanations for this. Your page does not meet the requirements to use such features or you are not an admin to see all the functionality. With Instagram, everything is much simpler: it works only with a business profile or an author's account. If you managed to enter, then you immediately get to the first tab of the tool menu - “Main”. You can switch accounts between Facebook and Instagram by simply clicking on the corresponding icons in the top bar. nine0003 Welcome to Creator Studio!
On the left side of the Creative Studio for Facebook menu you see different tabs: Home, Content Library, Statistics, Inbox, Monetization, Copyright, Sound Collection and Settings. Let's go over the surface of each so that you understand how they work.
This is an overview of all your video, photo, link and text posts from selected Facebook Pages. You can also view statistics and take action on individual posts, such as editing, promoting, or deleting them. Use filters to limit your search to certain types of posts (video, photo, link, or text). By checking the box to the left of the desired posts, you can perform certain actions with your publications: edit, view statistics, promote, view the publication in the feed, or change the date. nine0003
Crossposting is a video that you can use in multiple posts on different pages without re-uploading or reposting. In the "Playlists" section, you can create your own playlists. Something similar to Youtube Playlist. By viewing your videos in the list, users will watch them in the order you specify. The publication chronicle allows you to quickly find the desired post.
From the name it is clear that this tab contains various metrics. Performance - this is a collection of metrics for your videos on the page, videos that you have shared and cross-posted to all your Facebook pages. In the "Loyalty" section, you will see the appearance of new subscribers, the frequency of views and the number of returning viewers. You can study your audience in detail in the "Audience" section. And in the "Profit" you can see statistics on income from your videos with ad breaks. nine0003
Manage messages and comments left on your Facebook and Instagram pages.
Your page can earn income if you comply with the Partner Monetization Terms. For example, ad breaks for viewers in your videos will allow you to generate income.
This section helps you track the copyrights of Facebook and Instagram content. The control files you upload and the terms and conditions you specify are used to find matches. To use Rights Manager, you must apply and be approved. nine0003
Free, legal music and sound effects for Facebook videos. You can choose the genre, duration, vocals.
So I briefly reviewed the functionality of Creative Studio for Facebook. Regarding the functionality for Instagram, it consists of two tabs: "Content Library" and "Statistics". If you understand the essence of how tabs work on Facebook, then you can easily understand the tabs for Instagram. The essence of their work is the same. Therefore, I will not describe the principle of their work. But I will focus on the process of publishing a post on Instagram through Creative Studio. nine0003
Previously, publishing content on Instagram was possible only through the application on the phone, third-party services (paid or free) and through the computer, with certain skills. Now you can post content to Instagram and IGTV with just one Creator Studio tool on your computer. With Creator Studio, you can post all types of content on Instagram except for Stories. And this means that third-party services still have an advantage. nine0003
Step by step instructions for posting to the Instagram feed:
IGTV posting step by step:
Some Instagram posting features, such as effects, filters, and stickers, may not yet be available in Creator Studio.
Creator Studio is a great tool for business page administrators.