Instagram users spend, on average 53 minutes per day scrolling through the platform. This includes their news feed, Live,Instagram video, IGTV, and stories. If you want to get noticed as a brand you need to create the best video content you can. But Instagram has made it easy to shoot your videos on a smartphone and then upload them to the platform. The only issue you could run into is having the right Instagram video format, size, shape, and specifications.
Find best selling products to sell at Handshake, a wholesale marketplace built by Shopify.
And the pressure is on. Tech giant Cisco predicts that 82 percent of consumer internet traffic will be video by 2023. Plus, IGTV has arrived. So now is the time to invest by creating and sharing top-quality video content to grow your following.
In this article, you’ll learn about the perfect Instagram video format and specifications. We’ll also share plenty of other top tips to help you start creating professional videos to grow your business.
Start selling online now with Shopify
Start your free trial
What is the Best Instagram Video Format?The best Instagram video format is MP4. Your video file should include these technical specifications:
You can use most professional video editing software applications to export your video using these specifications.
However, if you just want to convert video to Instagram’s format you can use a free online converter.
There are tons available online, but let’s take a quick look at two.
First up is Kapwing. This online tool dubs itself “a modern editor for images, GIFs, and videos.”
Aside from providing an easy way to convert footage to the Instagram video format, it also has tools that allow you to make basic edits to your videos. You can trim, rotate, resize, and add music or text to your video.
Next up is Online-Convert – and it lives up to its name!
This free tool lets you convert all kinds of digital file types. And it even has separate pages for each social media platform, which makes it easy to convert footage to the Instagram video format.
You can even upload your video to the service directly from Dropbox or Google Drive.
So now that we’ve covered the Instagram video format, what else do you need to know?
Good question. Let’s start with the specifications that will work best for:
It’s best to upload videos to Instagram using an aspect ratio 9:16, which looks like this:
You’ve probably noticed that this is the standard size of most smartphone screens.
Now, the best Instagram video dimensions are 1080px by 1920px.
In other words, this means that your Instagram video should be 1080 pixels wide and 1920 pixels tall. This will provide the best quality video.
You can download the image template below and use it to create your Instagram videos:
To download the image:
Okay, that covers IGTV, Instagram Stories, and Instagram Live videos.
Instagram supports a range of video dimensions in Feed posts. Specifically, you can upload a video with an aspect ratio anywhere between 1.91:1 and 4:5.
These two extremes are simply portrait or landscape options.
The best Instagram dimensions for these aspect ratios are 1080 by 608 pixels and 1080 by 1350 pixels.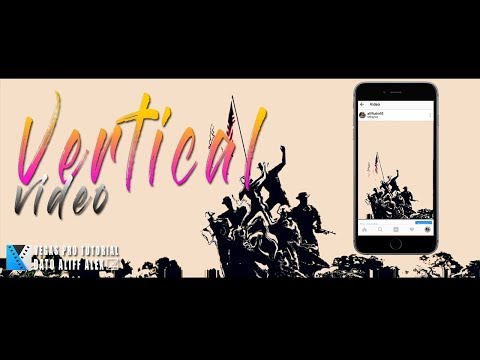
And as mentioned, you can use any aspect ratio between these two extremes.
For example, you could share a square video with an aspect ratio of 1:1 and dimensions of 1080 by 1080 pixels.
That said, you need to bear in mind Instagram’s user experience.
Remember, the Instagram app doesn’t rotate on smartphones. Plus, according to Wzowl, 87 percent of people say they typically hold their phone vertically for general use.
This means that whenever you share a widescreen image or video on Instagram, it will appear small like this video from The Rock:
This is far from ideal when you’re trying to engage your followers.
Instead, if possible, it’s best to create vertical video content. This will allow your videos to fill more of your viewers’ screens.
Compare the image above to the one below featuring an Instagram video from Gymshark:
It’s far more engaging to fill up a viewer’s screen with your video in this way.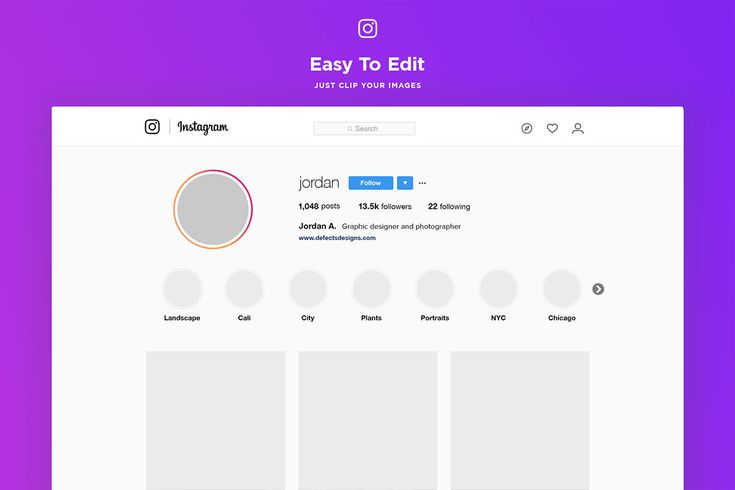
It’s also worth noting that when IGTV or Instagram Live videos are viewed in the Instagram feed, they’re cropped to an instagram video aspect ratio of 4:5 – the portrait option above.
All in all, it’s clear that smartphones are driving us towards a future full of vertical videos.
There are different Instagram video lengths for Feed posts, Stories, Live video, and IGTV.
Here’s a quick rundown of Instagram video lengths for each type:
It’s worth noting that if you upload a video to Instagram Stories and it’s longer than 15 seconds, the app will split it into 15-second clips for you.
However, it will only create four 15-second pieces, so this trick only works for videos up to 60 seconds long.
Plus, IGTV’s 10-minute limit is likely to change at some point.
When it comes to IGTV, Instagram says, “Larger accounts and verified accounts can upload videos up to 60 minutes long, but they must be uploaded from a computer.”
In the past, Instagram and Facebook have often made new features available to larger accounts and influencers before rolling them out to everyone.
Hopefully, the ability to upload longer videos will soon be extended to all Instagram accounts.
Instagram announced IGTV back in June of 2018.
While there’s a standalone IGTV app, it’s fully integrated with Instagram’s main service, so you can use and access it within the Instagram app.
As a result, there are three ways you can upload videos to IGTV:
It’s the third option that has got us excited.
The ability to upload content directly from a computer is a first for Instagram. This makes it much easier for brands and influencers to produce and upload high-quality content to Instagram.
So, how exactly can you upload your videos to IGTV?
First, open the Instagram app and head to the home feed. Then, tap the IGTV logo in the top-right corner of your screen – this will open IGTV.
Here, you can use IGTV just like you would in the IGTV app – the only difference is the access point. From here, we can run through how to upload a video to IGTV regardless of which app you’re using.
All you have to do is tap your profile picture in the small circle to the right of the screen above the video browser.
If you don’t see the video browser, just tap “Browse” near the bottom of the screen.
After you’ve tapped your profile picture, you’ll be taken to your IGTV profile. If you haven’t yet uploaded a video, this page will be blank.
To upload a video, just tap the “+” symbol.
Then choose a vertical video between 15 seconds and 10 minutes long, and tap “Next” in the upper right corner.
From here, the process looks similar to the process of uploading an image or video to your Instagram feed. However, there are a couple of new features.
After you add a description and title, you’ll need to choose a cover photo.
On YouTube, this is referred to as your video’s “thumbnail image.” It’s the image that’s displayed as a preview to viewers.
You can choose a still frame from your video or upload a specially designed image from your device in JPG format.
Once you’ve chosen your cover image, you can opt to also post a preview of your IGTV video to your Instagram profile and feed.
This will help to introduce your current audience to your IGTV videos.
To upload a video to IGTV on a desktop browser, head to Instagram.com, log in, and click to view your profile.
Under your profile description there are four tabs – click on IGTV.
If you’ve already uploaded videos using the apps they’ll be displayed here.
Just click the blue “Upload” button on the right-hand side of the screen and you’ll be taken to IGTV’s desktop video uploader.
Drag and drop your video into the space provided or click the big “+” icon to choose a file from your computer.
Then, complete the rest of the details just like you would when using one of the apps.
Instagram has a long history of cherrypicking the best features from their key competitors, such as Snapchat Stories, Snapchat’s face filters, text, and graphics, and Twitter’s Periscope for Live video.
Today, Instagram seems to have its sights set on YouTube.
For years, YouTube has dominated when it comes to long-form video content from brands and influencers.
Many influencers command mind-bogglingly huge audiences on YouTube. The most subscribed YouTube channel is a video creator who goes by the name “PewDiePie” and has almost 90 million subscribers.
Yet, influencers prefer Instagram for brand collaborations by far:
The ability to upload longer videos straight from a computer is sure to appeal to brands and influencers looking to capitalize on Instagram’s user base and engagement.
Unlike YouTube, Instagram is versatile.
It has combined images, gifs, videos, long-form content, Stories, Live video, messaging, commenting, discovery tabs, and more into one cohesive app.
This makes things easier for creators and consumers.
Instagram is literally becoming a one-stop shop for influencers and brands to engage with their audiences. Plus, consumers no longer need to cycle between apps to follow their favorite influencers.

Right now, unlike YouTube, there’s no way for creators to monetize their IGTV with ads to earn money from views right now.
However, it’s likely that this feature will become available in the future and it will undoubtedly persuade many creators to make Instagram their main focus.
Plus, it’s worth noting that IGTV videos are becoming shoppable, just like Instagram Stories and Feed posts.
Compared to YouTube, there’s very little competition for attention right now, but this is sure to change as people adopt the new publishing channel.
In summary, if you’re not creating content for IGTV, it’s a good idea to start.
If you want to start creating high-quality, long-form video content you’ll need a professional video editing program.
But with so many to choose from, which one should you use?
Here are four great video editing programs that you can use to create videos – two of which are free!
Plus, all of these video editors are popular, which means there are tons of free tutorials to on… um, YouTube. *Cough*
Best for: Windows users with a production budget.
Adobe Premiere Pro CC is a powerful video editing software program available on Windows and Mac computers.
This software is used by countless industry professionals for many top movies, such as Deadpool and Gone Girl.
This software provides all of the features you’d expect from software of this caliber – including multicam editing, 3D editing, and unlimited video tracks.
It has brilliant automatic functions as well.
For example, when you import multiple shots of the same scene, the software will synchronize the clips automatically, saving you hours of manual work.
It also covers all of the basics, including text overlays, graphics, transitions, and color grading.
Pricing: Adobe provides a free seven-day trial. After that, an Adobe Premiere Pro CC Individual account costs $31.49 per month. Alternatively, you can subscribe to gain access to all of Adobes apps for $74.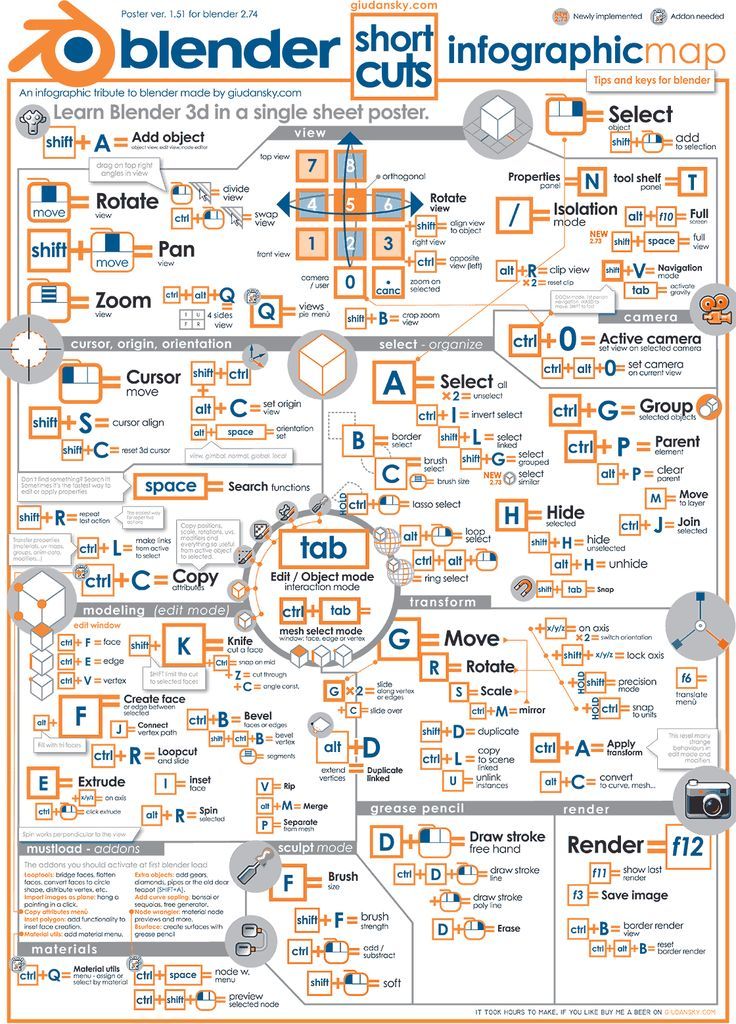 49 per month. In both cases, the price drops if you commit to a year or pay a year upfront.
Best for: Mac users with a production budget.
Apple’s Final Cut Pro X is another feature-packed video editing program only available on Macs.
This editor was used for many blockbuster films, including X-Men Origins: Wolverine, 300, Disney’s John Carter, and more.
As you’d expect from any Apple product, the Final Cut Pro X user interface is intuitive and relatively simple to use considering the multitude and complexity of its features.
Just like Adobe Premiere Pro CC, this program provides multicam editing, unlimited video tracks, automatic syncing, and intelligent color balancing.
If you’re already a Mac user, it’ll feel somewhat familiar and you’ll likely appreciate how well this software integrates with the rest of Apple’s ecosystem.
Pricing: Apple provides a 30-day free trial. After that, Final Cut Pro X is available for a one-time fee of $299. 99.
99.
Best for: Those with zero budget who might want to upgrade in the future.
Lightworks is a free video editing program available on Mac, Windows, and Linux.
It’s been used on countless movies, such as The Wolf of Wall Street, Mama Mia!, Braveheart, and Notting Hill.
The free version of Lightworks provides all of the basic video editing tools you might need, multicam editing, and a wide range of formats – including the Instagram video format MP4.
You can upgrade to a monthly subscription to access the full range of features.
The learning curve is fairly steep, however, there are plenty of free tutorials on YouTube to help get you started.
Pricing: You can use Lightworks indefinitely for free or upgrade to the pro version when you’re craving more advanced features for $24.99 per month.
Best for: Those with zero-budget and an interest in 3D animation.
Blender is one of the best free video editing software applications and is available on Windows, Mac, and Linux.![]()
The program was designed as a 3D animation tool, but it still works well as a standard video editor.
Aside from basic video editing functions, you can also use it for video masking, audio editing, layering, and more. It also allows up to 32 tracks for video and other media.
On the downside, the learning curve is steeper than Final Cut Pro X and many of the tutorials available online cater more to 3D animation than standard video editing.
Pricing: As it’s an open source program, Blender is entirely free to use with no upsells or upgrades.
For a list of more video editing software you can use to create your Instagram videos check out our 24 Best Free Video Editing Software Programs.
It’s time to get excited about Instagram video.
With the burgeoning rise of IGTV, it’s best to take advantage of the relatively low competition and a clear opportunity for increased engagement.
When creating videos make sure to:
And for quick reference, here are the Instagram video length specifications:
Do you have any questions about creating Instagram videos? Let us know in the comments below!
Instagram users spend, on average 53 minutes per day scrolling through the platform. This includes their news feed, Live,Instagram video, IGTV, and stories. If you want to get noticed as a brand you need to create the best video content you can. But Instagram has made it easy to shoot your videos on a smartphone and then upload them to the platform. The only issue you could run into is having the right Instagram video format, size, shape, and specifications.
Find best selling products to sell at Handshake, a wholesale marketplace built by Shopify.
And the pressure is on. Tech giant Cisco predicts that 82 percent of consumer internet traffic will be video by 2023. Plus, IGTV has arrived. So now is the time to invest by creating and sharing top-quality video content to grow your following.
In this article, you’ll learn about the perfect Instagram video format and specifications. We’ll also share plenty of other top tips to help you start creating professional videos to grow your business.
Start selling online now with Shopify
Start your free trial
What is the Best Instagram Video Format?The best Instagram video format is MP4. Your video file should include these technical specifications:
You can use most professional video editing software applications to export your video using these specifications.
However, if you just want to convert video to Instagram’s format you can use a free online converter.
There are tons available online, but let’s take a quick look at two.
First up is Kapwing. This online tool dubs itself “a modern editor for images, GIFs, and videos.”
Aside from providing an easy way to convert footage to the Instagram video format, it also has tools that allow you to make basic edits to your videos. You can trim, rotate, resize, and add music or text to your video.
Next up is Online-Convert – and it lives up to its name!
This free tool lets you convert all kinds of digital file types. And it even has separate pages for each social media platform, which makes it easy to convert footage to the Instagram video format.
You can even upload your video to the service directly from Dropbox or Google Drive.
So now that we’ve covered the Instagram video format, what else do you need to know?
Good question. Let’s start with the specifications that will work best for:
It’s best to upload videos to Instagram using an aspect ratio 9:16, which looks like this:
You’ve probably noticed that this is the standard size of most smartphone screens.
Now, the best Instagram video dimensions are 1080px by 1920px.
In other words, this means that your Instagram video should be 1080 pixels wide and 1920 pixels tall. This will provide the best quality video.
You can download the image template below and use it to create your Instagram videos:
To download the image:
Okay, that covers IGTV, Instagram Stories, and Instagram Live videos.
Instagram supports a range of video dimensions in Feed posts. Specifically, you can upload a video with an aspect ratio anywhere between 1.91:1 and 4:5.
These two extremes are simply portrait or landscape options.
The best Instagram dimensions for these aspect ratios are 1080 by 608 pixels and 1080 by 1350 pixels.
And as mentioned, you can use any aspect ratio between these two extremes.
For example, you could share a square video with an aspect ratio of 1:1 and dimensions of 1080 by 1080 pixels.
That said, you need to bear in mind Instagram’s user experience.
Remember, the Instagram app doesn’t rotate on smartphones. Plus, according to Wzowl, 87 percent of people say they typically hold their phone vertically for general use.
This means that whenever you share a widescreen image or video on Instagram, it will appear small like this video from The Rock:
This is far from ideal when you’re trying to engage your followers.
Instead, if possible, it’s best to create vertical video content. This will allow your videos to fill more of your viewers’ screens.
Compare the image above to the one below featuring an Instagram video from Gymshark:
It’s far more engaging to fill up a viewer’s screen with your video in this way.
It’s also worth noting that when IGTV or Instagram Live videos are viewed in the Instagram feed, they’re cropped to an instagram video aspect ratio of 4:5 – the portrait option above.
All in all, it’s clear that smartphones are driving us towards a future full of vertical videos.
There are different Instagram video lengths for Feed posts, Stories, Live video, and IGTV.
Here’s a quick rundown of Instagram video lengths for each type:
It’s worth noting that if you upload a video to Instagram Stories and it’s longer than 15 seconds, the app will split it into 15-second clips for you.
However, it will only create four 15-second pieces, so this trick only works for videos up to 60 seconds long.
Plus, IGTV’s 10-minute limit is likely to change at some point.
When it comes to IGTV, Instagram says, “Larger accounts and verified accounts can upload videos up to 60 minutes long, but they must be uploaded from a computer. ”
”
In the past, Instagram and Facebook have often made new features available to larger accounts and influencers before rolling them out to everyone.
Hopefully, the ability to upload longer videos will soon be extended to all Instagram accounts.
Instagram announced IGTV back in June of 2018.
While there’s a standalone IGTV app, it’s fully integrated with Instagram’s main service, so you can use and access it within the Instagram app.
As a result, there are three ways you can upload videos to IGTV:
It’s the third option that has got us excited.
The ability to upload content directly from a computer is a first for Instagram. This makes it much easier for brands and influencers to produce and upload high-quality content to Instagram.
So, how exactly can you upload your videos to IGTV?
First, open the Instagram app and head to the home feed.![]() Then, tap the IGTV logo in the top-right corner of your screen – this will open IGTV.
Then, tap the IGTV logo in the top-right corner of your screen – this will open IGTV.
Here, you can use IGTV just like you would in the IGTV app – the only difference is the access point. From here, we can run through how to upload a video to IGTV regardless of which app you’re using.
All you have to do is tap your profile picture in the small circle to the right of the screen above the video browser.
If you don’t see the video browser, just tap “Browse” near the bottom of the screen.
After you’ve tapped your profile picture, you’ll be taken to your IGTV profile. If you haven’t yet uploaded a video, this page will be blank.
To upload a video, just tap the “+” symbol.
Then choose a vertical video between 15 seconds and 10 minutes long, and tap “Next” in the upper right corner.
From here, the process looks similar to the process of uploading an image or video to your Instagram feed. However, there are a couple of new features.
After you add a description and title, you’ll need to choose a cover photo.
On YouTube, this is referred to as your video’s “thumbnail image.” It’s the image that’s displayed as a preview to viewers.
You can choose a still frame from your video or upload a specially designed image from your device in JPG format.
Once you’ve chosen your cover image, you can opt to also post a preview of your IGTV video to your Instagram profile and feed.
This will help to introduce your current audience to your IGTV videos.
To upload a video to IGTV on a desktop browser, head to Instagram.com, log in, and click to view your profile.
Under your profile description there are four tabs – click on IGTV.
If you’ve already uploaded videos using the apps they’ll be displayed here.
Just click the blue “Upload” button on the right-hand side of the screen and you’ll be taken to IGTV’s desktop video uploader.
Drag and drop your video into the space provided or click the big “+” icon to choose a file from your computer.
Then, complete the rest of the details just like you would when using one of the apps.
Instagram has a long history of cherrypicking the best features from their key competitors, such as Snapchat Stories, Snapchat’s face filters, text, and graphics, and Twitter’s Periscope for Live video.
Today, Instagram seems to have its sights set on YouTube.
For years, YouTube has dominated when it comes to long-form video content from brands and influencers.
Many influencers command mind-bogglingly huge audiences on YouTube. The most subscribed YouTube channel is a video creator who goes by the name “PewDiePie” and has almost 90 million subscribers.
Yet, influencers prefer Instagram for brand collaborations by far:
The ability to upload longer videos straight from a computer is sure to appeal to brands and influencers looking to capitalize on Instagram’s user base and engagement.
Unlike YouTube, Instagram is versatile.
It has combined images, gifs, videos, long-form content, Stories, Live video, messaging, commenting, discovery tabs, and more into one cohesive app.
This makes things easier for creators and consumers.
Instagram is literally becoming a one-stop shop for influencers and brands to engage with their audiences. Plus, consumers no longer need to cycle between apps to follow their favorite influencers.
Right now, unlike YouTube, there’s no way for creators to monetize their IGTV with ads to earn money from views right now.
However, it’s likely that this feature will become available in the future and it will undoubtedly persuade many creators to make Instagram their main focus.
Plus, it’s worth noting that IGTV videos are becoming shoppable, just like Instagram Stories and Feed posts.
Compared to YouTube, there’s very little competition for attention right now, but this is sure to change as people adopt the new publishing channel.
In summary, if you’re not creating content for IGTV, it’s a good idea to start.
If you want to start creating high-quality, long-form video content you’ll need a professional video editing program.
But with so many to choose from, which one should you use?
Here are four great video editing programs that you can use to create videos – two of which are free!
Plus, all of these video editors are popular, which means there are tons of free tutorials to on… um, YouTube. *Cough*
Best for: Windows users with a production budget.
Adobe Premiere Pro CC is a powerful video editing software program available on Windows and Mac computers.
This software is used by countless industry professionals for many top movies, such as Deadpool and Gone Girl.
This software provides all of the features you’d expect from software of this caliber – including multicam editing, 3D editing, and unlimited video tracks.
It has brilliant automatic functions as well.
For example, when you import multiple shots of the same scene, the software will synchronize the clips automatically, saving you hours of manual work.
It also covers all of the basics, including text overlays, graphics, transitions, and color grading.
Pricing: Adobe provides a free seven-day trial. After that, an Adobe Premiere Pro CC Individual account costs $31.49 per month. Alternatively, you can subscribe to gain access to all of Adobes apps for $74.49 per month. In both cases, the price drops if you commit to a year or pay a year upfront.
Best for: Mac users with a production budget.
Apple’s Final Cut Pro X is another feature-packed video editing program only available on Macs.
This editor was used for many blockbuster films, including X-Men Origins: Wolverine, 300, Disney’s John Carter, and more.
As you’d expect from any Apple product, the Final Cut Pro X user interface is intuitive and relatively simple to use considering the multitude and complexity of its features.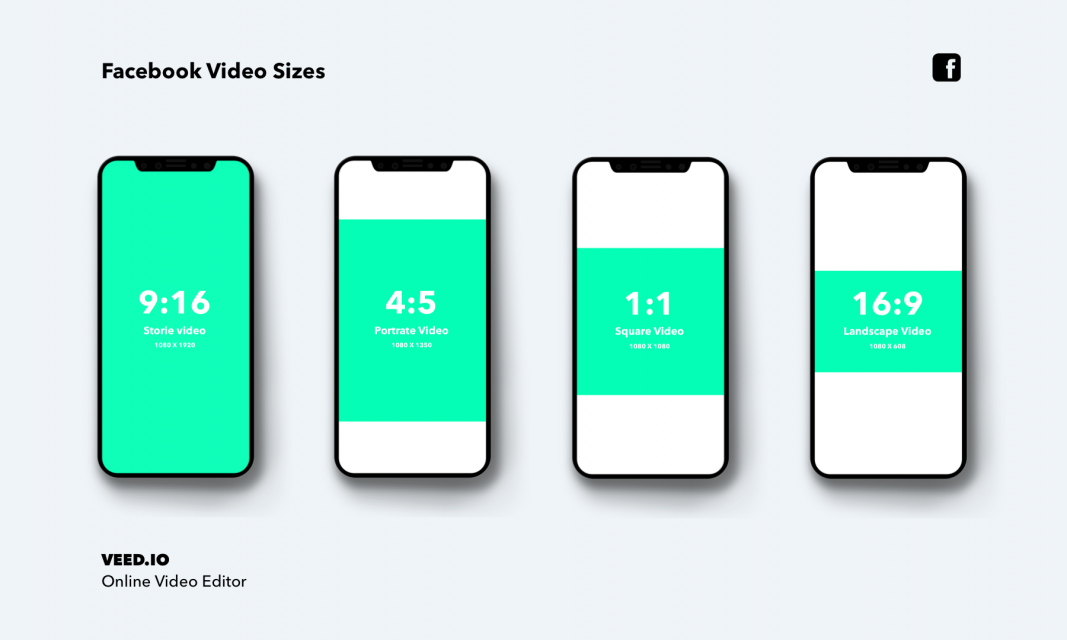
Just like Adobe Premiere Pro CC, this program provides multicam editing, unlimited video tracks, automatic syncing, and intelligent color balancing.
If you’re already a Mac user, it’ll feel somewhat familiar and you’ll likely appreciate how well this software integrates with the rest of Apple’s ecosystem.
Pricing: Apple provides a 30-day free trial. After that, Final Cut Pro X is available for a one-time fee of $299.99.
Best for: Those with zero budget who might want to upgrade in the future.
Lightworks is a free video editing program available on Mac, Windows, and Linux.
It’s been used on countless movies, such as The Wolf of Wall Street, Mama Mia!, Braveheart, and Notting Hill.
The free version of Lightworks provides all of the basic video editing tools you might need, multicam editing, and a wide range of formats – including the Instagram video format MP4.
You can upgrade to a monthly subscription to access the full range of features.
The learning curve is fairly steep, however, there are plenty of free tutorials on YouTube to help get you started.
Pricing: You can use Lightworks indefinitely for free or upgrade to the pro version when you’re craving more advanced features for $24.99 per month.
Best for: Those with zero-budget and an interest in 3D animation.
Blender is one of the best free video editing software applications and is available on Windows, Mac, and Linux.
The program was designed as a 3D animation tool, but it still works well as a standard video editor.
Aside from basic video editing functions, you can also use it for video masking, audio editing, layering, and more. It also allows up to 32 tracks for video and other media.
On the downside, the learning curve is steeper than Final Cut Pro X and many of the tutorials available online cater more to 3D animation than standard video editing.
Pricing: As it’s an open source program, Blender is entirely free to use with no upsells or upgrades.
For a list of more video editing software you can use to create your Instagram videos check out our 24 Best Free Video Editing Software Programs.
It’s time to get excited about Instagram video.
With the burgeoning rise of IGTV, it’s best to take advantage of the relatively low competition and a clear opportunity for increased engagement.
When creating videos make sure to:
And for quick reference, here are the Instagram video length specifications:
Do you have any questions about creating Instagram videos? Let us know in the comments below!
Social networks are now an important part of the life of any creative person. At least that's the way it should be, as there are plenty of opportunities to network with fellow creators and potential clients. It can also just be fun. One of the latest trends is quick video stories on your feeds like Instagram Reels. If you're in film production, make sure your clips look as good as possible. nine0003
To do this, you need to make sure that your edits and exports are optimized for the platform.![]() And if you want to make sure you hit that high-quality bar, you should watch this video from Sebastien Savoy on the right settings for Premiere Pro.
And if you want to make sure you hit that high-quality bar, you should watch this video from Sebastien Savoy on the right settings for Premiere Pro.
This may be new territory for many of you as Instagram has definitely moved to vertical videos as the standard. Now to adjust the sequence:
Frame size: 640 x 1136
Frame rate: 30.00 fps
Apparently IG automatically converts everything to 30 fps, and when exporting with this setting, Instagram will do less compression on its own.
When you import a clip and drag it to the timeline, you will see it with black bars. In this case, just go to the effects controls and zoom in until it fills the frame, then reposition to crop it as needed.
Set In/Out points on the timeline to prepare for export, and then you can simply use the keyboard shortcut Ctrl/Cmd + M to open the export settings:
Format: H.264
Preset: Source Match - High Bitrate
This your call to name and location. Make sure "Render at maximum depth" and "Use maximum rendering quality" are checked. Check the frame rate again. As for the bitrate settings, you will need to select the following:
Bitrate encoding: VBR 2 pass
Target bitrate: 2Mbps
Max bitrate: 3Mbps
You might want to save this as an "IG Reels" preset.
Check the thumbnail preview as you are stuck with what you have when you post it. If you need to transfer this to your phone, you can use something like AirDrop for Apple products, or even Google Drive or Dropbox on any device.
So, why would you put so much effort into rendering? Well, surprisingly, if you upload a heavy file, Instagram will compress it a lot and this can mess up your footage. If you create a file that is as close as possible to the IG target, it will only apply minimal compression. Definitely worth taking the time to make sure all your work looks good. nine0003
Become an author here, make a donation here
Now we have a rental in Krasnodar, details here
Also of interest:
DO WE STILL NEED FAST GLASS? ADOBE INTRODUCES DEPTH BLUR
HOW TO SHOOT FOOD BEAUTIFULLY? WE SHARE SECRETS.
If you find an error, please select a piece of text and press Ctrl+Enter .
The following two tabs change content below.
Filmmaker, editor-in-chief, technical writer For articles and materials write here http://news.fidller.com/about-contact/ Our hardware store - http://fidller.com/
March 13, 2018 nine0003
Getting a video in Premiere Pro for Instagram can be a bit cumbersome. The problem is related to two specific areas of the process. The first problem is related to the confusion around the export settings. What is the correct resolution for Instagram? What bitrate should be used when exporting?
These questions baffle many video editors. While Adobe offers several export presets, including presets for Facebook, Twitter, Youtube, and Vimeo, you won't find any available for Instagram. nine0003
The second obstacle is related to the download process. At the moment, you cannot directly upload content to Instagram from the desktop PC that most editors run. Because of this, several workarounds are required when downloading videos. Once again, you'll find plenty of options for uploading videos directly to social networking sites on the Publish tab of the Export Options dialog box. Once your export is complete, you can upload your Premiere video directly to Facebook, Twitter, Youtube, Vimeo, and a few other sites. And once again, Instagram is missing from the list. nine0003
First load the presets with export presets for Instagram - Instagram Presets. In this small archive, presets for four different aspect ratios, including square, vertical, landscape, and scenes. Once downloaded, open the export settings dialog and save them to your computer using the "Install Presets" button located next to the drop-down menu of presets. Once installed, you can delete the originals as they create copies after they are imported. Now just change the format to H.264, select the Instagram preset and export. nine0003
Once the videos are exported, you are ready to transfer them to your mobile device. This is another confusing area for many, as there are many competing programs that can help you with this step. I personally use Google Drive to transfer my video to my mobile device. I can upload via desktop and then access clips using the Google Drive mobile app. nine0003
Now that my video is uploaded to Google Drive, I can share it directly with Instagram. To do this, you need to select the video in the application and then select Send a copy to . Now I can choose to share the video as an Instagram post or as an Instagram story. In some cases, I may need to actually download the clip from Google Drive to my mobile device.