Device Links
Since Instagram is a mobile-focused app, you won’t find the same features on the web version. Up until recently, posting content from Chrome on your computer wasn’t possible. You had to use Android emulators or other methods to do this. Fortunately, this has now changed, thanks to new Instagram updates.
If you’re interested in learning more about how to post on Instagram from Chrome, you’ve come to the right place. In this article, we’ll offer a detailed guide on doing it on both PC and Mac.
Posting photos on Instagram using the Chrome browser on your Mac device has never been easier. Follow the steps below to do it:
Instagram has listened to its users, and now you can post videos to your feed directly from your Mac device. What’s more, you don’t have to limit yourself to 60 seconds anymore because you can now upload longer videos as well. Here’s how to do it:
Many users are thrilled because they can post photos and videos from the Instagram browser version on their Mac devices. Unfortunately, posting Stories isn’t an option. But that doesn’t mean it’s impossible.
The easiest way to upload Stories using Chrome on your Mac is to access the Developer Tools. Here’s how to do it:
As previously mentioned, Instagram has finally enabled its users to post content from their computers without using alternative, often more complicated methods.
No more using Android emulators or numerous programs and apps to post photos on Instagram using your PC. You can now finally upload them using Chrome in only a few steps:
Previously, posting Instagram videos using Chrome on your computer was a daunting task. You were limited to posting 60-second videos. Fortunately, this has changed, and you can now post longer videos in a few clicks:
By allowing its users to post photos and videos directly from their PC, Instagram has significantly improved their experience. Unfortunately, posting Stories using Chrome on a computer hasn’t become available. But, nothing is impossible, including posting Stories from a PC.
There are several methods for doing this, but the easiest one is to change the browser user-agent. Follow the instructions below to do it:
As you know, Instagram doesn’t have a desktop app. Since it was designed as a mobile phone app, the browser version was significantly lacking features. Thanks to the recent updates, Mac and PC users can finally post content without using workarounds.
We hope this article has taught you how to post on Instagram from Chrome. Additionally, we hope you learned more about the new Instagram updates. We can’t wait to see what the Instagram future holds.
Do you prefer using Instagram on your phone or computer? Have you heard about these Instagram updates before? Tell us in the comments section below.
While you can browse Instagram on your desktop or laptop through a browser, for a long time, the Instagram desktop website didn't offer a way to upload photos. Because Instagram is a mobile-focused service, it's bent towards uploading your photos through its Android and iPhone apps.
However, there is now an official method for posting to Instagram from your PC. And in case this doesn't work for you, we'll show you a workaround that lets you post to Instagram using Chrome.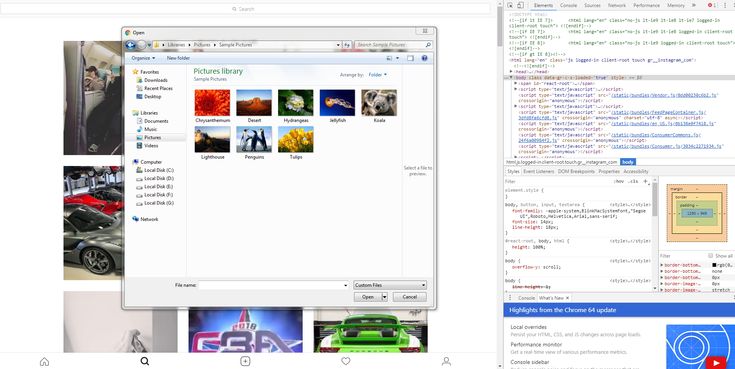 This works on Windows, Mac, or a Chromebook—as long as you have access to Google Chrome. Here's how to post on Instagram from a laptop or desktop.
As of late 2021, Instagram now allows you to upload photos to your account using its desktop website. While it took a while to roll out, it should be available for all users at the time of writing.
To upload from your computer, just log into Instagram.com and click the Plus button in the top-right corner. This will bring you to a screen where you can drag and drop photos from your PC, or click the Select from computer button to browse for them. From there, you can perform basic edits, apply filters, and add a caption.
This is the best way to add photos to your Instagram account using a computer. In case it's not available for you or you want to try a workaround, you'll find instructions on how to post to Instagram using Chrome below.
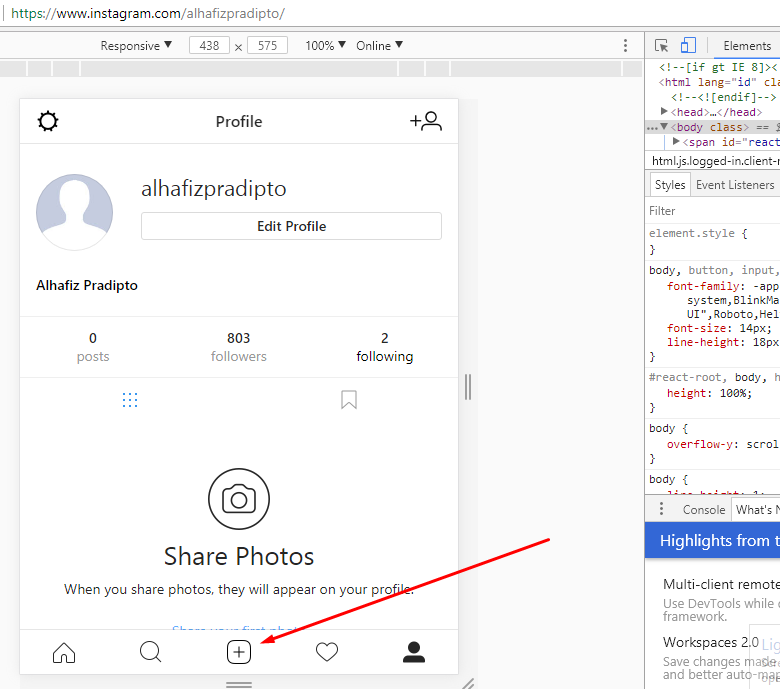
To start, open Instagram.com in Google Chrome and make sure you're logged into your account. Then right-click anywhere on the page and choose Inspect to open the Developer Tools panel. You can also use the F12 key on Windows or Cmd + Option + i on a Mac, if you prefer.
This will open Chrome's Developer Tools panel on the right side, containing a bunch of HTML and other page details. But you don't need to worry about any of that.
In the top-left corner of the new Developer Tools window, you'll see an icon that looks like a phone next to a tablet. Click on this to switch to mobile view—you can also use the keyboard shortcut Ctrl + Shift + M on a Windows PC or Cmd + Shift + M on a Mac.
This mode effectively tells the website that you're using a mobile device. You'll thus see the interface switch to something that's a lot like you're used to seeing on Android or iPhone. Keep the Developer Tools panel open to continue using the mobile interface, as closing it reverts to the normal desktop view.
At the bottom of the screen, with mobile view enabled, you should see the various icons for Instagram's different tabs. If you don't see this row of icons, refresh the page (F5) and it should appear.
Click the Plus icon in the middle of that toolbar to upload any photo from your computer using File Explorer or Finder.
By default, Instagram only lets you upload a few image types, including JPEG. If you want to upload a PNG or another type of image, you'll need to make a small change first.
On Windows, click the Custom Files box in the bottom-right corner of File Explorer and change it to All Files. If you're on a Mac, click the Options button at the bottom-left of Finder and change the Format box from Custom Files to All Files.
After you select your image, you have some options on the Edit tab. If your photo is larger than Instagram's standard dimensions, you can drag it around to frame the picture as you wish. Use the Rotate button at the bottom-right to spin it 90 degrees at a time. Click the full-size button in the bottom-left to toggle between the full width or a square size (if applicable).
Swap to the Filter tab at the bottom of the screen to apply one of Instagram's many filters. As you'll notice, you don't have access to all of Instagram's editing tools using this method. If you want to adjust the image further, we recommend using a photo editing app on your computer to make any adjustments before uploading your picture to Instagram.
From here, click the Next button and you can enter a caption, set the photo's location, and tag people if you want. Then you're all set to share your photo.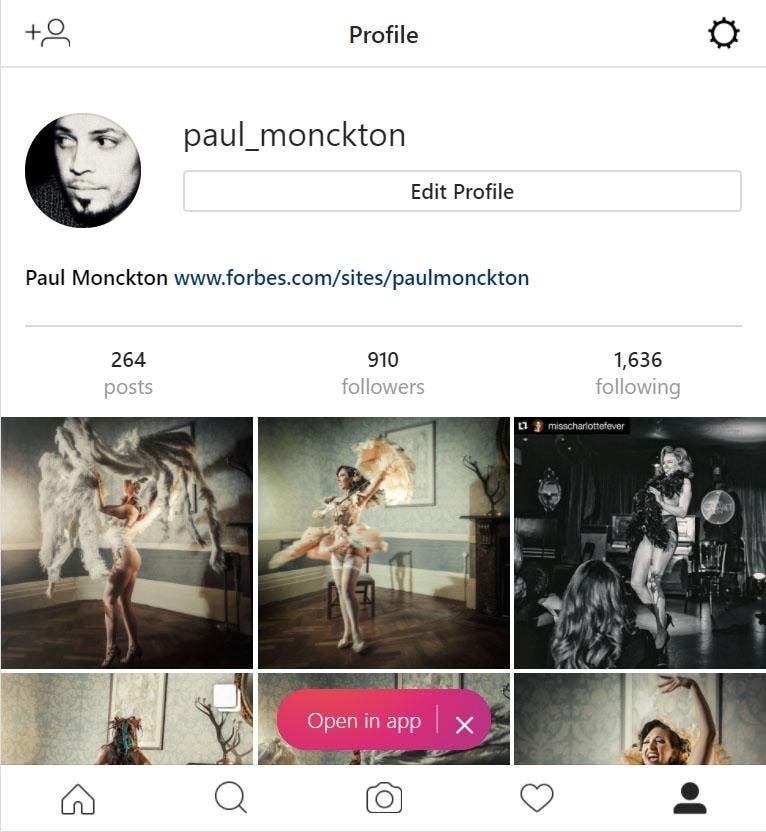 People will never know that you posted it using your computer and not a phone!
Instagram offers an official Windows app on the Microsoft Store for Windows 10 and Windows 11. It's basically a port of the mobile app, and provides the same set of functionality as the desktop website. This includes posting to Instagram from your PC, so give it a try if you prefer to use a dedicated app for posting to Instgram.
If you're interested in more, we've looked at other ways to post on Instagram from your computer. Keep in mind that none of the other options are more convenient than this, so we'd recommend either the official method or the mobile Chrome workaround in most cases.
Download: Instagram for Windows (Free)
Thankfully, you don't have to rely on this workaround anymore to post on Instagram using your computer. Instagram's desktop website now makes it easy to post photos no matter what browser and operating system you're using. But if the official method stops working and you need a workaround, it's simple to post on Instagram using this Chrome trick too.
Either way, posting from your desktop instead of a phone is great if you prefer to edit photos on your computer. It saves you the step of transferring the photos to your phone, then uploading them using Instagram's mobile app.
Now, make sure that what you post on Instagram attracts interest.
There are several official and not so official ways to add photos to Instagram* from a computer or laptop that you can use. But: I don't recommend using completely unofficial Instagram* clients, it could be potentially unsafe for your account.
This manual details how to post photos to Instagram* from your computer in various situations, some of the nuances, and a video where two methods are clearly shown. It may also be interesting: 4 ways to write in direct Instagram * on a computer.
Previously, by logging in with your Instagram* account on the official website https://www.instagram.com/* you could not publish photos and videos, but you could watch other people's photos, commenting, following, likes and other functions were available.
Starting from May 2017, when you access the site from a mobile device - tablet or phone, you can add a photo to Instagram*, even without installing the corresponding application. This feature can also be used to publish from a browser.
Here is a new way that greatly simplifies the task.
The Windows 10 App Store has recently launched the official Instagram* app, which also allows you to add a photo or video to your page. The app can be easily found by searching the app store.
After downloading the app and logging into your account (in my test, for some reason, I only logged in with email, not username), follow these simple steps:
As noted above, Instagram* for Windows 10 requires a webcam. However, this can be bypassed: if you install a virtual webcam program (I used e2eSoft VCam), then the application will assume that the camera is present and allow publishing. Also, when testing the application, for some reason it worked very unstable for me.
Another guaranteed and currently working way to post photos or videos on Instagram* with only a computer is to use the official Android application running on a computer.
To run the Instagram* Android application on a computer, you will need third-party software - an Android emulator for Windows or another OS. You can find a list of free emulators and official sites where you can download them in the review: The best Android emulators for Windows (opens in a new tab).
Among those emulators that I can recommend for posting on Instagram* are Nox App Player and Bluestacks 2 (however, the task will not be more difficult in other emulators). The following is an example of uploading a photo using Nox App Player.
 bignox.com/
  Another way: in the emulator settings (gear in the top line of the window), in the “General” item, enable Root access and restart the emulator, after that you can simply drag and drop image files, videos and other files onto the emulator window.
 In the BlueStacks 2 emulator (official site: https://www.bluestacks.com/en/index.html ), uploading photos and videos from a computer to Instagram* is even easier: just like in the method just described, you first need install the application itself, and then the steps will look like this:

Well, then, I'm sure you know what and how to do, and publishing a photo will not cause you any difficulties.
Note: BlueStacks is a secondary and less detailed review because I don't really like the fact that this emulator doesn't let you use it without entering your Google account credentials. You can work in Nox App Player without it.
The video below shows the first two ways to add photos and videos to Instagram* from a Windows computer - through the browser and the official application for PCs and laptops.
I hope one of the suggested methods will work in your case.
remontka.pro in Telegram | Subscription methods
We make your page interesting and encourage subscribers to visit your page or website more often for shopping
Fresh Posts Regularly
Get our book Social Media Content Marketing: How to get into the head of your followers and make them fall in love with your brand.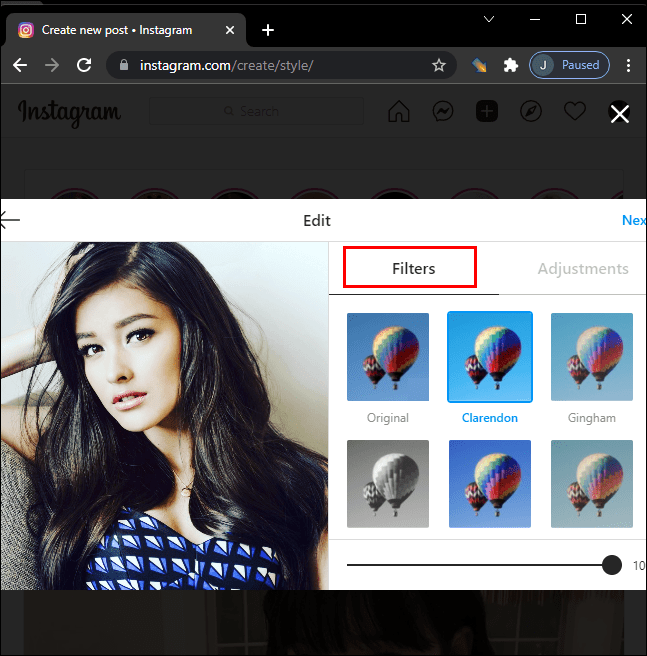
Subscribe to the newsletter and get a book as a gift!
Since the launch of the platform, the creators of Instagram have assumed that users will share photos from mobile devices. The main idea of the application is capturing the moment and photo chronicle.
A few years later, Instagram is one of the most popular social networks and platforms for creating and developing a business. Therefore, companies for which maintaining an Instagram account is an important point of Internet marketing, there is an urgent need to post on Instagram from a computer.
 com.
com.

There are a lot of such services. Their undoubted advantage over other methods of posting from a PC that I have described, since you can synchronously post to Instagram through a computer on Facebook, Vkontakte, Odnoklassniki and Instagram. This saves a lot of time and effort.
Aero
I use Aero – https://smmaero.ru.
The program is paid, but there is a test period - 7 days. One of the most budgetary and full-length services. If you manage more than one account, but several projects, then Aero is the best option for you.
You can set the posting time and format for each social network individually and you won't have any problems with how to edit an Instagram post from a computer. In addition, you can post to all accounts at once.
In addition to the convenience of posting, the Aero system offers complete statistics for each profile: coverage, engagement, etc.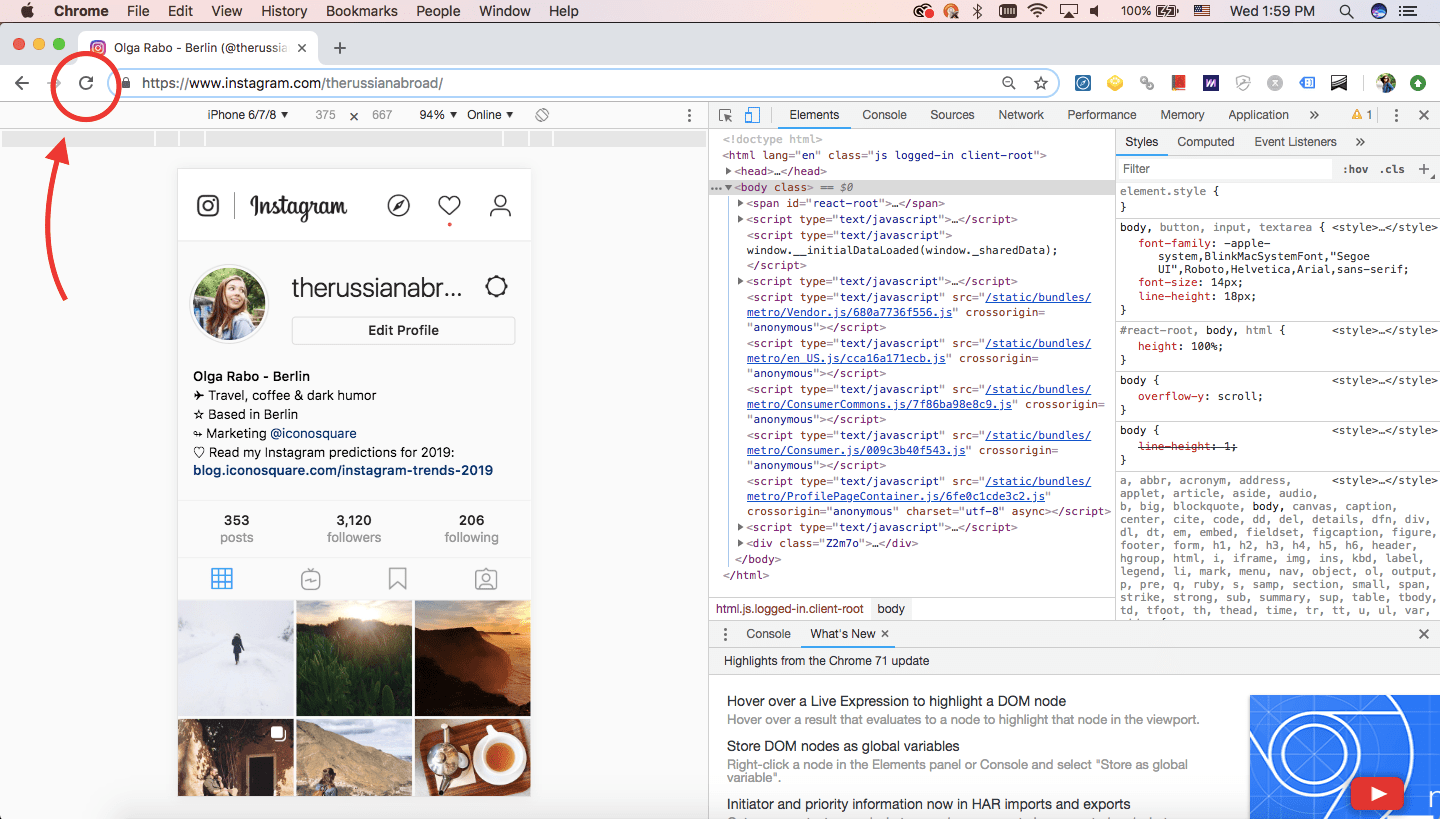
Other popular services that allow you to post delayed posts to Instagram from your computer:
https://Napotom.com
https://smmplanner.com/
https://iklife.ru/ using Gramblr
You now know how to create and post a post on Instagram from a computer without downloading programs.
But there is a third way - the Gramblr program.
Its interface is thoughtful and extremely simple, so you are unlikely to have questions about how to write or delete a post on Instagram from a computer.
Here is a quick guide to using the program:
You will see the following window: