Alexandra | Dec 15, 2016
I used to STRUGGLE big time when I was trying to design my Instagram feed.
Now I’m using 4 tricks every single time I make a theme:
I use Preview App to rearrange my feed. I love it because it allows you to rearrange posts using 3 different methods (and you can schedule unlimited posts for free).
I’ll show you exactly how I use the app to design my feed and to stay consistent.
Ready? Let’s go!
Click here to use it
Forget everything you know about Instagram. Let’s start fresh together.
You need a strong base when you start a theme.
The first thing you want to do is upload photos in your Preview App.
Here’s the trick:
Upload 9 photos only at the beginning.
That’s my “Rule of 9”.
It will be:
Your 9 photos are going to be the BASE of your theme.
You will be building on top of it.
If you upload too many photos, you might get overwhelmed and won’t know where to start.
Start focusing on a small grid.
I like to focus on 9 photos at a time, but you can also upload 6 or 12 photos:
Here are examples of a few themes I have started in my Preview App using the “Rule of 9”. As you can see, my base doesn’t move. it means that I can easily color coordinate and rearrange my future post (next tip):
Once you have your photos in Preview, you can rearrange their order.
There are 3 ways you can rearrange photos in Preview:
My personal favorite is the swap feature because I like to take my time visualising where to move my posts. I use the drag and drop feature when I want to quickly rearrange posts. And I use the shuffle feature when I create specific Instagram grid layouts.
Now the big question is: “What photos should I put next to each other?”
Easy!
Generally, people avoid putting the same kind of photos next to each other (unless they’re posting about the same thing all the time).
The trick is to alternate your photos based on:
The goal is to balance the overall look of your feed.
Here are some examples:
When you design your feed, look at the photo that is on the right, left, top and bottom. Try not to put the exact same photos next to each other all the time – space them out.
How do you keep your theme look consistent?
Alright, now you have a strong base with your 9 photos. Don’t mess it up!
After I finish designing my grid of 9 photos, I always upload 3 photos at a time in my Preview App.
3 photos = one row = my base stays intact
Have a look to see what I mean:
I love how I can build on top of my base!
This trick makes it so much easier to visualise my overall feed, and most importantly stick to my theme. Since I have a strong base at the beginning, rearranging my photos becomes a breeze.
Every time I add more photos in Preview, this is what I automatically think about:
This trick is especially crucial for you if you want to maintain a specific grid layout.
For example, if you want to do a “white line in the middle” layout, you need to stick to the Rule of 3:
I hope you found this article useful!
If you need more help creating a cohesive feed, I share all my tips in my step-by-step guide. You can download it below.
Have fun!
Alexandra
Download on App Store
► Get it on Google Play
+400,000 Instagrammers are already using Preview App to edit, plan & schedule their feed. If you haven't tried it, you're missing out.
Alexandra | Apr 25, 2018
Organizing your Instagram is a lot of fun! And it saves you a LOT of time and stress. But how do you do it without feeling overwhelmed? It’s much easier than you think.
I’m going to summarize all the tips I’ve been giving you in this blog post. I’m going to show you how to organize your Instagram photos and your hashtags. Follow these steps and I promise you’ll see a big difference.
Ready? Let’s go!
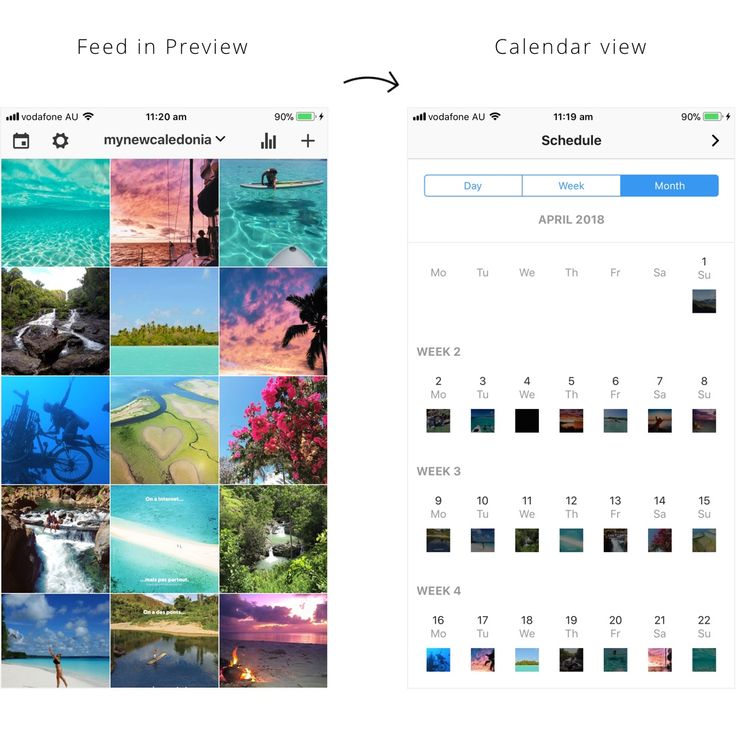
First step: get Preview app. Do you have it already? It’s an Instagram planner. It will help you see how your feed looks like before you post anything on Instagram.
You can organize your feed, rearrange your photos, schedule your posts, find hashtags and edit photos… and the list goes on.
You can upload as many posts as you want (photos, videos and slideshows). And you can create any theme you want (with all the filters).
Shoutout to our community for sharing their beautiful feeds with us:
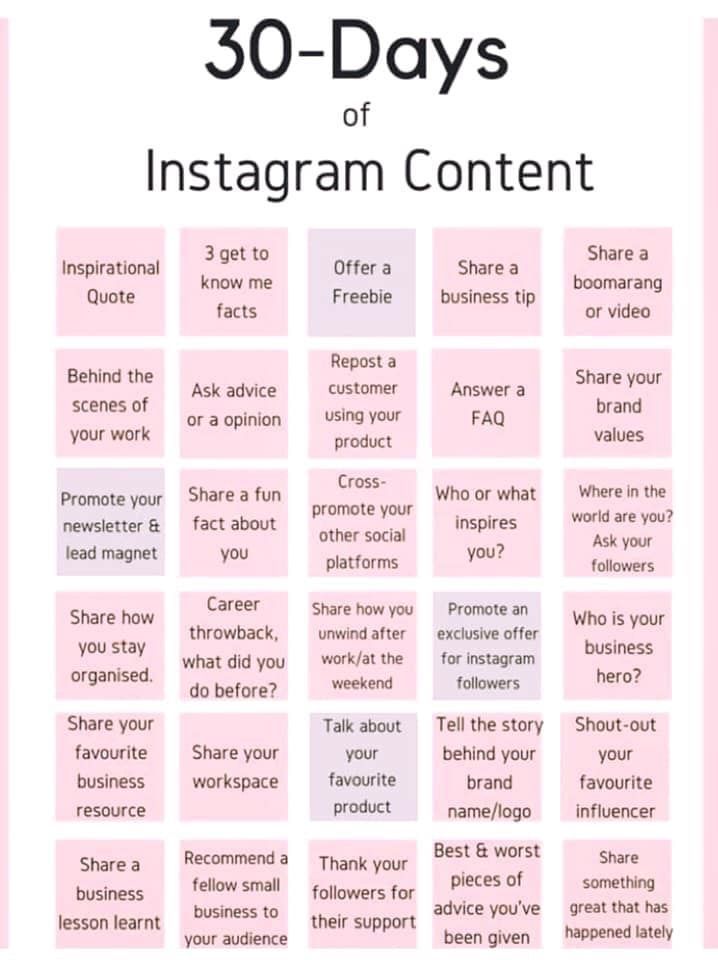
Choosing a layout is probably on of the easiest ways to organize your Instagram. There are 9 different types of Instagram layouts:
Choose one layout and stick to it.
Another way to organize your Instagram feed is by rearranging the order of your posts. You can do that in Preview.
Tricks you can use to organize your feed:
 Choose a color palette
Another good way to organize your Instagram is by sticking to certain colors in your photos. These colors are going to be your color palette. If you feel like your feed looks messy, this trick will save your Insta-life.
Choose 1 – 5 colors that always appear in your feed.
Pay attention to the colors of your subjects, objects, even your outfits (yes, next time pay attention to popular Instagrammers, you’ll see they wear the same colors most of the time). Instagramming is a lifestyle, my friend.
The background of your photos have a massive impact on your feed. Try to always use the same background for your photos (especially if you take a lot of flatlays photos, photos of food). If you can’t keep the same background, it’s okay. Try to keep it as clean, simple and minimalist as possible. This way it won’t clash with the rest of your feed.
A feed looks more organized instantly if you use the same filter all the time. A filter is a visual personality. It will make your whole feed look cohesive.
Another way to organize your Instagram feed is by knowing what you want to post about. I know it seems hard / impossible if you’re taking photos of a lot of different things all the time.
But try to find 1 – 5 things we really love to share. Example: quotes, food flatlays, nature photos, outfit photos, your dog.
Post about these 1 – 5 things all the time.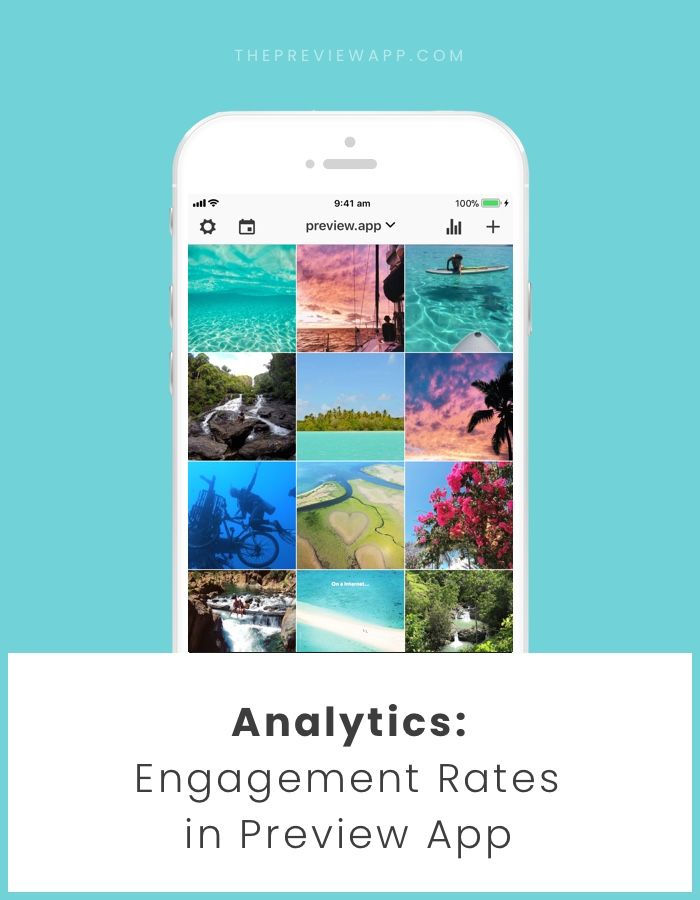 It will create consistency on your Instagram.
You can also find your “hero” photo. A “hero” photo is a photo you always share from time to time in your feed. For example: cute photos of your dog or very funny quotes. Your hero post should intrigue people and make them want to scroll down more and more. It will tie all your posts together. So choose something that stands out. Think about it as your Instagram signature.
Take half a day or one day (or more if you want to) to prepare a bunch of photos / videos / quotes in advance. This trick will really help you organize your Instagram. You won’t have to stress about “what to post next” – because you’ll already have a lot of content ready to go.
Just upload everything in your Preview app. Post when it’s time to post. #winning
Do you want to post once a day? Once every 2 days? Once every 3 days? There’s no wrong answer. Just pick a schedule and post consistently.
Schedule your posts in Preview app.
And lastly: organize your hashtags. If you want to connect with people, become best friends with the Instagram algorithm and grow your account naturally… hashtags are a must.
You can save your favorite hashtags in Preview. Then just select which hashtag group you’d like to use and it will be automatically added to your caption.
I hope you found this article useful. If you have any questions please leave them in the comments below.
Have fun organizing your Instagram!
Click here to use it
Do you want to make a post with photos on Instagram, but you have never done it before? Our small but useful guide on this topic may be useful to you.
Posting a new post on Instagram* takes a little time and is not difficult. How to add a post to Instagram* from your phone: first you need to go to your profile through the official application, then follow the steps. nine0003
 To do this, you need to swipe to the right.

We looked at how to post on Instagram* from Android. If you have iOS, the intuitive process will be the same, just some functions will be called differently.
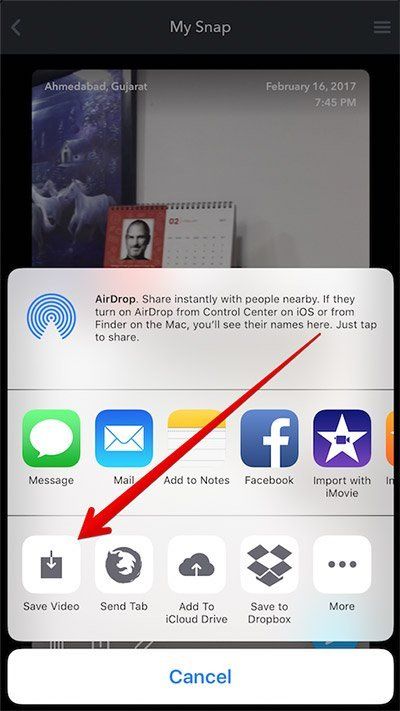
There is another way to post from your phone. This is very convenient, for example, when you scroll through your gallery and find a photo that you urgently need to share with other users.
Step by step how to add a post to Instagram* from your phone through the gallery:
 For each your own filter or one for everyone - just like when publishing simply through the Instagram application *.
 You can also crop unwanted parts of the frame to make it more accentuated in the right place in the photo. Or do nothing, don't edit, just click on the blue arrow to go to the next block. nine0003 You can use any suitable hashtags and geotags of your choice
Our blog has a lot of articles about the benefits of hashtags and how to use them correctly in publications. For example:
And if you just need to quickly find hashtags for publication, you can use our bot "Gennady".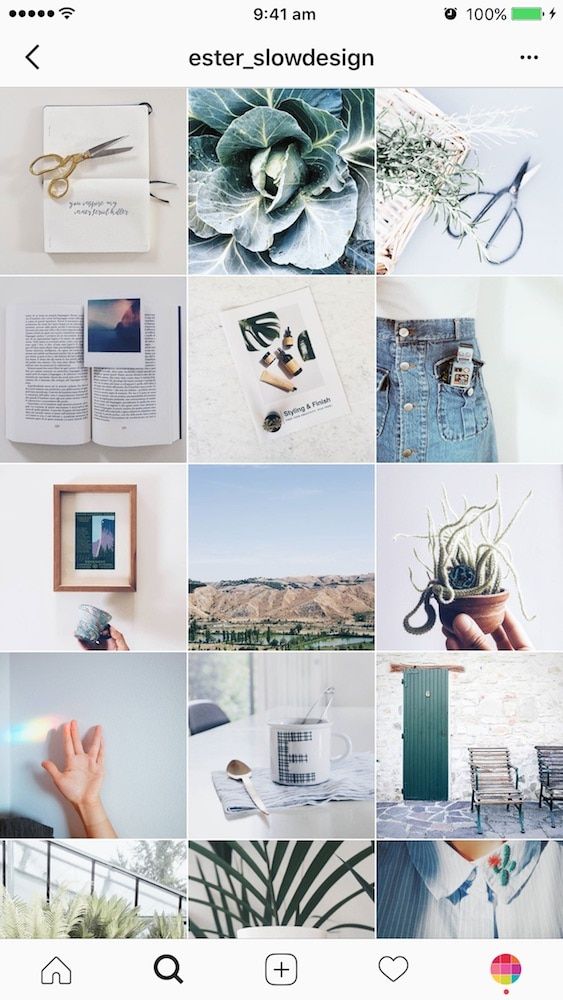 You give him a photo or a word for which you need to pick up hashtags, and he gives you a whole cloud of hashtags that can be attached to a post. But we digress. While we were thinking about hashtags, our post has already been published.
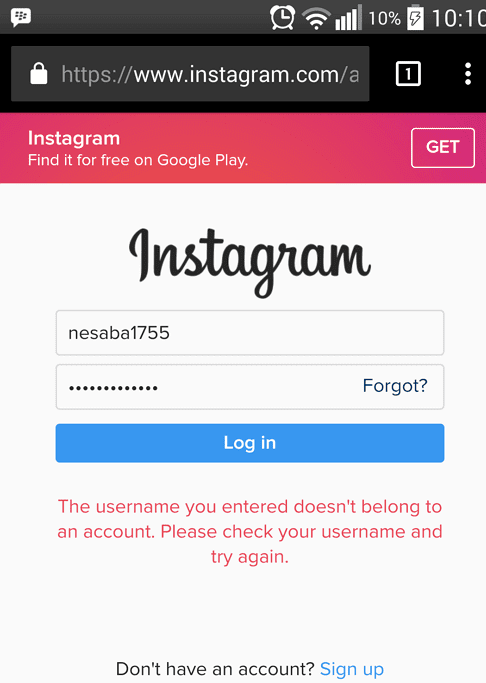
Let's say you tried both options, but the photo still doesn't want to be added. What to do in this case? Determine the cause and try to fix it:
 To fix this error, download the new version of the application from the Play Market or AppStore.
  nine0010
 We have figured out how to post to Instagram* from your phone using the Instagram* app or photo gallery. We talked about how to change settings, edit images and their number, add geotags and tag people. We studied why the photo might not be added to the post, and what to do in each of the cases. You can find more information about Instagram*, posts and promotion in our blog.
Why bother with the design of the text on Instagram? After all, you can just take beautiful photos. If you run a commercial account, and your goal is to attract customers and make sales, then photos alone are indispensable.
Beautifully designed text is easier to read, attracts attention, reveals the essence of the photo, arouses interest. The text can encourage followers to follow your account, make a purchase, tell others about you and your business, or at least be active on your profile. nine0003
Advertising: 2VtzqwCpaPT
In this article, we will give tips on how best to style the text under the photo on Instagram so that it works for you and helps to attract customers.
Read also : 10 services for mass looking on Instagram
Here are some tips that will allow you to beautifully format text on Instagram.
Do not write a canvas of text, divide it into paragraphs, so it is much easier to perceive information. nine0003
If you are too lazy to edit the text manually, you can use the Telegram bot Text4InstaBot . We find and open the bot in the messenger, click "Run".
The text must be divided into ordinary paragraphs in advance, then the bot will be able to divide them into “invisible” paragraphs that will be correctly displayed on Instagram (if you just throw the text even with paragraphs on Instagram, you still get a canvas). If this is not done, a warning will pop up from the bot. Visually finished texts do not differ, but you need to copy exactly the one sent by the bot. nine0003
In addition to dividing the text into paragraphs, the bot can align it in the center, underline and strikethrough words. You can also use any delayed posting service for Instagram, where there is text decoration.
If there is no desire to waste time on a bot or services, there is an option for the lazy - to separate paragraphs with dots.
Do not try to cram all the benefits of your product into one post, take some narrow topic and dedicate a specific post to it. For example, you held an event, released a new product, and are preparing for a competition - write your own text for each topic. nine0003
The structure itself must also have logic:
 Use Emoji
 Emoji help organize text and evoke certain emotions in readers. Yes, and just make the text bright. But use emoticons carefully and to the point - emoji stuck in different parts of the text without logic and meaning, on the contrary, are annoying. Like too many of them, the post is full of bright colors, which makes it difficult to perceive the text itself. nine0003
Example of good use of emoji in text :
Example of bad use of emoji in text :
With them, even large text is easy to read and you can note the most important points for yourself. nine0003
We have repeatedly written that the canvas of hashtags no longer works - they can be regarded by Instagram algorithms as spam and visually look ugly. In addition, an overly long list of hashtags distracts attention from the text itself.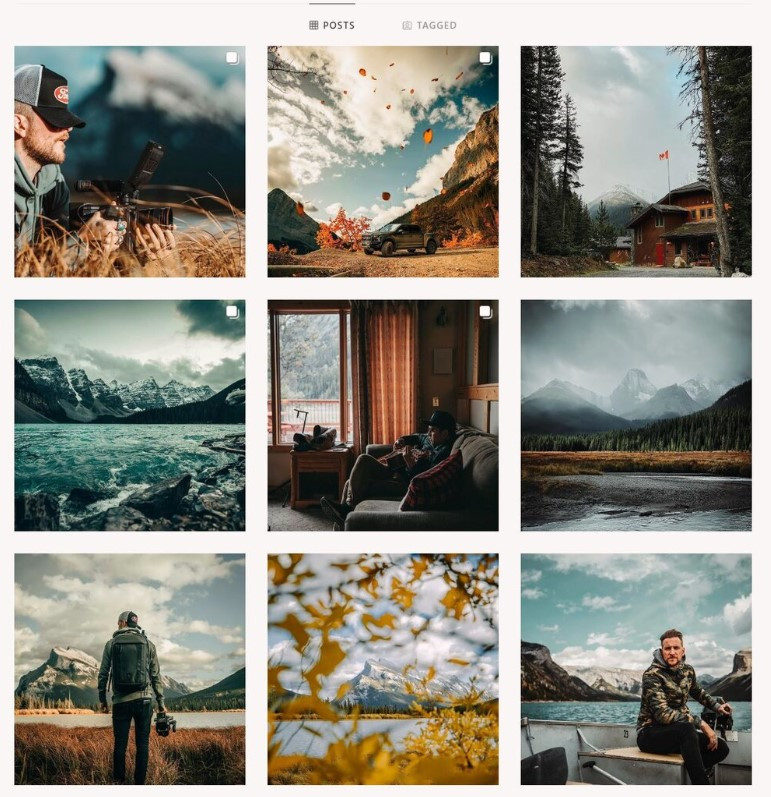 Choose 3-5 most important post tags.
Read more : How to use hashtags on Instagram to promote
This does not mean a call to buy something from you, it can be a phrase or a question that will provoke discussion in the comments. Activity in the comments will affect the reach and promotion of the account as a whole. In Instagram texts, write a call to action at the end of the post.
If you encourage subscribers to go to the site or write to you in instant messengers, then send their profile, where there are all these contacts. Or make a multilink.
By default, Instagram does not have a heading and subheading feature. The title can be visually highlighted using capslock, emoticons, dashes, symbols. The title will help identify the topic of the post and grab attention.
Also, you can make a title in the form of an inscription on the photo.
Sometimes the texts are very large and you don't want to divide them into several posts. And the number of characters in an Instagram post, as you know, is limited - 2200 characters, including spaces. nine0003
If you want to finish your thought, but the text no longer fits, you can place it in the form of photos following the main photo. At the end of the post, leave the call "Read the continuation in the carousel."
Periodically, you can post posts with strikethrough text to show an ambivalent attitude towards something or leave an understatement in the text. Such a function is available in the Text4InstaBot Telegram bot and the Spectrox application. nine0003
How to make strikethrough text on Instagram using the Text4InstaBot bot :
Run the bot and throw text there. Strikethrough words should be separated on both sides by three hyphens, like this: “Write texts as if you are communicating — not with clients, but — with friends. ” Then we copy the finished text and paste it into the post.
How to strikethrough text in Spectrox :
There are only 2 windows on the site. In the left, insert the words or phrases that need to be crossed out and press >>. nine0003
The finished piece will be copied and pasted into the post.
You cannot leave a clickable link to the site in the text of an Instagram post, but you can leave a link to the profile. You can create a separate advertising account or several accounts with the necessary links in the profile header. And redirect subscribers there by mentioning the profile in the text - @secondacc. In this case, you do not have to touch the main account.
Mentioning profiles in a post is more used to advertise other people's accounts, but do not underestimate the potential of this feature in terms of promoting your own.
You can leave your contacts right in the text of the post, then people will not have to look for them in the profile.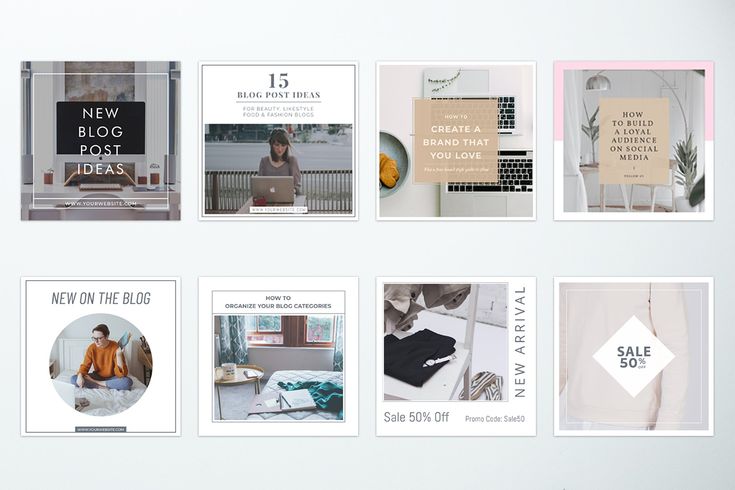 But this option is not suitable for everyone.
A couple of hashtags can be hidden in the body of a post as part of a sentence. They are well perceived by readers, while fulfilling their main function. nine0003
Stories have a very weak text editor by default. Apparently, because this function was originally conceived for creating video content, i.e. a lot of text there is simply useless. What can be done:
 In stories there is no function that allows you to make a voluminous text, you have to go for a trick. Write a word and fill it with a color, for example, black. Then write this word again and fill it with a different color. Make an overlay of one word on another, but with a slight offset, so that it looks like a 3D effect. nine0306
 If you don't have enough standard text settings for stories, you can use social media post builders like Canva and Crello. Or buy ready-made templates for Photoshop, After Effects and Premiere Pro and customize them to your liking.
Read also : Where can I learn how to promote on Instagram? Compilation of 10 courses
Beautifully designed text on Instagram grabs the attention of followers and increases engagement. In addition to decorating texts in the body of the post, you can also add text to the photo itself or to the story using third-party services.