How to make video quality better on instagram
How to Enable High Quality Uploads on Instagram
When uploading photos or videos to Instagram, you might have noticed that some content changes when you see it displayed on your profile. In fact, Instagram will resize, convert and/or compresses your digital files by default.
Although Instagram will upload your content with decent quality, there’s actually a way to improve them by restricting any sort of changes from ever occurring.
Note: At no extra cost to you, we may earn a commission for purchases using our links. Learn more.
Enabling High Quality Photo & Video Uploads in Instagram
While Instagram seems to try-hard to hide this feature by default, there’s a simple way to enable high quality uploads. Deep within the settings menu in your Instagram app is a simple way to change your upload preferences.
By enabling this setting, your photos and videos won’t experience any change in quality when you upload them. It’s possible to change this setting on Android or iOS; the instructions for each are similar but slightly different. See below.
Enabling High Quality Instagram Uploads on iOS
iPhone or iPad users will need to follow these instructions to enable high quality uploads:
1. Tap the Instagram icon on your Home Screen to launch the app.
2. Tap your profile icon in the bottom right corner so you’re viewing your own profile.
3. Tap on the three dashes in the upper right corner. This will pop-up a list of more options.
4. Tap “Settings” at the very top of the list.
5. Tap “Account” and then “Data Usage”. Alternatively, you can simply search for “Data Usage”.
6. Now, you will see two options. Click the toggle button next to “High Quality Uploads” so the button turns blue upon activation. That’s it. Now your uploads will be higher quality regardless if you’re using cellular or WiFi connectivity.
Enabling High Quality Instagram Uploads on Android
The process is quite similar but not exactly the same for Android users. Follow these instructions to enable this setting on the Instagram app for Android:
1. Tap the Instagram icon on your Home Screen to launch the app.
2. Tap your profile icon in the bottom right corner so you’re viewing your own profile.
3. Tap on the three dashes in the upper right corner. This will pop-up a list of more options.
4. Tap “Settings” at the very top of the list.
5. Tap “Account” and then “Cellular Data Use” towards the bottom of the list. Alternatively, you can simply search for “Cellular Data Use” back in the Settings menu.
6. Now, you will need to activate the toggle button next to “Data Saver” to unblur the “High Resolution Media” setting directly below. Once you do that, it will let you choose from three options: never, WiFi only or Cellular + WiFi.
Choose “Cellular + WiFi” and now, regardless if you’re connected through your cell service or WiFi, the Instagram app won’t change your uploads or even attempt to compress or distort any of the content you view.
Turning-On High Quality Uploads on Instagram
As you can see, regardless of the type of device you’re using, enabling high quality uploads without any restrictions is actually quite easy. Keep in mind, however, that regularly uploading high resolution photos or videos can quickly use a lot of data. In fact, it can easily diminish any data usage you may have through your cell phone or Internet provider. Even browsing around with these settings activated can make a huge difference in your data usage. By enabling, you’re basically telling Instagram to give you the highest quality content without any regard for the amount of bandwidth you’re using.
To be honest, most users won’t find a huge difference by activating high quality uploads on Instagram. Given how advanced Instagram’s default compression algorithm works, the changes they make to your photos and videos are hardly noticeable. But if you have a large following or you’ve got a knack for providing the highest possible quality, it’s a setting that you’ll probably want to keep activated. Either way, trying it out for yourself is the best option.
If you try these settings activated for a few days and you don’t notice a big difference, we recommend leaving the default settings activated. Ultimately, you’ll end up saving a lot of data usage and it may be for the best. After all, load times will likely increase with high quality uploads enabled, which could ultimately put a damper on your overall Instagram experience.
Regardless, learning new things with Instagram is fun and can be quite useful. Whether you’re a personal account user or a manager of a big brand, learning the ins-and-outs of Instagram is a great skill to achieve. Interested in learning more? Be sure to check out our other tutorials such as how to see a list of people you’ve requested to follow on Instagram or how to remove other users likes on your Instagram photos and videos. Enjoy!
Please consider sharing:
Note: At no extra cost to you, we may earn a commission for purchases using our links. Learn more.
Step by Step to Fix Instagram Video Quality
A social media platform that provides entertainment, information, and inside news about the showbiz world is Instagram. Today, almost everyone uses this platform because its advancing features attract and facilitate the user. But still, few people have questions like how to fix Instagram video quality and how to fix blurry videos on Instagram.
It gets annoying if your favorite platform does not give the same quality result as before. But we are here to resolve that problem and tell you how to fix the issue.
- Part 1.
 Why My Instagram Video Is in Low Quality after Uploaded?
 - Part 2. How to Fix Instagram Video Quality?
- Part 3. Instagram Video Format Specifications Recommendation.
Part 1. Why My Instagram Video Is in Low Quality after Uploaded?
The most commonly and widely used social media these days is Instagram. Uploading pictures on Instagram does not affect the picture quality, but on the other hand, when a video is uploaded, its quality is affected. It turns blurry and low quality after upload.
There might be several reasons for this downfall of video quality. A few of the contributing factors are listed below;
Bad/weak internet connection can be one of the reasons why video becomes low quality.
Another factor might be Instagram settings when using mobile data.
Network settings of Android/iPhone might also be disturbed, causing the video to get blurry.
The camera settings of the phone might also be unbalanced.
Another reason might be that the application is not updated, so that's why it's not working properly.
The video being uploaded might not be of the required standard size; that's why it gets blurry.
Part 2. How to Fix Instagram Video Quality?
Everything doesn't need to work well every time you try it. The same is the case with uploading a video on Instagram, and it might lose its quality while uploading it. Presenting you some solutions that will helpfix Instagram video qualityand resolve the issue of blurry videos.
Method 1. Adjust Instagram Setting
Instagram utilizes a lot of mobile data. But to avoid and prevent that, Instagram provides you with the settings that can be changed to minimize data usage. This will lower the Instagram video quality. The following steps need the user's attention;
1. Firstly, launch Instagram and tap on your profile icon to open your profile.
2. Now, click on the three horizontal lines in the top right corner.
3. When a sliding menu opens, go to 'Settings' and from there, select 'Account.'
4. When that opens, scroll and select 'Cellular Data Use. '
'
5. Toggle the Data Saver off.
Method 2. 4K Video
Sometimes, a few tricks and techniques can do the same job with long-lasting results. For this case, we will be fixing a video with different small techniques as;
Shoot video in 4K:
For filming a good quality video, you firstly need to have a good camera. That means a camera has impressive 4K video quality to get a perfect and flawless video.
Video Compression:
After filming an excellent 4k video, you need to look for such a video compressor to compress and save the 4K quality video. The video retains its 4K quality due to such video compressors even after it has been uploaded on Instagram.
File Transferring:
Compressing and transferring video files from one server to another also harms the video quality. So, you should avoid compressing files for transfer again and again.
Method 3. Fix Blurry Video with Video Repair Software
If your video is blurry, and you think you are in trouble, then you should know that you are not because Wondershare Repairit is here to save you. The amazing software has got a solution for so many unknown questions that no one ever imagined. The video repair software helps to repair any corrupted video file and make it new like never damaged before.
Video Repair software supports the following video formats; MOV, MP4, M4V, M2TS, MKV, MTS, 3GP, AVI, FLV. It can also repair multiple formats of videos at the same time.
Download | Win Download | Mac
Following steps should be followed properly to get the best result;
Step 1. Select the Corrupted file
After launching the software, add the corrupted file onto the surface of the software. The interface offers you two ways to upload a file. Either by clicking the '+ Add' button precisely in the center of the screen or else by clicking in the middle area of the interface and repairing it.
Step 2. Repair the video
After selecting the corrupted file for the repair process, click on the "Repair" button that is in the bottom right corner and let it repair.
Once the repairing process is over, then a window appears, confirming the repair has been completed.
Step 3: Preview the Video:
You can preview by clicking on "Preview." If you are confirmed, and the file is correct, click on "Save" in the bottom right corner to save the file. Keep in mind that you don't hold it on the same path from where you lost it.
Step 4: Advanced Video Repair:
It might also be possible that the video does not repairs that easily because it is severely corrupted. For such a case, select Advanced Repair. For this, click on the folder icon and add a sample file to repair. A sample file is the same as the corrupted file because it is created with the same device and exact format.
Advanced repair uses the information from the sample file, but it repairs the corrupted initially file. Click on repair in the bottom right corner and give it few minutes to complete the process.
Step 5. Save the repaired file
Once it's done, click on the "Save" button in the bottom right corner. Choose a path to save it and make sure that it is different from the previously saved path. It will take few seconds to save the repaired video.
Part 3. Instagram Video Format Specifications Recommendation.
The commonly faced problem of blurry video can be resolved through the different methods suggested in the section above. But still, for the ease of people, there are recommended specifications that if they are implemented, then the video quality is automatically improved. The best video format for uploading a video on Instagram is MP4.
Furthermore, the technical specifications must be included in the MP4 file so that the user can get the best video quality. These recommended specifications are like a cherry on top. Specifications are;
- AAC audio stream.
- 3500 kbps bitrate for video.
- The frame rate of 30 fps (frames per second).
- Maximum file size of 15 MB.
- The video must be a maximum of 60 seconds.
- The best dimension is with maximum video width of 1080 pixels.

- The video should be 920 pixels tall.
Bonus:5 Methods to Fix No Sound on Instagtram Video Issue
Conclusion
Sharing the best knowledge with users to learn more about the factors that affect the video quality and learn how to upload flawless and amazing stuff on Instagram without any trouble. The great guideline by Wondershare Repairit will change your life.
Download | Win Download | Mac
People Also Ask
-
How do I upload high-quality videos to Instagram?
By adopting the recommended specifications and by compressing the video into 4K quality, you can upload a high-quality video.
-
Does Instagram support 1080p video?
Yes, Instagram supports 1080p videos.
 It is also a part of the recommended specifications. 720p video is supported to upload on IGTV.
 -
Can I upload a 4k video to Instagram?
IGTV supports 4k vertical and landscape videos that are at least 15 seconds plus. But due to Instagram's compression algorithms, 4k videos are subject to severe quality loss.
-
What's the video length limit on Instagram?
The Video length limit on Instagram is 60 seconds. Multiple 15 seconds stories can also be posted. A video between 15 seconds to 10 minutes long can be uploaded on IGTV.
how to improve video quality on instagram?
By Milena Anderson Reading 5 min. Views 13
Short answer
- There are several things you can do to improve the quality of your Instagram videos.
 nine0014
 - First, make sure your camera is in good condition and has no problems.
- Second, be sure to use a high quality microphone.
- Third, use good lighting whenever possible.
- Finally, make sure the video is properly compressed before uploading it to Instagram.
How to post a HIGH quality video on Instagram without quality loss (2022)
How to post a BEST quality video on INSTAGRAM
How to improve video quality on Instagram?
There are several things you can do to improve the quality of your Instagram videos.![]() One is to use a higher resolution camera. Another option is to use a tripod or a stable platform to keep the camera still. Lastly, make sure your video is well lit and edited so it looks good on Instagram.
One is to use a higher resolution camera. Another option is to use a tripod or a stable platform to keep the camera still. Lastly, make sure your video is well lit and edited so it looks good on Instagram.
Why is my Instagram video blurry? nine0003
Instagram uses a different resolution than YouTube, so if your video is uploaded to Instagram at a higher resolution, it will be blurry when viewed on their app. To fix this, you can upload your lower-res video to YouTube and then post it to Instagram as a link.
Does Instagram downgrade video quality?
No, Instagram does not reduce video quality. Instagram videos are encoded at the same resolution as regular posts. nine0003
How can I prevent quality degradation on Instagram?
There is no one-size-fits-all answer to this question, as the best way to prevent Instagram degradation may vary depending on your specific situation. However, some tips that can help include using a quality photo editor or filtering app to enhance your images before posting them to Instagram, and also make sure you only post high quality images that you think will be well received by others. nine0003
Why does Instagram lower the quality?
There are several reasons why Instagram may reduce the quality of images or videos. First, Instagram may lower the quality to save bandwidth or storage space. This is especially common when uploading large photos or videos that take up a lot of space on Instagram's servers. Also, if you're using an older phone or low-spec device, Instagram may lower the quality of your images and videos to make them load faster. nine0003
How to fix blurry video?
There are several things you can do to try and fix a blurry video. One option is to try adjusting the video resolution. Another option is to try adjusting the frame rate of the video.
How do you download high quality videos?
There are several things you can do to improve the quality of your videos. First, make sure your camera is in good condition and has no problems. Second, use a tripod or a stable surface to keep your footage from shaking. Finally, use a good microphone and record clear audio with minimal background noise. nine0003
What is the maximum resolution on Instagram?
Instagram does not have a specific resolution limit, but recommends a photo resolution of at least 150 dpi.
Does Instagram support 1080p video?
Yes, Instagram supports 1080p video.
What is the best video quality for Instagram?
There is no definitive answer to this question, as Instagram videos can be shot in a variety of qualities, and each will have a different level of quality when uploaded to the platform. Some popular options for shooting high-quality Instagram videos include 1080p, 4K, and 6K. It's important to choose the right resolution for the specific content and audience you're targeting, as well as your own shooting and editing capabilities. nine0003
Can I post 1920x1080 on Instagram?
Yes, you can post 1920x1080 images to Instagram. However, you may want to consider downsizing them to a lower resolution if you are releasing them to a wider audience.
How to upload 4K to Instagram?
Yes, you can post 1920x1080 images to Instagram. However, you may want to consider downsizing them to a lower resolution if you are releasing them to a wider audience. nine0003
What is the resolution of the Instagram video?
Instagram videos are typically between 1080p and 2160p.
How do you upload HD videos in Instagram stories?
In order to download HD video in Instagram story, you first need to open the Instagram app and go to your profile. Then click on the three lines in the top left corner of the screen and select Stories. Next, you will need to choose which account you want to post from. After that, you will need to select the video you want to download. By selecting a video, you can specify how long people will watch it. nine0003
Is there an app to improve video quality?
There is no one-size-fits-all answer to this question because video quality depends on many factors, including the device used to record and play the video, the quality of the video source, and user preferences. However, some tips for improving video quality include using a high quality camera or recording device, encoding the video at a higher resolution or bit rate, and using a codec that preserves details in low light conditions.0003
How to upload a video to Instagram without losing quality, why the service spoils the video
Posting clips to the Instagram social network is sometimes accompanied by some technical problems. One of these is the deterioration in the clarity of the “picture”. Such an anomaly is not only unpleasant for the author, but also unlikely to please the readers of the page. However, this is quite possible to avoid by following the rules. nine0003
Below we will figure out how to upload a video to Instagram without losing quality. Stay with us and check out useful tips on how to easily share your favorite video with your friends.
Technical requirements Instagram for uploading videos
The first thing you should pay attention to before uploading a video to a common feed is the technical characteristics of the file. Ideally, they should fully comply with those set by the social network service. Namely:
- Video file format MP4 (found on Windows or Android) or MOV (common on Apple products).
- Clip size up to 128 megabytes.
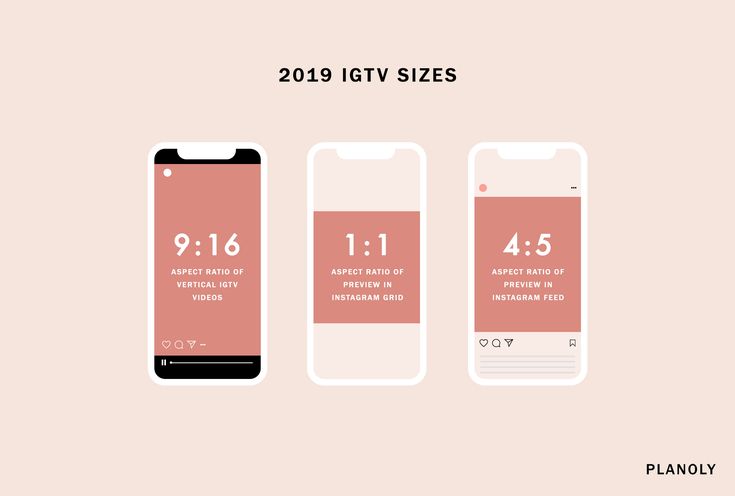
- Ribbon aspect ratio is square. These are proportions: 4:5 or 1:1. For stories or Insta TV, a vertical rectangle in the proportion of 9:16 is suitable.

- Codec - H.264 (the most common). Bitrate - 3000 kbps and above.
Movie playback time is important:
- for tape - up to 60 seconds;
- for stories - 15 seconds;
- for IGTV - up to 60 minutes.
The social network system will most likely not let you download the video:
- avi format;
- with other codecs.
Good to know. You can attach widescreen clips with a 16:9 aspect ratio to the post, but then white frames will appear on top and bottom of the film, and the video itself will be reduced.
Why does Instagram ruin video quality
So why does Instagram ruin video quality? The reason for this may be several things:
- The technical parameters of the file do not match those specified by the system.
 Accordingly, the social network simply compresses or crops the “picture”.
 - The quality of the Internet connection is poor.
- Application error.
- Outdated version of Instagram.
It is from this that the "picture" of the clip can deteriorate. What to do in this situation? It's simple:
- View the properties of the published material and correct the format or resolution in special editors.
- Connect to a Wi-Fi hotspot or find a place with a strong network signal.
- Reboot the device or log into Insta from a PC or tablet. If this does not help, then write to the support service through the "Settings - Help" section.
- Go to the game store on your smartphone (AppStore, Windows Store or Google Market) and update the version of the program to the latest one.
 nine0014
How to keep good quality when uploading videos from your phone
So, how to keep good quality video files when uploading to Instagram? Follow the standard algorithm of actions. And since it will be slightly different for iPhone and Android owners, we will consider them separately.
On Android
To publish a video clip with the best resolution on a smartphone with the Android operating system, you will need:
- Unlock the screen of your gadget and launch the Instagram social network. nine0014
- Log in to your account using your login (nickname/email/phone number) and password.
- Tap on the plus sign, which is located in the bottom menu.
- Select a suitable material from the device library or remove a new one. To record a new movie, you need to click on the "Video" tab and hold down the round button.
- Edit the file: apply a filter, change the color balance, add saturation, etc.
- Make a signature, add hashtags and geolocation as desired.
 nine0014
 - Click on "Share" and put the post in the feed.
If the Instagram video is still uploading in poor quality, then install the auxiliary utility FilmoraGo on your smartphone. With its help you can:
- change the aspect ratio for the social network;
- reduce file length;
- overlay text, music or thematic effects;
- adjust playback speed.
Note. FilmoraGo is a free Android app. nine0003
On the iPhone
For Apple owners, the step-by-step instructions are almost the same. Only the location of icons and options in the application can differ. All you need is:
- Make sure that the material is suitable for Instagram.
- Sign in to your account.
- Click on the "plus" in the menu.
- Capture a new clip or attach one from the gallery.
- Filter it and publish it.
If the resolution deteriorates, then you need to upload such a video with pre-processing. To do this, install the InShot editor on your phone. It will help:
- apply text, music, filters and stickers;
- adjust color, tint, shadows and brightness;
- speed up or slow down playback;
- cut or split a file into fragments;
- adjust the proportions to a specific social network (Facebook, Instagram, Twitter or YouTube). nine0014
Note. To improve the quality, install only official and user-tested programs from the Market. Utilities from unknown sites in the browser can be malicious.
The universal way is to convert videos via Convertio
Another way to avoid poor quality video on Instagram is to convert it. After all, an incorrect file format can lead to the fact that the clip will either not be added to the post, or it will “compress” greatly. nine0003
To improve the quality or restore the sharp "picture" of the movie, follow the step-by-step instructions below:
- Open a browser and go to the Convertio service.

- Scroll down the page and switch it to Russian, if it didn't happen automatically.
- Click on the "folder" icon and select the material to be converted from the device's library.
- Click on "to..(GIF)" and tap on the "Video" tab in the menu that appears.
- Click on the MP4 and start the process with the "Convert" button. nine0014
- Please wait a few minutes while the site processes the video.
- Download it back to your PC or smartphone.
Done. Now you can upload the resulting "short film" in the usual way.
Important. When processing a movie in the editor, always choose the best quality for saving.
To upload a video to Instagram without losing quality, you need to know the requirements set by the social network.


