If you want to edit video for Instagram, you have a number of options for doing so. However, the first thing to establish is what kind of video you’re planning to post. Instagram has taken a while to figure out its video offering, and you currently have a few options for where and how you can post videos.
Currently on Instagram, you have three main methods of posting videos – Stories, main feed posts and Reels. Until recently there was also the long-form IGTV app, however Instagram’s parent company Meta announced that it would be shutting down IGTV as of March 2022, due to lack of interest and a desire to simplify the platform’s video offering. You can also go Live, but since we’re talking editing here we’ll leave that alone for now.
UPDATE July 2022: video posts are (almost no more) – an Instagram Reels update means that all videos less than 15 minutes in length will now automatically be shared as Reels.
In this guide, we’ll take you through each type of video you can post on Instagram, explain the requirements and how best to edit and optimise your videos for each one. For more powerful video editing options, check out our guide to the best video editing software, as well as the best free video editing software if you’re on an extremely tight budget. Also, bearing in mind that Instagram works best on mobile, our guide to the best video editing apps might also be helpful.
The easiest way to get started posting your video on Instagram is to hit the + symbol at the top right of the screen. This will take you to the menu where you can select what type of content you want to post. The top three options will be Post, Reel and Story. Select which one you want to post, and you'll be taken directly to the editing and uploading interface.
So, let's look at each one in turn.
An Instagram feed post is the simplest way to share a video. The in-app editing functionality here is quite limited, meaning that if you simply want to share a video on your feed, you may want to edit it beforehand in a separate app or program. Here are the key things to remember.
Set the dimensions: You can post a video in Instagram’s traditional square format, or in the dimensions it was originally shot. When selecting your clip from your gallery, click the two-arrows icon on the bottom left to toggle between these options.
Remember the time limit: You’ve got a maximum of 60 seconds when posting video clips to your Instagram feed.
(Image credit: Jon Stapley/Future)Trim and add filters: In-app, you can use the uploader to trim your video clip, or to add one of Instagram’s famous filters (though they are a bit passé these days). If you want to add music, text or effects, you’re best off either doing it beforehand or using either Reels or Stories, as the post editor doesn't offer this functionality.
Instagram Stories are short, ephemeral photos and videos that show up at the top of a user’s feed, and disappear after 24 hours. Originally introduced to compete with Snapchat, Stories have since become a key part of the Instagram experience. Here are some tips for editing Instagram Stories.
Think in 15 seconds: An individual Instagram Story is 15 seconds long. If you upload a longer video, it’ll automatically be split into multiple stories, but this can make for a disjointed experience for the viewer. You can individually select parts and remove them to isolate a 15-second section, but the breaks may not be where you want them. It’s best to plan in advance and trim your clips to 15 seconds or less before upload – your phone’s native video app will likely be able to handle this.
Stay vertical: Instagram Stories are almost exclusively viewed full-screen on a phone display, so portrait format dimensions (1080 by 1920 px) are what you need to be thinking in.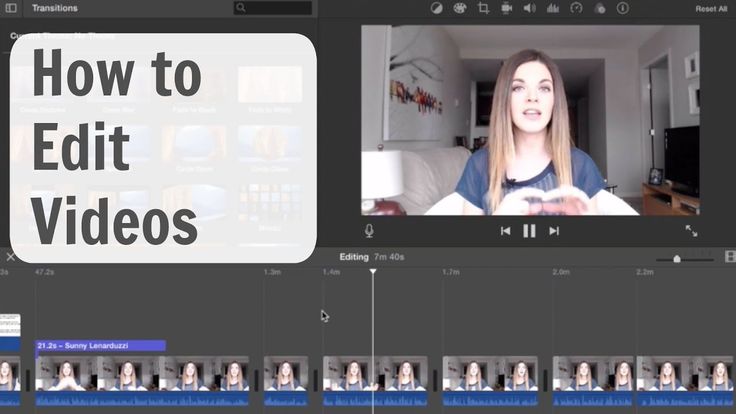 If you do have video that’s a different orientation, you can always zoom in manually in the interface like you would with a photo, but remember that this will have an impact on the quality.
Remember what you can do in the app…: The Instagram app makes it easy to add simple things to your Stories. You can overlay text, add music (the app links up with Spotify), rotate video, zoom in, move the video around the canvas, add a background, overlay photos from your gallery, and more. If you have simple tasks like these in mind, the easiest thing to do is probably handling it in-app.
… and what you can’t: The Stories interface isn’t much for colour correction. There are Instagram’s well-known filters named after cities, which you can access by swiping left or right in the Stories interface, but honestly these are pretty lame. For simple colour correction or stylish presets, you’re best off looking into an app like Adobe Premiere Rush.
For more on Stories, see our Instagram Story tips guide.
What Stories were to Snapchat, Instagram Reels are to TikTok. These are short clips that can be posted to the main feed, or continually scrolled through just like TikToks.
Create in-app if possible: You can add pre-recorded clips to a Reel by tapping the camera roll icon at the bottom left, but unlike TikToks, Reels don’t let you add many effects to these clips. You can add text, stickers and music in a similar interface to Stories, but the more advanced stuff is fenced off unless you’re shooting in-app. Simply tap the centre button to start recording, or use the clock icon to start a recording timer.
Set the length: Reels can be set to 15, 30 or 60 seconds – they don’t have to be exactly these prescribed lengths, but they cannot exceed them.
Use transitions: In the Effects panel (accessed by tapping the stars icon), you can find some useful Transitions to get you from one clip to another. These include effects like Warp (whip between clips when you turn your head left or right), Spin (trigger a spinning transition by tilting your head), Zoom (tap a section of the frame to transition by zooming in on that area) and more. They can be really handy for stitching clips together smoothly.
Save effects: The effects interface on Reels is a big sprawling mess. If you find an editing effect you like, save it using the bookmark icon so that you can easily access it again.
(Image credit: Jon Stapley/Future)Align your clips: Once you’ve added your first clip, you’ll notice a new icon on the left-hand menu bar. This is the Align tool – selecting it will bring up a ghost overlay of the end of your previous clip, which you can then align the next shot to. This is useful for smoothly transitioning between clips.
Want to know more about Reels? Check out our full beginner's guide to Instagram Reels for more tips.
Read more:
Thank you for reading 5 articles this month* Join now for unlimited access
Enjoy your first month for just £1 / $1 / €1
Already have an account ? Sign in here
*Read 5 free articles per month without a subscription
Join now for unlimited access
Try first month for just £1 / $1 / €1
Already have an account ? Sign in here
Jon is a freelance writer and journalist who covers photography, art, technology, and the intersection of all three. When he's not scouting out news on the latest gadgets, he likes to play around with film cameras that were manufactured before he was born. To that end, he never goes anywhere without his Olympus XA2, loaded with a fresh roll of Kodak (Gold 200 is the best, since you asked). Jon is a regular contributor to Creative Bloq, and has also written for in Digital Camera World, Black + White Photography Magazine, Photomonitor, Outdoor Photography, Shortlist and probably a few others he's forgetting.
Are you looking for the best Instagram video editing tools for your business?
Instagram is one of the most popular social media platforms around. And as a result, it’s one of the most competitive when it comes to growing a following.
As the social channel has matured, so have user expectations. That means you need cutting-edge videos that are unique, engaging, and (of course) look professional.
But how do you regularly create high-quality videos for Instagram if you’re not a professional video editor?
This is exactly what we’ll be covering today.
Because, in this post, we’ll share 15 of the best Instagram video editing tools on the market.
Before we do, though, let’s get clear on why you’d want to create Instagram videos in the first place.
When Instagram first emerged, it was all about photos.
And while it’s still largely focused on photos today, Instagram has added many ways to share videos to your feed, like Instagram stories and IGTV (Instagram TV).
More recently, Instagram has been heavily promoting Reels which are short, 15-second edited videos that make the platform even more addicting.
But when it comes to posting high-quality and professional videos to your Instagram account, there are 3 major benefits:
 Then use that content to drive more leads back to your website.
That last point is probably the one that interests you most.
Which means you might be wondering, “How do I convert visitors from Instagram once they land on my site?”
We’ll answer this question in more detail at the end of this post.
Feel free to jump straight to our section on how to convert Instagram followers into paying customers.
Otherwise, let’s dive into our list of the 15 best Instagram video editing tools on the market.
Here are 15 Instagram video editing tools that you can use to get more engagement from your target audience:
Let’s get started with the first on the list.
VideoShow is an all-in-one video editor and makes a great solution for editing your Instagram videos.
This tool lets you create stunning and engaging videos FAST. You can add stickers, emojis, text, and more to hook your audience and increase watch times.
It also comes with ready-made templates that you can use to create videos more quickly. Plus, you have other useful features to repurpose content like an audio extractor, 4k video exports, video splicing, and more.
That means you can easily take your Instagram videos and turn the same content into podcasts, a YouTube channel, and other video or audio-based platforms.
This will allow you to get more marketing mileage from your Instagram videos with VideoShow.
Key Features
Who Is VideoShow Best Suited For?
This tool would be best for people who want a quick way to make stunning videos for a variety of channels. If you’re simply making Instagram reels, then this tool might be overkill.
But if you create lots of video-based content for your audience, then VideoShow is an absolute no-brainer.
The InShot video editing app is made for iPhone and Android users to be able to edit videos quickly on the go. However, the “edit on the go” feature means the app will be limited in what it can do, but it’s simple and easy for anyone to use. On top of video editing, you can make picture collages and add filters to images.
Key Features:
InShot offers so many features that we could write an entire blog post about it.
Related Content: 103 Blog Post Ideas That Your Readers Will LOVE [Updated]
The only downside to InShot is that if you use the free version, your videos will come with InShot brand logos and a small ad space. You can eliminate this by paying $2.99/month. Paying will also open all of the features, although you can still get by pretty well with what’s offered in the free version.
Who Is InShot Best Suited for?
InShot obviously can’t replace the technicality of software like Adobe Premiere Pro. But if you just want some fun, quick videos for your Instagram that aren’t meant to be extremely professional, InShot is an excellent place to start.
Quik is a video editing app created by GoPro. If you have a GoPro, you should be familiar with Quik as it’s the app where you go to see your GoPro images and videos. But to make a video on Quik, you can also import footage from anywhere, including your camera roll.
You can decide to custom make videos, or let the app make videos for you by gathering moments and putting them together. It looks professional, there’s music, and the cuts and transitions are smooth.
Key Features:
The features offered by Quik are impressive, and there isn’t much you can’t do to create your dream video. It’s nice that you have the option to edit yourself or let the app do it for you.
Quik costs $4.99/month, but you’re invited to a 30-day free trial to try it out first. You also won’t have any ads or brand logos shown on your videos.
Who Is Quik Best Suited for?
Quick can import up to 500 videos at once. If you’re trying to make an IGTV or Instagram video with multiple scenes, this Instagram video editing tool is for you. You don’t need any video editing experience as Quik is easy to piece a bunch of clips together.
Magisto is an Instagram video editing tool that is powered by artificial intelligence. Magisto’s AI will create your videos based on sound and facial recognition, landscapes, and action sequences. Their goal is to create a sequence that will trigger emotional responses from viewers.
Unlike the tools mentioned above, Magisto has the capability of providing you with more customization, almost automatically through AI.
Key Features:
Magisto is one of the most feature-rich tools available for Instagram video creators. The only thing that’s missing is the ability to upload items in bulk.
In terms of pricing, Magisto has 3 separate plans, all with different features included. The plan you choose will depend on your business needs and how serious you are with video marketing. Here are the plans:
Who Is Magisto Best Suited for?
Magisto is for people who want to produce more than just a basic video. It’s best suited for small to medium businesses looking for the most features and customization options to turn their videos into scroll stoppers.
Most Instagram users record their videos in portrait mode since it’s best-suited for Instagram, and you’re able to fill the entire screen of a user’s phone. However, almost every other platform supports videos shot in horizontal. If you want your Instagram videos to match your YouTube or Twitter videos, Horizon will avoid shooting in portrait mode no matter how you hold the camera.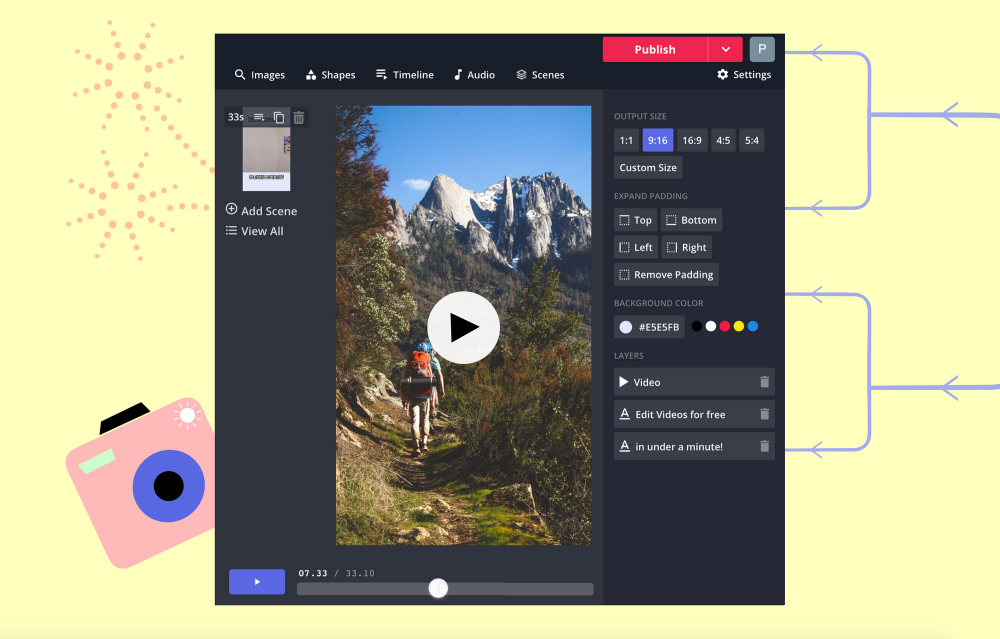
You can tilt the camera up, down, back and forth, and the captured video will always be in horizontal. This helps tremendously in ensuring your horizontal videos look clean and professional.
Key Features:
Horizon offers a free version for Android users. However, the features are limited, and you can only record video clips up to 15 seconds. They also have a watermark in the bottom corner, and each video ends with a Horizon brand advertisement. Having said that, investing $1 to unlock all features and have no advertisements might be worth it.
iOS users still don’t have access to a free version and will pay a one-time payment of $1. 99. When you pay for the iOS version, you’ll unlock all features right away.
Who Is Horizon Best Suited for?
Horizon will best benefit Instagram users who prefer a horizontal view on their videos.
Animoto is a free editor that allows you to easily make your own Instagram videos.
This tool doesn’t require any video editing experience or “tech skills” to get started. That’s because it comes with a drag and drop video maker that anyone can use.
Plus, Animoto comes with pre-made templates to help you make videos more quickly. And if you run out of images or music in your video, you’ll have thousands of stock-free options to choose from.
If you need a quick and easy solution to make your videos, then Animoto might be the right tool for the job.
Key Features
Who Is Animoto Best Suited For?
This is a great tool for busy business owners without any video editing experience.
It’s also a free tool (though you might want to upgrade). And that means it’s one of the best solutions for getting started with video editing for your Instagram channel.
Previously referred to as Adobe Premiere Clip, Adobe Premiere Rush is a free video editing app that’s connected with Adobe Premiere Pro.
They offer 2 forms of editing to cater to your needs: freeform and automatic. Freeform mode will let you take control and do all of the editing yourself while automatic mode will create the video for you with smooth transitions and selected footage clipping.
Key Features:
Like Magisto, AI powers Adobe Premiere Rush, which they call Adobe Sensei. This AI will capture all of the best moments of your clips and mash them together automatically. However, it can also make the footage a bit rocky by cutting to different clips at random moments, resulting in the video making no sense at all.
The app is free to download and use, but only comes with 2GB of storage. If you need more than that, you can pay $9.99/month for the Premiere Rush Single App.
Who Is Adobe Premiere Rush Best Suited for?
If you already have other Adobe products downloaded, this app will feel familiar to you in terms of editing. Their freeform mode is one of the most versatile tools for creating high quality, customized videos.
If you’re looking to bring some real fun into your Instagram video editing, look no further. Boomerang is different than the Instagram video editing tools mentioned above.
Instead of making a formal video, you can make your own GIFS and short videos using a sequence of 10 pictures. All you need to do is select 10 photos, and the app will loop them automatically into a mini video. This allows you to get creative and make engaging videos quickly.
Key Features:
The Boomerang app is free and easy to use and set up. You’ll be limited to Instagram’s features, so you won’t have very many customization options other than adding filters, music, text, and stickers. However, Boomerang isn’t for editing professional videos, so the features that come with it are pretty much all you’ll need.
Who Is Boomerang Best Suited for?
Anyone can and should use Boomerang. Whether you have a huge company or you’re just starting out, it’s a great way to engage with your audience and show people that you’re playful.
Designed for iOS users, iMovie may be the easiest to use Instagram video editing tool for you. It’s a well organized, user-friendly interface that helps you create good quality videos with many great editing features. You can take control and edit on your own with the movie option, or let iMovie edit for you with the trailer option.
Key Features:
All of these features come at no cost as iMovie is free.
Who is iMovie Best Suited for?
iMovie is great for beginners who are looking for something simple that still gives you good video quality. Unfortunately, it’s only available to iOS users.
BeeCut is a video editing software that promises to make your stores come alive.
It allows you to quickly trim and cut your videos, so your audience will focus their attention where you want them to. You can also split and splice videos together for smoother (and seamless) transitions.
Everything can be matched to your brand’s style, too. This allows you to embed videos on your Instagram channel that fully represents your brand’s voice, style, and look.
Finally, BeeCut offers plenty of advanced features like filters, overlays, visual effects, music, and much more.
Key Features
Who Is BeeCut Best Suited For?
BeeCut is best for intermediate users who may not have a lot of time but have a good understanding of video editing.
While beginners can definitely still use BeeCut for their Instagram videos, the advanced features would likely be wasted. But intermediate and advanced video editors will love the variety of tools they can use to make professional and stunning videos FAST.
WeVideo is a great video editing tool that’s cloud-based, making it accessible by anyone, anywhere in the world, at any time. Because of this handy feature, there are over 30 million existing accounts. And, if you’re looking for more than just a quick and simple editor, WeVideo has plans that include features to take your videos to the next level.
Key Features:
WeVideo offers 5 plans. The most basic plan is free, but as you can imagine, it doesn’t provide many features. You’ll get 1GB of cloud storage, and only be allowed 5 minutes of publish time per month. If your business is planning on getting serious about uploading videos on Instagram, it would be beneficial to invest in a paid plan.
Here is a look at the paid plans:
The power plan only gives you 30 minutes of publish time per month. But publish time is unlimited with all of the other plans. All of the plans offer a single-seat license except the business plan, which offers a team license with 3 seats.
Who Is WeVideo Best Suited for?
WeVideo is an excellent option for small to medium businesses looking to create high-quality videos for Instagram. Its simple interface and iCloud sharing makes it an enjoyable video editing tool all around. The iCloud feature also makes it easier for remote companies to share and edit projects.
Apple Clips was created by Apple as a dead-simple, “what you see is what you get” video editing app. It’s feature-rich but doesn’t offer many advanced options for those looking to take their editing beyond the starting line. However, the simple functionality of Apple Clips is precisely the reason why people prefer to use it.
Key Features:
As is the case with most of Apple’s products, you must have an iOS device to download it. Apple Clips supports any iOS device. However, to be able to use all the features, you must have an iPhone 7 or later, iPad (6th generation), or the 2017 iPad Pro or later.
And the best part is that Apple Clips is 100% free!
Who Is Apple Clips Best Suited for?
Apple Clips best suits iOS users who are looking for an easy Instagram video editing tool that allows for plenty of creativity but doesn’t overwhelm the user with complicated features.
If you’re interested in photography, you probably already have a VSCO account or at least have heard about it. In 2017, VSCO upped its game by creating a video editor. It’s relatively new, but it’s a great tool to use for your Instagram videos.
Having a VSCO account also gives you access to their VSCO community, where you can get access to a huge network of other creative users.
Key Features:
VSCO offers a 7-day free trial so you can decide if it’s worth it for you.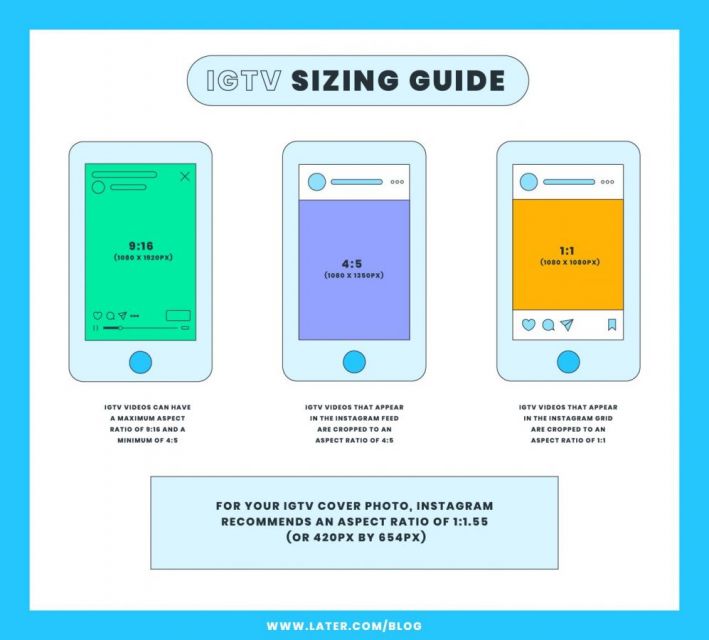 After your free trial, you’ll pay a low price of $19.99 per year with access to the video and image editor.
Who Is VSCO Best Suited for?
If you’re already familiar with VSCO, this could be the easiest Instagram video editing tool for you. VSCO doesn’t cost much, and you also get access to an active community of users. VSCO also offers the most presets out of any other tool.
FilmoraGo is a free video editing app to spice up your Instagram videos. This app was worth the mention because it’s free, and it doesn’t add any branded watermarks or advertising to your videos. There’s also no limit on the length of video you can record, edit, or share.
Key Features:
FilmoraGo has all the ingredients to make an entertaining, visually appealing Instagram video. Plus, the fact that you won’t get watermarks, ads, or a time limit on your video is everything.
FilmoraGo is entirely free, and you’ll only pay extra if you want additional unique features like holiday and retro effects.
Who Is FilmoraGo Best Suited for?
FilmoraGo is for anyone looking for a cheap, simple way to make fun Instagram videos. However, it’s not the most developed app out there. If you’re a company looking to create super polished videos through heavy editing, it would be more beneficial to go with something like Adobe Premiere Rush. That way, you can connect to Adobe Premiere Pro, which could support heavier edits.
Clipomatic is a smart video editor that will turn the words you say into captions over your videos.
All you need to do is hit the Record button and speak clearly into your phone while recording. Then, the words you’re saying will be transformed into a caption for live subtitles.
You can also customize your videos and change the style of the caption, the filter of the video, and more to keep your Instagram videos on brand.
This tool supports over 30 languages and allows you to completely personalize any captions that aren’t 100% accurate.
Key Features
Who Is Clipomatic Best Suited For?
People who use Instagram to teach their audience would get the biggest benefit from this. Many people who watch your videos might not be able to use audio as they listen.
Or your followers might prefer taking notes from a written source.
Either way, Clipomatic can be a great solution for people looking to use Instagram to educate their audience about a particular niche.
And now that we’ve seen 15 of the best Instagram video editing tools, let’s look at what you’re really curious about: converting your Instagram followers into loyal, happy, and paying customers.
Earlier in this post, we mentioned that one of the biggest advantages of upgrading your Instagram videos is that you can drive more sales from your online store.
The only question that remains is, “How?”
Now, we’re going to answer that question with the following 3 tools:
Let’s take a look at each of these tools in more detail to learn how they can help you convert traffic from your Instagram account.
OptinMonster is the best lead generation software on the market.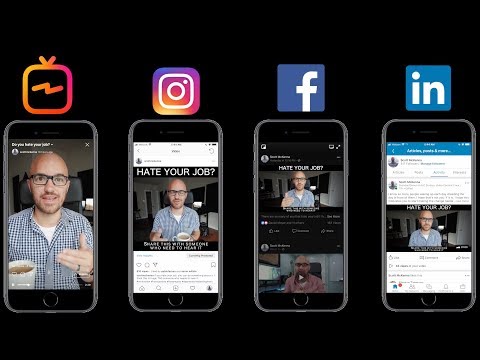 So you might be wondering how it will help you convert your Instagram followers into customers.
This happens in a few easy steps.
First, OptinMonster gives you all the tools you need to create stunning optin campaigns in a matter of minutes.
By “optin campaigns,” we’re referring to things like popups, floating bars, fullscreen welcome mats, and more.
The goal of these campaigns is to get users to “opt-into” your offers. This could be for:
But the best part is that you don’t need to be a professional coder or designer to build high-converting campaigns.
That’s because OptinMonster gives you 50+ pre-made templates to choose from:
These templates are fully-response and look great across devices.
Plus, they’re easy to modify. Once you’ve selected the template you want, everything can be customized to your brand’s style and offer with just a few clicks.
That’s because OptinMonster uses a codeless drag and drop visual editor:
At this point, though, you might be wondering:
“How will any of this help convert my followers from Instagram?”
One of the best reasons for using OptinMonster are the powerful targeting rules. While you’ve likely heard of OptinMonster’s Exit-Intent® Technology or Geolocation targeting, there’s an even better rule for targeting your Instagram followers:
Referrer Detection.
This allows you to show campaigns to your site’s traffic who came from a specific 3rd-party site.
In this case, that would mean targeting people who came from your Instagram account:
Notice how the message is totally tailored to someone coming from their Instagram account.
By personalizing the user experience (UX) in this way, you’ll be more likely to see HUGE increases in signups and conversions across your site.
Want to see it in action for yourself? Click below to start your 100% risk-free OptinMonster account today:
BONUS: Done-For-You Campaign Setup ($297 value)Our conversion experts will design 1 free campaign for you to get maximum results – absolutely FREE! Click here to get started →
If you’re using WordPress, then SeedProd is hands down the landing page builder you need to convert your traffic from Instagram.
This tool allows you to create stunning landing pages in just minutes, even if you don’t consider yourself “technically savvy.”
That’s because SeedProd has 100+ templates for all kinds of pages, including:
Plus, SeedProd has a drag and drop builder that makes it easy to customize your pages:
But, again, how does this help you convert your Instagram followers into paying customers?
The reason landing pages are so effective is that they focus your user’s attention on a single call to action (CTA).
That means you can load your page with reviews, testimonials, and other forms of social proof to persuade more visitors to opt in.
And when you design the page with your Instagram audience in mind, you can personalize the user experience (UX) for even MORE conversions.
Key Features
Get started with SeedProd today!
 Smash Balloon
Smash Balloon is the world’s leading social media feed plugin and the best way to grow your Instagram followers.
This plugin allows you to leverage your site’s traffic to connect with more people on Instagram. From there, you can use the other tools on this list to engage those new followers and transform them into loyal customers.
How does this work?
Smash Balloon can add your Instagram feed to your website in just a few clicks.
Plus, you can tailor the feed to match your site’s look and style. That means you’ll display your Instagram videos without distracting or harming your visitor’s UX.
These feeds can be displayed in a variety of layouts, and you don’t need any coding experience to embed feeds on your site in seconds.
So when your site’s traffic arrives from other marketing channels, they’ll get a glimpse of your Instagram content.
As a result, you’ll see more people switching over to your Instagram account and following you. Over time, you can nurture these new followers and guide them down your sales funnels.
At the end of the day, this means more followers AND more sales for you.
Key Features
Get started with Smash Balloon today!
And that’s all for today! These have been 15 of the best Instagram video editing tools on the market.
Plus, we shared 3 expert tools that you can use to convert your Instagram followers into happy (and paying) customers.
BONUS: Done-For-You Campaign Setup ($297 value)Our conversion experts will design 1 free campaign for you to get maximum results – absolutely FREE! Click here to get started →
We hope you enjoyed this post. If you did, you’ll definitely want to check out the following resources:
These articles will have even more information on how you can take your Instagram marketing strategy to the next level.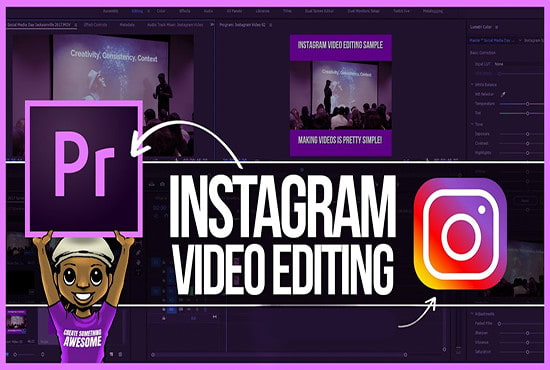
Director himself.
Anastasia Chernykh
content director at Amplifer
Video in InstagramThe product belongs to an organization recognized as extremist on the territory of the Russian Federation. helps you increase reach and engagement and get recommended faster. I already talked about 10 apps for Stories, but here I have collected 3 apps to make cool videos for InstagramThe product belongs to an organization recognized as extremist on the territory of the Russian Federation. , adjust the speed. The app is easy to understand, but the free version still has a watermark on the videos.
20% discount for the first two months in Amplifer with the promo code AMPLI20
Price: free, paid version from 329 ₽ per month by subscription. Download from the App Store and Google Play.
Upload videos to Amplifer to post on Instagram*.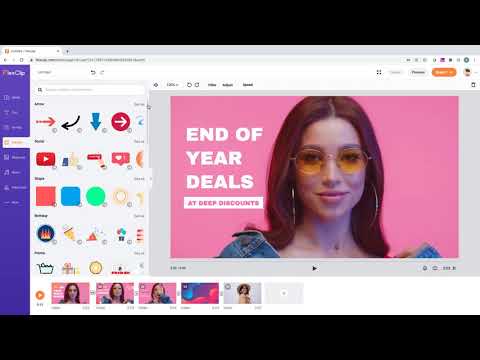 Try it for 7 days for free
If you are looking for an app to add fashionable motes or add a film effect to your videos, this is it. Here you can also trim the video and change its speed, add music, make color correction and retouching, which is not available in other applications presented. Prequel has a lot of filters and effects, but they are only available in the paid version.
Price: free, paid subscription version from 299 ₽ per week. Download from the App Store and Google Play.
With the effects from this application, you can definitely surprise your subscribers - the application allows you to select a specific object in the video and add animated effects to it. For example, a running line or neon lights. It's nice that the free version has a lot of effects and you can adjust color correction, but it's a pity that there is a watermark, and Vochi is not suitable for full-fledged editing.
Price: free, paid subscription version from 459 ₽ per month. Download from the App Store and Google Play.
⌘⌘⌘
I use all three apps regularly. I edit video and add music to InShot, I go to Prequel for filters and dust particles, and then I can add animation to Vochi. This way the videos are dynamic and catchy - every time I get questions about what applications I use for this :). You can see in my InstagramThe product belongs to an organization recognized as extremist in the territory of the Russian Federation..
Connect Instagram* to Amplifer and schedule posts with videos, photos and Stories in a convenient editor and calendar. Get recommendations for the best time and evaluate the effectiveness.
Share
* The activities of the Meta organization are recognized as extremist and banned on the territory of the Russian Federation
If you're shooting Instagram videos with a digital camera instead of a smartphone, you'll likely need to edit them on your computer before posting. And if you need to save the same file in several formats - for example, for the feed and for stories - cropping can take a lot of time.
To make it easier, we've prepared detailed instructions on what Instagram video sizes are considered optimal, how different aspect ratios look in the feed, and how to quickly save an Instagram video in the correct size and format.
We use VSDC as the editing software. It is a free video editor for Windows that is suitable for both simple operations such as trimming and adding audio, as well as for more complex tasks such as creating a picture-in-picture effect, color correction, and working with sound.
Looking for a convenient and free video editor for PC?
Download VSDC
VSDC has special video export profiles for Instagram and other social networks in the required size. This means that you can automatically apply the optimal settings for each social platform, and adjust them if necessary.
We will show how this works in detail below. But first, let's talk about the optimal video size for Instagram.
The answer to this question depends on what type of post you are planning. Currently, you can post on Instagram:
The general requirements for any video on Instagram are as follows: MP4 format, H.264 codec, 30 frames per second - maximum frequency, resolution - 1080 pixels wide. Lower quality videos - 600 pixels wide - are allowed, however, you should understand that on a visual platform like Instagram, you should always strive for maximum image quality.
Let's move on to the aspect ratio of the video for Instagram. Here you have several options.
If your video for is a regular post in feed , you can choose any aspect ratio between 1.91:1 (horizontal video) and 4:5 (portrait/vertical mode). Naturally, if your goal is to draw attention to the publication as much as possible, we advise you to choose the second option, because it takes up much more space on the smartphone screen. The recommended settings for vertical video on Instagram are 1080 x 1350 and 864 x 1080 pixels. However, if you shot the original video in a non-portrait mode, it will be difficult to apply the optimal aspect ratio. In such cases, it is worth using square videos with a standard 1:1 ratio. The optimal resolution here would be 1080 x 1080 pixels.
The best video resolution for Instagram Stories is 1080 x 1920 pixels. And, of course, for maximum organicity, shoot video initially in portrait mode.
Finally, if you're editing a video for IGTV , you can save both a 9:16 vertical video and a 16:9 horizontal video. It is worth remembering that when an IGTV video is viewed in the feed, it is loaded in portrait mode, so it is again recommended to shoot vertically for optimal results.
After you have finished editing, you can save the video in the desired format and size as follows:
To change any of the video parameters - width, height or frame rate - use the "Change profile" option, this button is located below the preview window. If you need to create and save your own video export profile, see this guide.
If your video is longer than allowed, you can quickly split it into parts and post sequentially to the carousel or stories. The easiest way to do this is with cropping markers:
Saving videos in the optimal size for Instagram is not difficult if you use a program with preset export options. Maintaining maximum quality, however, can be more difficult. We recommend that you try the following tips: