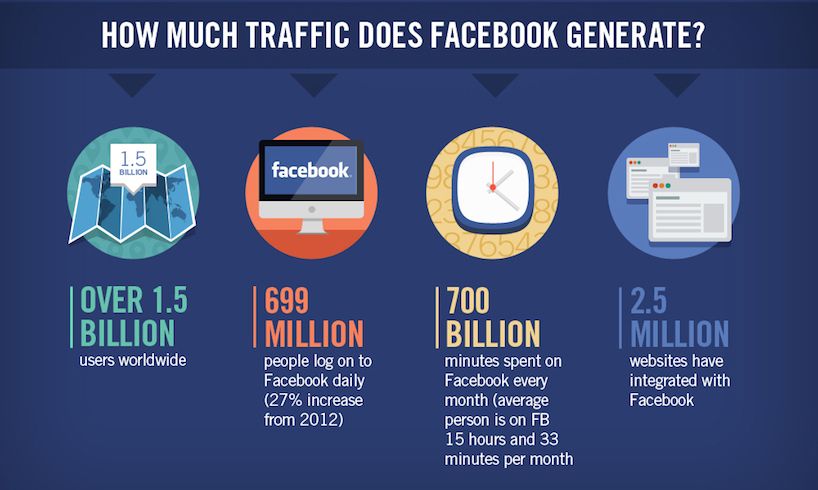
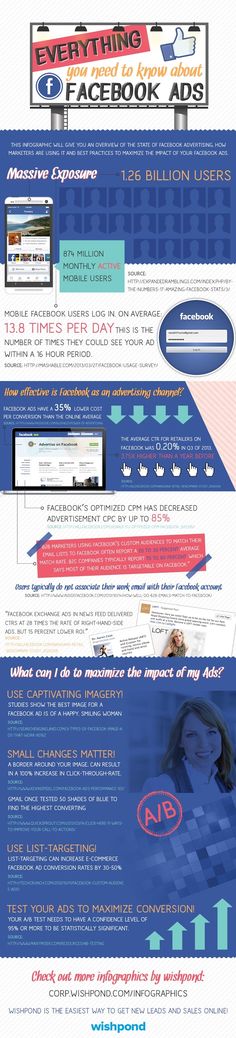
Fact: There are 2.93 billion Facebook users out there.That’s double the population of China.
Fact: We spend an average of 33 minutes on Facebook per day. That’s double the time you could spend to save 15% or more on your car insurance. But I digress.
Between its widespread usage, versatility, targeting, and low costs, it’s not surprising that 66% of U.S. small businesses use Facebook ads.
So in this post, I’m going to walk you through a full tutorial on how to advertise on Facebook, complete with screenshots, tips, FAQs, and visuals.
If you’re reading this post, chances are you’ve already made up your mind as to whether you should advertise on Facebook. But in case you’re still on the fence, here are some reasons:
And if that’s not enough, here are some numbers for ya:
When you run Google Ads, you set up a Google Ads account and then off you go, but with Facebook, there are several different properties involved. If you’re new to Facebook advertising, you’re highly susceptible to falling into a black hole of confusion surrounding which accounts you need.
Here’s the breakdown (and don’t worry, I’m going to walk you through setting up all of these):
Quick halftime break. Here, have some orange slices 🍊 and water 💧
 You need a Facebook Page in order to advertise on Facebook, but you don’t need to be advertising on Facebook in order to create a Page. In fact, this is a staple in any organic social media marketing strategy. You can create a Page entirely separate from all of the above, right from your Facebook profile. Or you can create one out of Business Suite.
Alright, now that we have the visual map to an actual Facebook ad, grab your charger and buckle up because it’s time for us to hit the road. Here are the steps that we’ll be covering:
And here’s the Facebook ads tutorial video:
As mentioned above, Business Manager and Business Suite are now merged into one. When you create a Business Manager Account, you will be brought into the Meta Business Suite interface. You can access the old Business Manager interface (by clicking Help > Switch to Business Suite) but your best bet is to get familiar with Business Suite since this is here to stay.
To create an account, go to business.facebook.com and click “Create account” on the upper right.
You’ll be asked to add your business name, your name, and then your business email. Upon confirming your email, your account will be set up.
Here is where you’ll be brought to the Meta Business Suite interface.
Head down to the bottom left and click on Settings.
From there, click the second gear you see, or you might see a prompt to go to Business Settings. Both take you to the same place. Business settings is basically the legacy Business Manager.
You need a Facebook Page in order to advertise. On the left window, select Pages and then click Add. Here you can either add an existing Page, create a new Page, or request access to a Page (such as if you’re running ads for another business).
While you can supply the bare minimum just to get your page created, it’s best to build it out fully before you start advertising since users can navigate to your Page from your ad.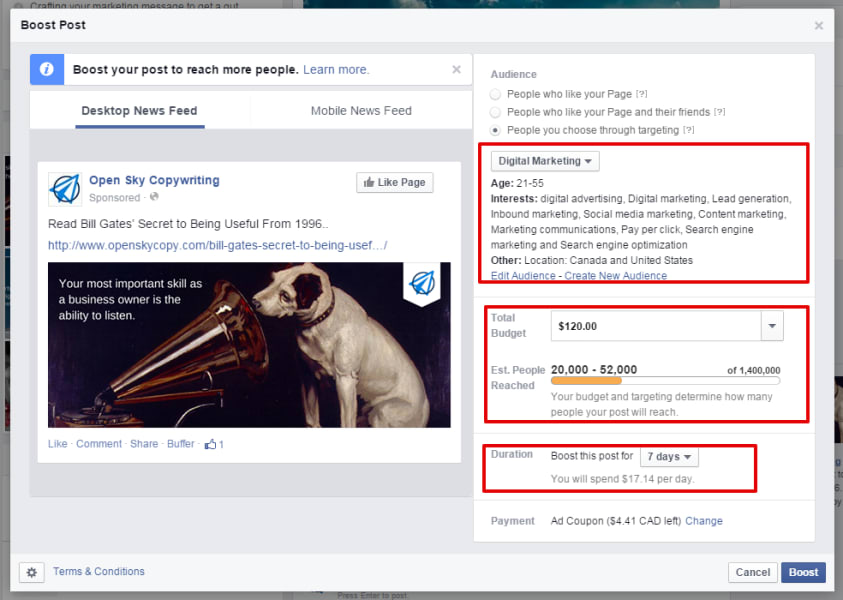 Use our guide to creating a Facebook Business Page to set your page up in full and optimize it for marketing purposes.
Okay now navigate back to Ad accounts in that left-hand pane. You’ll see an option on the right to create a new ad account.
Provide your Ad account name, time zone, and currency then click Next. Facebook will then ask you whether the ad account is going to be used to manage ads for the business account through which you’ve created this ad account or for another business or client.
Next you’ll be asked to add people and permissions. Select your name and give yourself full control over everything.
Click Assign and then click Add Payment Info. Now you have an ad account set up.
You don’t have to do this step now, but you’re going to have to do it eventually, so may as well get it over with! The pixel is a little snippet of code that will tell you what your ad viewers do once they land on your website. Insights from the pixel help you to further optimize your ads as well as create Facebook retargeting audiences which tend to perform well.
Note! With iOS privacy updates and the eventual end of third-party cookies, we highly recommend you set up the Facebook Conversions API as well, as this is the best way to get the most complete picture of your data possible.
To set up the pixel, go to Data Sources, select Pixels, and on the right, click Add.
Facebook will ask you whether you want to install it manually or using a partner integration.
The partner integration methods are designed to make the process easier without using code, so I’d encourage you to go that route first. Current partners include:
If the partner integration method doesn’t work or you don’t use any of those platforms, this video tutorial on setting up the Facebook pixel manually from Ivan Manna is super helpful.
As part of the pixel setup process, you’ll have to verify your domain and configure your web events (Aggregated Event Measurement). Paid Media Pros offers an easy tutorial video for configuring your web events.
Note that you can always revisit the domain verification process by going to Brand Safety > Domains, and revisit the event setup process by going to Events Manager.
Now click the hamburger menu at the top left (All tools) and select Ads Manager.
On the left, select “Create.”
Facebook offers three categories of campaign objectives: Awareness, Consideration, and Conversion.
In terms of which objective to choose, it will depend on what your offer is and who you’re targeting.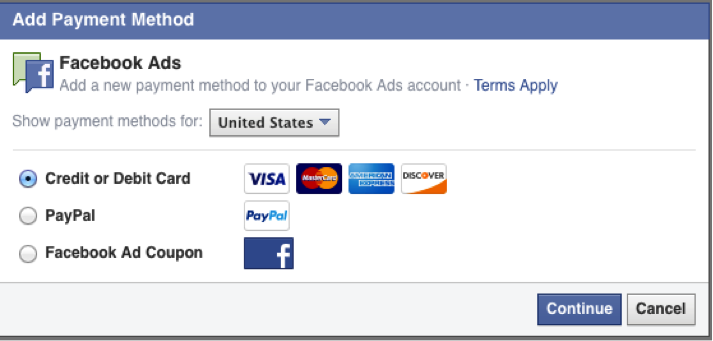 Ultimately, you want to have a full-funnel Facebook ad strategy where you create different campaigns for each stage of your funnel, but for help choosing which objective is best for this particular campaign, this chart may help:
Note that if you choose a conversions campaign, you definitely need to have your pixel set up and web events configured.
Once you select your objective, you’ll see something like this:
Now we’re in the ad set stage. There are more features and settings here too, but here’s what matters.
 ) and Facebook will mix and match them into different combinations. For simplicity’s sake, I will not opt into this setting.
The options here will vary depending on your campaign objective, but here is a quick guide on how to choose:
Here is where you choose a daily budget or lifetime budget. You can learn about daily vs lifetime budgets here, but in general
Choose daily budgets when:
Choose lifetime budgets when:
If you go with a daily budget, it’s best to start with something like $5-$10 a day. If you set it too low, your ad may not compete as well, meaning it will show less and not collect enough data for Facebook to further optimize for the best results. More on that in this list of Facebook advertising mistakes.
You also have the option here to set up your ad scheduling which is fairly easy on Facebook. You can tell Facebook to only run your ads when it makes sense for your business (such as only during your operating hours) or audience (such as only running your breakfast cafe ads in the morning).
In this step, you select exactly who you want to reach with your Facebook ad, which you can define based on:
You can check out our full guide to Facebook ad targeting, but here’s a quick crash course:
Though it has taken a bit of a hit due to privacy changes, Facebook’s targeting is still among the most powerful out there since users provide such detailed information about themselves on this platform—their age, marital status, job, interests, and more.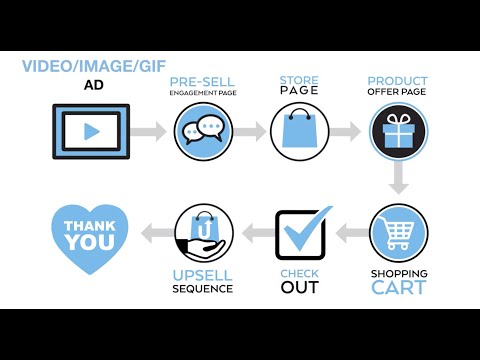 There are three types of audiences you can target in Facebook ads.
 Keep in mind that these are just estimates and aren’t always 100% reliable, so take them with a grain of salt.
Now you’ll choose your placements. Placements refer to where your Facebook ad will appear on the Facebook network. Between mobile and desktop, Instagram and Facebook, there are a number of placements to choose from.
You’ll have two options here: automatic or manual. You may be tempted to manually choose which placements you want, but if you’re just starting out, it’s best to leave it on automatic and let your ad show on every possible placement to start. Then, after a week or two, you can look at which placements are performing best, switch to manual, and optimize your placements from there.
Now the fun part—creating your ad! The possibilities here are endless, but if you need a little inspiration, check out these Facebook ad examples.
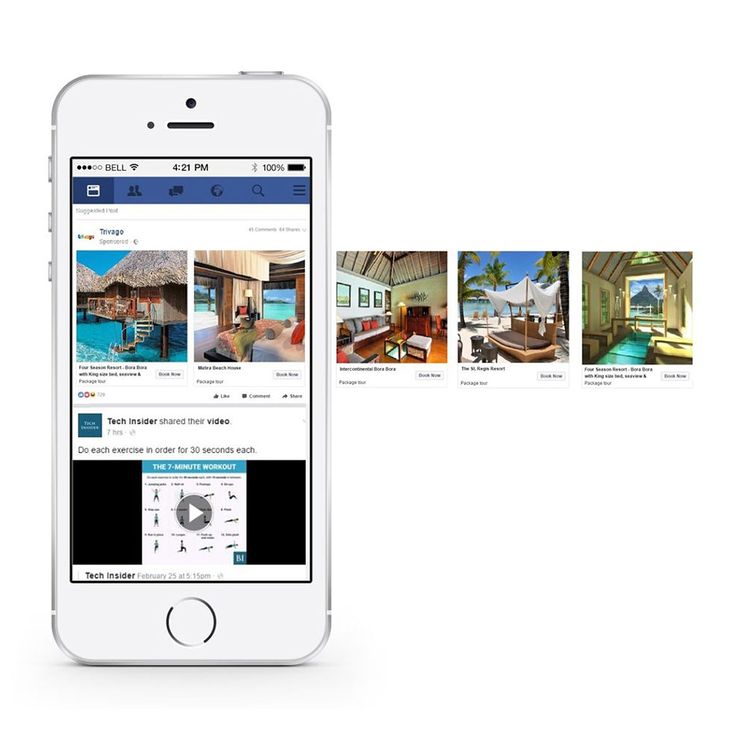
The creative refers to the visual part of your ad, and this should be the focal point of the ad. Facebook supports three ad formats: single image and video ads, carousel ads, and collection ads, and you have three creation options: use an existing post, a Creative hub mockup, or upload your own design.
The choice is entirely yours, and there are all kinds of free tools to design Facebook ads.
Facebook video ad templates in Canva.
Next it’s time for your ad copy, which consists of:
According to a study by AdEspresso, The perfect Facebook ad headline length is five words. In terms of sentiment, split test both positive and negative emotions in your headlines. By using the same targeting, but switching up the ad copy, you’ll be able to see which emotional appeal resonates best with your audience.
For more help with Facebook ad copy, we have a few resources to help you:
Once you enter your ad copy, enter your website URL and choose the call to action that makes the most sense for your offer. You can always A/B test this later!
Last but definitely not least, make sure your website event tracking is set up (if you skipped it from earlier). You’ll have the option to set up app and offline events if applicable, as well as set a unique URL parameter so you can identify visitors to your website from this ad.
That green button on the bottom right of your screen never looked so beautiful. Once you hit publish, an algorithm (and sometimes a person) will review for any Facebook Ad disapprovals, so your ad can take 24 hours (sometimes more) to get approved. Once it’s up and running, your ad will go through a learning period during which Facebook will gather the performance data it needs to optimize who it delivers the ad to and when.
To recap, here is how to run Facebook ads:
Let’s close out with some answers to frequently asked questions so you can truly compete in Facebook ads.
The Facebook ad auction works differently from the Google Ads auction. The key factors involved in determining who wins the Facebook Ads auction include:
These qualities ultimately determine your Facebook cost per click, which goes a long way in determining Facebook metrics that are tied more closely to revenue, like cost per action and cost per lead.
In order to make your ads as relevant as possible, make sure your audience is meticulously crafted, your Facebook ad creative and messaging resonates with said audience, and you’re rotating new ads in and out of your campaign periodically.
Depending on industry, campaign objective, and other factors, the average Facebook cost per click can range anywhere from a quarter to $5. For a deeper dive, refer to our post on Facebook ad costs.
Use our free Facebook Ads Grader to make sure you’re not wasting any spend in your account.
Facebook remarketing (or retargeting) allows you to advertise to users who have already engaged with your business—such as on your website, app, Facebook Page, other Facebook ads, or even offline. You can upload lists of leads or customers to target or the pixel and Conversions API can also help identify these users. You can even layer audiences by combining retargeting with detailed targeting.
However, as pixel data is less reliable due to privacy, retargeting users based on their engagement with your business on Facebook itself is the way to go.
For effective Facebook advertising, your Facebook Ads account structure should resemble a typical marketing funnel, with upper funnel campaigns devoted to prospecting, mid-funnel campaigns devoted to Facebook lookalike audiences and other audiences with mid-tier granularity, and lower-funnel campaigns devoted to highly refined Facebook remarketing audiences.
If you have the volume, you can also add broader Facebook lookalike audiences to your upper-funnel ad sets. And don’t forget to adjust your campaign objective based on the goal of each campaign. Your upper funnel campaigns should be geared toward driving awareness, getting clicks, and swelling your remarketing audiences, while your mid-and-lower-funnel audiences should be geared toward conversions (purchases, form fills, etc.). Head here for more Facebook ad optimization tips.
Running into the snafu in which your Facebook ads aren’t working is one of the most common Facebook ad fails for advertisers. And, as such, it’s nothing to be embarrassed about. It happens to everybody. Some reasons your Facebook ads might not be working:
If your Facebook ads aren’t working for one of these reasons, don’t panic. Use the tips and resources in this article you will be back up and running in no time.
Advertising on Facebook isn’t dead. Despite new players on the social media scene — TikTok, we’re looking at you — knowing how to advertise on Facebook is still an essential skill for most marketers.
Right now, if you advertise on Facebook, your ads can reach 2.17 billion people — in other words, close to 30% of the world’s population. Plus, the platform’s active user base continues to grow.
Sure, these are impressive numbers. But Facebook is all about getting your message in front of the right segment of those people. The users who are most likely to be interested in buying your products or services.
Keep reading to find out everything from how much Facebook ads cost to how to plan your first campaign.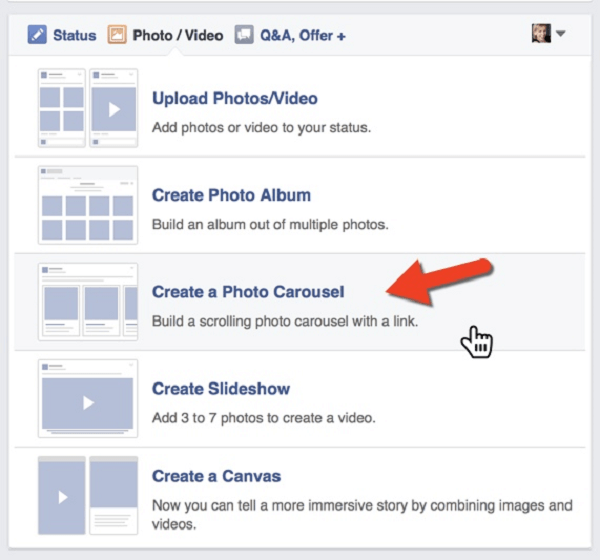
What are Facebook ads?
How much does it cost to advertise on Facebook?
Types of Facebook ads
How to post ads on Facebook
3 tips for posting ads on Facebook
Bonus: Get the Facebook advertising cheat sheet for 2022. The free resource includes key audience insights, recommended ad types, and tips for success.
Psst, if you’re here for the simplest way to post a Facebook ad, watch our video on how to boost posts from your Facebook page:
Facebook ads are paid posts that businesses use to promote their products or services to Facebook users.
Source: Fairfax & Favor on Facebook
Facebook ads are usually targeted to users based on their:
Businesses set an ad budget and bid for each click or thousand impressions the ad receives.
Like Instagram, Facebook ads appear throughout the app, including in users’ feeds, Stories, Messenger, Marketplace, and more. They look similar to normal posts but always include a “sponsored” label to show they’re an ad. Facebook ads include more features than regular posts, like CTA buttons, links, and product catalogs.
To get your brand in front of more users, ads should be a component of any Facebook marketing strategy.
There’s no hard and fast rule when it comes to Facebook ad budgets. The cost of Facebook ads depends on several variable factors, including:
 It usually costs more to put your ads in front of a narrower audience as opposed to a broader one.
Setting the right campaign objective is the most important thing you can do to control Facebook ad costs. Getting this right also increases your chance of success.
Cost-per-click benchmarks vary according to each campaign objective. There are five core campaign objectives to choose from:
Average cost-per-click varies between different Facebook ad campaign objectives. For example, on average, an impressions campaign objective costs $1.85 per click, while a campaign with a conversions objective costs $0.87 per click.
Choosing the right objective for your campaign is key to reaching goals while lowering costs.
Marketers can choose between different Facebook ad types and formats to suit their campaign goals, including:
The wide range of Facebook ad formats means you can choose the best ad type that matches your business goal. Each ad has a different set of CTAs to guide users to the next steps.
Here are each of Facebook’s ad formats explained in more detail:
Image ads are Facebook’s most basic ad format. They let businesses use single images to promote their products, services, or brand. Image ads can be used across different ad types, placements, and aspect ratios.
Image ads are a good fit for campaigns with strong visual content that can be shown in just one image. These images could be made from illustrations, design, or photography.
You can create one with just a few clicks by boosting an existing post with an image from your Facebook Page.
Image ads are simple to make and can successfully display your offering if you use high-quality imagery. They’re suitable for any stage of the sales funnel — whether you want to boost brand awareness or promote a new product launch to increase sales.
Image ads can be limiting — you only have a single image to get your message across. If you need to display multiple products or show how your product works, the single image ad format isn’t the best choice.
Source: BarkBox on Facebook
Pro tip: Pay attention to image ad specs and ratios so your product doesn’t get cut off or stretched.
Just like image ads, video ads on Facebook let businesses use a single video to showcase their products, services, or brand.
They’re especially helpful for product demos, tutorials, and showcasing moving elements.
Video can be up to 240 minutes long, but that doesn’t mean you should use that time! Shorter videos are usually more engaging. Facebook recommends sticking to videos under 15 seconds.
Video ads can add some movement to any user’s feed, like this short and sweet video ad from Taco Bell:
Source: Taco Bell on Facebook
The downside of video ads is that they’re time-consuming to make and can become expensive. A carousel or image ad may be a better fit for simple messages or products not requiring demos.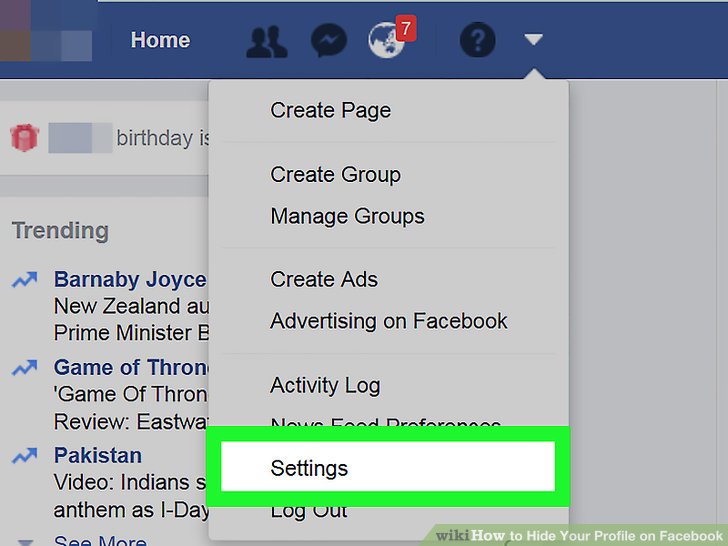
Carousel ads showcase up to ten images or videos that users can click through. Each has its own headline, description, or link.
Carousels are a great choice for displaying a series of different products. Each image in the carousel can even have its own landing page that’s specifically built for that product or service.
This Facebook ad format is also helpful for guiding users through a process or showcasing a series of related products by separating each part across different sections of your carousel.
Source: The Fold London on Facebook
Instant Experience ads, previously known as Canvas Ads, are mobile-only interactive ads that let users engage with your promoted content on Facebook.
Using Instant Experience ads, users can tap through a carousel display of images, shift the screen in different directions, as well as zoom in or out of content.
Facebook suggests using five to seven images and videos in each Instant Experience ad for the best chances of engagement. Premade templates also help you save time and repeat your key theme throughout the ad.
Source: Spruce on Facebook
Collection ads are kind of like immersive carousels — taking the user experience a step up. Collection ads are mobile window-shopping experiences where users can flick through your product lineup. More customizable than Carousels, they’re also full screen. Users can purchase products directly from the Collection ad.
Source: Feroldi’s on Facebook
Businesses can also choose to let Facebook algorithms select which products from your catalog are included for each user.
Collection ads are a great choice for large businesses that sell a variety of products and services. Smaller businesses with a more limited product line may be better suited to other ad types like Carousels.
Lead ads are only available for mobile devices. That’s because they’re specifically designed to make it easy for people to give you their contact information without a lot of typing.
They’re great for collecting newsletter subscriptions, signing someone up for a trial of your product, or allowing people to ask for more information from you. Several automakers have successfully used them to encourage test drives.
Source: Facebook
Slideshow ads are composed of 3-10 images or a single video that plays in a slideshow. These ads are a great alternative to video ads because they use up to five times less data than videos. That makes slideshow ads a top choice for markets where people have slower internet connections.
Slideshow ads are also a great way to get started for people without video-making experience.
Source: Charter College on Facebook
Mobile phones are meant to be held vertically. Stories ads are a mobile-only full-screen vertical video format that allows you to maximize screen real estate without expecting viewers to turn their screens.
Right now, 62% of people in the US say they plan to use Stories even more in the future than they do today.
Stories can be made up of Images, videos, and even carousels.
Here’s an example of a video made into a Story ad:
Source: Waterford on Facebook
Stories provide more creative freedom than regular image or video ads. Businesses can play around with emojis, stickers, filters, video effects, and even augmented reality.
The drawback of Facebook Stories is that they’re not placed in Facebook feeds, so users may not see them as much as other Facebook ad formats.
Facebook Stories also require different formatting than video or image ads, so you may need to create original content just for Stories.
#1 Social Media Tool
Create. Schedule. Publish. Engage. Measure. Win.
Free 30-Day Trial
Messenger ads show up in Facebook’s messenger tab. Since it’s where people spend time chatting with friends and family, Messenger ads feel more personal than scrolling through Image or video ads.
People see your Messenger ads among their conversations and can tap to start a conversation with your brand. These ads are a great way of getting people to interact with your brand. For smaller businesses promoting local products or services, Messenger ads can help start the conversation.
Source: Facebook
If you already have a Facebook business page (and you should), you can head straight to the Ads Manager or Business Manager to create your Facebook ad campaign. If you don’t yet have a business page, you’ll need to create one first.
We’ll follow the steps for Ads Manager in this post. If you’d prefer to use Business Manager, you can get the details in our post on how to use Facebook Business Manager.
Ads Manager is the starting place for running ads on Facebook and Messenger.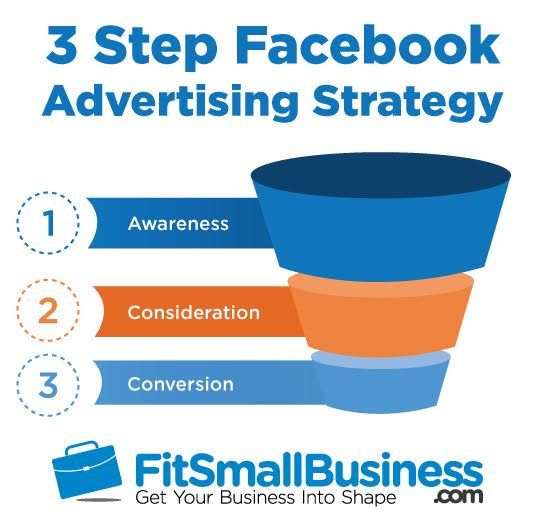 It’s an all-in-one tool suite for creating ads, managing where and when they’ll run, and tracking campaign performance.
Log into Facebook Ads Manager and select the Campaigns tab, then click Create to get started with a new Facebook ad campaign.
Facebook offers 11 marketing objectives based on what you want your ad to accomplish.
Here’s how they align with business goals:

Choose a campaign objective based on your goals for this particular ad. Keep in mind that for conversion-oriented objectives (like sales), you can pay per action, but for exposure objectives (like traffic and views), you will pay for impressions.
For this example, we’ll choose the Engagement objective.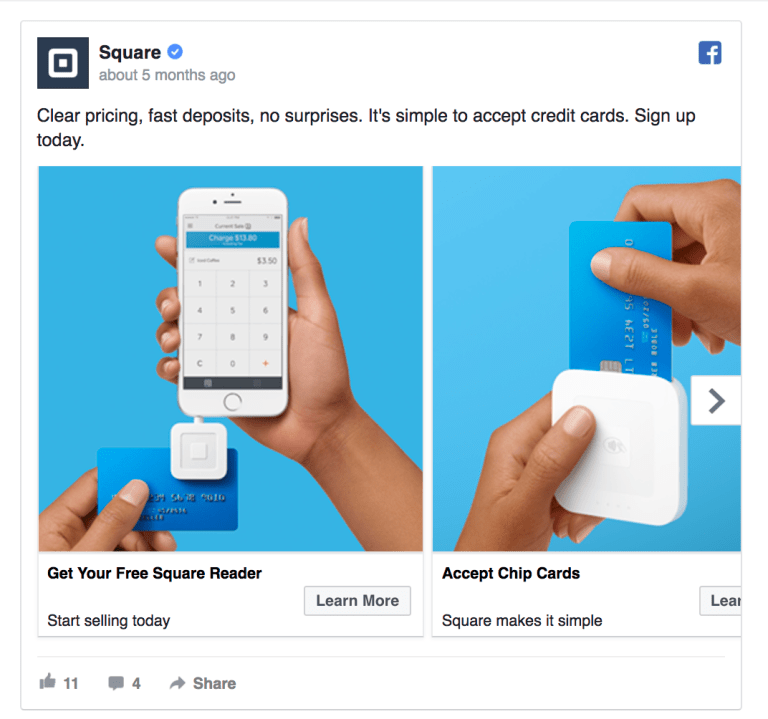 From there, we need to specify which kind of engagement we want.
We’ll choose Page likes for now.
Some of the options you see in the next steps will vary based on which objective you choose.
Click Next.
Name your Facebook ad campaign and declare whether your ad fits into any special categories like credit or politics.
If you want to set up an A/B split test, click Get Started in the A/B Test section to set this ad as your control. You can choose different versions to run against this ad after it’s published.
Scroll down a little further to choose whether to turn on Advantage Campaign Budget+.
This option can be useful if you’re using multiple ad sets, but for now, you can leave it turned off.
Click Next.
At the top of this screen, you will name your ad set and choose which Page to promote.
Next, you decide how much money you want to spend on your Facebook ad campaign. You can choose a daily or lifetime budget. Then, set the start and end dates if you want to schedule your ad in the future or choose to make it live right away.
Running your Facebook paid ads on a schedule may be the most efficient way to spend your budget since you can choose only to serve your ad when your target audience is most likely to be on Facebook. You can only set a schedule if you create a lifetime budget for your ad.
Scroll down to start building the target audience for your ads.
Start by selecting your target location, age, gender and language. Under location, you can even choose to include or exclude cities over a certain size.
You can also prioritize people who’ve recently shown an interest in the product or service you sell.
As you make your selections, keep an eye on the audience size indicator on the right of the screen, which gives you a sense of your potential ad reach.
You’ll also see an estimated number of daily reach and Page likes. These estimates will be more accurate if you have run campaigns before since Facebook will have more data to work with. Always keep in mind that these are estimates, not guarantees.
Now it’s time for the detailed targeting.
Remember: Effective targeting is key to maximizing ROI—and there’s no shortage of ways to target your audience using Facebook Ads Manager.
Use the Detailed Targeting field to specifically include or exclude people based on demographics, interests, and behaviors. You can get really specific here. For instance, you could choose to target people who are interested in both traveling and hiking but exclude people who are interested in backpacking.
Scroll down to choose where your ads will appear. If you’re new to Facebook advertising, the simplest choice is to use Advantage+ Placements.
When you select this option, Facebook will automatically place your ads across Facebook, Instagram, Messenger, and the Audience Network when they are likely to get the best results.
Once you have more experience, you may wish to select Manual Placements. By choosing this option, you get complete control over where your Facebook ads appear. The more placements you select, the more opportunities you’ll have to reach your target audience.
Your options will vary based on your chosen campaign objective, but may include the following:
Scroll down to the Brand Safety section to exclude any types of content that would be inappropriate to appear with your ad. (To learn more about brand safety, check out our complete guide to managing risk on social media ad placements.)
For example, you can choose to avoid sensitive content and add specific block lists. Block lists can exclude specific websites, videos, and publishers.
When you’re happy with all your options, take a last look at the potential Reach and Page Likes estimates.
If you’re happy with what you see, click Next.
First, choose your ad format, then enter the text and media components for your ad. The formats available will vary based on the campaign objective you selected back at the beginning of this process.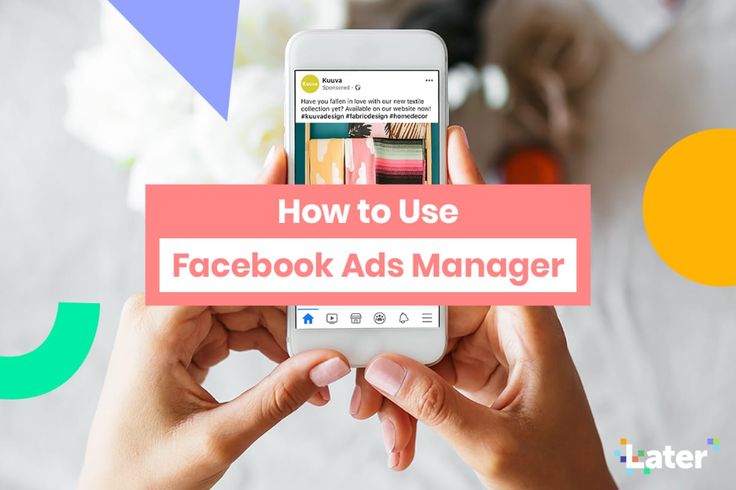
If you’re working with an image, choose your media from your Facebook gallery, and select the right crop to fill your placement.
Use the preview tool at the right of the page to make sure your ad looks good for all potential placements. When you’re happy with your choices, click the green Publish button to launch your ad.
Facebook ad sizes change more frequently than the weather (seriously). So that your Facebook ads aren’t stretched, cropped, or distorted in any other way, you’ll need to make sure your selected images and videos fit the right dimensions.
Here’s a quick breakdown:
Facebook feed videos
Minimum width: 120 px
Minimum height: 120 px
Resolution: at least 1080 x 1080 px
Video ratio: 4:5
Video file size: 4GB max
Minimum video length: 1 second
Maximum video length: 241 minutes
Facebook also has a full list of all aspect ratios and features for videos.
Facebook instant article videos
Resolution: at least 1080 x 1080 px
Video ratio: 9:16 to 16:9
Video file size: 4GB max
Minimum video length: 1 second
Maximum video length: 240 minutes
Facebook Stories ads
Recommended: Highest resolution available (at least 1080 x 1080 px)
Video ratio: 9:16 (1.91 to 9:16 supported)
Video file size: 4GB max
Maximum video length: 2 minutes
Facebook feed images
Resolution: at least 1080 x 1080 pixels
Minimum width: 600 pixels
Minimum height: 600 pixels
Aspect ratio: 1:91 to 1:1
Facebook Instant Article images
Maximum file size: 30 MB
Aspect ratio: 1.91:1 to 1:1
Resolution: at least 1080 x 1080 px
Facebook Marketplace images
Maximum file size: 30 MB
Aspect ratio: 1:1
Resolution: at least 1080 x 1080 px
 Test everything
It’s important not to make assumptions about what will work and what won’t in your Facebook ads.
Every time you try something new, you should test it against your previous ads so you can see whether you’re making improvements to the metrics that matter most to you.
The best practices for Facebook ads are constantly changing. Only you know what works for your specific audience. And the only way you can keep that knowledge up to date is by testing.
Social media marketers are busy people with seemingly never-ending to-do lists. But there are a couple of ways you can simplify your workflow.
Hootsuite Boost lets you promote social media posts directly from your Hootsuite dashboard. Manage audience targeting, campaign spend, and duration. By setting up Automation Triggers, you can let Hootsuite manage which posts to boost when according to your criteria.
Hootsuite Social Advertising helps you streamline your social marketing workflows and maximize your ad spend. You can boost your most popular organic posts to reach more people. Create ad campaigns, track performance, and make adjustments to improve results. Later, generate rich analytics reports to see which campaigns met your goals.
Get the most out of your Facebook advertising budget with Hootsuite. Easily create, manage, and optimize all your Facebook ad campaigns in one place. Try it free today.
Get Started
With files from Christina Newberry.
Easily plan, manage and analyze organic and paid campaigns from one place with Hootsuite Social Advertising. See it in action.
Free Demo
Facebook advertising is a way to promote a brand, goods and services through a multimillion-dollar social network using advanced technologies. Facebook allows you to create catchy and effective ads that you can target your target audience for little money.
According to Statista, eight million companies were actively advertising on Facebook in the first quarter of 2020. Last year, advertising brought the social network 69billion dollars, while all other activities brought in less than $2 billion.
The Facebook team regularly improves its marketing tools to improve the quality of advertising and make it as useful as possible for both the audience and entrepreneurs. Let's find out why Facebook advertising is an effective assistant in attracting new customers and promoting your business.
There are a number of factors that make Facebook an ever-growing advertising platform. The following five are beneficial for both small companies and large businesses:
 This is more than a third of the total population of the planet and their number continues to grow. That's why on Facebook you can easily find your audience and tailor your ads to them.
  Facebook tools help you grow hot leads and convert them into customers.
 Below we will look at two key metrics - CTR and conversion rate - to analyze the performance of Facebook ads.
The average click-through rate for Facebook ads is 0.9%. The lowest CTR for vocational training companies is 0.47%, while the highest for the legal industry and retail is 1.6%. Here is the average CTR by industry from the WordStream report.
The fitness industry has the highest conversion rate at 14.30%, while technology and hospitality companies have the lowest at less than 3%. Compare the conversion rate between other industries in the report below.
Even though the CTR of a Facebook ad doesn't look impressive, it still delivers the desired conversions and money thanks to precise targeting parameters and a large audience.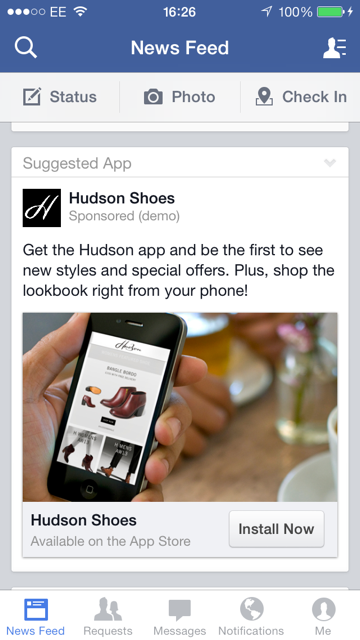
There are two ways to create advertisements:
Facebook Ads Manager is a professional tool that allows you to efficiently target, create audiences, select ad objectives, create ads and ad groups, track performance, and generate reports.
Below you can see what the campaign creation page looks like in Facebook Ads Manager. A navigation bar is displayed on the left, and settings for each element are made on the work field. So step by step you create your advertisement.
Please note that Ads Manager has a number of useful features for professional ad customization and effective budget management. These features include:
Possibility to set the ad display schedule. If your target audience is more active in the morning and evening hours, then you can stop showing your ad, for example, from 12 to 16. 00. This approach saves money.
Create different audience groups. You can create a Custom Audience in Ads Manager if your ad belongs to a custom ad category, Lookalike or Custom.
Suppose you posted a video about a new product on your page, now you can form different audience groups based on the duration of views and then create a relevant ad for each of them. Check out the screenshot below.
A/V testing. With it, you can determine which advertising will be most effective. You can test ad creative, audience, placement. A/B testing on Facebook allows you to measure the results of changes in advertising or quickly compare two strategies to achieve your goals.
And that's not all the benefits of setting up ads through Facebook Ads Manager. It takes time and practice to understand all the subtleties. However, it is not as difficult as it might seem at first. In this case, the main thing is desire, patience and attentiveness.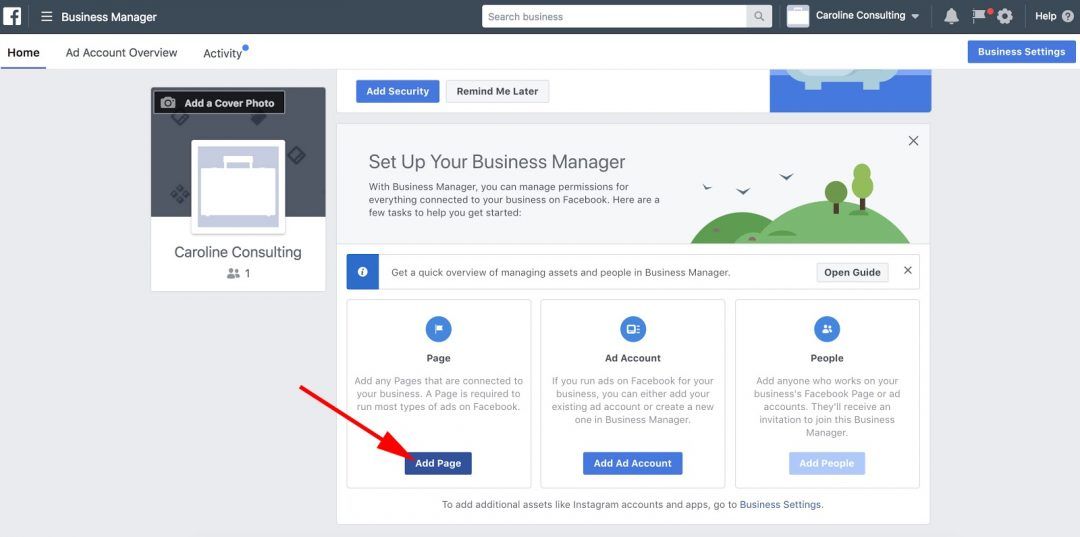
And if you want to try running ads today and are not ready to spend time studying your ad account right now, use the Ad Center right on your Facebook page.
You can read more about the differences between the two tools in the Help Center. However, in a nutshell, the Advertising Center is an easier way to promote your company, products, and services. With it, you can promote posts or the page itself, drive people to your site, and create other types of ads.
Now, let's see how to create advertisements directly from your Facebook page. Follow the step by step guide below to set up your first campaign.
Open your Facebook page and in the menu on the left click on the "Ad Center" tab, then on the right click on the blue "Create Ad" button. After that, a page with goals will appear in front of you.
Another way to open the goals page is on your main page in the menu on the left, just click on the blue "Promote" button.
Campaign goal determines which types of Facebook ads you can create. They may differ for different pages. For example, for our Big Box page, only 5 goals are available so far:

For clarity, let's choose the goal "Promote Page".
After selecting a goal, you will be taken to the Ad Creatives setup page. Write the text of the ad or leave the one that will be specified by default. In our example, this is "Contact the Big Box Page".
Then select the appropriate ad format. There are 4 of them in total:
Available ad formats depend on the target selected in the previous step. We chose "Promote Your Page", so the carousel format is not available to us. In order for ads to be the most effective for each type of ad, Facebook offers specific creative formats. In this case, you can upload an image or video. To do this, click on the download button as shown below.
Facebook provides the most accurate targeting options. First, you can target based on location by country, city, or mileage to reach local users. Secondly, you can choose gender, language, interests, behavior and more. More precise targeting options, such as excluding certain user groups, are available in Ads Manager.
To create an audience for an advertising campaign from your page, you need to scroll down a little and click on the "New" button in the "Audience" section. After that, you should give the audience a name, then choose the gender, age, location, interests and behavior of potential customers. We narrowed down our audience to women in their 20s and 30s from Kyiv who are interested in fitness and a healthy lifestyle. As you can see, our potential audience is 370 thousand people.
You can also select "People Near You". This will allow you to attract an audience within a radius of one or more kilometers from a certain point. An interactive map will help you determine the specific location of your target audience.
To expand your audience, you can use Lookalike Audience. To do this, you need to configure the Facebook pixel. Then, based on your existing audience, the social network will select similar users, which will help increase the number of leads.
Once you've specified your target audience, set the number of days to show ads and the amount you're willing to spend. You can select "Show this ad continuously" or "Choose an end date".
When defining the budget, note that you are setting a daily spending limit. That is, if you run an ad for four days and specify the amount of $3, then the cost of the advertising campaign will be $12.
Facebook allows you to pay for services via PayPal or a bank card. If the social network previously provided you with an advertising coupon, you can mark it and then enter the coupon code.
To verify a bank card, Facebook will ask you to deduct up to one dollar from it. After linking the card, the money will go back to your account.
The following shows how to select a payment country and currency, and add a payment method.
Now that the ad is set up and the payment method is selected, check all the details and click the "Promote" button.
To see the performance of an ad, go to your Ad Center page and click View Results next to the ad you want to see. Next, you'll see reach, engagement, and reactions.
You can also see the breakdown of the audience by age and analyze the effectiveness of advertising depending on the placement.
To track campaign performance in more detail, use Facebook Ads Manager. In it, you can use filters to narrow down the amount of data in your reports and more effectively target and define target audiences.
Detailed reports help analyze the effectiveness of advertising campaigns and see if advertising costs for interaction with a particular category of users pay off. Tracking results is important to narrow your audience and exclude “non-target” customers to cut costs. Or vice versa, to identify users and ad placements that need to spend more money to get the desired profit.
The price depends on several factors:

Let's look at another WordStream report to see the average CPC for different industries. It states that the highest CPC for an ad is $3.77 for the finance and insurance industries, while the lowest CPC for the apparel and fitness industries is $0.45 and $0.70, respectively. You can compare CPC across industries in the report below.
Look at AdEspresso's detailed report to get an idea of Facebook ad pricing.
To increase the effectiveness of Facebook advertising campaigns, you can use them to attract users to Facebook Messenger. And in the messenger, using a chatbot, answer frequently asked questions, talk about products or services, and move leads down the sales funnel.
A chatbot is a technology that works according to a pre-planned scenario and helps to unload the support service, segment leads, take orders, sell and perform other assigned tasks.
SendPulse allows you to create up to three chatbots for free. Add a virtual assistant to your online marketing strategy and see how effective it is.
Now, let's compare two tech giants who are making the most of online advertising.
The two companies are often seen as rivals. Yes, they both dominate the online advertising industry, but offer advertisers different opportunities.
Google primarily focuses on search engine advertising, which is extremely effective due to the nature of today's shopping. At any stage of the sales funnel, people use search engines to find solutions, products, services, compare different stores, prices, and more. In addition, Google AdSense links advertisers to relevant sites that receive a high volume of traffic so that site visitors see relevant ads based on their preferences and behavior.
Unlike Google, Facebook is a social network, so the platform's advertising activities focus on collecting and using user behavioral data on Facebook. What Facebook and Google have in common, and sometimes make them look like competitors, is the sheer scale of their operations and their tendency to monopolize the online advertising market.
Here are some helpful tips to help you improve your Facebook ad campaigns.
Remember that Facebook advertising will only work if you do it right. Use the guidelines below to run quality ad campaigns.
 Remember, most users hold their phones vertically while browsing the news feed.
 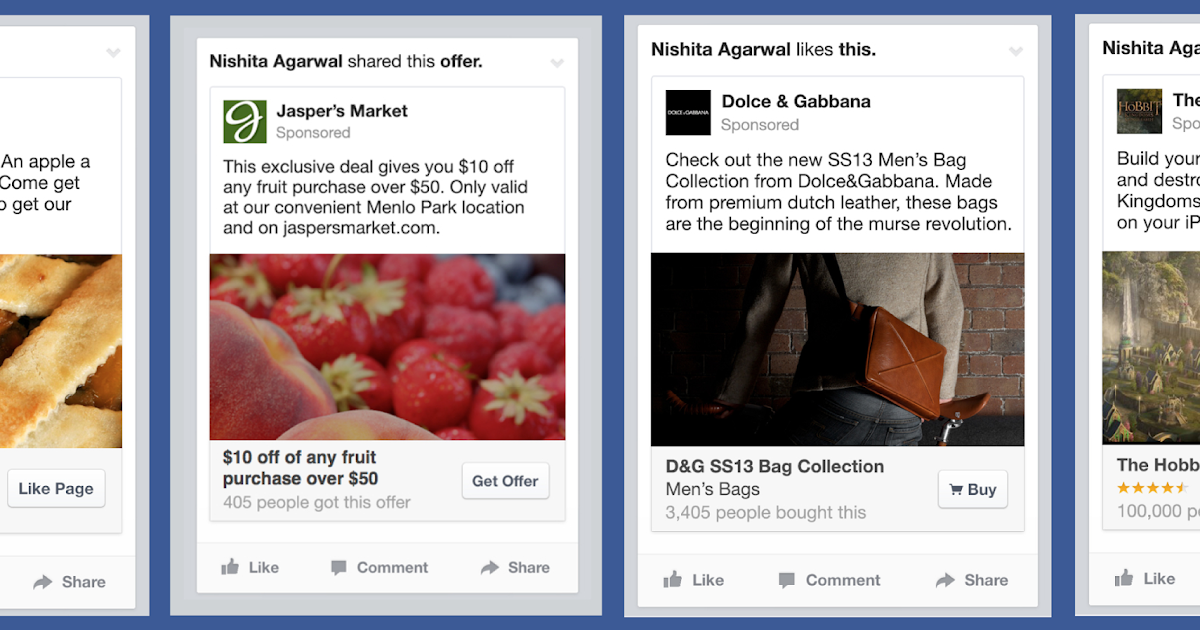 Facebook offers different CTA buttons to encourage users to interact with ads. Think about what you expect from users and choose the right CTA. This can be a transition to the site, filling out the registration form or correspondence in the messenger.
 You are now ready to create your first Facebook ad campaign. We wish you success in promoting and attracting customers!
Updated: 03/27/2023
Contents
 1 Campaign Level
 In this article, we will not only take a detailed look at the process of setting up Facebook ads from the technical side, but also analyze how this knowledge can be applied to create acquisition and retention campaigns. Let's take a look at Facebook Ads Manager first.
Ads Manager is a free tool from Facebook with which you can create and manage ads and measure the effectiveness of their results.
In the advertising account you can create, view and edit advertising campaigns, ad groups and ads. You can use Ads Manager on both desktop and mobile devices. Please note that not all ad objectives and features are available when creating campaigns on mobile devices.
You can promote posts using the "Promote Post" button below the posts on the business page, but you will have less targeting options if you do so. We recommend launching and maintaining advertising campaigns using the advertising account in the desktop version.
You can access Facebook Ads Manager using one of 3 methods:

Advertising campaigns can be run from a personal account. Thus, you can create only one advertising account and, accordingly, only one Facebook Pixel. To create more than one account and more flexible management of all pixels, pages, applications, we recommend using Facebook Business Manager.
Facebook Business Manager is a tool for managing all Facebook resources and sharing them with other users. In Business Manager, you can manage apps, pages, and ad accounts. You also have the ability to upload product catalogs, create posts, add payment methods, and more. For efficient management of all projects, you can create multiple cabinets.
Find out more: Facebook Business Manager: full overview of features and capabilities
If you are creating an ad on Facebook for the first time, you will also create an ad account.
To create it, you will need to specify its name, the company that will control it, time zone, payment method and currency.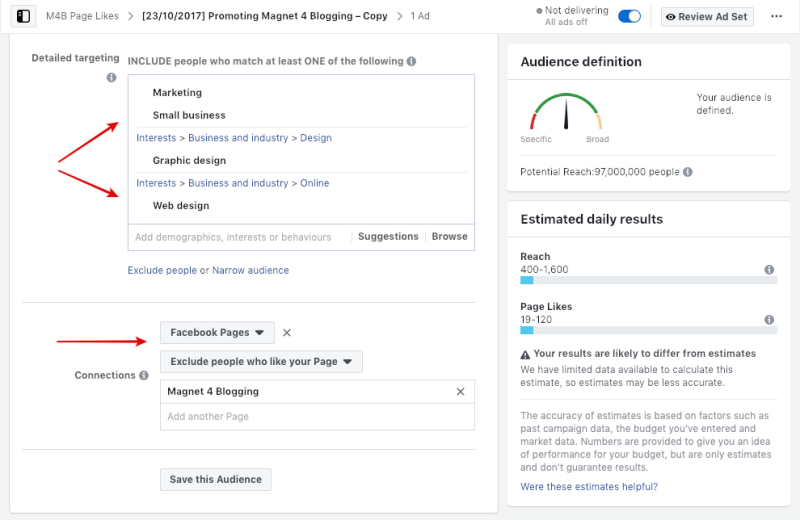
Account currency is the currency used in the ad account for billing. Facebook writes that it regularly adds new payment methods. The Ukrainian hryvnia is not yet available, but the supported currencies are the Russian ruble, euro and US dollar. Once every 60 days, you can change the currency to pay for ads on Facebook, provided that you do not have a current balance. But when you change the currency, you will have a new advertising account created. In some countries (such as Brazil, Nigeria, and Venezuela), the ad account's company country must match the currency.
By creating an ad account in Business Manager, you'll have your campaigns, ads, and billing information all in one place. You can also share it with other people so they can manage your ads.
To prevent your advertising account from being blocked by the Facebook administration, it is enough to follow the advertising rules, which you can read here.
Now let's take a closer look at the functionality of the advertising account.
1. Top navigation bar
Here you will find sections such as "Audiences" and "Analytics", you can set up reporting and set automatic rules, edit settings and much more.
2. Search and filters
The search will help you find the campaigns, groups or ads you need, and the filter will leave those campaigns that you plan to analyze using specific metrics: the names and goals of advertising campaigns, gender and geography of the audience, recent changes etc.
3. Button to create an advertising campaign
With this button you will start the process of creating a new advertising campaign, which we will describe in detail in the next section.
4. Ad account overview
Here you will find general information about your ad account, such as: reach or amount spent on all ads created, a detailed breakdown of the amount you spent on ads in the last 7 days, and any spending limits that you have set for the account.
5. Overview of advertising campaigns
In this tab, you can create and manage advertising campaigns: duplicate and edit existing campaigns, set up columns, and split the results according to the required metrics.
6. Overview of ad groups
Here you can create new ad groups within an existing campaign, edit, duplicate and view results.
7. Overview of ads
In this tab you can create new ads within an existing group, edit, duplicate ads, view their results.
8. Columns
Select one of the columns with the metrics you need or customize them yourself.
9. Campaign Breakdown
Here you can break down existing campaigns based on factors such as age, gender or placement.
10. Date Range
With this feature, you can set a specific date range so that advertisements are shown only for a certain period of time.
11. Campaign results
Here you will see the results of your active and inactive campaigns according to the selected columns.
Reports
Create standard or custom reports, export performance data as Excel or CSV files, and share reports with users who work with your ad account. You can also filter out those campaigns that you want to pay special attention to. If you need to send them to colleagues or a client, you can create a shortened link.
As we mentioned in the first section, you can start creating an ad campaign in Ads Manager using the "Create" button.
At the campaign level, you can name the campaign, define the budget, purchase type and select the advertising objective. Let's take a closer look at target selection.
The first step is to select a target. It is chosen according to your tasks - what you want to achieve. Choosing the right target will help you get the most effective results.
What are the goals?
The target list is subject to change. If you have a new ad account or use its functionality infrequently, you may have fewer options. With its active use and taking into account many other aspects, you will probably be the first to receive all updates to the advertising account.
The goal you choose is also your way of optimizing. If you select the "Traffic" goal, the algorithm is optimized for those users who are more likely to click on the site, if "Application Installs" - for those who are more likely to download the application.
A little test of practical understanding: Let's say you've posted a blog post and published it on your business page. You want to promote it to increase the reading of the article.
What advertising goal will you choose?
If you choose Engagement, you will get interactions: ads will be optimized for those who like, share, comment, and make any other interactions. This means that if 9 out of 10 interactions are likes, then with this chosen goal, you will get a lot of likes for the article, but not transitions to the site.
If you want to get readers, then you should stop at the "Traffic" goal. In this case, the algorithm will be optimized for those users who click on the article.
If you want blog subscribers, for example, then your goal is Conversion. It will allow you to optimize impressions for those who subscribe to your blog. To do this, you need to use Facebook Pixel. About what a pixel is and why you need it, read our article.
⇨ The target is selected for optimization, but it is important to understand what you need to optimize for.
Another situation is also possible - adjacent goals with the same result.
For example, your task is to get leads. These can be collected through goals such as Lead Generation and Conversion. What to choose in this case? Let's simulate:
First, let's look at the cost per conversion:
↳ Lead Generation goal — $1. Goal "Conversion" - $3.
In this case, it is logical to choose the Lead Generation goal.
Next, we proceed to the analysis of the validity of leads:
↳ "Lead generation" - 10%, a valid lead will be $10.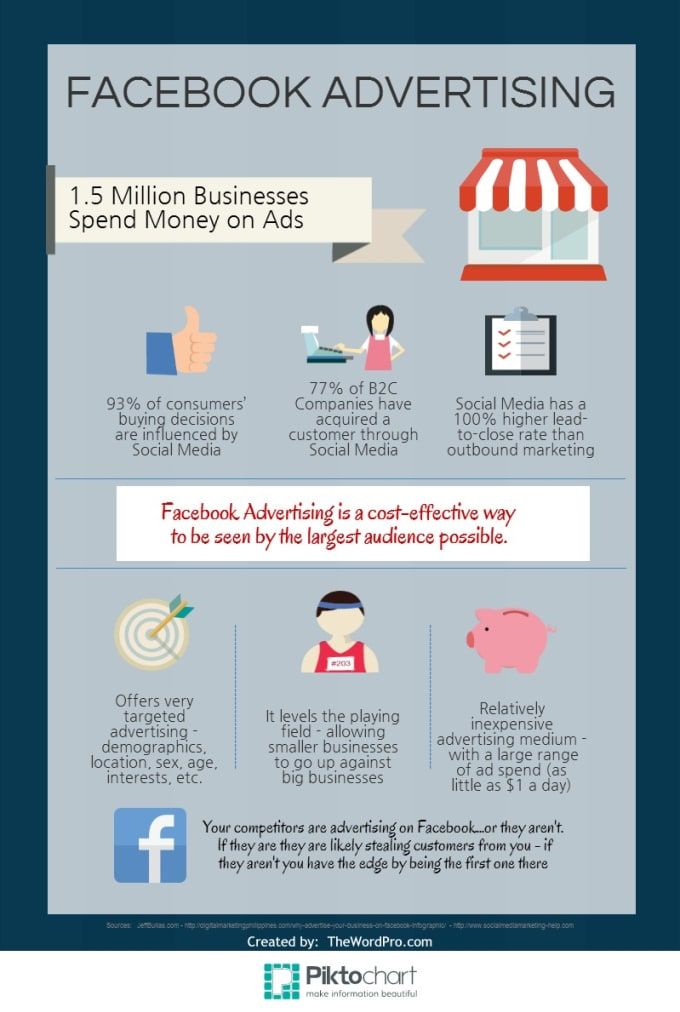 The “Conversion” goal is 50%, a valid lead will be $6.
Lead Generation loses in cost per valid lead.
But the analysis does not stop there, if you control the unit economy and end-to-end analytics.
The average check for valid leads through the Lead Generation objective, for example, may be higher, but CLV lower. Then, if we measure the average check and we have a one-time purchase, then perhaps the goal of "Lead Generation" can be more cost-effective. In any case, measure everything in terms of money.
If you're measuring results by taking into account the total amount of revenue for a customer, then you should stick with the Conversions goal.
⇨ The main point of your campaigns is profitability. Therefore, it is important to test the goals and see the results for different metrics.
Budget is the amount of money you will spend showing ads to people. It is also a price control tool.
By setting the budget at the campaign level, the system spends it automatically on the best results among all ad groups within the campaign.
But the best results for the system may not necessarily be the best for you. Let's imagine that you have created several personas, and the results in groups of some persons are more expensive than the results in others. In this case, the system will spend the budget on the group with cheaper results. But after analyzing the groups, you can see that the cheaper groups have much lower CLVs. To manage this, set a budget at the ad group level.
For example, select the "Conversions" goal at the campaign level and start creating an ad group and give it a name. Next, select the place where you want to drive traffic - website, application, Messenger or WhatsApp. Having determined the required entry point, the system will request clarification. For example, if you select "Website", the system will ask you to select a Pixel with events to track and optimize for conversions.
Next, Facebook suggests creating dynamic creatives or offers.
You just need to upload images, headlines and other creatives, and the system will automatically create combinations, selecting several components (for example, images, videos, headlines, descriptions, etc.) for a given audience. You can read more about them here.
Offers are discounts that you offer Facebook users to encourage them to make a purchase online and/or offline. When a person sees your offer in the feed, a person can not only like it and leave a comment, but also save it in the Offers tab. Facebook will remind the person of the saved offer up to three times, depending on their personal notification settings.
Here you define how much you want to spend and set the period for which the ad will be displayed. The budget can be set daily or immediately for the entire duration of the advertising campaign. If you select "daily budget" your bid can be correlated throughout the week, and if you select "lifetime budget" - throughout the entire period.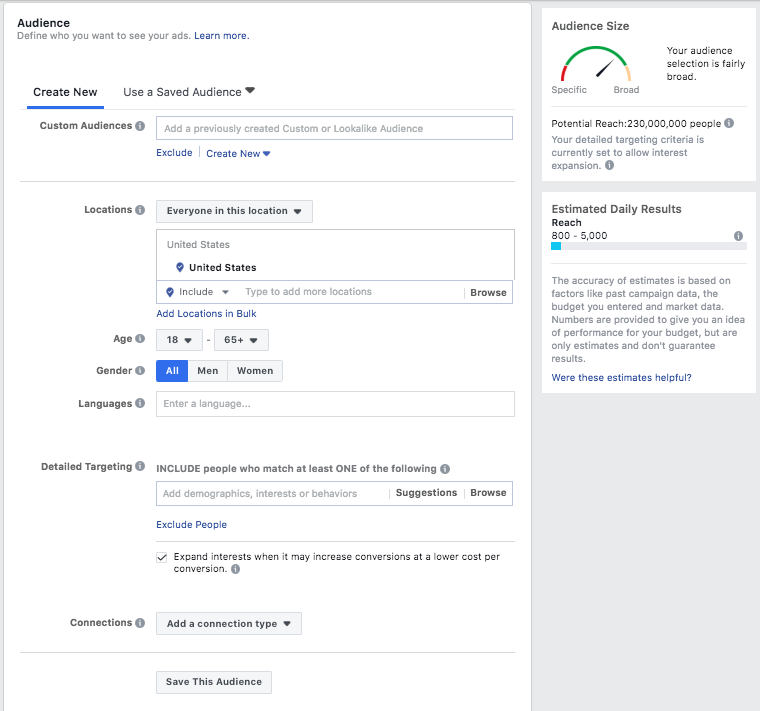 You can also set an end date for your campaign, which will be disabled automatically.
Next, we proceed to the choice of the target audience: create a new one or use the saved one.
When you create a new audience, you include or exclude the collected audience lists for retargeting or look-alike audiences.
You can also specify socio-demographic (social) targeting:
When creating multiple ad groups and using detailed targeting in them, audience saturation is possible. This issue can occur if you are targeting with different conditions by including and don't use exclusions. For example, the same user can simultaneously be included in an interest group and in a group who visited the site. How to prevent the problem of audience attrition in advance, read our article “Audience satiety: How to avoid early and correct it in time”.
You have the option to include, exclude, or target friends of users who follow your business page or use your mobile app. You can also include or exclude people who checked in to the event.
Placements include 2 categories: device types and platforms.
In device types, you can select desktop and/or phone to select the devices on which ads will be displayed. On the platforms, you define the ad zone (location) where your ad will be shown - on Facebook, Instagram, Audience Network or Messenger. When editing placements, you can select not only certain devices and platforms, but also configure additional settings.
Platforms and device types can be separated into different ad groups for content customization and testing. But we recommend combining them for more efficient optimization. However, it is important to see how ads will look on all devices beforehand at the ad level.
Next, let's move on to choosing the option to optimize ad display. It will help the system understand how to deliver your ad. If you select "Conversions", the algorithm will select the audience that is more likely to make the specified conversion on the website. Delivery options depend on which advertising objective you are using.
When creating a Facebook ad campaign with the Conversions ad objective, you can choose the following types of bids to optimize: your ads with different intensity to all users from your targeting. "Impressions" - with a frequency of up to 4 per day, "Daily reach among unique users" - up to 1 per day.

One of the important steps in setting up an advertising campaign is choosing a bid strategy.
In order for the right audience to see your ad, you must win an auction with other advertisers. In the Facebook auction, the ad with the highest "total value" wins. The total value is not the amount you are willing to pay to display your ads. When determining this indicator, 3 factors are taken into account:
Rate is how much you are willing to spend. It controls the cost per result in case the auction wins and the impression is completed.
There are 2 bid strategies: Low Price and Target Price. Read more about them in our article How to Choose a Facebook Bid Strategy.
This parameter determines the speed of your ad impressions. You can use standard mode or set up accelerated impressions to get results faster. In the second case, your bid will be raised in order to get a higher place in the auction and get more impressions.
Let's start creating an ad creative.
First you need to choose from which page the advertisement will be shown. If you have specified Instagram as one of the placements, you must also specify the desired account here.
Facebook offers several ad formats to choose from. Choose the appropriate format depending on the purpose of promotion and content.
Upload your own photos or use stock. On the right, you can find the image parameters recommended by the social network for the best selection of pictures. You can create up to 6 ads at the same time. You can find all the recommendations from Facebook on creating creatives in the "Creative Center" section.
All ad settings occur on the left side of the page. On the right is a preview of your creative in different placements.
Next, you fill in the required fields: title, text, link to the site, call to action, etc.
When the ad is ready, click the "Confirm" button and your advertising campaign will be sent for moderation.
It is important to remember that the effectiveness of an advertising campaign is determined by the communication in your creatives - the settings only correlate the cost per result. The target audience makes decisions according to what they see in the advertisement.
We have analyzed the creation and setup of an advertising campaign from A to Z. But how to apply this knowledge correctly and get effective results?
If you have a website or mobile app, before launching an acquisition campaign, start by setting up a retargeting campaign.
For this you need:
Why start with retargeting? While you are setting up an advertising campaign for a cold audience, you will be able to start communicating with existing traffic.
Retention (retargeting campaigns) is a system promotion. And its task is to reach all relevant users/visitors and lead them to the final goal. At the same time, each stage of the funnel needs to be improved by increasing the Conversion Rate. In the case of acquisition campaigns, it is important to test in order to find the most profitable cost for achieving the goal.
If you are sure that your audience is of high quality, then the percentage of the target audience tends to 100. In this case, you do not need to worry about the type of delivery and optimization of the advertising campaign. In this case, the goal is to reach everyone. Choose the Reach objective to reach everyone in your sample and get a lower CPM.
If someone has already worked with the sample before you and you are not sure about its quality, then stop at the “Traffic” goal and optimize for clicks to reach only those who are more likely to want to receive your offer.
If the audience is of poor quality, then select the "Conversions" goal and optimize for conversions. You will lose volume, but at the same time you will not spend money on inappropriate impressions.
To be sure that you have chosen the right goal, we recommend testing and analyzing the results. The selection of an advertising goal for retargeting is the search for the ratio of the optimal price per result to the number of results received.
If you're getting sales for, say, $10 per unit for the "Conversions" ad objective, but your KPI is $15, try switching to the "Traffic" ad objective. The cost per result will likely fall while still being within the KPIs, but sales volumes may rise as more people see your ad.
If you don't plan on active promotion, it's definitely worth launching retargeting campaigns. This will help you reach the entire loyal audience and lead the funnel to the result for a penny. Most of the spending is always on acquisition campaigns. If you don't have enough budget, run only retargeting campaigns.
Planning and implementing acquisition campaigns is completely different from retention campaigns.
The first stage is testing. Persons are created, a number of messages for each of them, a list of target groups, and saved audiences (targeting combinations) are loaded. Additionally, saved audiences are created based on data, and not only on portraits of the target audience (lookalike audiences from the base, lookalike audiences from events, etc.).
When testing is in progress, you need to move on to stabilizing the results and optimizing them. How to do this, we described in detail in the guide “Optimizing and scaling Facebook advertising campaigns”.
With the help of this article you will be able to create and set up an advertising campaign without any experience with Facebook Ads Manager. In the process of improving your skills, you will understand how you can manage the settings to get more effective results from communication with the audience.
Important points we would like to recap: