The days of Instagram having only a few photo filter options are long gone.
Using the latest features and filters, Instagram stories can now be enhanced in various ways. You can use existing filters by selecting one of the pre-loaded camera settings. It is also simple to locate and download additional filters for your camera.
Some of these filters are a lot of fun to use. For instance, did you have a childhood dream of featuring in a Disney movie? It is now possible to at least see how you would look in such films through the cartoon filter on Instagram.
Thanks to the magic and technology created by Instagram, you can now make your childhood dream a reality.
Table of Contents
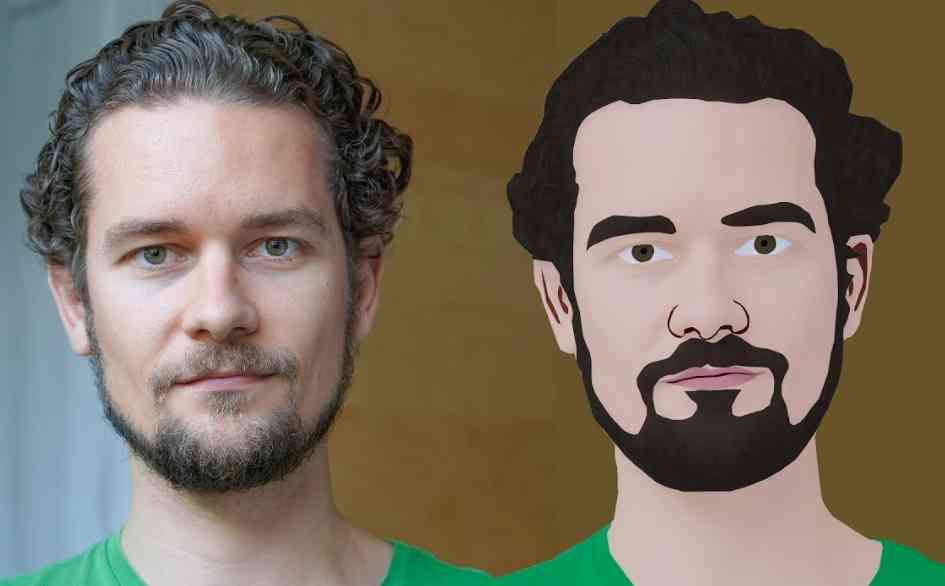
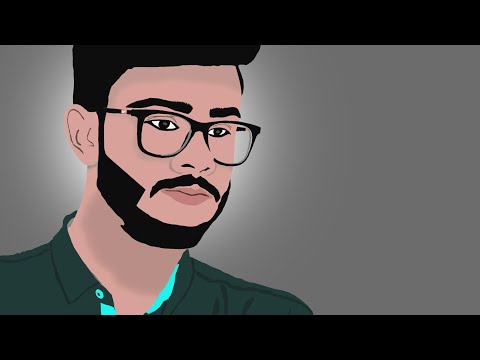
The Cartoon filter on Instagram was launched in August 2020, followed by another 3D filter named Cartoon. The latter was more advanced since it monitors your entire face, much as in a Pixar film.
It was soon followed by a third Instagram filter, Cartoon 3D Style. With its face-tracking capabilities, this one is much better. It just transforms you into a Pixar character and allows you to see how you would appear and move if you were one.
With this Cartoon 3D Style lens filter, we can see our faces as if they are featuring in an animated film.
Instagram has released another Cartoon Face filter, which turns our selfies into Disney characters. This Instagram filter’s most exciting feature is that it transforms you into a Disney princess or prince, complete with huge eyes.
If you are willing to try this cartoon filter on Instagram out, here’s what you need to do.
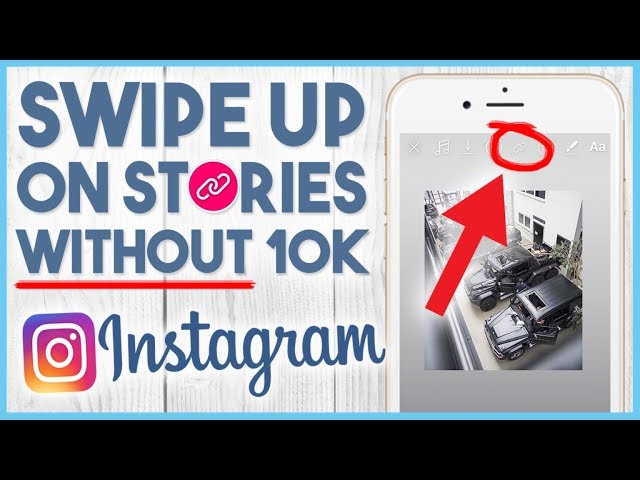
Sign in to your Instagram account and swipe left on your newsfeed to activate your camera.
Swipe left on the menu bar on the camera screen until you see the option for “Browse Effects”, represented by a magnifying glass.
Select from the most popular filters, or explore and select categories at the top. Alternatively, you can search for filters using the search bar at the top.
You will see a button titled “Try It” on the bottom left, which you may click to check how this filter looks on your face.
Click on the bookmark icon if you want to save it.
If you go to your stories now and go through the effects, you should find the Cartoon Face filter, which you may apply at any time.
Instagram constantly introduces new improvements and features to keep users engaged and ensure they don’t switch to other social media platforms. One of the simplest ways to do so is with new, distinctive filters.
Recently, it introduced the Disney-style 3D filter or the cartoon filter. The cartoon filter on Instagram turns a user’s face into a cartoon version as if they were in a Disney movie. It is immensely popular among app users.
This article walks you through how to get this filter on your Instagram.
To get started, open Snapchat and go to the Filters tab. After that, go to Explore and type cartoon into the search box. Rather than using the one named Cartoon face, use the one titled Cartoon. Click a picture using the filter and send a snap to your friends!
There are various photo editing software for iOS and android that use AI to turn your photographs into Renaissance paintings, Pixar-inspired cartoons, etc. You can use apps like Voila AI Artist, Prequel, and Toon Me to enjoy these effects and filters.
Culture
By Jenny Desborough
Culture Snapchat Instagram Pixar Disney
A new trend which has been taking over Snapchat, TikTok and Instagram is turning selfies into Disney Pixar caricatures.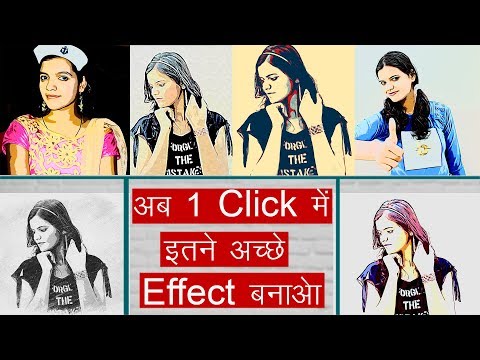 The app which allows fans to do this has been around for quite a while, but Snapchat's recent addition to their lenses has proven hugely popular.
Since its launch one week ago, over 215 million Snapchat users have engaged with the new Cartoon 3D Style lens, and the lens has been viewed more than 1.7 billion times.
It is pretty simple to get this filter working on social media, whether it is using the Voila AI Artist app or just your favourite platform.
In the case of Snapchat, the lens is really simple to use as it exists on the app itself.
The first thing to point out is that technically, for the Snapchat version, this is not known as a filter, but a lens.
There are three cartoon lenses on Snapchat, each of which give you a cartoon face, though slightly differently.
The most recent release, Cartoon 3D Style, was released in June 2021 and has a more Pixar-like look to it, and you can choose your cartoon gender.
The key difference with Snapchat's lens compared to the Voila app is that it can change your face in real time, meaning you can make movies as a cartoon which will move with you.
You can download the movies and images created using the Snapchat lens, meaning you can share your Pixar-style movie on Instagram or TikTok as well.
To open the lens, Snapchat users can go to the camera screen and click the smiling face icon to the right of the camera button.
A search bar will appear in the bottom right corner of the screen, in which, if you type cartoon, the lenses will appear.
Choose the Cartoon 3D Style lens and select, and either use it for images or movies to share or download.
For Instagram and TikTok users who do not have Snapchat, Voila AI Artist may be the way to go.
The free app is very easy to use, is available on iOS and Android, and manipulates selfies rather than making things in real time.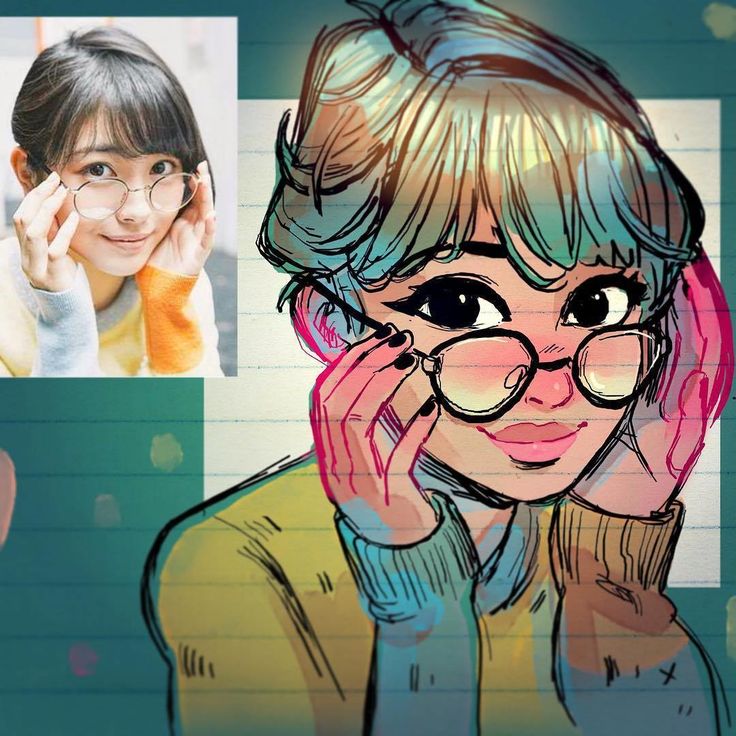
There are other modes than just the 3D cartoon, which has become the most popular for its Disney Pixar look.
Snapchat's Cartoon 3D style lens in action. Snapchat users can use the lens to turn selfies into Disney Pixar characters, and use the lens in real time for movies. SnapchatFans can also change their selfies to look like a Renaissance painting, caricatures and 2D cartoons.
Within the 3D Cartoon filter are also subfilters: Royalty 3D, Baby 3D and Cartoon 3D, the latter of which is the Disney Pixar face.
You can combine the filters to make a collage, and even upload celebrity photos so you can compare your Disney Princess look with someone famous.
The images are easily downloadable, and fans can share them to Facebook, Instagram, Whatsapp, or save them onto their device.
After downloading and opening the app, select the 3D Cartoon mode, after which you can choose to take or select your own photo, or search for a celebrity photo.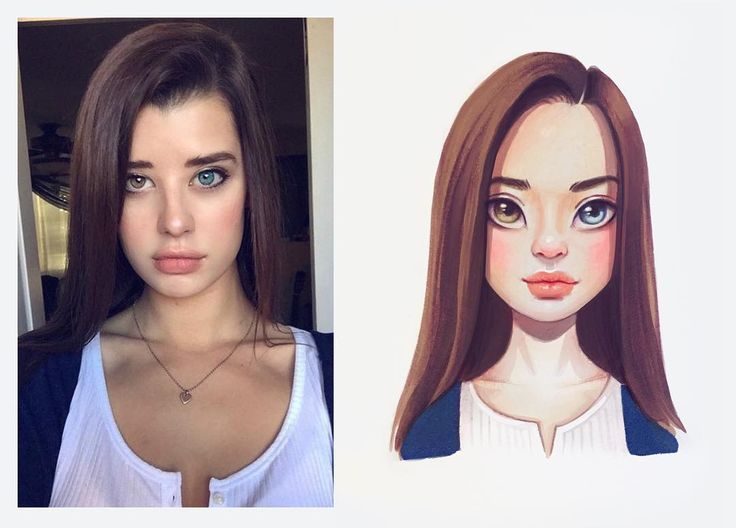
Once you have taken or selected your photo, Voila will render the image and show a grid with the original photo, plus the three filtered ones in Royalty, Baby and Cartoon 3D filters.
Select the photo you like and click the share button in the corner to save it, or choose to share on social media.
An image of Kim Kardashian at Paris Fashion Week in March 2020, edited using the Voila AI Artist app. The collage shows Kim as herself, and as three cartoon versions including Royalty 3D, Cartoon 3D and Baby 3D. Pierre Suu/Voila AI Artist/GettyRequest Reprint & Licensing, Submit Correction or view Editorial Guidelines
In 2019, Facebook opened the tools for creating AR masks to a wide range of users. During this time, masks have evolved from a unique content format to a completely mundane one. Most of the big brands have already released their masks, games and filters, but the tool itself is still rare in the Instagram accounts of small companies. We at TexTerra believe that this is wrong: masks can not only diversify the page on the social network, but also become another marketing channel and additional advertising.
This article will show you how to make a simple Instagram mask using the official Spark AR tool. The guide will be useful not only for SMM specialists, but also for company owners: you will see what the cost is and how difficult it is to make certain types of masks.
But first, let's start with the theory: what are masks, why they are needed and how brands use them in practice.
The term AR means "augmented reality" and, unlike VR (virtual reality), there are different principles: various three-dimensional objects and filters are superimposed on the image from the lens of a smartphone, tablet or laptop. Below we will analyze the most popular mask formats on Instagram based on the tools that SparkAR provides.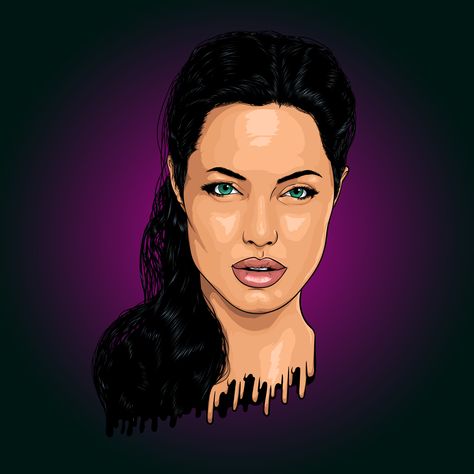
They apply various effects to the image from the camera lens. This can range from minor adjustments in warmth or contrast to unexpected color inversions. They work through the Canvas tool in SparkAR.
These masks even out the skin or apply various effects: correct lips, eyes, eyebrows. Here we are working with the face tracker, textures and materials.
If the masks above are more about design and art, then AR games will require writing JavaScript code to create logic scripts. You can use manually created 2D and 3D objects from external editors, or use the SparkAR database with free templates.
Unlike all the masks above, these are used to add objects to the environment: this requires the Plane tool, which allows you to attach an object to flat surfaces or bind them to QR codes. For their work, you do not need to read facial expressions.
Unlike beauty masks, where the face tracker works with the texture of the face, in this version of the masks dots are attached to the face, on which various objects are hung.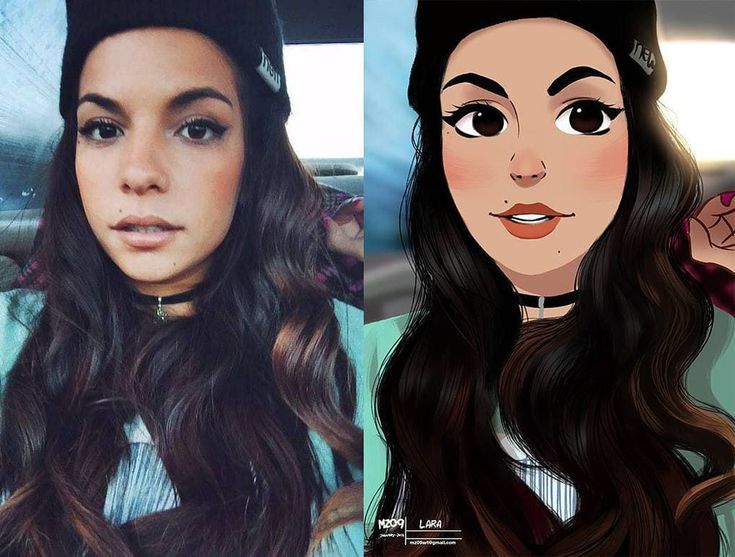 Here, the background usually changes (or is supplemented) and effects are created during facial actions: smiles, blinking, head turns. Just such a mask we will try to make further. But first, let's look at how masks are used by brands and companies.
Live broadcasts on Instagram: how to start and make it so that they watch
There are two distinct types of mask formats for brands – entertainment (and potentially viral) content or product ads.
For example, Leroy Merlin, a chain of hardware hypermarkets, offers to place a 3D replica of a summer chair (and other furniture) on the lot, while snack manufacturer Chio promotes its brand and American football using a face tracker. Funny: Papa John's puts pizza on users' faces, and Lamborgini offers to try on a branded sports helmet.
Games are also used for promotion. So did Reebok, making an adaptation of the runner, where you need to jump over street obstacles, and Pepsi, together with Messi, released a game where you need to fill the ball by tapping on the screen. The simplest and most effective is Lay's, which made a regular randomizer - it will help you choose chips for the evening.
Virtualization of branded items is a good opportunity to try on products without leaving home. Basically, companies rely on the demonstration of accessories, since there are no good tools for body tracking in the editor yet (they promise to add hand reading in space soon).
Therefore, brands that make jewelry, cosmetics, eyewear and hats are most comfortable to promote through AR. So, for example, the accessories brands Bolon Eyewear and DKNY did. But the manufacturer of smart watches Huawei and Swiss watches Rodolphe had to contrive: the first made filters for the face in the theme of lenses, and the second screwed a randomizer that is simply attached to the screen, and not to the face.
The most creative masks are used by musicians, bloggers and television. For example, Netflix released a thematic mask for the premiere of a film about Eurovision, where you can become the hero of the video. Also for the release of the cartoon "Camouflage and Espionage" they prepared a model of a three-dimensional dove that walks along the surface and suspiciously inspects the room. Musicians release themed masks for albums or mascots - this is what Loboda, Green Day, Pink Floyd and others did.
How to Make a Stylish Instagram Photo: A Beginner's Fashion Shooting Guide
Let's Get Started! Let's start with theory. Spark AR is a mask integration tool for Instagram. It is important to understand that the drawing of masks and the creation of three-dimensional objects will have to be done through Photoshop or Blender. But attaching an inscription, ornament or making an effect to the face is not difficult. I will show how it works within the framework of one example, but it will not work to cover all the tools in one material - the program has many functions and capabilities.
First you need to download the Spark AR distribution from the official Facebook website, it supports Windows and MacOS.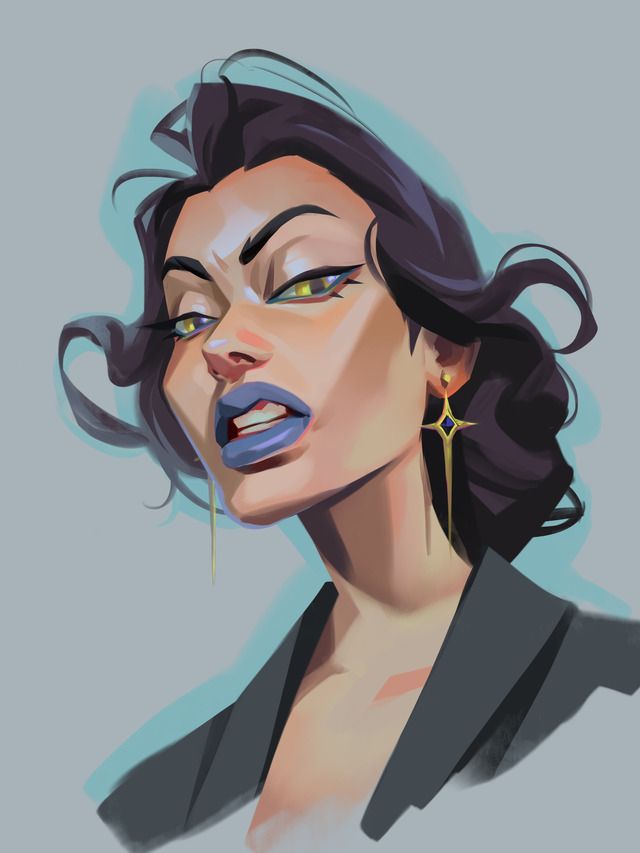
By the way, pay attention to the minimum system requirements. Personally, I was unable to run the program on a laptop with a GT640m discrete graphics card, but everything went smoothly on the new Vega 8 and MacBook hardware from 2012. If your Spark AR does not start or starts with a white screen without an interface, then most likely you need to update your video card drivers. If this does not help, then the hardware of the computer does not support the architecture of the program.
So, we go into the program. First, you will be asked to sign in or link an account to Facebook or create a new one. Choose what is convenient, but remember that when you upload a mask, it is tied to the profile from which you logged in.
You will see the project selection window. Here you can make a new one from scratch or choose templates: stickers, 3D posters, disappearing objects, masks, filters and other AR formats.
We'll start with a clean face and select New Project.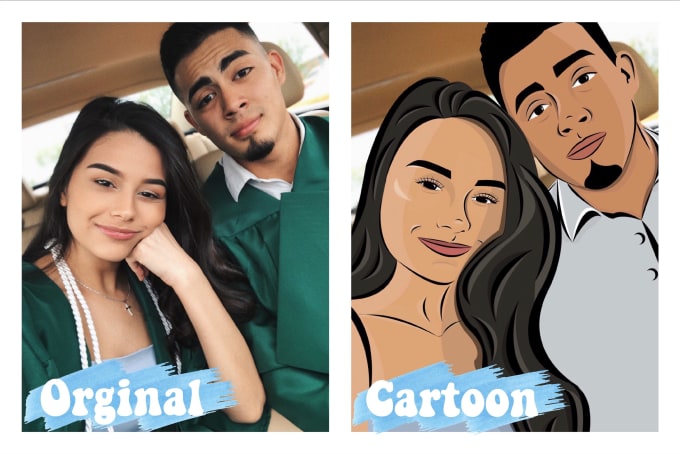
You will see a window for selecting a tracker to download the project. Select Face Trekking and it will open the Spark AR editing interface with several windows. So far, everything is unclear, but let's look around - in fact, the interface is simple, you just need to figure it out.
On the left (highlighted with a white square) is Scene and Layers - here you will work with the basic scene mechanics and layers (backgrounds and objects), add face trackers and frames. Assets (highlighted in green) will contain all the creatives that you upload or create - three-dimensional, two-dimensional and other objects. Setting specific textures, materials and effects from Assets will be in the right window - I highlighted it in blue.
Well, the central field is a general view of your project. In the upper right corner is a preview - how the mask will look on the user's face. By clicking on Video (red circle) in the left corner, you can switch the view to the computer's webcam and test directly on your face (or on the cat, if you have one).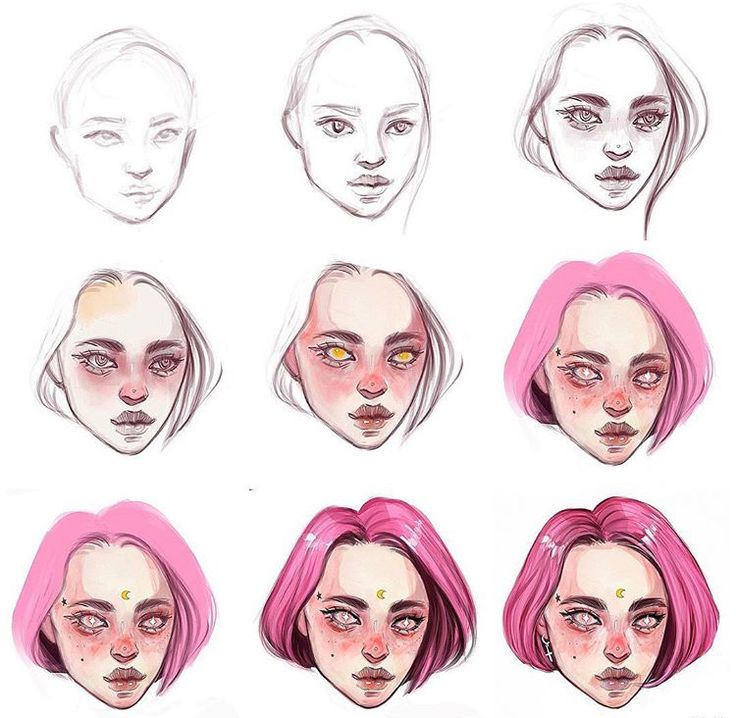
But in order to test something, you must first do it. Let's start!
In order for our future mask to be attached to the position of the face in space, we need to add a face tracker. This is done as follows: in the Scene block at the bottom, click on Add Object and select Face Tracker.
As soon as you add Face Tracker, a coordinate axis will appear on the main screen, which will be anchored to the center. The sub-item FaceTreaker0 will be added to the upper left Scene block.
Now we need to add a layer mask (texture) to this face tracker. To do this, click on FaceTreaker0 and again click on the Add Object button, where select Face Mash.
As a result, a square grid will appear on the coordinate axis. This is almost a ready-made mask: it can define a face and apply a texture to it. Now all that's left is to set everything up!
Let's set up the material. By clicking on FaceMesh0, a column will open to the right of the central one. There you can remove the eyes or mouth to make the texture solid (Eyes and Mouth items). But let's leave everything as it is and click on the item Materials (red circle) - the mask of white and black squares will turn gray. Now you can customize this material however you like. For example, change its color and properties.
In the lower left corner (green circle) there is an Assets folder where your Material0 material is displayed. Click on it, and the block on the left will change to the settings for this material.
Here, too, I recommend clicking on all the points to figure it out. For example, if you click on Specular, then a reflective sheen will appear on the texture, and in the Render Options you can adjust the depth and transparency of the texture. These bases are used to create beauty masks.
Now we need to come up with a texture that will appear on the face.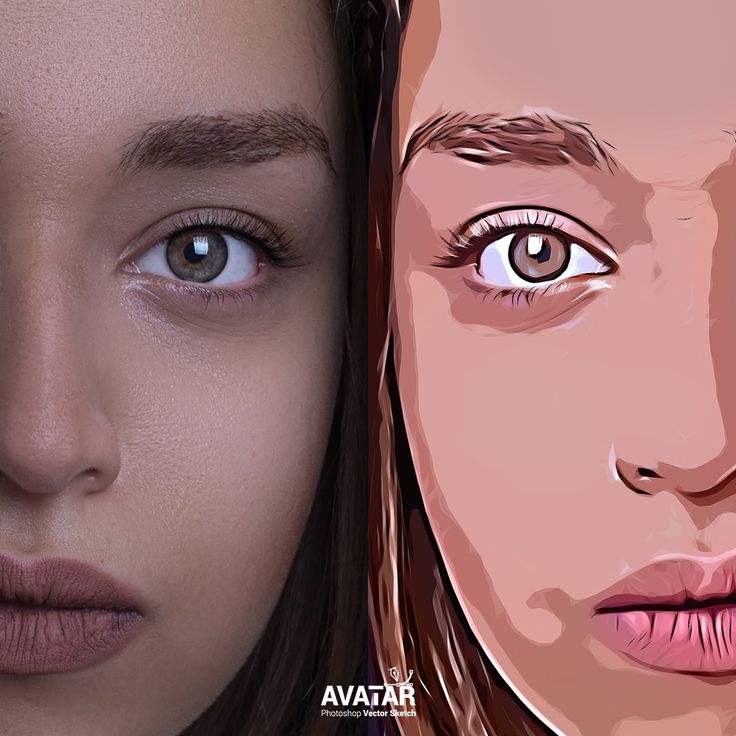 We will need a template and any photo editor that can work with layers (Adobe Photoshop, GIMP or any suitable online editor). Check out our Photoshop guide if you want to delve deeper into this topic.
In order for the face images to display correctly, we need face templates. We download them from the Spark AR website and in the unpacked folder we find Texture, and in it - faceFeminine or faceMasculine. Load any image into the photo editor and create a new layer. I used online Photoshop and marked the block with layers in green in the screenshot below.
In this guide, I'll just add TexTerra under the left eye and make a red colored background. You can draw various masks and apply any textures (even pizza :-)). The main thing - when saving, delete the layer with faceFeminine or faceMasculine and save the file in PNG format with a transparent background.
Next, close the photo editor and return to our project in Spark AR.
In order to load our face mask, you need to select Material0 in the window on the left and find the Diffuse tab in the window on the right, and in it - Texture and New Texture. Click on it and select the saved file. All! The texture is added to the face and, in fact, your first mask is ready.
But I want to add a background and attach some objects around the head. Now I will tell you how to do it.
You can add animation to Spark AR, but you can't just drop a GIF: you'll need to split it into frames first. I found a simple GIF of fire on a transparent background and uploaded it to the Ezgif service to split it into frames and save it as PNG. Spark AR allows you to upload these pictures, adjust the frame rate and randomize. Now I'll show you how it's done.
In the current Face Tracker click on Add Object (or right click) and add a Plane (red box), and in the Layers tab create a new background and call it Fireback. As a result, we will get a new coordinate axis, which I will place on the forehead in the preview.
Now select Plane0 and on the left side of the window (orange) create a new material. Rename it in the tab below to fire (yellow).
Now we need to attach a storyboard instead of a single texture! Select the material fire and in the Diffuse tab select Texture, and then New Animated Sequence. In the lower right corner (purple square), the corresponding folder with the future animation will appear. We click on the file NewAnimatedSequence0 (also change the name to fire) and load all the images (in my case it is eight frames).
Please note: this is how you can set the animation to repeat (tick on Loop) or set randomly (tick Randomize). With the help of the latter, you can make "randomizer masks" - these are the ones that show what kind of cat you are today or what chips to choose for the evening! If you want me to talk about the development of these masks, write in the comments - we will update the material or make an additional one.
Well, the animation has loaded and is now attached to the forehead. I changed the color from blue to red-black in the settings (Materials-Mask-Color). In general, everything: in this way, you can create several more objects on the face, and fix them at different scales through coordinates. But we will focus on one. Now let's make the background!
One minute commercial break! Our TeachLine online university offers excellent SMM courses: SMM Specialist, Instagram Promotion 2.0, Community Management, Targeted Advertising and others. Sign up if you're interested. Now there is a big discount - 35%.
Before we start adding the background, we need to make templates for the camera to find the face and back. To do this, click on the Camera in the upper left corner and click on Texture Extraction and Segmentation (located in the right window).
I decided to make an animated background by doing the same steps as for the fiery gif on the forehead. Now you need to put this GIF in the background. To do this, click on the Camera in the upper right block and add a Canvas, and two Rectangles to it.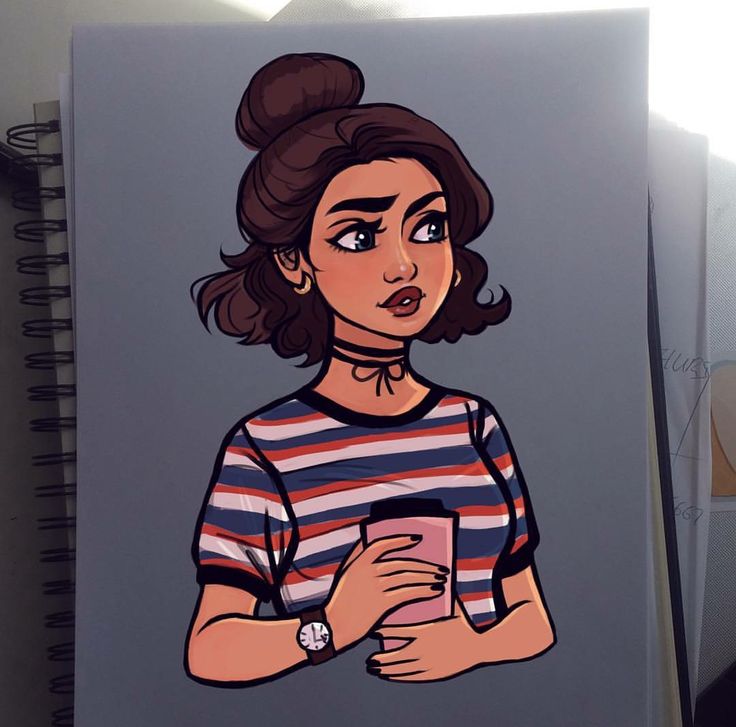 They will act as background and face. In order not to get confused, we rename them to user and back.
Also in the Layers tab create two layers with the same names.
Now for our user and back we need to adjust the width and height so that it fills the entire screen. To do this, click on these items and in the right window (green circle) set the Fill Width and Fill Height values, respectively. Everything will disappear on the preview screen, but don't be afraid, it's necessary!
Now create new materials for each. In the settings of these materials, you will need to connect the textures that we created earlier from the Camera - these are PersonSegmentationMaskTexture0 and CameraTexture0.
Accordingly, we need to connect the CameraTexture0 texture for the background, and PersonSegmentationMaskTexture0 for the person.
In order for the background to be behind the person, and the face to come forward, you need to make an alpha channel. To do this, select Assets in the lower left window, click on user and click on the Alpha item on the right. In it, select the texture PersonSegmentationMaskTexture0. So your face will come to the fore, and the background will come to the background.
Done! It remains only to load the image - I used animation. I know this may sound complicated, so here's a video showing how to work with backgrounds in Spark AR:
If you've made it to this point, congratulations! In general, it was possible to stop already at the second step, but since you are here, it means you are ready to continue. Let's add an effect so that when we smile, we have gray balls. To do this, we will have to do visual programming. This is certainly not JavaScript, which is used to create games, but it is already very close.
So, first add Particle System to the face tracker - this is a generator of the same type of objects. It can appear anywhere, but it is important for us to put it under the FaceTraker0 item - exactly as in the screenshot below.
By clicking on this generator, a large window will open on the left with a bunch of settings. I decided to make gray drops. To do this, I chose the Sphere setting in the Shape and connected the material with a gray color and a metallic effect.
Well, now you can try to build a simple script. To do this, open the Show/Hide Patch Editor.
We will work in the window that appeared below the main one. First we need to run initialization. At the bottom right there is an Add Patch button, click it and in the window that opens, find Face Finder and Face Select. Connect them as in the screenshot below.
Now let's make a simple logical chain - if a person smiles, then our effect with generated gray balls should turn on. To do this, we search for the Happy Face element in Add Patch and add it to the board. Now we find our effect and in the left window click on the arrow next to Visible. This element has been moved to the board. We connect everything together.
Everything is ready, now the mask can be tested or published immediately!
You can check the mask before sending it on your phone by downloading the Spark AR Player app and connecting it to your computer via a wire. The send menu itself is located in the lower right corner, on the Test of Device tab. There you can also send a test notification to check in the Facebook or Instagram app.
To export a mask, it must be submitted for moderation. To do this, click in the same lower right Export & Upload block. The program will convert the file into bootable and take you to the Spark AR website. There you will need to fill in information about your mask: name, icon, example, and so on. In the same section, you can link a mask to a profile: if you are connected to commercial accounts, you can attach a mask to them.
Here you can also test the mask on the device and save a draft. You can immediately send it for moderation - it usually takes about 10 days.
By the way, when uploading, make sure that the size of the mask does not exceed 4 megabytes for Instagram and 10 megabytes for Facebook. If it turns out to be more, then you will not be able to write the mask to the story and save it. To check what specifically takes up a lot of space, you can find out by clicking on Review.
As you can see, creating a mask is not difficult. Spark AR allows you to experiment not only with design, but also with programming, creating interesting visual reactions to user actions. We've looked at the easiest option, but if you figure out the JavaScript code and apply good artistic skills, you can make cool portfolio projects and attract subscribers! For businesses, masks are another advertising tool and an opportunity to increase the audience in the profile.
Come to us for promotion on Instagram, and we will make a unique mask for you as part of the service ;)
April 20, 2013PhotoAndroid not the best photos with retouching and filters.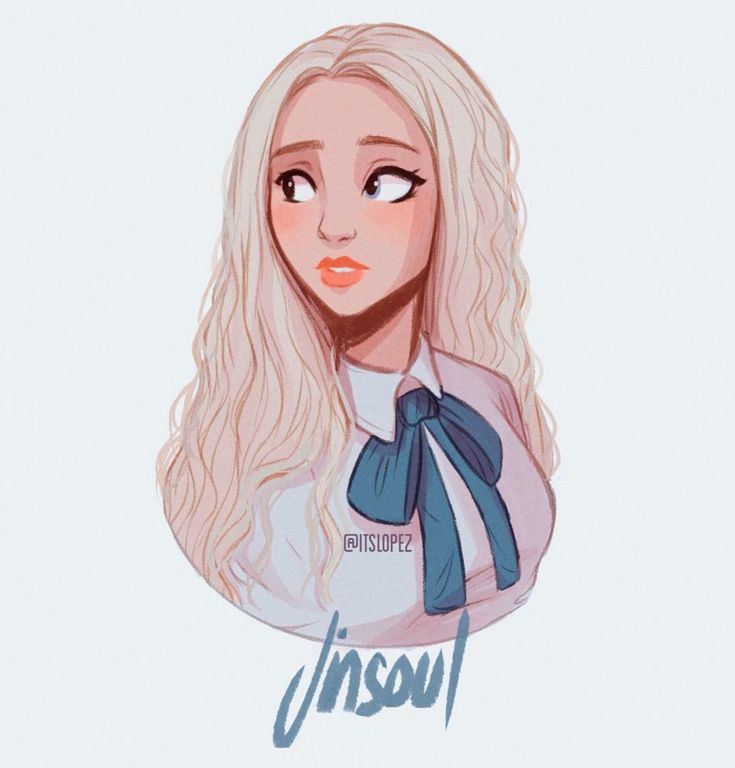 What each of the 40 filters of the service gives and how best to use them, you will learn from the Lifehacker guide.
Share
0There are 23 filters enabled by default in the app. To connect the rest, at the end of the list with filters, click "Management" (Android) or "Settings" (iOS). In the menu that opens, check the box next to the filters you need.
does One of Instagram's most popular filters*, originally only available for videos. Brightens and intensifies colors.
When you want to make a picture brighter or make objects in the foreground stand out. Great for pictures of animals and children.
Also previously only used for video. Slightly blurs the image, creating a slight "fading" effect. If the photo is dark, this filter will give it a yellowish tone. If light, it will make the image brighter, as if shrouded in a romantic haze.
When you want to take vintage style photos. Hipsters love him.
does A black and white version of the previous filter, only Moon emphasizes the shadows a bit more.
When you want to "age" a photo. Works great with portraits.
Brightens the image. Makes all colors except red more vibrant.
For outdoor landscapes and portraits. The filter well emphasizes the beauty of tanned skin, green grass and blue sky. Also good for food photos.
One of Instagram* vintage filters. Brightens the image and reduces the saturation of colors, which creates an antique effect.
In portrait photography, especially if the model has problematic skin: Reyes handles light retouching.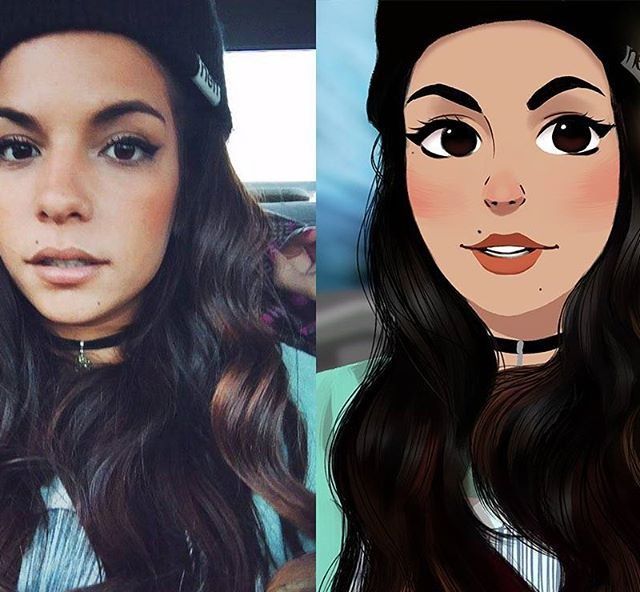
Enhances colors, making them richer and deeper. Brightens yellow, orange and red.
For editing pictures taken on city streets.
Creates a yellow mask, thereby reducing the saturation of other colors.
When you want to give an image an antique and romantic effect. Works well with pictures taken in natural light.
does Adds saturation by brightening the center and removing unnecessary shadows.
Good for portraits as it can hide some skin imperfections. Looks good in pictures taken in nature, where there is a lot of green and blue. Also often used for food photos.
does Adds contrast to a photo by making warm tones lighter and cool tones darker. Emphasizes shadows and highlights.
For street scenery, building and sunset photography. It can also give an interesting effect to black and white shots.
does Softens colors slightly, making them more pastel. Reduces contrast and creates a hazy effect.
Good for autumn cityscapes and retro portraits.
does Adds brightness, highlights greens and yellows.
For beach photography. Not recommended for portraits as it can give the skin an unnatural tone.
does Adds more light: the closer to the center of the image, the lighter. And the darker the original, the greater the effect.
When you want to age a photo a little. Perfectly emphasizes the beauty of autumn landscapes.
Darkens the edges, brightening the center of the picture.
When you want to draw attention to the subject in the center of the frame. Works well with light saturated photos.
does Adds nice soft lighting.
Best for close-ups of people.
Shifts tones towards the blue end of the spectrum and makes photographs appear colder.
Suitable for photographing buildings and monuments, as well as winter landscapes.
Does Makes a photograph look like it was taken in the 1980s.
Quite a versatile filter as it brings colors to life in photos.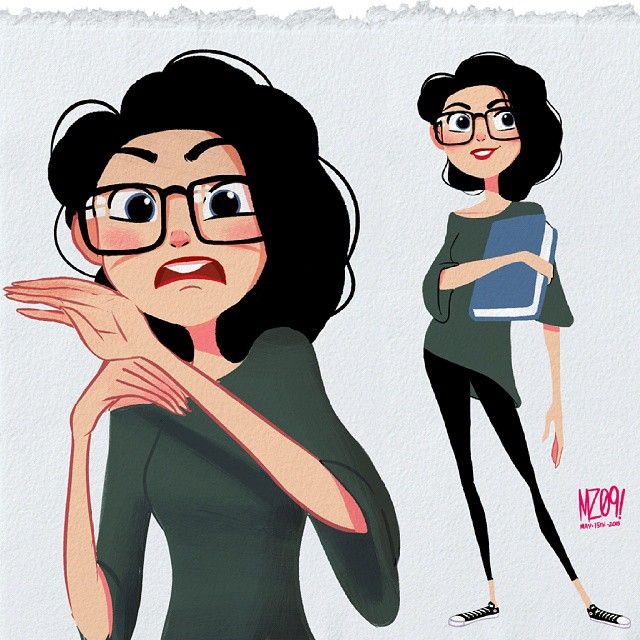 Use it if you want to take an old school photo.
Quite intense filter that makes the picture much brighter, gives warm tones.
Can be used both indoors and outdoors. Doesn't work very well with close-up portraits, but good for shooting fashionable looks.
Similar to Rise: soft tones, bright center. But, unlike Rise, it makes the picture richer and deeper.
Another hipster favorite filter. Best suited for photos taken in nature.
does Not only makes a photo black and white, but also gives it a matte effect.
For portraits and close-ups.
does Makes the photo brighter and more saturated, emphasizes the shadows.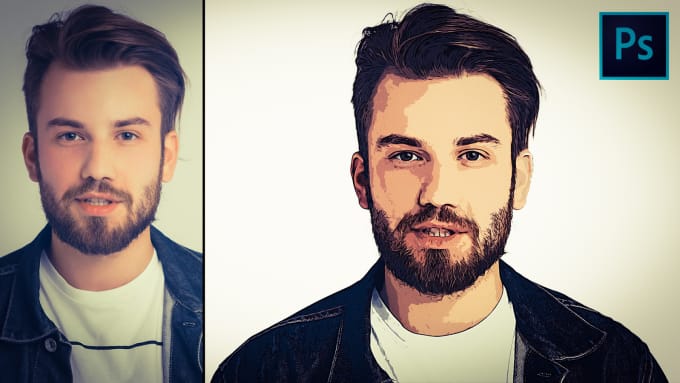
Ideal for food photography. But it can also be used for landscapes depicting a forest or lawn.
Turns a color image into black and white.
Basic monochrome Instagram* filter. Use it if you want to take a black and white photo that has a lot of light and deep shadows. Pretty versatile, but especially good for portraits and nature shots.
Similar to Lo-Fi, but the colors are warmer and less dramatic.
If you want to enhance colors, but not to the same extent as with Lo-Fi. Good for processing natural landscapes.
Gives a pinkish tint to the image while brightening the entire image.
Like Valencia, suitable for vintage photography.![]()
does Slightly lightens the image and washes out colors.
If you are taking portraits or taking pictures on the beach. But in general, it can give any picture a little nostalgic look.
does Evens out skin tone. Adds a yellowish tint for an antique effect.
Portraits, portraits and more portraits!
does Brightens the center of the image.
Best for portraits and other shots where there is a lot of light. The latest Walden is slightly aging.
Softens tones, adds yellow, and due to the sepia effect makes the picture slightly faded.
When you want to take a retro picture with slightly darkened edges. Looks good on thematic staged photographs.
does A rich gray filter that increases exposure and contrast.
If you want to see what your portrait would look like a hundred years ago. It also emphasizes the beauty of sea and winter landscapes.
Emphasizes reds while making the picture brighter and slightly faded. This is what photos looked like in the late 1970s.
Instantly age photos. It looks especially good in pictures taken on the beach, where there is a lot of sun glare.
does Brings pictures to life and shine, as if bathed in summer sunshine.
If you want a photo to evoke a warm, pleasant feeling. Great for shots where there is a lot of natural light. For example, for photos taken at sunrise or sunset.
does Due to the predominance of purple and brown colors, it makes the picture a little smoky.
When you want to make an image look creepy. It is better not to use for portraits, unless, of course, these are photos from Halloween.
does Another filter referring to photographs from the 1980s. It adds redness and light in the center while darkening the edges.
Ideal for summer beach photos and picnics.
does Darkens the image, emphasizes the shadows, adds a little yellow tint.
Good for architectural shots, giving an interesting effect to blue skies and green lawns.
 Ginza
Ginza
does Gives photos a warm glow.
Use it for landscapes, including urban scenery. Also suitable for portraits and fashion shots.
does Performs a function similar to auto-correction in photo editors: equalizes brightness, contrast. Gives pictures a glossy effect.
Able to transform any photo.
does Increases contrast while blurring highlights.
The filter does not work well with images of the night sky, but on the contrary, it gives zest to well-lit landscapes. In close-up portraits, it helps to emphasize the look.
Brings out green tones.
Can be overlaid on nature photos.