So, it happened. You posted to your Instagram, only to see a mistake in your caption, location, tags or in the photo itself! 😱
Now you’re wondering how to edit an Instagram post after posting – and you’ve come to the right place.
Whether you’re correct a spelling error or add a missed photo to a carousel post, we’re covering all the major mistake-prone spots, including captions, locations, tags, and photos.
In this article, you’ll learn how to edit each of these four categories with step-by-step instructions.
Don’t worry; you can fix your Instagram mistakes faster than you can say, “No one saw that!”
Let’s get to it! ✏️
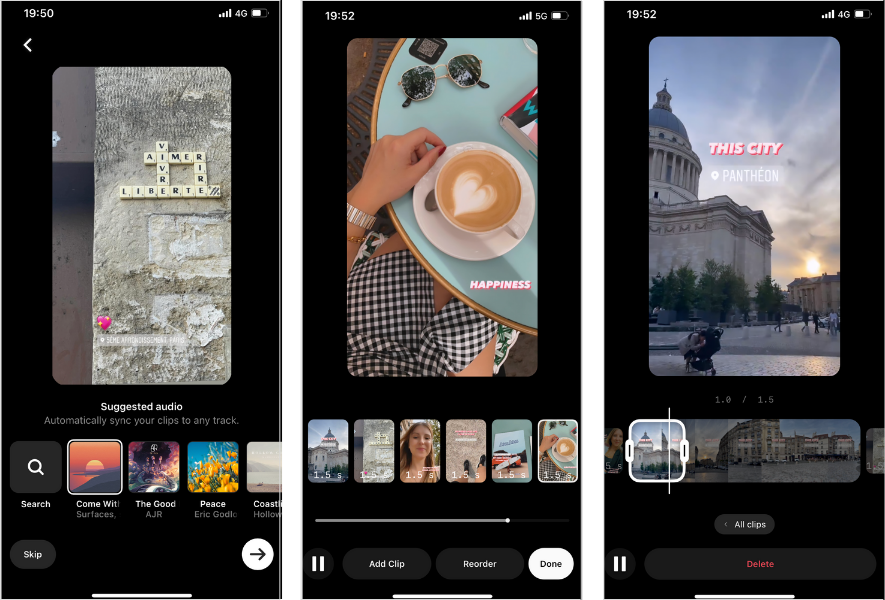
How Do You Edit The Caption, Location, Tags On An Instagram Post?First things first. If you’ve messed up your location or tags or need to know how to edit your Instagram caption, here’s the way to fix them:
Tap the three dots at the top right.But wait! There are a few things to keep in mind when you’re editing your caption, especially if you’re trying to fix formatting or line breaks!
If you’ve posted your caption and it’s one wall of text, you can add spaces to your caption by hitting the return key after each paragraph.
Just make sure you remove any hidden spaces after the punctuation at the end of your sentences, or Instagram will ignore your line break! 😭
You may even have to remove an emoji (at the end of your sentence) in order to get it to work.
Sound annoying? It is. 😤 There’s good news though!
You can avoid formatting issues entirely by using the caption tool in Tailwind for Instagram! 🎉 Our formatting tool allows you to add a clever caption and select your favorite emojis with ease from the Emoji Picker keyboard.
It also automatically removes the pesky space that appears after emoji on your smartphone keyboard. 🥳
Not only that, but our caption tool also preserves your line breaks!
Well, unless you hit the Space key after the end of your line! ⛔️
Want to try it for yourself? Snag a free trial of Tailwind for Instagram today – no credit card required! 💳
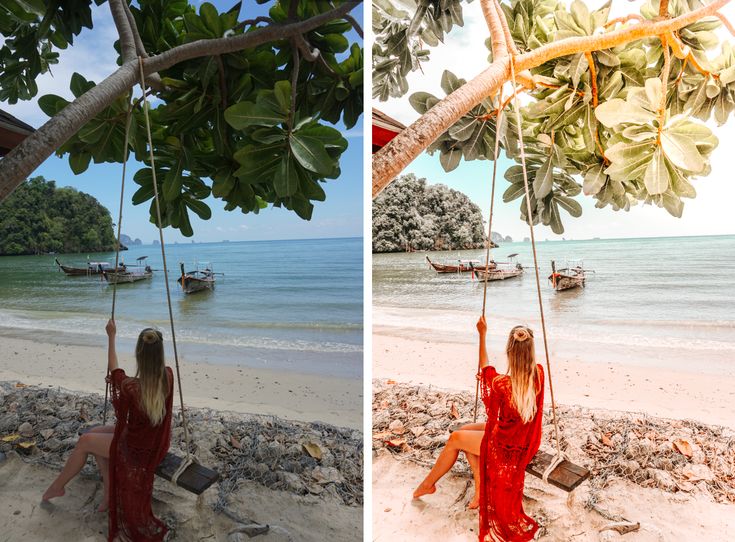
Can You Edit A Picture On Instagram After Posting It?You may be searching the web, desperately trying to find out how to edit Instagram photos after posting.
Here’s the bad news – you can’t. Unfortunately, you have one shot to add the right filter, crop or adjust your photo before it goes live. 😔 Instagram doesn’t currently support any features to edit your Instagram photos after you post.
If you’ve messed up your favorite photo before sending it to your feed, your best bet is to delete and re-upload.
Make sure to copy and paste your caption before you do this, so you don’t lose all your hard work – and hashtags!
I’m sorry we don’t have better news here. To cut down on room for error, make sure to edit your Instagram photos thoroughly before posting.
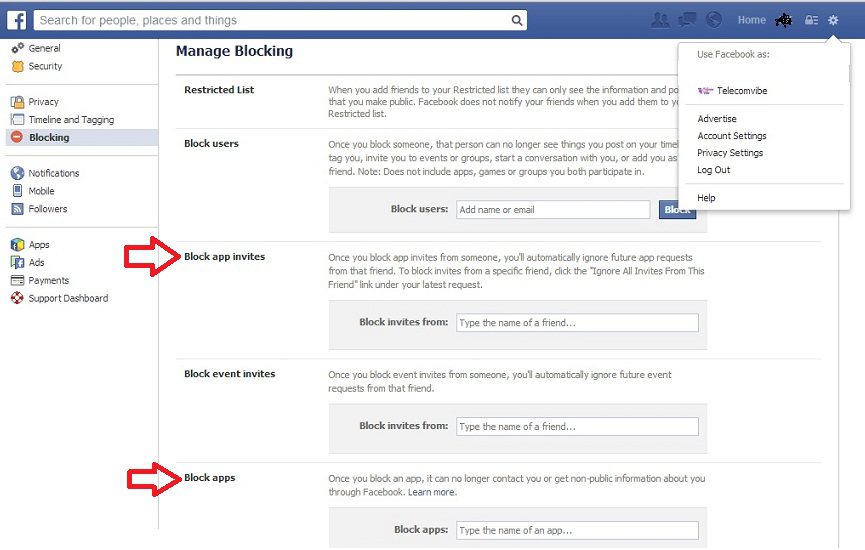
Can You Add A Photo To An Existing Post?So, can you add photos to an Instagram post after you’ve posted it? No, you can’t. Unfortunately, this capability isn’t available on Instagram OR in Facebook Creator Studio yet (although it’s certainly been requested!)
Missed out on adding a key photo or video to your latest carousel post?
You’ll want to delete or archive the post as quickly as possible and re-upload the correct series.
Pay close attention to each frame and swipe through a few times to double-check before you post!
This will help you keep track and catch mistakes before they go live.
Plan, Schedule, Publish Your Posts In One Place!In fact, one of the best ways to combat pesky mistakes on Instagram posts before they cost you time and energy is planning and scheduling your content in advance!
That’s where our all-in-one tool comes in! 🔥
Tailwind’s Instagram publishing tool allows you to tag your images, set your location and format your caption perfectly the first time around. 🧑💻
Plus, you can crop your photos and check how they’ll look in your feed with our 9-Grid preview tool! 🤩
If you want to create the perfect post – from locations, hashtags and everything in between, sign up for a free trial of Tailwind for Instagram now.
You’ll have access to all our pro features for 30 posts – and the best part is, no credit card is required! What are you waiting for? Test it out for yourself!
That photo you just shared on Instagram looked perfect before you posted it. But now that you look at it, it doesn’t look so good anymore. Maybe, if you just used a different filter, it would be that much better.
You’re not the first person that has wanted to edit a photo after posting it on Instagram. Poster’s remorse is a widespread issue, and you’ll learn how to make changes to your photos in this article. There are a few edits you can make to the pictures you’ve posted, so we’re going to take a look at them one at a time.
It’s always best to start with the bad news. That way, it only gets better going forward. So, the bad news, in this case, is that you can’t change the filter on pictures that you’ve posted on Instagram. It’s probably not what you wanted to hear, but it’s the unfortunate truth.
For Instagram’s moderators, there are many factors to consider in this kind of scenario. Any editing of photos after they have been posted would impact all the people that interacted with the photo. Even something seemingly insignificant, such as a filter change, could markedly change the context of a photo. Just think about it: if you were to like or comment on a photo, it surely wouldn’t sit well with you if the content of that photo were to change in the future.
There are some changes you can make, however. You can change the caption of the photo and edit the location. You can also change the people that you tag in it.
You can change the caption on photos after you’ve posted them. If this is what you want to edit, then you’re in luck. Follow these steps:
Open the post you want to edit and tap on the three dots in the top-right corner.
You will automatically see a text box. Type in the caption you want the photo to have.
Once you’re satisfied with your caption, tap the checkmark in the top-right corner.
This will change the caption for your photo. That may not seem like much, but if you’re creative, it can make a significant impact.
Changing the location is also quite straightforward. You’re mostly going to take the same approach. Access the editing menu and tap on either Add Location or on the location that you have tagged. You will find this on the top-left of the picture, and it will change dynamically as it is updated.
It’s good to remember that Instagram will not give you the option of tagging a photo very far from where you are. However, you can certainly retag your photos when you’re traveling if you think it will make an impact.
Changing Who’s TaggedAt this point, you should be familiar with the process. Go to the Edit menu and select Tag People in the bottom-left of the picture. You will be prompted to tap anywhere on the photo and then search through your contacts to tag people. Once you select the people you want to tag in the photo, you can drag the tags around and edit them later.
OK, so admittedly, there is very little you can do to alter a photo once it has been posted. If you’re really that unsatisfied, the only option is to just delete the photo entirely and start anew. Before you do that though, here are some considerations.
If your photo is not getting the kind of engagement that you want, a different filter is probably not going to make a monumental difference. You may have to just accept that it’s not a winner. On the other hand, if your photo has a lot of engagement and you want to improve it in a fragmentary way, maybe rethink that. If you’ve achieved a good level of exposure, maybe you should leave it well enough alone and accept that maybe a change could make it worse.
When you consider it this way, you may just decide that not changing the photo is the best thing you can do.
Some Things Will Never ChangeIt is difficult to create a perfect Instagram post. There are many considerations about what to say and how to appeal to your audience. Sadly, there’s not a lot you can do after the fact, so you should get in your due diligence before you decide to post. If you’re very unsatisfied with your photo, at the end of the day, you can just get rid of it and try again. Aside from that, you can change the caption and the tags, but not much else.
Unfortunately, no. There is no option to add or remove an image or video once you’ve submitted the post. Instead, you will need to delete the entire post and re-post it. u003cbru003eu003cbru003eIf you aren’t happy with the post but you no longer have the images you can change the visibility of that post by clicking on the three horizontal dots and choosing the ‘Archive’ option. This will move your post from the main News Feed to the archive folder found in Instagram’s settings. You can set this folder to private, save the photos to your phone (so you can re-post), or delete it.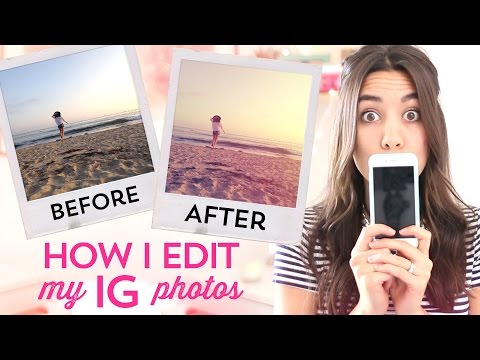
Yes, by editing the text as described above, you can add hashtags or remove them. Simply click on the text box and type or delete as you normally would.
While you can’t edit a Story on Instagram, you can save it to your camera roll and upload it again the way you want. Click on the story and tap ‘More’ in the lower right-hand corner. From there, tap ‘Save.’ Upload it back from your camera roll as if it were a new post and make any necessary edits before publishing.u003cbru003eu003cbru003eInstagram Story Highlights do give you a little more flexibility in editing. If you want to save your Story for people to view for longer than 24-hours, you can change your Story to a Highlight and edit the content that way.
Do you find yourself frequently deleting photos? If you could give some advice to people who have just started using Instagram, what would it be? Let us know in the comments below.
Prepared instructions: how to add a photo to an Instagram post and story * using a phone or computer. Article for beginners - we reveal only the basic methods and share small life hacks.
Step 1. Go to the application . Click on the plus button in the upper right corner. nine0003 Adding a photo to Instagram*
By the way : you can add a photo in an alternative way - swipe right from the Instagram feed* and select "Publish".
Step 2. Select photo . Select a finished photo from the Gallery or take a new one by clicking on the camera icon.
Click "Next" - the arrow is in the upper right corner.
Select a photo from the Gallery or take a new photo Step 3. Edit photo . After selecting the image, the editor will open. You can apply a filter and use the sliders to adjust the light, contrast, brightness, warmth of the frame. We press "Next".
Step 4. Put the photo in the feed . We write the text, put a place, mark accounts, indicate hashtags - in general, we finalize the post. Post it by clicking on the checkmark in the upper right corner. nine0003 Posting a photo to Instagram feed*
Can I edit a photo after posting? Unfortunately no. When editing, you can only change the text and tagged accounts:
Please note: after changing the text, the post will remain in the feed in the same place and will not be republished. If you want to change the image in the post, you will have to delete it and re-upload it. nine0003
Read also: How to post a post on Instagram* in 2021 – the most detailed guide on Runet Click on the plus sign in the upper right corner to add a story.
Step 2. Select the item "History" . By default, the menu for creating a post will open - scrolling to the left to get to the story editor. Take a photo or select an image from your device's Gallery. nine0003 How to add photos to stories
Step 3. Add stickers, text and other extras . You can publish.
Read also: Instructions: how to post a Story on Instagram* from a computer
Several photos in one post on Instagram* are called a carousel. This is a convenient format for posting themed photos and collection posts.
Step 1. We go to the application . Click on the plus sign in the upper right corner. nine0003
Step 2. Select photo . Click on the icon with slides and select photos from the Gallery.
You can collect up to 10 photos or videos in one postStep 3. Edit . You can apply a general filter to all photos, and if you click on the picture, an individual editor for the image will open.
Editing some photosStep 4. Write post . We add a description, put a place, mark accounts. We publish.
By the way : to swap photos, click and drag the image to the desired location. You can also remove a photo from the list.
To make a collage, you need to install the Layout app from Instagram* or use special services and tools. Read more in the article “How to make a collage on Instagram*”.
There is a special sticker for Stories.
When choosing a photo for a post, click on the frame icon. It is in the lower left corner of the photo.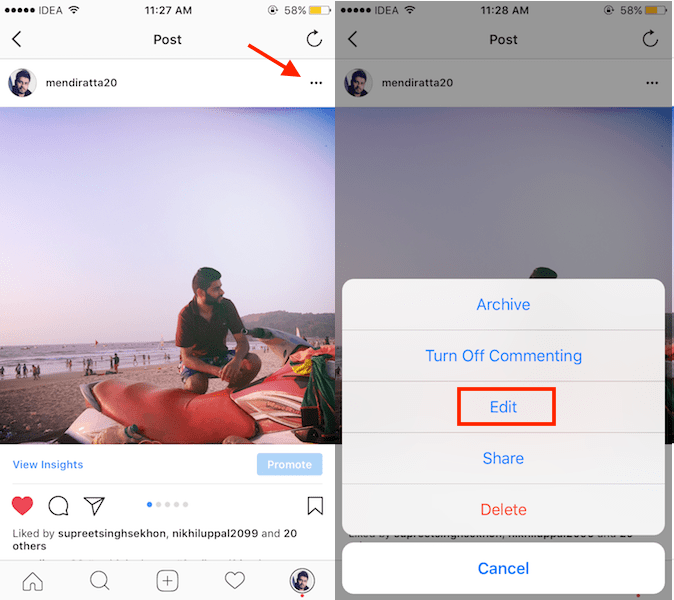 nine0003 How to enlarge a photo on Instagram*
After clicking on it, the photo will return to its original size. You can hold the image with two fingers and crop it: stretch, pull or move across the field.
If you pinch the picture, you can change the scaleThe best pictures on Instagram* look with an aspect ratio of 1:1 (square) or 4:5 (vertical rectangle). But pictures from computers in 16:9 format turn out to be narrow and visually take up less space in the social network feed. nine0003 The scale of the pictures and how much space they take up in the feed
The built-in graphic editor in SMMplanner will help you crop the frames conveniently - you can edit the photos there and post them with a timer at the right time. Read more in the article "Instructions for posting photos on Instagram* via SMMplanner".
You can send an image to Instagram* directly from the Gallery on your phone.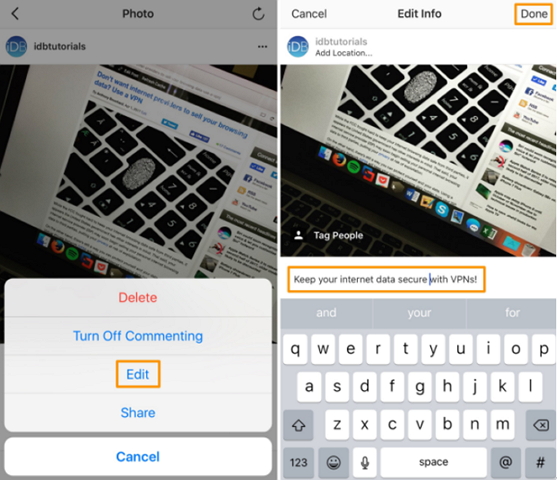 Devices have a different interface, but the principle is the same: select a photo, find the "Share" button and select Instagram *: feed, chat or Story. nine0003 This is how you can send a photo from Android 10
Use Facebook Creator Studio - go to the service under your account, click "Create a post" and select "Instagram feed" *".
Facebook Creator StudioNow you can add a photo by clicking the Add Content button. You cannot apply an effect - only crop. Don't forget about the text for the post! After that, click "Publish" and the post will be scheduled for publication in the Instagram feed*. nine0003 Add photos to Facebook* Creator Studio
Another option is to use our auto-posting service SMMplanner. Click Add Post and select Photo/Video. In the built-in editor, you can set a filter, adjust the color, add text and attach a sticker. In general, create a full-fledged cover for the post.
You can add photos to Instagram* through a mobile browser. We can enable it on the computer. nine0003
Step 1. Go to the Instagram website* and right-click anywhere. Select "Show Code".
Enable code viewingStep 2 . Switch to mobile layout.
Switching to the mobile version of the siteStep 3 . Refresh the page.
Refresh the page and postStep 4 . Add a photo from your computer and post it to your feed.
To exit the mobile layout, click the cross in the right corner where you see the HTML code. Or just close the page. nine0003
Posting a photo on Instagram* is quite simple - in the application this is done through a single editor on the "+" button. If you want to make a collage, then refer to the article “How to make a collage on Instagram *: instructions + 12 apps to help”, and in the article “How to post a post on Instagram * in 2021 - the most detailed guide on Runet”, we take a deeper look at the post editor .
More articles to help:
Each post is placed in the user's main feed, where it can be viewed by unique visitors and page subscribers. In the process of adding, the images are colorfully decorated as you wish, using a wide range of built-in tools. Is it possible to change the entry after it is posted in the public domain? In this article, we will tell you how to edit photos on Instagram after publication. nine0003
The main purpose and direction of the social network Instagram is to communicate with other users by posting personal photos and videos for everyone to see. You can turn even a bad photo into a high-quality image, thanks to a large selection of built-in graphic elements, text content and colorful filters.
The material is posted instantly and after posting it can be found in the main feed on the user's page. Here it can be viewed by any of your subscribers or guests (provided that the profile is not private). To post a photo, you will need to do the following:
 There is a corresponding button for this. nine0044
 Done. The post will appear in your news feed and be visible to all subscribers.
What if I need to make adjustments to an image after it's been shared? Standard social network tools allow you to edit pictures at any time after adding. To do this, follow these steps:

It should be said that when editing, you can only change the text accompaniment of the image, the signature under it, and also mark a specific person. Everything else can't be configured. If you want to select other filters and change the graphical display, you will have to delete the material and re-lay it out. nine0003
In the Instagram social network, each user can leave likes and comment on photos, provided that this function is not blocked by the page owner. If you do not like someone else's text, then you can delete it at any time. To do this, you need:
It is worth knowing that once comments are deleted, they cannot be restored, so think carefully before you take action.
To reply to a comment, just click on the appropriate button and enter a message. After that, the interlocutor will receive a system notification. In this way, you can erase not only your answers, but also the texts of other users. nine0003
Another unique feature in the Instagram social network is hashtags, with which you can find stories on the desired topic. They are ordinary words, but with a pound sign "#" in front of them. They can be left under any post and in short stories. If you need to edit the tags under a shared photo, follow these steps:
All photos and videos in the user's main feed are placed one after another, according to the date and time they were added. Sometimes you may need to swap photos or replace them. There are many reasons for this, for example, the meaning of the overall picture depends on the order. nine0003
Unfortunately, the interface of the social network does not allow you to swap already posted materials, but there is a way out and it will take you a lot of time and effort. To do this, you need to delete the publications and re-upload them in the required order. There are no other ways without deleting content on Instagram.
The article told how to edit photos on Instagram after publication. Everyone registered has this opportunity, but you can only change the text caption under the picture, everything else cannot be configured.