While Instagram is mainly a platform for posting photos, it also offers its own private messaging system. And like most messaging services, you have full control over which messages get saved and which get deleted.
If your inbox is filling up, there are two ways to delete your Instagram messages. You can both delete entire conversations and delete individual messages you've sent.
These steps work for both the iPhone and Android Instagram apps.
Deleting entire conversations1. Open Instagram and tap the messages icon in the top-right corner, which looks like a paper airplane.
2. On the messages page, tap the icon in the top-right that looks like a bulleted list.
3. Tap all the conversations that you want to delete, then tap Delete in the bottom-right corner.
Highlight and delete the conversations you don't want. Instagram; William Antonelli/Insider4. Confirm that you want to delete the conversations.
Remember that the other person (or people) in the conversation will still be able to see the messages, unless they delete it themselves.
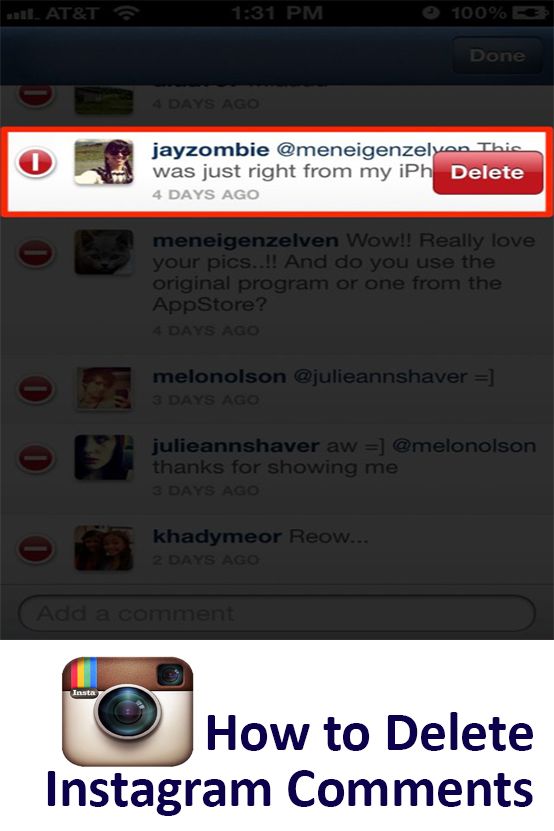
If you've sent a message that you later decide you want to take back, you can delete it using the "Unsend" option. This will delete it for everyone in the conversation.
1. Open Instagram again and find the message that you want to delete.
2. Press and hold your finger on the message that you want to unsend.
3. When a pop-up menu appears, select the Unsend option and confirm that you want to delete it.
Tap "Unsend." Instagram; Jennifer Still/Insider; William Antonelli/InsiderNote that while unsending a message will delete it for everyone, sending a message might still notify everyone else in the conversation.
Jennifer Still contributed to a previous version of this article.
William Antonelli
Tech Reporter for Insider Reviews
William Antonelli (he/she/they) is a writer, editor, and organizer based in New York City. As a founding member of the Reference team, he helped grow Tech Reference (now part of Insider Reviews) from humble beginnings into a juggernaut that attracts over 20 million visits a month. Outside of Insider, his writing has appeared in publications like Polygon, The Outline, Kotaku, and more. He's also a go-to source for tech analysis on channels like Newsy, Cheddar, and NewsNation. You can find him on Twitter @DubsRewatcher, or reach him by email at [email protected].
Read moreRead less
 Here is a step by step guide you can follow for the same.
Instagram: How to delete a conversation or unsend messages | Representational image
By India Today Web Desk:
Instagram is one of the most popular social media applications used by millions of people around the world regularly to share their photos and videos. On Instagram, you can follow your favorite celebrities and even meet new people. Over the years, the app has expanded and included more features like Reels, IG Stories, and Direct Message. However, the whole Instagram experience is not only limited to posting photos and videos anymore. You can chat one-on-one with friends, create groups just like on Facebook where you can send direct messages to multiple people at once.
Instagram nowadays has become the go-to instant messaging service for many users, especially for entrepreneurs who use Instagram often for their businesses. Now, if you are also using Instagram for the same purpose then there are chances that your inbox may be cluttered with older and less important messages. If, yes then you should clear it.
Delete messages and conversations on Instagram is quite simple! You have to first open Instagram on your phone or tablet. The next steps will depend on what you intend to delete from your Instagram's direct message inbox.
Here is a step by step guide you can follow to delete a conversation on Instagram or un-send messages using your iPhone or Android.
advertisement
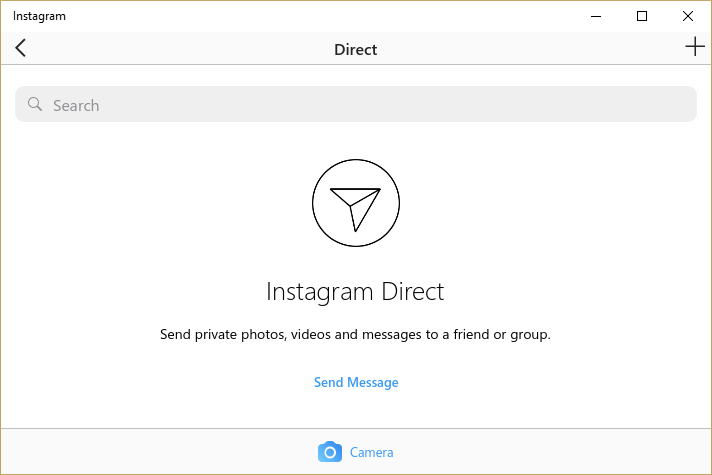
How to delete a conversation on InstagramSteps you can follow to delete a conversation in Instagram Direct
Step 1: First, open the Instagram app on your device.
Step 2: In case, if you are logged out, log in by entering your User ID and Password.
Step 3: On the home page tap Instagram Direct icon, which appears as a small paper plane icon.
Step 4: On the conversation page, locate the conversation you wish to delete, swipe left (iOS) to reveal the Delete option. If you are using (Android) tap and hold on the conversation you'd like to delete.
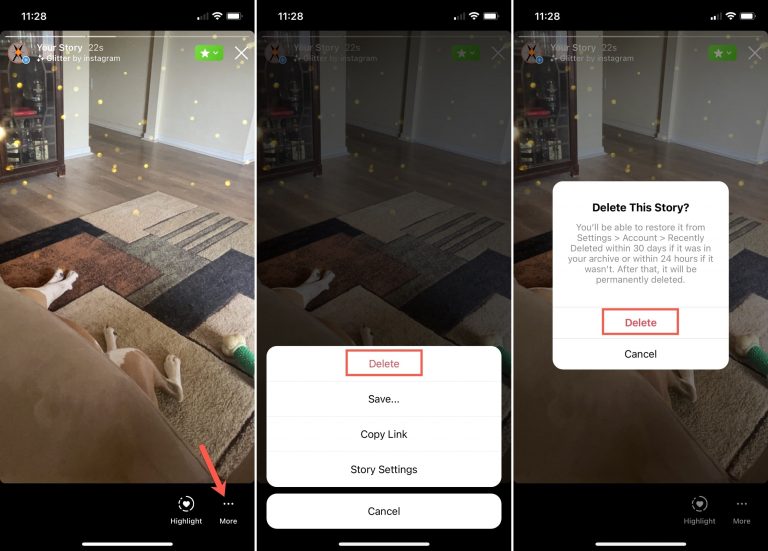
Step 5: Tap Delete on the conversation. A pop-up will appear on the screen, asking you to confirm your wish to delete the conversation. Tap Delete again to remove the conversation completely.
When you delete a conversation, it will no longer be visible in your inbox. Keep in mind that this only deletes the conversation for you and that it will still appear for other people included in the conversation. However, you can also unsend a message on Instagram Direct rather than deleting the entire conversation. Here is a step by step guide you can follow to delete private Instagram messages by unsending them.
How to unsend messages on InstagramSteps to delete private Instagram messages by unsending them.
Step 1: First, open the Instagram app on your device.
Step 2: In case, if you are logged out, log in by entering your User ID and Password.
Step 3: On the home page tap Paper plane icon in the top right of feed.
Step 4: On the new page, locate the conversation and go to the message you'd like to unsend.
Step 5: Now, tap and hold on the message, and then select Unsend > Unsend (iOS) or Unsend Message > Unsend (Android).
Once you unsend a message, it will no longer be visible to people included in the conversation. But there are the chances that the people you sent it to may have already seen your message.
(Information source: Instagram website)
READ | Instagram: Check steps to customise your nametag here
READ | How to clear Instagram search history
READ | Instagram: How to use the stickers
Social networks actively collect information about their users and are not at all eager to part with it - even if the account owner makes such a request. We figure out how to delete your data from Facebook, Twitter, VKontakte and Instagram.
Most social networks base their business on displaying advertisements. For their targeting (personalization of the display), a lot of data from the user profile is used, as well as information about actions in the social network, and sometimes beyond it. By creating a profile on Facebook, VKontakte or Twitter, the user accepts the confidentiality agreement, often without even reading it, and also leaves the privacy settings set by default. This leads to the fact that social services accumulate a huge array of data related to a particular person for years.
Of course, Russian legislation establishes certain rules for the processing of personal data of citizens and limits the possibility of their use, however, not all information about your actions in social networks is subject to Law No. 152-FZ and other regulations. In addition, by registering an account, we usually give the service consent to the processing of our data. However, the operator is under no obligation to provide us with tools for self-management of information about itself.
Interestingly, foreign Internet sites are often more client-oriented in terms of personal data management. This is partly due to more stringent legislation (primarily European and American), partly due to more developed traditions regarding the secrecy of correspondence and personal life, a higher culture of handling such information. Nevertheless, for both Russian and foreign social services, the rule is true: it is much easier for them to become a user and a donor of information than to delete this information later.
In order to minimize the amount of data collected about you by the social network, we recommend that you pay attention to your profile privacy settings as soon as possible (ideally, immediately after registration). If you did not immediately limit the "appetites" of the site, try deleting some of the accumulated information. We have prepared short instructions on how to do this on Facebook, Instagram, VKontakte and Twitter.
Facebook collects a lot of data about the activities of its users. Information that allows you to more accurately target (and therefore sell more expensively) ad impressions is the basis of a social network business. Therefore, she knows and remembers a lot about you: what and when you published, whose post was “liked” and what information they were looking for. Moreover, sometimes Facebook shares some of this data with other online resources - as part of partnership agreements and with your consent (remember the boxes that you checked when logging into a third-party service using your account). There is also a reverse scheme - online stores, banks, taxi services and other companies transmit data about your actions to Facebook in order to “catch up” with you with their advertising on the social network.
Nearly two-thirds of Americans don't trust Facebook to store their personal data, according to a study by NBC News and The Wall Street Journal. If you are also uncomfortable with being tracked by a social network, we recommend limiting its activity in relation to your personal data, as well as deleting information that you do not want to share. This is not to say that this is a very simple and convenient process, but there is an opportunity to clean up your personal data box.
First of all, we recommend downloading the archive of information collected by Facebook about you - in order to understand the scale of the problem and just in case. Here's how to do it:
By default, all types of data that Facebook collects about you are selected; if necessary, you can disable the download of individual sections. Select the file format - HTML or JSON - as well as the date range and quality level of downloaded photos and videos (the size of the archive depends on this), then click the "Create file" button. In an hour or two, a link to download the archive will be sent to the email associated with the account.
Let's start deleting information. Unfortunately, Facebook does not allow you to “wholesale” destroy all personal information or individual groups of data, but it is possible to get to each individual record. Open the same "Your information on Facebook" section (see above) and select "View my information".
Figure 1. User information collected by Facebook
This is a comprehensive library of Facebook data related to you: information about all posts, photos, search history and interactions with other users.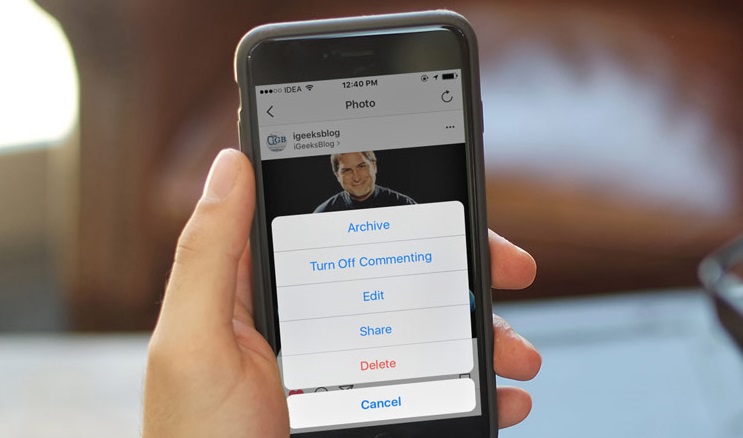 We recommend that you carefully study each section and delete redundant data about yourself. Here is a list of 5 sections that you should take a closer look at:
Finally, we recommend that you visit the Off-Facebook Activity page, which is also located under Your Facebook Information. Here you will find data about third-party sites and services that transmit information about you to Facebook, you can see what specific information they share (section "Manage information about actions outside of Facebook"), and delete it (section "Clear history").
Instagram is part of the Facebook media empire, so the conditions for storing, using and administering user data are largely similar. You can view, download and - in some cases - clear information about your activities within the service. Most of the features for managing your information on Instagram are located in the "Security" section of the "Settings" menu.
In the Data Access section, you can see what information the social network has collected about you. Not all data can be deleted, but the information from the "Account Activity" section can and should be cleared.
Figure 2. User data collected by Instagram
The Apps & Sites menu item contains information about Instagram-related third-party services. If you used your account details to log in to another site, then its owners may have access to some information from your profile. We recommend that you audit the connected services and remove those that you no longer use.
Instagram stores and uses your search history for personalization purposes. This information is involved in the formation of a "smart feed" and the display of targeted advertising. You can view the relevant data and clear it in the "Search History" section.
To download an archive of all the data collected about you by Instagram, you need to go to the "Download data" section, enter the email address where the link will be sent, and click the "Request file" button. Interestingly, you can specify any mailbox as a recipient, not just the one associated with your profile. To verify the request, Instagram will prompt you to enter a valid password for your account.
Just like Facebook, Twitter collects a lot of information about you to manage smart feed (show posts based on your preferences) and target ads. Removing or preventing the storage of some of such information may affect the operation of these services; This is something to keep in mind when changing your privacy settings on Twitter.
You can download data about you accumulated by the social network; this will allow you to understand what personal information Twitter holds, as well as to have an archive of published posts and photos. To request a download of information, follow these steps:
After the social network creates an archive with information about you, a link to download it will be sent to the e-mail specified in your account.
Unfortunately, you can remove all information about yourself from Twitter only by deleting your profile, and even then in this matter you will have to rely on the honesty of the service. However, you can adjust the privacy of your account to reduce the amount of information about your activity saved by the social network. To do this, in the "Settings and Privacy" section of the main menu, select the "Privacy and Security" item.
Figure 3. Off-Twitter Data Management Menu
Under the Sharing and Actions Off-Twitter section, there are four important privacy sections:
 If you do not want such close attention to your person, disable these features.
 To complete the process of removing redundant data about yourself on Twitter, take a look at the "Security and account access" section, which is also located in the "Settings and privacy" menu. Here you can edit the list of applications that are associated with your account - for example, they used its data for authorization.
Unfortunately, the leading Russian social network does not provide the user with advanced tools for managing personal data. Even the basic function of downloading an archive of personal information appeared in it only a couple of years ago. To ensure the necessary level of confidentiality of information, the creators of VKontakte offer to set the visibility of information about you for other people and services (this can be done in the "Privacy" section), but they do not allow you to regulate their storage and further use.
You can delete all information about yourself from VKontakte only when deleting your account. However, even in this case, your data will be stored on the servers of the social network for some more time, during which you will be given the opportunity to restore your profile.
Figure 4. Information about data management in VKontakte
select the "Data Management Order" section. From it you can find out what information the social network collects about you and how it uses it. The button for requesting the accumulated data archive is located at the bottom of the page. The download link will be sent to the email address associated with your account. The term for completing the application is from three hours to several days, depending on the composition of the requested information.
The most effective way to delete data from social networks is to completely delete your account. Theoretically, one month after you have deactivated your profile, all data associated with it should be deleted from the servers of the company that owns the service. In practice, this does not always happen. If, 30 days after deleting your account, you find that your information is still being used by a social network, you need to contact its technical support with a letter withdrawing consent to the processing of personal information, and if this does not help, write a complaint to Rospotrebnadzor.
However, deleting an account is a drastic measure. In the vast majority of cases, information about the user's actions in the social network is used to make his work with the service more convenient. Simple rules of information hygiene will help you find a balance between a comfortable level of privacy and using the opportunities of the site for communication and entertainment:
 Disable the access of the social network mobile application to your geolocation, prohibit integration with the contact list on the phone, cancel saving the search history. Check the status of these settings regularly so that the social network does not change your privacy level unilaterally.
 Twitter LinkedIn Facebook E-mail address
The Interleaved Linked List (SList) simplifies the task of inserting and removing from a linked list. SLists are implemented using a non-blocking algorithm to provide atomic synchronization, improve system performance, and avoid issues such as priority inversion and lock convoys.
SLists are very easy to implement and use in 32-bit code. However, they are difficult to implement in 64-bit code because the amount of data exchanged by the native interlock data exchange primitives is not twice the address size as it is in 32-bit code. In this way, SLists allows high-level, scalable algorithms to be ported to Windows.
Windows 8. Starting with Windows 8, 64-bit code is available for 64-bit code, such as InterlockedCompare64Exchange128 .
Applications can use SLists by calling the function InitializeSListHead to initialize the head of the list. To insert elements into a list, use function InterlockedPushEntrySList . To remove items from the list, use function InterlockedPopEntrySList .
All list items must be aligned to MEMORY_ALLOCATION_ALIGNMENT boundary . Unshifted elements can lead to unpredictable results. See _aligned_malloc .
See "Using singly Linked Lists" for an example.
The following table lists the functions of SList.
| Function | Description |
|---|---|
| InitializeSListHead | Initializes the head of a sequentially linked list. |
| InterlockedFlushsList | Clears the entire list of elements in a sequentially linked list. |
| InterlockedPopEntrySList | Removes an element from the front of a sequentially linked list. |
| InterlockedPushEntrySList | Inserts an element at the front of a sequentially linked list. |
| InterlockedPushListsList | Inserts a single-linked list in front of another sequentially linked list. |