In recent years, Chatbots have taken giant steps in a world that is becoming more and more digital. These little robots have been evolving to interact much better with us and give us better support experiences.
They have taken businesses to a new technological level and have managed to save companies hundreds of thousands of dollars in staff costs for the customer service sector.
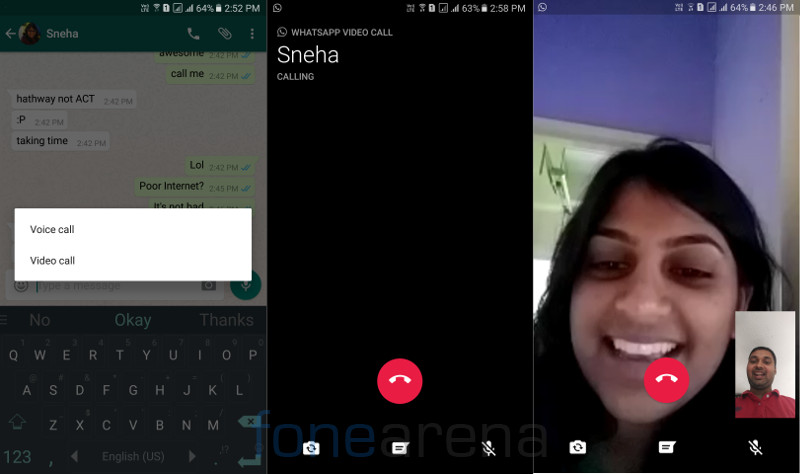
More and more companies are creating their own chatbots and there are certain applications that are expanding their platform to offer them. An example of this is WhatsApp. In the next post we will tell you how to create Chatbots for WhatsApp.
What is a ChatbotA Chatbot is a system or computer program powered with artificial intelligence capable of mantaining conversations with human beings.
They are in charge of simulating a human conversation. Their purpose is to help in the different customer service departments of all companies to save money and to ensure a more pleasant experience for customers. While most chatbot publicity focuses on customer-facing scenarios, there are significant employee benefits as well. A chatbot can help streamline workflows and assist employees with onboarding, data retrieval and satisfaction surveys.
Before talking about what are the Chatbots for WhatsApp let's talk a little about what this application is. WhatsApp is an instant messaging tool that allows you to share not only text messages but also multimedia messages such as photos and videos through an internet connection.
It is widely used throughout the world and it can be said that it is the most popular of all. It works on any smartphone and also on your personal computer. Thanks to its popularity, WhatsApp has grown so much that it has been developing new options so that companies can make themselves known through this application.
Chatbots for WhatsAppChatbots continue to offer great benefits to businesses and consumers, and Chatbots for WhatsApp are trying doing the same. As the most popular messaging appication, WhatsApp opens a new channel where you can promote your products and offer customer support. Chatbots on WhatsApp allow you to automate those tasks, by running scripts or automatic answers 24/7 with little human supervision.
Although you may not believe it, creating a WhatsApp bot is simple and easy, but only when the best practices are implemented. This guide will help you gain more solid understanding of what a WhatsApp Bot is and how to make one.
What is a bot for WhatsAppA WhatsApp Bot is a chatbot program or software that can be used specifically in the popular WhatsApp encrypted messaging application. A WhatsApp Bot can be used for conversational marketing, sales, promotions and can help you manage your support requests from clients, with little or no human supervision.
You can also give your customers assistance on how to purchase and answer their questions immediately. This allows you interact with a large number of customers more efficiently by offering responses to frequent questions automatically or by confirming appointments, purchases, and deliveries in real time, improving customer experience and saving you a lot of valuable time and money.
When you create your own WhatsApp bot, your e-commerce opportunities are endless. An by customizing the script that uses the WhatsApp bot you can customize the experience for all your customers.
The encryption of WhatsApp also makes it an easy and safe way to communicate with them in real time.
Creating a bot for WhatsAppCreating a Chatbot for WhatsApp is easy when you have a clear strategy on how to do it. The construction of Chatbots for WhatsApp also shares similarities with the creation of a Facebook Messenger Bot, but offers more flexibility in personalization.
These are the steps you need to create Chatbots for WhatsApp.
Step 1: To create Chatbots for WhatsApp you must first Request the WhatsApp Business API.In other words, before you can create Chatbots for WhatsApp, you should request the beta service called WhatsApp Business API or request to use their API through a third party (we can help you speed up the request and approval if you register on our platform). Currently, direct requests to WhatsApp are encouraged for medium and large-sized companies.
When requesting approval, you can choose to be a customer or a solution provider. The application also requires the name of your company, the URL of the website and the name and information of the company representative.
Once your application has been reviewed and approved, you can start using the WhatsApp API.
Step 2: Think about the conversationIf you want to make sure that your chatbot will answer your clients' questions, it is important to think about the dialogue when it is being developed. This applies not only to any of the Chatbots for WhatsApp but to all kinds of Chatbots in general.
That also includes thinking about how your robot should answer the questions you will most likely get.
You can choose between two types o conversations, directed and open. Directed conversations guide the user with the use of options and validations to a specific purpose, such as asking availability, order status, creating appointments etc. An open conversation lets users ask questions and send messages openly without being directed to a specific task.
A chatbot platform, like ChatCompose, can help you save time by creating Chatbots for WhatsApp so you do not have to do it from scratch.
You can add scripts for specific tasks (lead generation, support ticketing, etc.), prebuilt response templates and conversation flows this way. A Platform will also help you improve the chatbot experience by showing you the accuracy of your responses, bounce rate and general sentiment of a conversation.
When you use a chatbot platform, you can create a demo of your application before producing the full version. This facilitates the visualization of the changes you need to make before investing more time and money in the production of your WhatsApp bot.
Step 4: Test your Chatbot for WhatsAppTest your bot to make sure it works well by answering your customers. Fix errors and try again to check its functionality. This will guarantee that the product will be of high quality and that it is ready to improve the customer experience.
The work to develop Chatbots for WhatsApp does not have to be just for WhatsApp. You can use a platform, to create a General Bot that can be displayed on a variety of channels. This way you can install the same bot on different channels (Website, Facebook, Telegram etc.) to offer a standardized experience that uses the same scripts and responses on all channels.
Step 5: Install the chatbot on a numberOnce your chatbot is developed and your number approved, you can install the chatbot on that number. You will only have to give it a name, an icon (optional), contact details, and link it with ChatCompose.
Step 6: Monitor and Improve your chatbotYou can monitor your chatbot conversations through our platform to gain knowledge on how to improve your responses and scripts.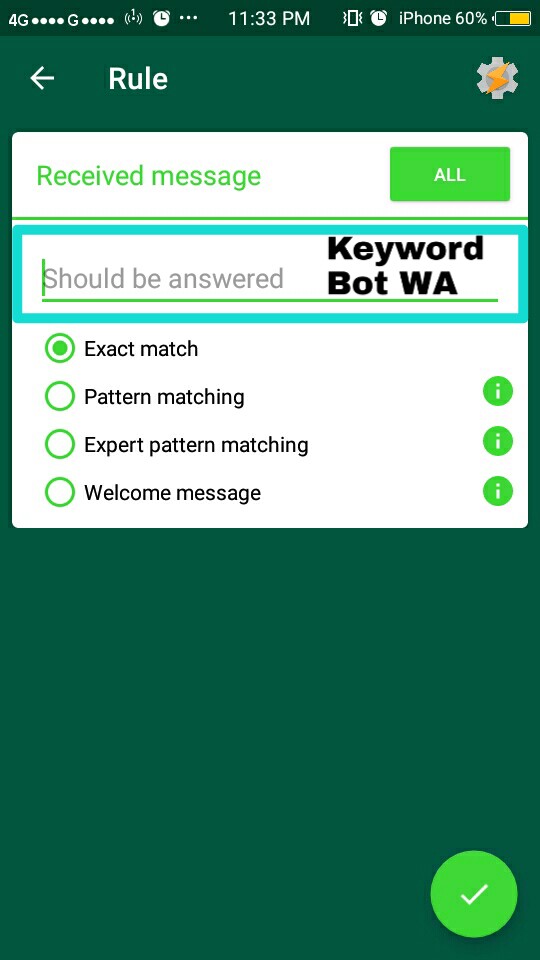 Check responses, the information captured and conversation abandonment of users to get tips on how to respond more accurately, and keep them more engaged.
Keep in mind that chatbots for WhatsApp work differently than chatbots for Facebook or the Web. You can read more information here.
Since you’re here, it means that you have understood that you need to engage your customers over the channel they are most comfortable using. Kudos to you!
You know that your customers are rather active over WhatsApp. Now, you have three questions on your mind.
Well, we’ve got all the answers you are looking for.
We’re going to help you decide whether you need a WhatsApp chatbot, then show you exactly how to create it, and walk you through all the steps involved in deploying it on WhatsApp in just 5 minutes.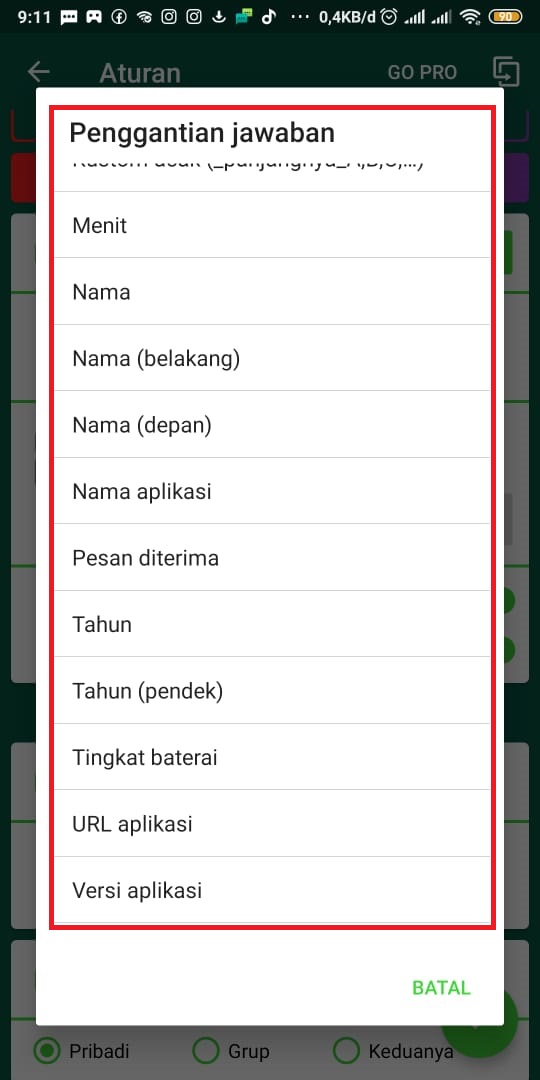 Grab on to your seats. We’re getting started!
A WhatsApp chatbot is a system that either uses artificial intelligence or pre-programmed rules to engage your customers and audience on the WhatsApp platform.
Engati's WhatsApp chatbots use AI and our proprietary NLP (Natural Language Processing) engine to intelligently interact with your customers. You can use them to answer customer questions about your products and services, share content, drive sales, and send notifications regarding orders, payments, shipping, etc.
WhatsApp business chatbots run over the WhatsApp Business API to intelligently engage with your customers, employees, students, and other types of users, without any need for human intervention.
If you have a very small clientele, you might be able to survive by manually responding to each message. But as your business grows, that will become harder.
However, even if you have a limited customer base, there is still one major problem with manually answering every question - a lack of speed.
Your customers will have to wait for you to get around to answering their questions. This means that more often than not, they won’t get an answer when they want it. That’s never a good idea.
If you’re into eCommerce or retail, that puts you in a more challenging position. 53% of online shoppers abandon their carts for lack of instant answers.
So, if you’re interested in having satisfied customers and protecting your carts from abandonment, you should create a WhatsApp chatbot for your business.
Here’s where we show you how to make a WhatsApp bot in 5 steps.
Here are the steps to create a WhatsApp chatbot in 2022:
When it comes to creating a chatbot, you’ve got two choices.
Building it with a no-code chatbot platform like Engati is the wiser choice. After all, why would you make the effort to painstakingly code a chatbot when you can build your WhatsApp chatbot visually?
We can help you get your bot up and running and start delighting your customers much faster than if you chose to code it yourself.
Also, we gives you in-depth analytics about your conversations with customers, helping you measure the effectiveness of your WhatsApp messages.
Bonus: You can even automate the training of your bot with the help of our DocuSense technology. It can parse through the documents you upload and assimilate 12 pages of data every 8 seconds.

In the Engati portal, navigate to the Deploy tab and select WhatsApp. Now you’d want to choose your provider from the drop-down menu. To set up your WhatsApp bot in the fastest way possible, choose 360Dialog as your WhatsApp provider (doing this also allows you to create WhatsApp message templates that can be used for broadcast messages directly from the Engati portal).
Choosing your WhatsApp Business API service provider
Now, you’re going to have to update a couple of fields:
You’d want to log into your 360Dialog account. Now, you need to navigate to the ‘WhatsApp account’ section.
You’ll be able to find your WhatsApp business phone number here.
Copy your registered and approved WhatsApp Business phone number and paste it into the phone number field on the Engati portal. Make sure to add the country code without any spaces or a ‘+’ sign.
Enter your Business phone number
Now, go back to the ‘WhatsApp account’ section on the 360Dialog portal. Click on ‘Generate API key’.
Generate your WhatsApp API key
You can only generate your WhatsApp chatbot API key once, so copy it and store it in a secure manner.
Now paste your API Key in the Engati portal.
Now, if you want to use voice interactions on your WhatsApp business chatbot, enable voice input (use the checkbox in the bottom left corner, as depicted in the image above) and upload your JSON voice file.
Now that you’ve entered all your details, you’re ready to test the Engati chatbot that you created on WhatsApp.
Now, I know what you’re thinking. You’ve learned how to make your WhatsApp bot. Now, the question in your mind is, ‘Can I integrate my WhatsApp bot into my website?’
Don’t worry. We are going to show you how to do that too.
Create your Whatsapp Chatbot for 5$ a day.
Schedule a demo
1
Larsen & Toubro (L&T) needed a solution to engage their workforce of 3,30,000 employees across sites, answer all their questions, and receive progress updates from them.
They deployed an intelligent chatbot operating in English and Hindi over WhatsApp and Telegram.
It facilitates communication between employees working at their various construction sites and off-site project managers. By sending questions to the workers and collecting their responses, the bot has reduced the time spent on daily reporting.
It has even simplified the process of tracking progress across multiple projects for the project managers.
2
Poppy’s is another major retailer and eCommerce store that opted to use a WhatsApp bot with Engati Live Chat. This power-packed combination of automation and the human touch helps with lead generation as well as customer support, ensuring that customers get all their questions answered instantly, irrespective of complexity!
Their bot can pull information about all their products and share it with customers in both English and Spanish.
Since catalogs are constantly changing, training the bot manually would not make sense. Poppy’s did not want to upload FAQs about every single product manually.
That’s why they opted to use DocuSense. Our DocuSense technology uses cognitive search to parse their documents and answer customer questions based on the information in them.
The result? Customers get answers to all their questions, while Poppy’s team does not need to spend time manually training their bot!
3
Mall of the Emirates uses Engati to provide customer service and run its loyalty program. They use an intelligent chatbot for WhatsApp, along with Live Chat, to give their patrons a fantastic experience.
Their bot uses Optical Character Recognition (OCR) to pull details from receipts uploaded by guests. So, all they need to do is send their receipts to the bot, and their loyalty points are automatically allocated without human intervention.
1
To deploy a chatbot on WhatsApp Messenger, all you need is:
1. Verified business on Facebook
2. Registered WhatsApp business phone number
3. Official WhatsApp Business API (which Engati helps you get)
2
Session messages are messages sent within 24 hours of a user-initiated conversation. If you wish to initiate a conversation with customers after that window of time has expired, you would need to send them a predefined template message. To limit spam, WhatsApp used to control the approval of the templates and it even charges for these messages.
Earlier, WhatsApp was against using template messages for marketing purposes, so the company only allowed you to send messages regarding payment confirmations, account updates, order status, shipping updates, etc. Any templates that WhatsApp considered promotional were rejected, so you could not really drive marketing campaigns and announce discounts very effectively here. But that has since changed.
WhatsApp has recently permitted the use of promotional templates, thus making it possible for you to announce your sales and discount campaigns to your customers over WhatsApp, allowing you to drive more conversions, earn more revenue, and gain more value from your WhatsApp AI chatbot.
3
You can use broadcasts to send plain text messages, messages with options, and even take users through paths. We even allow you to schedule your broadcasts and target them to specific segments of your users. To broadcast messages on WhatsApp outside the 24-hour window, you will need to use a template message.
The good news is that you don’t need to go to the 360Dialog portal and create new broadcasts from there every time you want to send a template message.
All you’d have to do is set the templates up directly in the conversation flow while building your WhatsApp API chatbot by making use of the Template Message node.
4
WhatsApp distributes its business APIs through its partners. When you create a WhatsApp bot on our platform, Engati will help you get access to these APIs.
5
Since WhatsApp does not allow advertisements to be run on their platform, they earn revenue by charging for the use of their WhatsApp APIs. WhatsApp Marketing is thriving and you must leverage the power of reaching out to your customers via WhatsApp. So, while it is not free to deploy a chatbot, through our partnerships with WhatsApp API providers, Engati can help you do that at a competitive price.
6
You can segment your existing user lists on the basis of user attributes, but there is an even easier way for you to do that. It is possible for you to set up your WhatsApp chatbot to automatically subscribe your chatbot users to broadcast campaigns on the basis on the actions that they take while interacting with the template messages from your chatbot.
In addition to that, you can also choose to upload a list of users with a certain attribute and send your broadcast message campaigns to them.
This allows you to target your users with broadcast messages that actually appeal to their interests, rather than annoying them with irrelevant announcements.
7
WhatsApp chatbots play an important role in an effective omnichannel support strategy because over 2 billion people around the world use WhatsApp. These users open the app an average of 23 to 25 times a day, which means that WhatsApp Messenger is definitely an important messaging app for them.
It plays into your broader omnichannel support strategy because the bot you deploy on WhatsApp can also be deployed on Facebook Messenger, Instagram, Telegram, and 10+ other messaging channels. All your conversations across these channels can be managed in a OneView inbox, allowing your agents to always have context about past conversations across all channels. This means that your customers can continue conversations where they left off when they switch channels, making the experience truly omnichannel.
8
The WhatsApp Business API is used by medium & large businesses to scale up their customer engagements on WhatsApp with interactive buttons, broadcasts, templates, and other special features that are not available with WhatsApp Business App.
It is used the most by large businesses that have a lot of customers and a business suite that integrates with their other systems, software and data.
Create your WhatsApp chatbot now!
Create your own Whatsapp chatbot for 5$ a day
Schedule a demo
Use WhatsApp mailings for various business tasks:
Subscribers open triggered messages better than mass mailings and are willing to engage in dialogue.
Turn potential customers into buyers using message chains with useful content.
Ask customers to leave feedback after the purchase and rate the company's work. This way you can improve the service.
Create a support chat to advise and assist customers 24/7.
Use tools that will help you communicate effectively in the messenger
Place a subscription widget on the site and collect your WhatsApp messenger audience. In the service, you can also send an email or SMS campaign to the existing database with an offer to subscribe to the WhatsApp campaign.
Create triggers, set up auto-responses and define bot logic. To build an effective sales funnel, think about the sequence in which messages will be sent to subscribers.
Invite colleagues to your SendPulse account to work with conversations as a team and support multiple chats simultaneously from different devices.
Information on the number of delivered, sent and read messages is available in the statistics section. Analyze which messages are read and which are not. Based on this, correct the text of messages and change the time of sending.
SendPulse provides a public API with which you can integrate the WhatsApp channel into your infrastructure, CRM or analytics system.
More API Documentation
Companies communicate with customers on Whatsapp in several ways: through the WhatsApp simple client, the WhatsApp Business app, or the WhatsApp Business API integration. Before connecting, weigh the pros and cons, having studied the main differences.
Communicating with customers via app on mobile or PC
The application runs on one device with one user. In a simple client, you can use WhatsApp from a PC, and the WhatsApp Business application is installed on an Android, iOS phone.
It is impossible to distribute responsibility between managers for correspondence in the messenger, because access to correspondence is only on one device.
You are unlikely to be able to send bulk emails because WhatsApp blocks bulk promotional emails. The same message can only be sent to 256 recipients at the same time. It is possible to set up auto-replies to frequently asked questions from customers.
Unable to integrate WhatsApp with your CRM and other projects.
Communication via SendPulse chats or integration with your system
SendPulse receives and sends WhatsApp messages. Access to the SendPulse panel is possible from different devices for all members of your team.
Invite new users to your SendPulse account so that several managers can respond to clients at the same time.
Use approved templates for newsletters and service mailings that allow you to be the first to start a conversation. There are no restrictions on sending the same messages at the same time.
Using SendPulse's open API, integrate WhatsApp capabilities with the company's internal infrastructure: CRM, chat services, and other projects.
Connect WhatsApp
Officially, WhatsApp allows access to its API only through partners. SendPulse provides an API for sending to WhatsApp through the official channel. Connect WhatsApp Business API via SendPulse and enjoy a seamless service. We provide the following terms:
To connect to the WhatsApp Business API, you must be verified by WhatsApp. To do this, you need to register a company page on Facebook, add it to Facebook Business Manager and collect all the necessary documents - we provide advice and assistance at every stage of connection.
WhatsApp blocks users who connect through gray schemes. Connection through the official channel excludes unreasonable blocking. The main thing is to get the consent to the mailing from users and strictly follow the WhatsApp requirements for content and message design.
Connection is completely free, you pay only for the number of sent messages.
Use WhatsApp in conjunction with other messengers. In SendPulse, you can comprehensively set up messenger marketing: connect bots and send messages to Instagram, WhatsApp, Telegram, Facebook, and also make Viber mailings.
Install the application to quickly respond to messages from Instagram, WhatsApp, Telegram and Facebook, work with subscriber data and analyze statistics.
Dialogues that you start yourself. To send a message first, you need to use an approved template. The price of a templated message depends on the country you send it to.
Every month, the first 1000 sessions will be free for you, and you will be able to send even template messages without paying..
Learn more about WhatsApp message charges.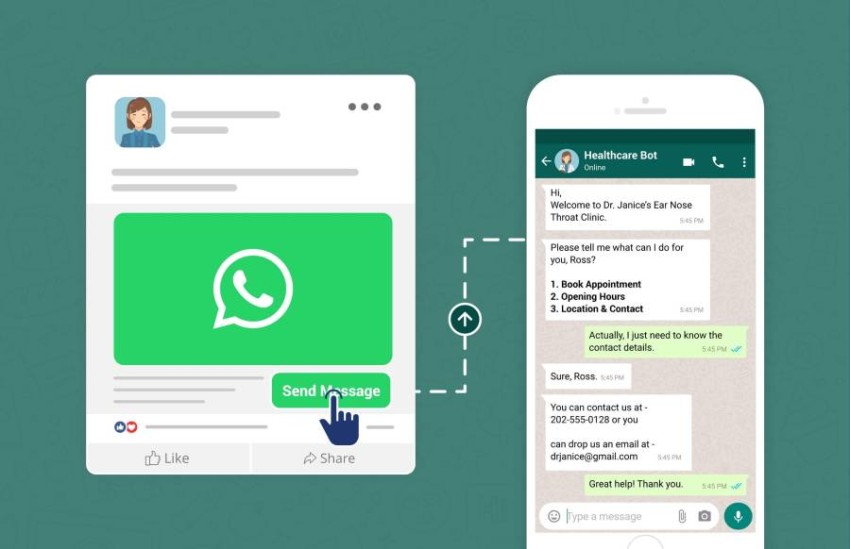
Go to tariffs
On any paid SendPulse subscription, you can connect to the WhatsApp Business API for free for 7 days. If you don't have an account, register on the SendPulse platform and connect to a paid plan. Then create Facebook and WhatsApp business accounts and connect your number to the WhatsApp Business API. Read more about how to connect to WhatsApp Business API for free in just a few minutes.
If you used a number with WhatsApp Business API, you can port your number and change provider (BSP) to create chatbots in the constructor. Follow the instructions to successfully migrate your number.
WhatsApp policy has limits on the number of recipients of messages in a 24 hour period, which depend on the level of the sender. The first level allows you to send messages to 1,000 unique users within 24 hours. Read more about how WhatsApp message limits work.
Use the constructor to create a message thread for your WhatsApp bot. Develop the structure of the bot, specify keywords and set up auto-responses. Read more about how to set up a message thread for WhatsApp bot.
Select the connected bot and recipients, fill in the content of the message and define the send time. After sending, you can check how many messages were delivered and how many subscribers interacted with the mailing list. Read the step-by-step guide on how to create a WhatsApp newsletter.
Distribution of messages with the same content to all subscribers is possible according to the approved template. Such a template can only be used for transactional and triggered mailings without promotional content. You can create your own templates in the "Chatbots" section, in the "Templates" tab. Each template is moderated by WhatsApp. After the template receives the "Confirmed" status, you can start sending mailings based on the template.
The chain builder is the main tool for customizing your bot, which will welcome new subscribers, advise, sell products and notify the manager about the subscriber's question in the chatbot. As well as collect and filter data and send it to you in the system for further processing.
You just need to specify the keywords, define the structure of the bot and move the elements, setting them one by one.
Below is a detailed table of contents for easier navigation through all possible starts and chain elements that can be added.
By default, Welcome Series, Standard Response, and After Unsubscribe are available. You can also create your own triggers.
Select your bot. Go to the Bot Structure tab and select the launch type to edit.
Sent immediately after subscribing to your chatbot by entering the /start command or via the subscription widget.
Such a chain introduces the subscriber to your chatbot, in it you can tell about your bot and its capabilities - how the chatbot will be useful to the subscriber, what information it can give, how often it will send mailings and what content.
Fired in response to subscribers' questions outside the chatbot scripts, as well as when sending a picture to the bot. Here you can add a message with the text that the manager will connect during the working day and the answer to your question.
You can set the chain launch interval from 1 minute to 24 hours - then the bot will not restart when the same command is entered.
The message chain that will run after the unsubscribe command - /stop or /unsubscribe.
You can create your own words - triggers, to which the bot will react and start the chain.
Click "Create New Trigger" and select the "Command" trigger type. Write a command from a word or several words. For example, "Order", "Tickets", "Price", "Tariff", "Delivery", "Terms of Delivery".
You can also set the callback prohibition here.
Read more: How to manage chatbot chain triggers
If the user enters part of your command, the bot will offer him a response in the form of a button with the name of your trigger - after clicking on it, the chain will start.
To disable this feature, go to your chatbot settings and select the option "Disable bot hints when message does not match exactly".
After creating a trigger, click "Create a chain" and start editing it.
It is important to think over the architecture and logic of your chatbot so that the user can easily find answers to their questions or successfully place their order by providing the necessary information.
Define the tasks of the bot, break its functions into sections, describe the relationships of the blocks, and then start creating the chatbot script in the constructor, adding elements one by one.
You can select the following blocks as the first element from which the chain starts: "Message", "Filter", "Random Selection", "API Request" or "Action".
For example, through the "Filter" and "API Request" blocks, you can check the subscriber's data and personalize communication by starting the chain only for those users who have or do not have the requested data or branch the chain and send different messages. And with the help of the "Random Selection" block, you can diversify the bot's auto-responses or create an A/B test.
To make a block a start element, connect the desired element to the Start block.
To see which trigger starts the chain, click on the "Start" block.
Using the "Message" element, you can create a message of any type and add various blocks to it: text, video, gallery, buttons, or request user data and the like.
The "Message" element can also be inserted in other places in the chain. For example, in the last block of the chain, you can thank the reader, confirm the order and send information with the collected variables, specifying whether everything is correct.
Type your message in the text box. You can also insert variables to personalize information and emoji.
To do this, click on {} in the upper right corner of the text field and select the desired variable from the drop-down list. Each user will receive a message with the value of the variable from their contact.
You can add the following variables:
last_message . You can also display the subscriber ID with contact_id . $bot_name and $bot_id are available. To connect the Message element to other elements, add a button or input element. This is one of the main elements of user communication with the bot - thanks to the button, the subscriber is involved and sets the direction for the further script of the bot.
To add a button, click "+Add button".
Set the text for your button - note that there is a limit of 20 characters. You can add emoji to button text.
The text on the button should be clear - it is important that the user understands what will happen after clicking the button and what exactly he selects. Make sure that the next block matches the text of the button to which it will be attached so that the logic is not broken.
You can also add a list button that opens a list of clickable option elements. Click "List", enter the text of the button, the name of the section and the titles of the section elements.
You can add up to 10 items. You can place all the elements in one section or make 10 sections of 1 element.
In one "Message" block, you can add either one list button or up to three regular buttons.
Diversify the information in your message with visual content that is consistent with the text.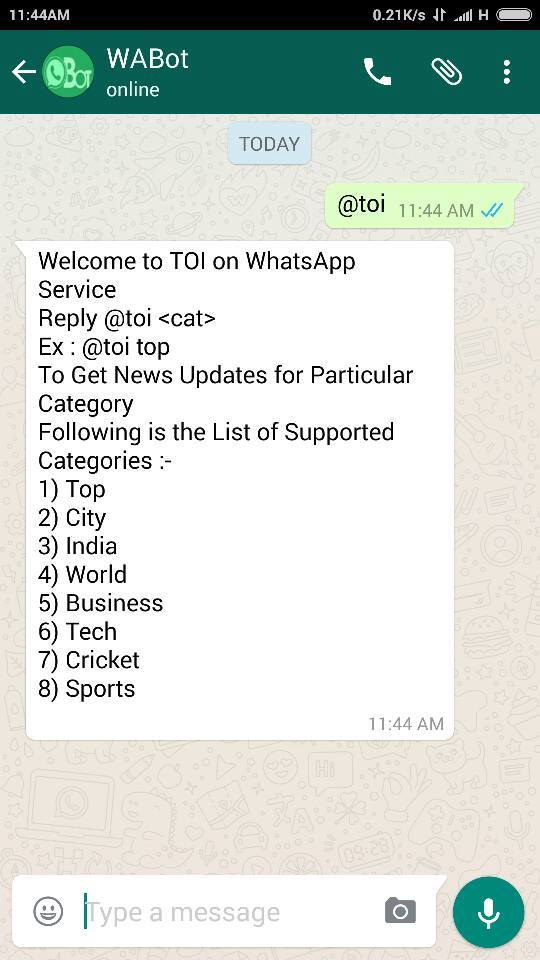
To do this, click "Add" and select the "Picture" element. Click the "Select File" button to upload an image from a computer or device, or drag and drop a file into the upload box..
There are no restrictions on the size of the image, but when adding a picture, keep in mind that the image resolution for WhatsApp will be 500px in width and 200px in height.
To download an image from a link, select "Download image by URL" from the drop-down menu and enter the link to the image in the field.
You can also specify a dynamic image path. For example, using the "API Request" element or from the a360 event, triggering an API chain, you can pass a product image and use this variable in the next message, displaying order data to the client.
To do this, select a variable or specify the JSON path in the field and pass the path to the image as the value of the variable. Thus, each client will receive an image according to his order.
You can add files in any format, except for executable files, up to 5 MB in size. Attach tickets, checklists, certificates, receipts, instructions, or other additional materials.
If you have a product catalog set up in Facebook Commerce Manager, you can add a product card.
Click Add and select Product. Enter catalog ID, product ID, message text and signature text.
To add multiple products, divide the products into sections.
See also: "How to add a product card in the WhatsApp chat bot."
You can collect responses from subscribers and store them in a variable for later use. The subscriber can enter a derived value, and you set up validation for this value - a string (for text values), a number, a date, a phone number, an email, a link, a regular expression, a geolocation, and an image or document.
Activate the "Wait for subscriber response" function. Select the type of validation, the message for incorrect data entry, and the variable in which to save the data.
For example, you have a request in the message block - "Press a number to get certain information." The validation type will be "Number", if the user enters a non-numeric value, he will be shown an error.
Another example is "Leave a link to your Facebook". Validation type should be set to "Link".
Read more: How to set up manual entry of user variables
The received email address, phone number and other user data are stored in the automatically created address book of the Email service.
You can also choose how long to wait for a response from the user. If the user does not respond within the selected time, the user's response timeout will expire and the chatbot will no longer validate the entered data to record the response.
You can also create quick reply buttons under the message so that the user does not enter his own values, but chooses from existing ones. You can add up to three quick reply buttons.
You can add quick responses for data with String, Number, and Regular Expressions validation types. For example, for the user to enter a specific word, enter the quantity of a product, or select a product category.
For data with "Phone" and "Email" validation types, the messenger prompts the user to use the contact details of his account.
Read more: "How to use regular expressions in chatbots"
Branch the script and send the next message, depending on whether the user has entered the requested data (green dot branch) or not (red dot branch).
By default, each added element in a block is placed at the end. Hover over the element you want to move and you can move it up or down.
You can connect the next element after the "Message" block using the button or the "Data entry" function. You can also continue the chain without waiting for the user's response. We recommend using it together with the Pause block to check if the subscriber has interacted with the chain and send a message after a certain time.
Read more: How to continue the chatbot chain without user action
Click on the blue circle in the block and drag a line from one element to another element to link them.
Double-click on the line to display the buttons for delinking.
An unattached chain block will glow yellow to remind the user that it needs to be tied.
A block with empty fields will be highlighted in red. For example, you selected a button but did not name it, you selected a link but did not specify it. Until you fill in the fields, you can't exit the element or persistence constructor.
You can lighten the structure of your bot by moving the reader to another thread.
After selecting the "Chain" action, select the previously created chain from the drop-down list.
The branch ends at the "Chain" block. After this block, you will not be able to continue the edited chain by adding other elements.
Using the "Action" element, you can do the following actions with the data of the subscriber who passes it:
Read more: How to use the Action element.
Segment customers based on their personal data and prior communications received. Select an element in the left panel and drag it after the block that will start your script branching.
Then select the condition itself. You can filter by: variable value, name, contact phone and country, presence of a tag, participation in a chain, sending a newsletter, last activity, date of subscription, day of the week, date and time of activation, presence of payment, opening a chat, incoming and unread messages.
Combine conditions by adding "each" or "any" operators, or add independent additional conditions.
In our example, we are filtering the values of the variables obtained through the "Data Entry" by setting additional conditions.
After adding the conditions, add the following elements of the chain to each of the options if the condition is met (green dot) or if the condition is not met (red dot).
Read more: How to use the "Filter" element in the chain builder.
You can query a third party server to create objects or get information. Get data and use it further in the bot.
You can write the received data to a variable or add it to the next message as JSONPath.
Select the "API Request" element in the left panel and drag it after the block where your script forks will start. Select the request type and enter the URL to send the request to.
After validating the request and receiving a successful response, store the value in a variable or copy the JSON Path from the response field to use in subsequent messages.
Read more: How to send and receive data from external sources
This is the period during which no automatic messages are sent to the subscriber. The pause can be set in minutes, hours or days.
You can choose to pause in between using the Time Period option, or up to a specific time using the Until Time option.
Select "Time period" and set a pause between sending elements of the chain from 1 minute to 24 hours. Use it in a chain, for example, to warm up a client. After the specified time, the next message will be sent.
Please note: WhatsApp only allows the next message to be sent after a user interaction for 24 hours.
If you select a pause between blocks of 1 day or more, you can set the time - at which time to send a message. The next day is considered to be the passage of the hour hand through 00:00 according to the time zone set in the personal account settings.
You can also select "Until Time" and set the delay until a certain time. For example, you can use this option to indicate business hours or the duration of a promotion.
Also, using the Pause element, you can set the condition for the execution of the next chain element: send always or when the subscriber is inactive.
Set up random sending of chatbot elements by branching its script to arrange quizzes, tournaments and A/B testing.
Drag the "Random Choice" element onto the workspace, connect it to the element from which you have the scenario branching.
Adjust the ratio for each of the options - what percentage of users will receive each of the options, or break the chain in an equal ratio. The higher the value, the more likely and the more users will get this option.
After adding all the blocks and checking the links between them, save the chain before exiting. To do this, click on the “Save and send to yourself” button in the upper right to test the chain and check if everything works correctly.
You can also save an updated version of the chain while leaving the current version unchanged. To do this, click "Save thread as new". The new chain will be saved in the "Chains" section.
Please note that there must be at least one "Message" or "Action" block in the chain.
And then you can choose "Save and Exit".