Home » Misc » How to block your facebook profile from public
How to block your facebook profile from public
How to Hide Myself From Users on Facebook | Small Business
By Jason Spidle
Facebook provides a full range of privacy tools that enable you to control who can see your profile, pictures and status updates. With these privacy tools, you can completely hide your profile from other users on Facebook. Depending on your needs, you can either hide your profile from specific users or you can configure your profile to be invisible to everyone except friends or friends of friends. On the other hand, if you only want to hide your profile when you are signed out, you can do so by deactivating your account.
Hide From Specific Users
Navigate to Facebook and sign in to your account.
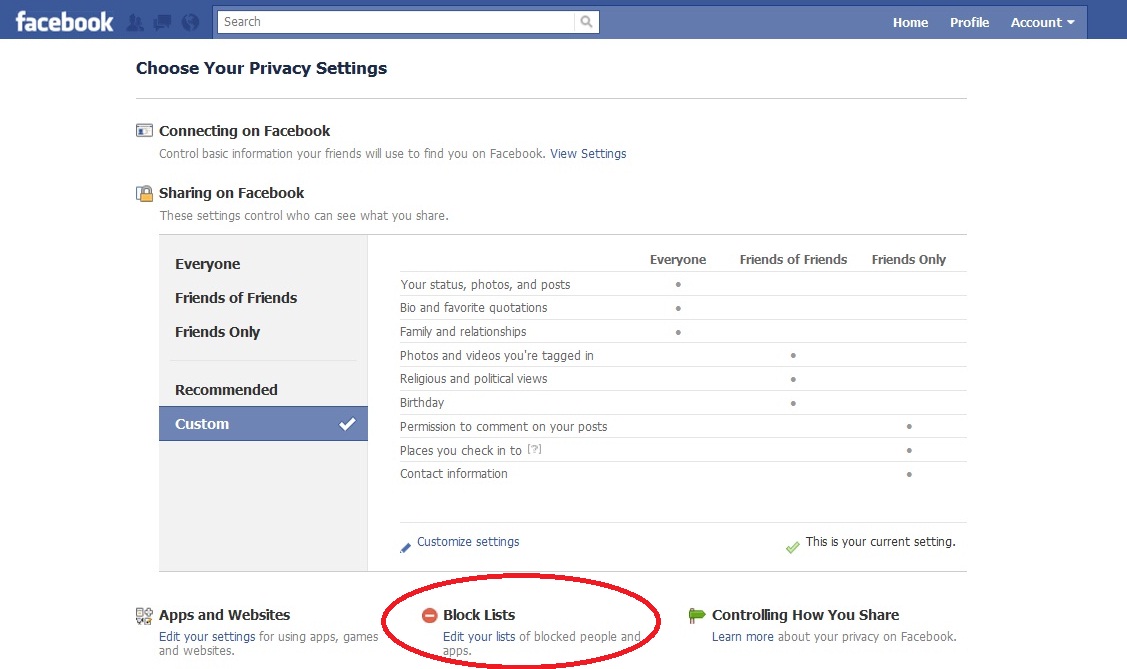
Click the arrow to the right of the "Home" menu and select "Privacy Settings" from the drop-down menu.
Scroll to the bottom of the page and click "Manage Blocking" in the Blocked People and Apps section.
Type the name or email of the user you want to hide your profile from in the "Block Users" section and then click "Block. " If you are blocking a user by name, you may be presented with a list of users with that name from which you will need to press the "Block" button beside the specific user you want to block.
Hide From Public Searches
Navigate to Facebook and sign in to your account.
Click the arrow next to the "Home" menu and select "Privacy Settings" from the drop-down menu.
Click "Edit Settings" in the "How You Connect" section.
Click the "Who can look up your profile by name or contact info?" drop-down menu and select "Friends of Friends" or "Friends" to limit the people who can view your Facebook profile. This hides your profile from being visible in public searches on Facebook or from search engines like Google.
Click "Done" to save your settings.
Hide When Signed Out
Navigate to Facebook and sign in to your account.
Click the arrow to the right of the "Home" menu and select "Account Settings" from the drop-down menu.
Select the "Security" tab and then click "Deactivate Your Account."
Select "This is temporary, I'll be back" and then click "Confirm."
Enter your Facebook password and then click "Deactivate Now." You will be signed out of Facebook and your profile is hidden from everyone on Facebook. Reactivate your account by signing in as usual from the Facebook home page.
References
Facebook Help Center: Blocking People
Facebook Help Center: Privacy: Search Privacy Settings and the Suggestions Feature
Facebook Help Center: How Do I Deactivate My Account?
Facebook Help Center: I Deactivated My Account. How Do I Reactivate It?
Writer Bio
Jason Spidle is a technology enthusiast and writer. His writing on computers, smartphones, Web design, Internet applications, sports and music has been published at a variety of websites including Salon, JunkMedia, Killed in Cars and The Columbia Free Times. Spidle maintains a number of blogs featuring poetry, short stories and other fiction.
How Can I Hide My Facebook Account From Search?
by Madalina Dinita 2 Comments
Facebook wants you to connect to as many people as possible. But according to Dunbar’s number, humans can only maintain up to 150 social relationships. That’s why having thousands of Facebook friends can drain your energy.
Of course, you can tweak your settings so as to hide posts from friends or groups. But one of the quickest ways to avoid Facebook information overload is to limit the number of people that can access your profile and send you friend requests.
That’s why many users prefer to hide their Facebook accounts from public searches, or temporarily hide their profiles without deleting them.
How Can I Hide My Facebook Account?
Can I Hide My Facebook Account From Public Searches?
Before we dive in, it is worth mentioning that you cannot completely hide your Facebook profile from public searches. What you can do is limit who can find your profile.
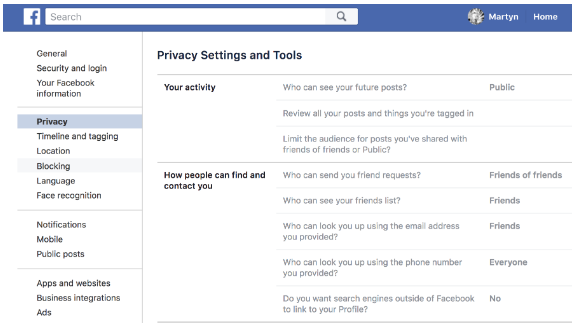
Click on More options and select Settings & Privacy.
Then go to Settings, click on Privacy and navigate to How people find and contact you.
Customize your settings and select how people can find you on Facebook.
Who can send you friend requests? Select Friends of friends. In this manner, people who are not friends of your friends, won’t be able to send you friend requests.
Who can look you up using the email address you provided? Select Only me to prevent people from finding your FB profile using your email address.
Who can look you up using the phone number you provided? Select Only me to block people from using your phone number to find you on Facebook.
Do you want search engines outside of Facebook to link to your profile? Select No to prevent other search engines from linking to your FB account.
Even if you enable all the settings above, people will still be able to look you up and find you using your full name. Additionally, you can also hide your last name on Facebook to prevent other users from finding your profile.
Can I Hide My Facebook Account Without Deactivating It?
Another way to hide your Facebook account without deleting it to temporarily disable it.
Click on the drop-down menu in the top right corner.
Go to Settings & Privacy, and select Settings.
Then click on Your Facebook Information.
Go to Deactivation and Deletion.
Select Deactivate Account, and follow the on-screen instructions.
Conclusion
If you want to hide your Facebook profile from public searches, navigate to Privacy Settings and select “How people find and contact you”. Then prevent other users from looking you up using your email address and phone number. Alternatively, you can also disable your account. Are you planning to disable your account for more than one week? Let us know in the comments below.
Filed Under: Internet Tagged With: facebook
Reader Interactions
How to hide all information about yourself from Facebook in a few minutes – AIN.UA
March 18, 2015, 15:00
219585
Social networks know much more about the habits and lives of their users than their parents or even spouses. This is not a very pleasant fact, because all this information is available not only to advertisers, but also to your competitors and enemies. In the lives of many people, there are situations when it is necessary for some time to disappear from the public space and go into the shadows. Facebook does not have a built-in ability to delete all your posts and photos, but you can hide them from prying eyes for a while. Business Insider journalists described a sequence of actions, as a result of which you can hide Facebook information, and the user's previous activity will be hidden.
In 2021, the editors of AIN.UA updated this text. 6 years after its publication, Facebook has simplified the procedure for hiding all information about yourself from Facebook and switching to "invisible mode". In addition, there was also a function to delete posts for a certain period. In the updated material, we tell you how to do it.
How to hide Facebook information
Open your personal Facebook profile and open the drop-down list in the upper right corner of the screen. Select "Settings and Privacy", and then go to the "Quick Privacy Settings" menu.
Images in the material: Tatyana Gritsyk, AIN.UA
In the "Quick Privacy Settings" menu, look at the "Privacy" list and click "Advanced Privacy Settings".
Find "Who can see your Future Posts?", click "Edit" and select "Only Me".
The next step is to hide previous posts. To do this, click on the link "Restrict access to old publications" and confirm the action. Thus, all our previous entries will become visible only to friends.
Repeat the step "Who can see the people, Pages, and lists you follow?". Next, limit the list of people who can find you and contact you. Be sure to turn off the ability to find us by email address and phone number.
Another important thing is that search engines should not know about us, so we uncheck the box "Allow search engines outside of Facebook to show your profile in search results."
If you want to limit new correspondence requests, in the "How requests for correspondence" menu, click "Edit" and select "Do not receive requests" for each option.
Then go to the "Profile and Tags" menu and restrict the ability of other people to post on your profile. For each of the items, indicate "Only me", and also prohibit others from sharing your publications in their stories. Repeat the steps on the Tags tab. If you want to check the posts you're tagged in before those posts are shown on your profile, set the appropriate settings on the "Verification" tab.
Next, go to the Public Posts menu. Prevent outsiders from subscribing to your updates, commenting on publications, and leaving "Like" marks. Turn off the Off-Facebook Preview option.
After that, we prohibit Facebook and third-party sites from using the data from your profile. To do this, go to the relevant menus on the link and click on "Your data settings on Facebook". Here, remove all integrations with third-party sites and various kinds of applications.
In the "Your advertising preferences" tab, prevent other users from seeing information about your social interactions with ads by selecting "Only me".
Bulk delete Facebook posts
Open your personal Facebook page.
Go to your feed and click Manage.
Click select all.
Click Next.
Select "Remove Posts"/If you want to hide posted posts, check "Hide Posts".
Recall that recently Facebook has seriously taken care of the problem of cheating likes on brand pages and announced changes to their counting system. Soon the social network will remove "likes" from users whose accounts have been deactivated. This applies to deceased users and to those whose profiles have been deleted for violating the terms of use of the social network or due to prolonged inactivity.
Login / register
or
Remember me
By clicking "Login/Register" you agree to the terms "User Agreement" AIN.UA
Forgot your password?
Password recovery
Please enter your e-mail. You will receive an email with a link to create a new password.
Back
How to protect your data on Facebook
The guide was published as part of the Journalism on Facebook project, but the information from it is useful for all users who post on this social network.
What the authors of the guide advise:
Protect your password
Turn on notifications about unidentified devices
Enable two-factor authentication
Use Facebook verification tools
Manage your presence on pages and profiles
Monitor your location in publications
Be safe when communicating
Block users
Report offensive content and offenders
Remember what to do in case of a break-in
Protect your password
Your Facebook password must have two properties:
Uniqueness . You do not need to use logins, account numbers and passwords that are already used to log into other accounts.
Reliability . It is dangerous to use personal data for a password, such as a name, date of birth, phone number or address: this will simplify the work of hackers. You also don't need to store your password in a public place or on your device.
Meta recommends using password managers that will allow you to create unique passwords for all accounts and keep them safe.
Examples of such managers are Dashlane, LastPass, Nordpass, Bitwarden. All services have free versions.
Turn on notifications for unknown devices
If notifications are configured, Facebook will notify you every time you try to sign in from a device that it doesn't recognize.
You can enable notifications in the settings. To do this, click the button with an arrow in the upper right corner, the "Settings and Privacy" section.
Next - "Quick privacy settings".
In the "Account security" section, click "Set up notifications about suspicious logins".
On the next screen, you can enable notifications for Facebook and Messenger logins - notifications will be sent to the devices you normally use to log in.
You can also duplicate email alerts — to do this, check the checkbox opposite the address that was used during registration, or add a new address.
Turn on two-factor authentication
This authentication method will slightly complicate logging in from an unidentified device or browser, but will become a serious obstacle for hackers. Each time you log in, the user will need to enter a new security code.
Two-factor authentication can be enabled in the settings. To do this, click the button with an arrow in the upper right corner, the "Settings and Privacy" section.
Next - "Quick privacy settings".
Next, in the "Account security" section, select "Use two-factor authentication".
Facebook will offer three options to choose from: use a code generator, codes in SMS, and a physical USB security key.
One common method that Facebook itself recommends is the Google Authenticator app, which is available for free on Google Play and the App Store.
Use Facebook 9 verification tools0145
The tools will allow you to manage your privacy on Facebook and check the level of account security.
To access these tools, click the arrow button in the upper right corner, Settings and Privacy section.
Next - "Check Privacy".
A screen with several options will open.
Who can see your posts . This is a privacy check. Facebook will show your current privacy settings and allow you to change them. For example, with this tool, you can restrict access to personal data or make future posts visible only to your friends.
How to protect your account . This is a security check. Facebook will report the current level of account security and provide recommendations.
Learn more about privacy and security settings on the Facebook website.
Manage your presence on your profile and pages
In Facebook terminology, a personal page is called a profile. A Facebook page is a public page for a business, blogger, and so on.
First, let's look at how to manage the visibility of your and other people's posts on your profile.
Set the visibility of your posts in your profile
When you create a post, you can specify who will see it. To set up access on the post creation screen, there is a button under the username.
You can make the publication hidden from everyone except the author, open only to friends or a list of specific users.
An icon that shows the access level will be displayed at the top of the post.
Control the visibility of other people's posts on your profile
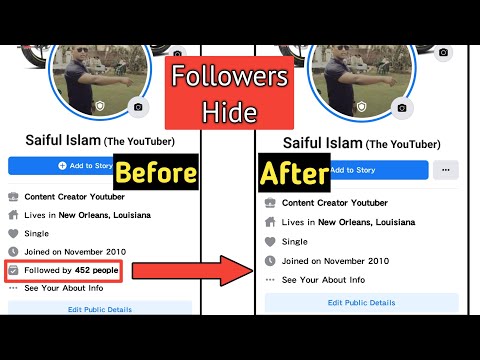
Your friends can also post on your Facebook profile page. In addition, users can tag you in posts, and these posts will also appear on your profile.
To prohibit such actions or set access levels, go to the profile and call the menu with the button with three dots. Select Profile & Tags Settings.
You can now allow or block posts on your profile and set the visibility of posts you've been tagged in.
If you expand the menu item "Hide comments with certain words from your profile", you can add a list of banned words - Facebook will not let posts and comments that contain them.
Set page access levels
If multiple people manage the page, the creator can set their access levels. To do this, you need to go from the page to its settings (bottom item of the left menu).
Next, open "Roles on the page". Here you can add a community manager and manage roles.
When you add a new member or set their role, Facebook will tell you what permissions you give them.
Control your location in your posts
Facebook allows you to specify your location in your posts, but this option is not enabled by default.
However, if you don't want people to know where you are right now, Facebook recommends disabling geolocation on your device.
You can also prevent Facebook from tracking your location. You can do this in the general settings. Click the arrow button in the upper right corner, "Settings and Privacy" section.
Next - "Settings".
Select Geodata from the left menu. On the screen on the right, you can disable geodata logging.
Secure your communications
For private communications, you can use WhatsApp, which by default uses end-to-end encryption for calls and messages.
End-to-end encryption can also be configured in Messenger on a mobile device. This is created at the stage of creating a correspondence - it can be made secret by moving the slider with a lock in the upper right corner.
Block users
Blocking is available on Facebook and Messenger.
On Facebook, to block users, go to settings. Click the arrow button in the upper right corner, "Settings and Privacy" section.
Next - "Settings".
Select Lock from the left menu.
On the screen on the right, you can completely block users: they will not be able to interact with your profile anywhere except third-party pages, applications and games.
Here you can also configure "restricted access" - it will hide content with the access level "for friends" from the user.
In Messenger, to block a user, click on the chat you need in the list and hold - a menu with the "Block" button will pop up.
Report offensive content and offenders
To report inappropriate content to Facebook, click the three dots button at the top of the post. In the menu there is an item "Complain about the publication".
Facebook will offer a list of reasons why you may have found the post inappropriate.

 Spidle maintains a number of blogs featuring poetry, short stories and other fiction.
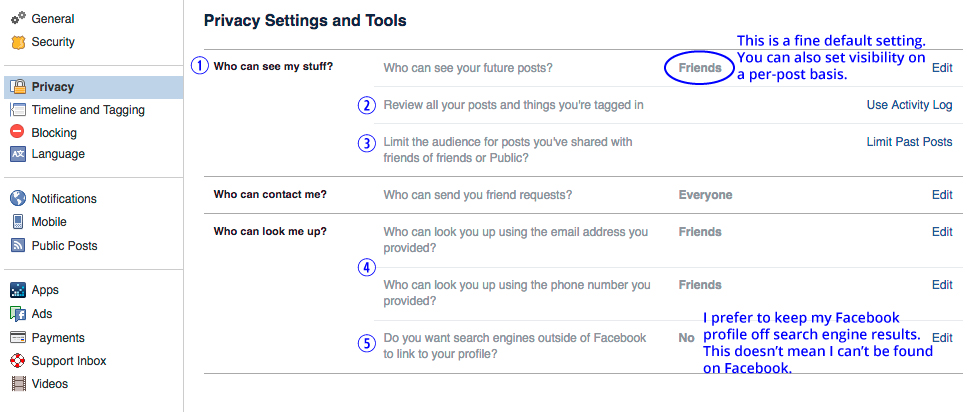 What you can do is limit who can find your profile.
 Alternatively, you can also disable your account. Are you planning to disable your account for more than one week? Let us know in the comments below.
 Thus, all our previous entries will become visible only to friends.
 Soon the social network will remove "likes" from users whose accounts have been deactivated. This applies to deceased users and to those whose profiles have been deleted for violating the terms of use of the social network or due to prolonged inactivity.
 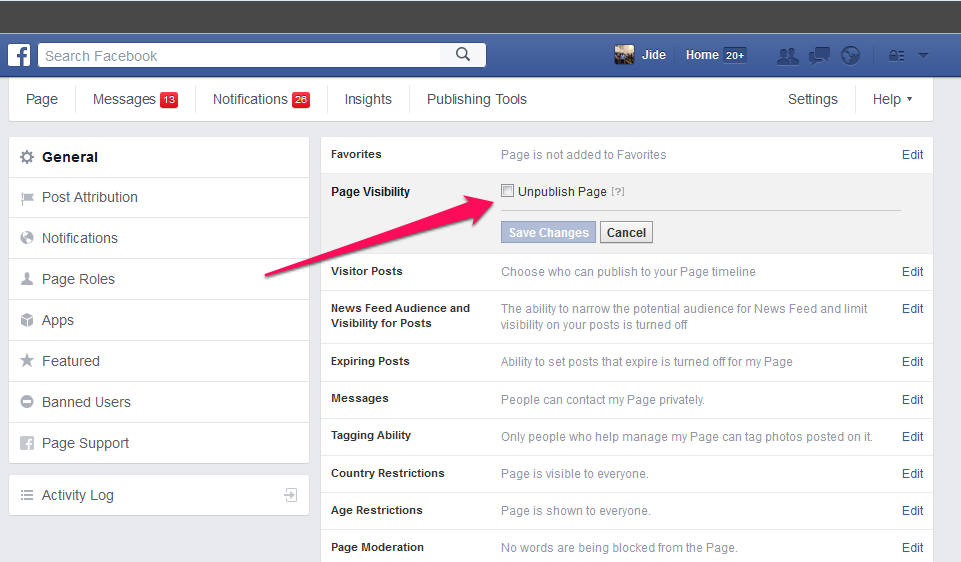 You will receive an email with a link to create a new password.
  You do not need to use logins, account numbers and passwords that are already used to log into other accounts.
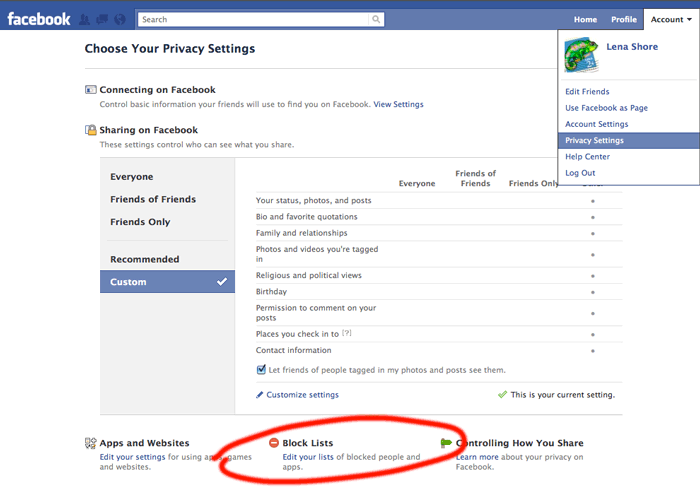
 This is a security check. Facebook will report the current level of account security and provide recommendations.
  In addition, users can tag you in posts, and these posts will also appear on your profile.