If you are used to sharing experiences and opinions on social media, you probably know something about the Facebook Messenger app. You know, there are certain instances when you need to back up FB messages for later reference, such as reinstalling the app, switching Android phones/iPhones, or just doing Facebook Messenger backup to prevent conversations from permanent loss.
Well, you may be concerned about how to back up Facebook Messenger safely since FB doesn't come with a message backup feature for its users. OK, let's go through this post to learn how now.
So, what's the most excellent tool for Messenger backup on iPhone? iOS Data Backup & Restore is fully eligible for its reputation. This iPhone/iPad backup software features one-click encrypt/standard backups, selective backup/restore, and backup preview. What's more, it won't overwrite any data on your iDevice while performing file restore.
Key highlights of iOS Data Backup & Restore:
Now, just FREE download this software and proceed to its user guide with us.
How to back up Facebook Messenger conversations on iPhone via the best Messenger backup tool?
Step 1. Run iOS Data Backup & Restore
Download and install the software on your computer. Run it and choose "iOS Data Backup & Restore" from its main interface. Then, connect your iPhone to the computer via a USB cable.
Step 2. Click iOS Data Backup option
Click on "iOS Data Backup" section and the software will detect your iPhone automatically. Now, you should unlock your iPhone.
Step 3. Select the backup mode
The software provides two backup options: "Standard backup" and "Encrypted backup". Choose either you need and click "Start".
Step 4. Choose data type(s) for backup
Tick on the box before the data types from your iPhone/iPad. For this topic, please mark the "Messenger & Attachments" option.
Step 5. Back up messenger messages and attachments
Click "Next" and select the destination to save the FB messenger backup onto your computer. The backup will then initiate immediately.
How to restore Facebook Messenger from the backup?
Quick look: connect iDevice to the computer > run the program and pick "iOS Data Restore" > click Start > select the backups you want from the list and tap "View Now" > checkmark the items you wish to restore > click "Restore to Device" or "Restore to PC".
Read Also:
How can I back up messenger on Android in a direct manner? Well, that's easy. You could simply work it out from the Facebook Settings, through which you'll be allowed to download Facebook messages from its server to keep a copy of your chat history.
How to back up Facebook messages on Android online directly?
For those who only need to back up the particular conversation(s) from Android/iPhone, just do it from facebook. com. This method is a bit tedious, though it does works. And if you have a handful of chats to process, you have to repeat the same procedure.
How to back up Facebook messenger on iPhone & Android individually?

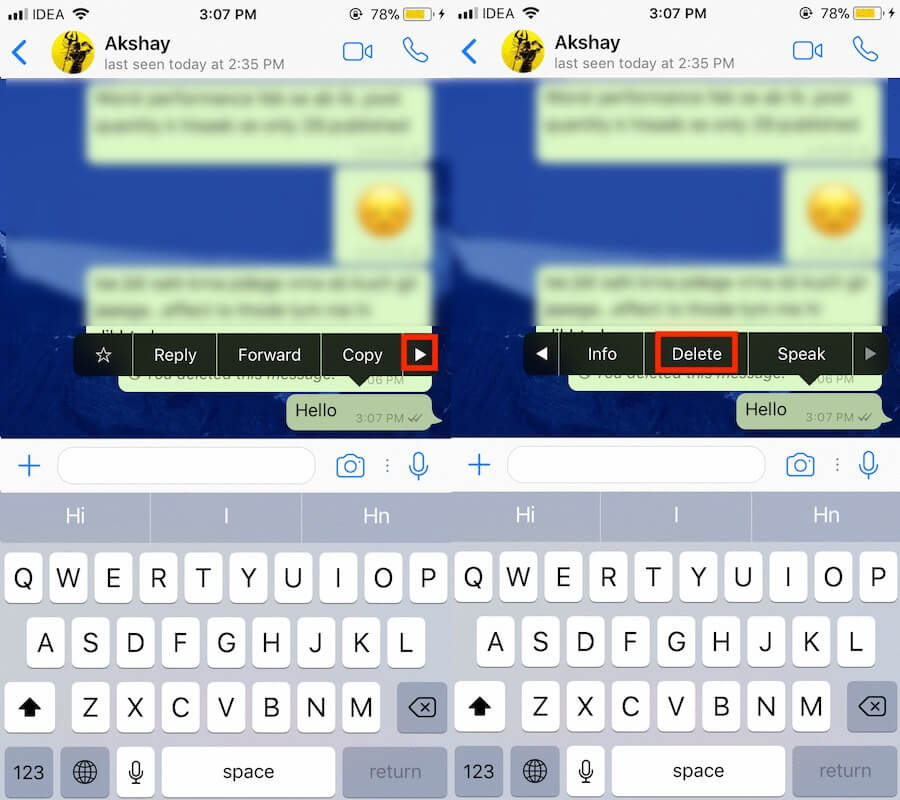
If you get an error saying that you can't save it, simply select a different encoding type other than "ANSI". Other options of encoding could be Unicode, Unicode big-endian, and UTF-8.
You May Also Like:
Keeping message backups for Facebook can better preserve the content in case of possible data loss. Likewise, filing or archiving FB messenger gives you an option to save messages that you no longer want to show on the profile and recover them anytime. Then how to do it? Here it is:
You might have Looked for hours on a tool or plugin that can back up Facebook messages but came out pretty much empty-handed. Judging from the above, iOS Data Backup & Restore is, obviously, the best bet for iPhone users, as it can back up your FB messages and attachments on an iPhone easily and flexibly. Assuming you are to back up messenger conversations on Android, simply follow the easy guide in the second part.
Related Articles:
Manage/Edit/Delete Facebook Messages on Android
What to Do When Facebook Messenger Video/Voice Fails to Play?
Easy Ways to Solve Facebook Messenger Not Responding Problem
Effective Ways to Fix Facebook Blank Pages Error
Ultimate Guide to Back Up WhatsApp Photos/Videos on Android & iPhone
4 Ways on How to Back Up Text Messages on Android?
Looking to Back up Facebook Chat to Cloud Storage Like Google Drive? Here is the Simple Guide to Backup Messenger to Chat.
Social Media platforms not only allow us to share our life with others, but they are one of the main platforms to stay connected with our friends and family members. Several businesses also make use of Facebook to stay on top of customer feedback and regarding order delivery, etc. Having a backup of Facebook messenger chat is a good thing, for such instances, where you may need to produce Facebook messages for references.
How would do that, though? If you are also having this question in your mind, then you are at the right place. Because, in this guide, we will show you a complete guide to how you can back up Facebook messenger chat by yourself. Without any further ado, let us jump straight into it.
Page Contents

Your messenger chats will be downloaded either in HTML or JSON format. HTML is much easier to view as you can open it in any web browser. The JSON format includes encoding elements, better if you want to do some programming things on it. For general users, we would advise you to stick with the HTML format.
Now you can upload the Messenger Chat Backup to Cloud Storage like Google Drive, DropBox, Mega, OneDrive, and more.
There is an alternative way to save your messenger conversations if you do not want to download all of your chat conversations. This method will let you download only a specific conversation that you want to have a copy of. Here are the steps.
Although this process requires manual input more than the previous method, it could come in handy in situations where you just want a copy of a specific part of a conversation. If you wish to save the entire conversation with a friend from the beginning, then we would suggest that you make use of a bookmarklet. There are plenty of bookmarklets available, such as Scroll All. This will prevent the need to scroll all the way to the top of your conversation. All you need to do is add to your browser, head over to the Messenger chat, and hit the Scroll All button.
- “I want to save my Facebook chats with a friend from all elements. I mean, I want to completely save all texts, used emotions, time and date. I don't want to use the "Print Screen" command and paste them into JPG files. How can I download messages from Facebook like Microsoft Word? "
It's very common to make copies of Facebook conversions. However, many Facebook users don't know how to save Facebook messages is correct. As per the requirement of numerous Facebook users, this article 3 demonstrates different ways to download Facebook messages to your computer, iPhone and Android with detailed instructions.
If you just need to save a few Facebook messages, you can copy and paste all text messages into Word manually or print screen on Mac or Windows computer to save image messages. .
.
However, for people who need to download a copy of Facebook's entire conversions, you can try the steps below on a Windows or Mac computer. In a word, you can learn how to download Facebook Chat Chat to your computer here.
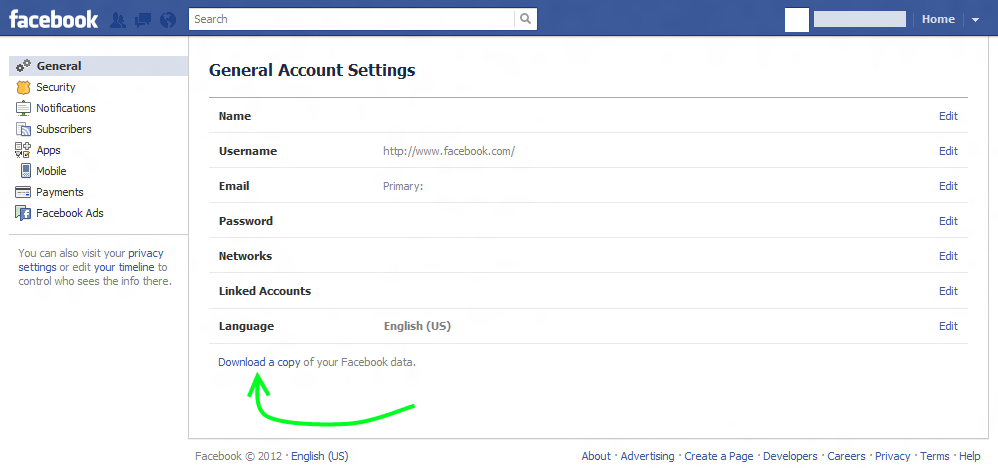
Step 1, Access Facebook message download settings
Open the Facebook webpage in your browser, such as Firefox, Chrome, Safari, and others. Log into your Facebook account to access its main interface. Select the blue arrow in the top right corner. Then select "Settings" from the drop-down menu. At this time, click on the hyperlink called "Download a copy of your Facebook data" at the bottom.
Step 2, Send request to download Facebook conversations
You may see a pop-up screen that says "Download Information". Click the "Start My Archive" button to start uploading your personal archive, including photos, posts, and Facebook posts. Enter your password and click "Submit" to begin the Facebook data upload process.
Step 3, Confirm uploading messages to Facebook
When the Request Upload window opens, click Start My Archive. Later, a message will appear telling you that you will receive an email notification when it is ready to download. Select "OK" and sign in with the email account associated with your Facebook profile. Go to this email page and open the confirmation email. After a few seconds, you will receive another email that the download is ready. Click the download link provided to return to your Facebook page.
Step 4, Finish downloading Facebook messages
Click "Upload my archive" and enter your password to download Facebook data. Unzip the downloaded file and find the "messages.htm" folder. You can then export and print Facebook messages if needed. That's all, how to save Facebook messages to computer.
If you want to save Facebook messages on iPhone or iPad, then Apeaksoft iPhone Data Recovery is your best choice. You can selectively and securely save Facebook messages and other iOS data from your iOS device to PC.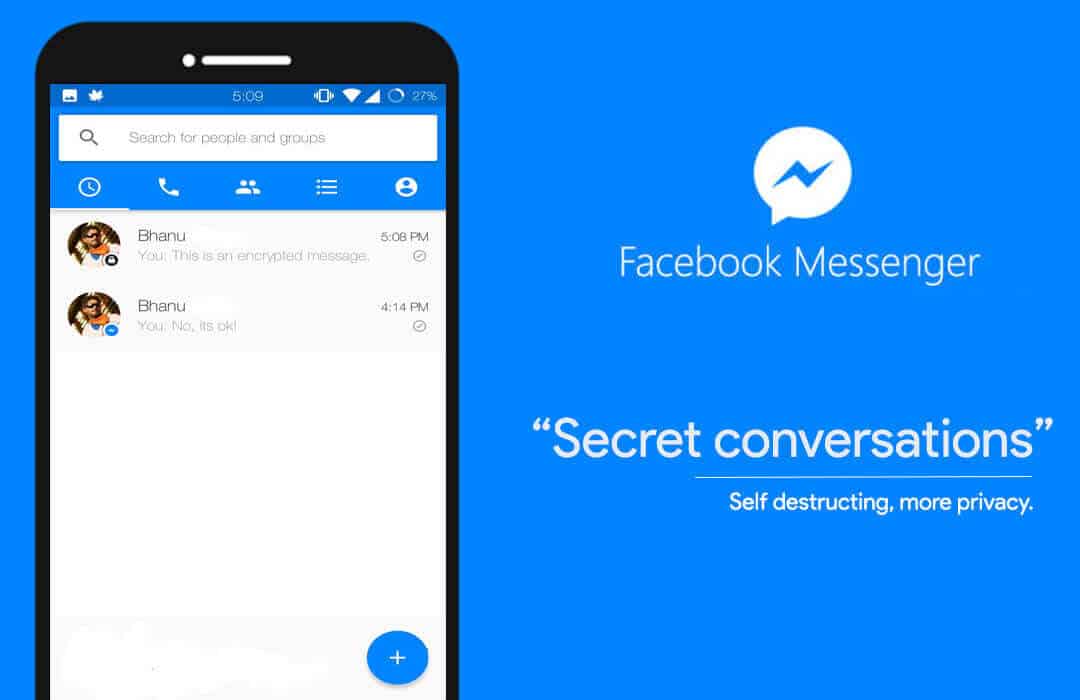 Besides, you can recover lost iOS data from iPhone or iPad directly.
iPhone data recovery
Download for Win Download for Mac
Step 1, Launch iPhone Data Recovery
Free download this Facebook chat history manager and screensaver. Open it and select "iPhone Data Recovery". Then you will find its main interface.
Step 2, Connect iPhone to PC
In the left pane, select "Recover from iOS Device" mode. Then connect your iPhone to your computer with a lightning USB cable.
Step 3 Scan iPhone 9 Files0007
After connecting the iOS device, click the "Start Scan" button. Later, iPhone Data Recovery can automatically detect your iPhone.
Step 4, Save Facebook Messages from iPhone
You can see how all iOS files are displayed in categories. Select one file type, and then view the details on the right. You can mark the items you want to download for free. Finally, click the "Recover" button and set the output folder for saving Facebook messages.
If you want to recover deleted Facebook images, just click "Messenger Attachments".
Also, you can print all data from iPhone, like Kik, Viber, LINE, contacts, messages, etc.
For Android users, you can use Apeaksoft Android Data recoverydownload Facebook messages without data loss. It is the best data recovery and download software with which you can save data from Android phones, tablets and SD cards directly even you may have system error, rooting error, flashing ROM messenger failure and various abnormal scenarios. In a word, if you don't know how to save Facebook messages on Android, you shouldn't miss Android data recovery.
Android Data Recovery
Download for Win Download for Mac
Step 1, Connect Android to Android Data Recovery
Free Download Android Data Recovery. Open this Facebook message downloader and connect your Android to your Windows or Mac computer with a USB cable.
Step 2, Enable USB Debugging Mode
Follow the instructions to enable USB Debugging Mode on your Android device. You need to find which Android system you are using and then read the specific guide to enable USB Debugging. Then click "OK" to continue.
Step 3, Select File Types
You can check "Messages" and "Message Attachments" to save Facebook messages on Android. Otherwise, you can also select other available file types to upload together.
Step 4, Save Facebook Messages from Android
Click the "Messages" category on the left panel. Select one message and then view the details on the right. Once you have marked Facebook messages, click "Restore" to save the messages to Facebook.
1. How to save a Facebook message as PDF?
Simply find the file and select Print. In the Print window, you need to change the printer assignment to Save as PDF in order to save the conversation as a PDF.
2. How to recover deleted Facebook messages?
You can recover deleted Facebook messages from facebook.com. Login to your Facebook account, go to settings and then go to General account settings.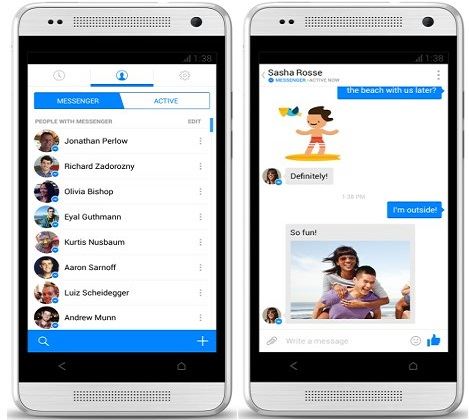 From the menu, select the "Download a copy of your Facebook data" option. Then a new page will appear. You may see a "Start My Archive" button to view deleted messages.
3. How do I search for messages on Facebook?
Visit the official Facebook page in your browser, then log in to your Facebook account. Select "Messenger" on the left panel and then you can see all your previous Facebook conversions. You can then enter a phrase to search for Facebook posts at the top of the search bar.
This article is also suitable for people who want to save data and files from other applications. Finally, feel free to ask us if you have any questions about how to save Facebook messages.
Facebook is the largest social network on the planet with 1.3 billion active users and 20 billion messages sent each month. Users can use the Messenger app to keep in touch with their friends, but both small businesses and international companies also use the platform.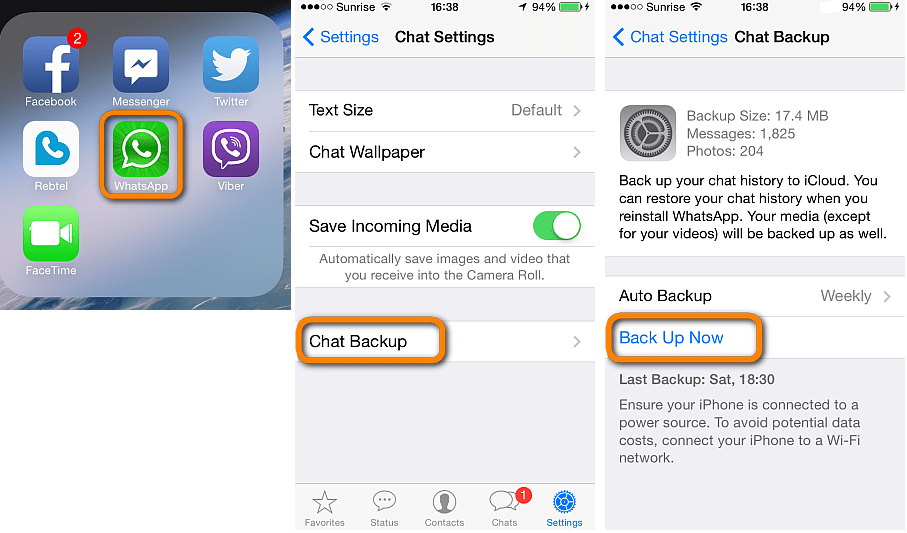
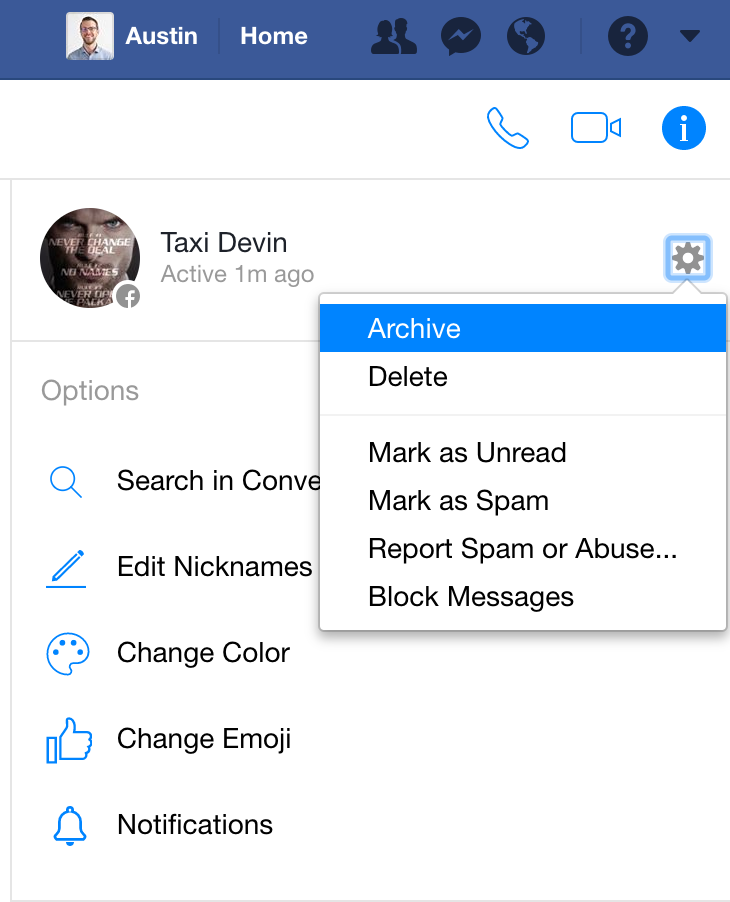
If you regularly message a lot of people on Facebook, it's easy to get overwhelmed. That's why Facebook allows you to archive chats you want to pause so you can return to them any time in the future. Keep reading and learn all about the Facebook archive feature.
You can archive any Facebook message or chat with a few simple clicks or taps, depending on the device you're using. However, you can only archive messages through a computer, but you can view them from mobile devices at any time. Here's what you should do:
Programs for Windows, mobile applications, games - EVERYTHING is FREE, in our closed telegram channel - Subscribe :)
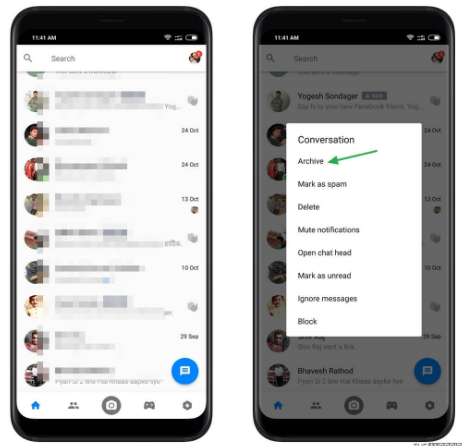
The entire conversation history will disappear from the message feed and appear in the Archive folder.
People are usually embarrassed when this happens, but answering an archived chat makes the conversation active again. It is then automatically transferred to the message folder.
You can also use the Search Conversations feature to find a specific message by entering the keyword used in that conversation. Keep in mind that this only works on desktop computers.
When viewing archived messages from your mobile device, you don't even need to open the Facebook app. Facebook Messenger has everything you need to access the archive. Here's what you need to do:
If you want to make sure your Facebook posts are secure, you should back up your account. Repeat the process every two or three months to make sure nothing is lost. Here's what you need to do: