4 min
This article shows you how to fit the whole picture on Instagram. If you have a full portrait (9:16) image or video or a landscape (16:9) image or video, you can fit the whole picture in your Instagram post by following this tutorial.
Instagram has a maximum aspect ratio of 4:5 on portrait posts (four pixels wide for every five pixels tall). Instagram’s restriction reduces the number of very tall images that take up a lot of vertical space in the feed. Although it’s nice that Instagram keeps users from publishing massive, obtrusive posts, the 4:5 limit makes it difficult to post a whole vertical picture or video that you shot on your phone.
Here's what your tall photos will look like on Instagram without added borders.If you want to fit your whole picture on Instagram but it is taller than the 4:5 aspect ratio, you need to modify your image before posting. Otherwise, Instagram will automatically crop your image to a maximum of 4:5. I recommend the Kapwing resizer as it allows you to add white space on either side to bring your image to the required aspect ratio. In this article, I’ll explain how to fit the whole picture on Instagram in three simple steps:
Start by opening the Kapwing’s Resizer tool on your phone or computer. Upload your image file from camera roll or import it from a URL. Kapwing supports images, videos, and GIFs, so you can use it to resize for any kind of media.
The video resizer tool in KapwingOnce your picture loads into the editor, you’ll be taken into the Kapwing Studio Editor where you'll see a preview of your image in the center of the screen.
In the Output Size section, select the 4:5 option. This allows your photo to take up maximum vertical space in the Instagram feed without getting sized down. There is a resizing option for Instagram, 1:1, but this shrinks your image to fit in the default square shape.
Resize the image to 4:5 using the button in the Output Size listOnce you have selected the size option, Kapwing adds white padding to either side of your image to make it fit the 4:5 aspect ratio. You can change this white background to any color you want so that it stands out in the Instagram feed.
Click the red Export Image button at the top of the screen. After a few moments of processing, Kapwing makes your resized 4:5 picture or video available for download. Whether you're using a desktop computer, iPhone, Android, or tablet you'll be able to instantly download the image to your photo gallery once published.
If you're not signed into a Kapwing account, sign in or sign up using your Google or Facebook account – once you've signed into a Kapwing account, the watermark in the lower right corner will be removed from your final image.
Open the Instagram app and upload your picture. You’ll notice that Instagram crops the picture to square by default, but you can click the expand arrows or pinch the image in the lower left to fit the whole picture on Instagram. When you publish it, Instagram will resize to image width to fit the screen, the white image background will blend in with Instagram’s white background, and your whole picture will appear on Instagram with no cropping.
Note: You can also choose a black background, if you and your followers use Instagram in Dark Mode.
This tutorial shows you a workaround for posting full portrait pictures and videos on Instagram. You can use Kapwing’s Resizer to post multiple images with different sizes on Instagram, add a thin white border around your media, and publish TikTok and Snap videos. I hope that it helps speed up your social media workflow and enables you to post your beautiful and fun candid moments to Instagram.
For more information on how to resize a video for Instagram, check out this video tutorial (we give you the best sizes for each type of video too!):
Check back in at the Kapwing Resources page or our YouTube channel for other content creation tips and tutorials! And remember to tag us @KapwingApp whenever you share your content on social media– we love to see what our creators are passionate about!
Related Articles:
Instagram is a great app for sharing the daily highlights of your life and experiences – and the platform being highly-visual makes that even more appealing. Everybody wants their photos to look good on Instagram and once you finally have that perfect photo it can be annoying to see it get cropped by Instagram.
Instagram uses different image aspect ratios, specifically 4:5 for portraits, 1:1 for squares, and 1.91:1 for landscape pictures. If your image does not align with image guidelines for Instagram your image would get cropped to fit.
However, there are multiple ways you can add your pictures on Instagram without them getting cropped which involve resizing, adding borders, and using third-party apps to make your image fit within Instagram’s given frame. Read on to find out how to fit your images for a cleaner and more consistent look.
When Instagram first started out it only had the option to upload square images with a ratio of 1:1 however an update back in 2015 changed this as Instagram started to allow uploading portraits and landscape images as well.
It’s very easy to resize your images using Instagram’s crop feature. When adding a new post you will see a light grey icon with a white frame inside on the bottom left of your post screen. Click on it and it will automatically resize your images to fit the frame. You can also pinch your fingers together to shrink your image so it fits in the post.
The main downside to this method is that it is limited and might not fully cover the excess or might awkwardly resize them. You want your images to look good, natural, and neat but the zoom feature can only do so much.
If this method does not work on your image then a much better way to resize your images is to do it manually using a photo editing tool or third-party apps.
The best way to make your images fit on Instagram without cropping them is to manually resize them. Resizing your pictures this way would allow you to have full control over the image.
It’s important to know that when you do resize your image you will have some empty space around your image. The thing cool thing is that if you are manually resizing your images you can have a custom background for your images.
A great tool you can use is BunnyPic – a free online photoshop editor. You don’t have to sign up, install it or be worried to have a watermark on your images. It is totally free to use and beginner-friendly.
To resize your images using BunnyPic follow the below steps:
You can see how the image now fits perfectly inside the frame compared to the cropped image from before without losing any of its original value.
The above method should work for all your photos but if you want to keep the whole process on your phone without having to switch around your photos from your computer you can try third-party apps.
There are numerous third-party apps on Google Play Store and Apple App Store that you can download which would automatically resize your photos to fit into your canvas.
The best free apps to make pictures fit on Instagram without cropping are No Crop & Square, Whitagram, and PicsArt.
No Crop & Square for Instagram is an app that gives you different options to edit your photos for Instagram. It has a number of resizing options such as rotation, shrink, and enlarge. You can also add text and stickers to your images; making it a great app to meet all your needs.
No Crop & Square is only available on Android and can be downloaded for free from the Google Play Store here.
Whitagram is an IOS app that allows you to add white borders and resize your images for Instagram. It is quite similar to the above app and will get the job done to make your images look cleaner without going through a complicated editing process.
Download Whitagram from the Apple Store here.
PicsArt is a popular editing app that is available for both IOS and Android and has a better and unique way of resizing your photos for Instagram. It has a blur effect which can be added to the image borders which is far more attractive than the white or black borders from the previous apps.
To edit your Instagram pictures without cropping using PicsArt follow the below steps:
The effect works best for landscape photos. This is the kind of result you would get.
Download PicsArt on the Play Store or App Store.
Instagram is a great app for sharing your pictures online but it can be annoying when Instagram crops your image to make it fit in the post. This cropping is poorly done, making it look awkward and not as you intended.
To make your images fit better on Instagram you can use their crop feature, our BunnyPic editor, or third-party apps on your phone to resize your images and make them fit the way you want them to.
You must have heard that Instagram* is a social network for visuals, and photos are of paramount importance here. Not without exceptions, but that's how it is. What to do if you want to conquer Instagram *, but you have never been a photographer? How to take cool photos on Instagram*? Don't be upset, believe in yourself and read this article!
If you have long been attracted by the art of photography, but are frightened by the number of complex words, technical nuances and long processing, your time has come - Instagram* will solve problems and awaken dormant creative potential. After all, everyone can take cool photos on Instagram* and upload normal, high-quality content to their profile! nine0003
You don't have to buy a big expensive camera to take cool photos for your Instagram account*. You can get by with a smartphone with a good camera.
By default, there are two types of photos on Instagram*: square and rectangular. This means you don't have to worry about cropping, weight, or photo size. The social network will think about it for you. Catch cool shots and upload to your account by publishing a post or story. nine0003
Read our blog about the nuances of uploading photos to Instagram* without cropping.
If you make it a rule that your profile will contain only Instagram photos*, that is, square ones, you can do the following:
In the case of an ordinary camera and an ordinary website (or social network), it takes effort to turn a simple photo into a beautiful photo. Pictures will have to be uploaded from the camera to a computer, deal with processing programs (Photoshop or similar), learn a lot of complex words, like “exposure” or “trimming”. It's easier with Instagram. nine0003
The application itself has a shooting function. You can edit brightness, contrast, saturation and other parameters in the application by moving your finger along the scale. Here, on Instagram*, there are many filters that are superimposed on the photo with a touch, even a child can handle it.
When standard photo editing tools are no longer enough, check out our articles for more applications:
- photo and video editing for Instagram*;
- top 25 services for working on Instagram*. nine0037
Tip: If you don't want to share a photo taken and edited with Instagram*, save it to your smartphone.
After applying the filters, click "Download"When deciding how to take good photos on Instagram * on your phone, follow a few simple rules.
Light from a chandelier and lamp makes the photo yellow and distorts colors, so if you are new to photography, shoot only in daylight - it is the most advantageous. Daylight doesn't mean sunny day, it's just daylight hours. In this light, the photo turns out “as if alive”: with natural colors and shadows. nine0003
You don't have to go outside to take a photo on Instagram* in daylight, you can also take pictures at home. If it's dark at home, get closer to the window, shoot on the windowsill, or set up a photo zone next to the window.
The social network is not an online store, and photos of items on an etched white background that look great in a store window on Instagram * usually do not arouse much interest. Here they love photos with details and textures that are interesting to consider. In this case, you can use a white background, but if it is a sheet or a blanket, the frame will become more interesting. In addition to them, you can use a special photophone. Backgrounds come in different textures and colors: under the tree, under the concrete, under the brick - choose any. nine0003
The photophone itself, of course, is not very interesting. To make it interesting, you need to put something on it. It can be postcards, books, magazines, cookies, flowers, travel magnets - all that junk that gathers dust on the shelves and it's a pity to throw it away.
But if you are thinking about creating an online store, read “How to take a professional photo for Instagram *”, “Hand-Made.
How to make a selling photo of a product” on our blog.
It may be obvious and funny, but it is the smudged lens that often prevents you from taking normal photos on Instagram*. One day I decided that my phone was broken: all the photos turned out to be cloudy. A few hours separated me from buying a new phone, when I realized that I just needed to wipe the lens.
Wipe the lens. Always clean the lens.
There may be more than one subject in the frame. The most clear should be the main one. To "catch the focus" it is enough to poke your finger into the desired object on the phone screen. nine0003
Back when everything was shot with film cameras, every shot was worth its weight in gold. Now, in the digital age, we can click the shutter until our phone runs out of space. Then remove the excess and click again. This is good, because it is not always possible to "see the frames" the first time.
Tip: Take multiple shots at once. Swap items in places, add new ones, remove unnecessary ones. Then choose the best option and publish a post or story. nine0003
In theory, everything is simple and clear, but in practice, accounts are full of trash pictures. Why? Because after the lecture it is necessary to work out seminars to consolidate the material. And if “just a photo” in stories is still somehow appropriate, then beautiful photos should always be taken for posts on Instagram *.
Taste can be trained like a muscle. Perhaps now you don’t know what a “beautiful photograph” is, how to build a frame, how to lay out small things on a photo background. But there are many who know and post cool photos on Instagram* - find them! Subscribe to accounts that you like, whose style is close to you. Let their photos constantly flash in your feed. nine0003
You can't use other people's photos. But you can take your photos "based on". At first, this will help you to “fill your hand” and feel the insta-style in photography. Do not worry that you are repeating, because you are unlikely to get exactly the same photo.
Over time, you yourself will learn to invent and see shots, and the need for repetition will disappear by itself. Repetition is only needed at the very beginning while you are learning. I myself went through this, learning to photograph from other people's photographs. nine0003 Friend / foe
Among the pictures you view, there will most likely be those that you can hypothetically repeat for your profile. Surely you also have beautiful bedding, or a cool mug, or you can also lay out dry leaves in a book, or it’s interesting to gut a bouquet. If you like the frame and you understand that it is not difficult to recreate it, take a print screen and save the idea for creating a photo in the Instagram format*.
Change your angle.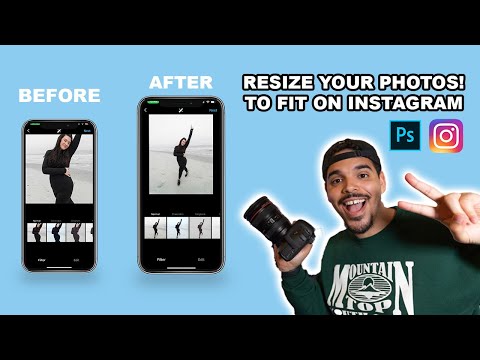
The simplest thing you can do. What is the point? You are asked to take a picture of a person. You take your smartphone, stand in front of it and press the button. Do not do like this.
Squat or stand up so that your faces are at the same level to prevent the person in the photo from turning out to be short-legged. For the next shot, climb somewhere higher and take a picture from above. Squat down and take a picture from below. Come closer and again from below. Take a photo from the side. Go behind the tree and take a couple more shots through the leaves. This is called changing perspective. nine0003 lissa.zn and _lsvln_ just put a smartphone in an unusual place for shooting, and the result was not “just a photo”
When you look at cool pictures on social networks, not necessarily people, think for a second where was the photographer at the time of the shoot. And how would the frame turn out if the photo was taken in a standard way, from a height of human growth.
The technique is also suitable for subject shooting. You can take a beautiful photo of a mug on a table on Instagram* from a dozen angles: from the side, placing the smartphone on the table, just from the side, from the side of the handle, from the top in the center, slightly tilting the smartphone from above, and so on. nine0003
Reflection.
Also an easy trick. Look for reflections: in shop windows, in puddles, in mirrors, in sunglasses, and even in broken glass, if you're not superstitious.
irenaponaroshku and kristikut are experimenting while relaxing on the beach and taking Instagram photos* for posts and storiesGet deeper.
Cool trees, flowers, grass, children's climbing frames? Don't stand in the background, go inside if possible. nine0003 akmaral_bekmaganbetova and analim_oni were not afraid to go deep into the thickets
Seasonal photos.
There is something beautiful in every season. If you get stuck with ideas, remember what is now, what will not be later, and take a picture with it. In winter, it is snow, snowmen, a fairytale forest, garlands in the city and cool shop windows, snow fun. In the fall ... yes, you yourself will continue this list better than me!
In spring nature wakes up and photographer.victoria28 takes a photo with everything that woke up, filling the feed with spring contentFocus on one subject .
Often, seeing something cool, we take and take a photo thoughtlessly. Tip: Your shots will look more professional if only a small part of the beauty is in focus, and the rest goes into the background.
An example from my dacha. Pay attention to the grid - the main object is better placed along the lines or at the intersection points of the lines. The eye is so pleasingA part of myself.
The picture will attract more attention if you shoot not just an interesting street or forest, but insert a part of yourself into the frame.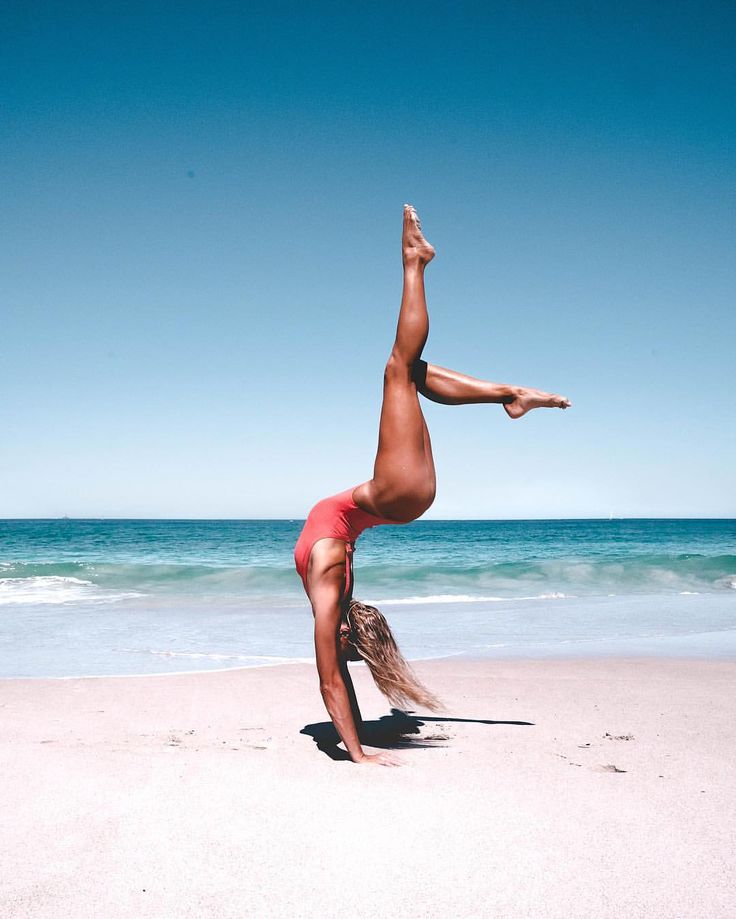 Let it be your legs, or a hand with a hat or ice cream, it doesn't matter.
Film life .
When you blog and look for footage, walk the streets of the city and take a closer look at your surroundings. We all often hurry somewhere, and do not notice many curious things. You can also ask to take a picture of you "in the crowd." Here you are going somewhere, or sitting on a bench thinking, and people, bicycles, cars are hurrying around. Just make sure the focus is on you. nine0003 Tip: if it's difficult, imagine that you are a reportage photographer and your task as a newspaper editor is to capture the life of the city :-)
Natural frames .
Arches, a large mesh fence, an art object, even an inflatable swimming ring can become a kind of photo frame.
When shooting outdoors, just think about what could serve as a frame for a photo, and most likely, you will quickly find the right one. v.olga3 and krutikova_yana found ideas for Instagram photos*
 Repeating objects, symmetry .
A row of identical cars, a long fence, even identical white sneakers lined up - all this attracts attention with its repetitions. The same with symmetry: the eye automatically begins to look for inconsistencies in ideality, and you have earned attention to your photo.
monika0305 sees symmetry in architecture, red_apple_photo in nature. When there is no symmetry around, create it yourself like ya.shedowUse shadow .
Difficult but interesting technique. An ugly shadow will spoil even a beautiful shot. Do you want chic? Train your eyesight and repeat like a pro.
little_studio and irenaponaroshku and their shadow gamesFunny shots .
The main rule is not to overwork. Such shots are best done by people with a good sense of humor. nine0003 Which of the “fu, not funny” photos do you think?
Selfie stick and tripod .
The tripod helps you avoid hand shake when taking pictures and take selfies without help. And with the help of a selfie stick, you can get breathtaking and amazing shots.
What is strength, brother? In stick, selfie stickCamera zoom .
Do not use the zoom on the smartphone, it is better to approach the object yourself. In a smartphone, the zoom is not the zoom of a professional camera. It will ruin the photo quality. nine0003
As you can see, everything can be learned if you really want to. And Instagram itself is ready to teach you this. Your task is only to find what you like, remember and practice a lot.
Cool shots for you!
How to post a photo to an Instagram post*
How to post multiple photos to Instagram* A post of several pictures that you can scroll through is called a carousel. In this format, it is convenient to post thematic photos and collections. nine0003
How to post a photo on Instagram* in full sizeWhen choosing a photo for a post, click on the frame icon. It's in the lower left corner of the image.
How to add a photo to an instagram story*
How else can you post a photo to instagram*
- Use the service of delayed posting
- Through the browser
Do not rush to roll your eyes, exclaiming: “Content for dummies has been brought up!”. Although the article is written for beginners, a rare seasoned instagram user* has used ALL of the methods described for posting photos. And yet, some of them are undeservedly forgotten. nine0277
Shake the dust off them.
Option one, it is also the simplest:
Option two: send a photo to Instagram* directly from your phone gallery or from another application. It will not work to write a step-by-step guide, because the phones have a different interface. But the principle is always the same: select a photo, find the Share button, select Instagram*, and then add the photo to your feed, chat, or Story. nine0003
To post multiple photos to instagram at once*:
Step 1. Open the app, tap the plus button at the bottom of the screen.
Step 2. Click the slide icon to select the desired photos from the gallery.
Remarochka: in one post on instagram* you can collect up to 10 photos or videos. nine0003
Step 3 Edit the images as needed. You can either apply a general filter to all photos at once, or edit each one individually by clicking on the desired photo.
Step 4. Write a text, put a geolocation, mark friends on the photo if necessary. Now you can publish.
Another note: images in the carousel can be swapped or removed from the list. To reorder an image, click and drag it to the desired location.
After clicking on it, the photo will return to its original size. You can also pinch a photo with two fingers and crop it.
Keep in mind that square pictures or 4:5 aspect ratio (vertical rectangle) look best on instagram*.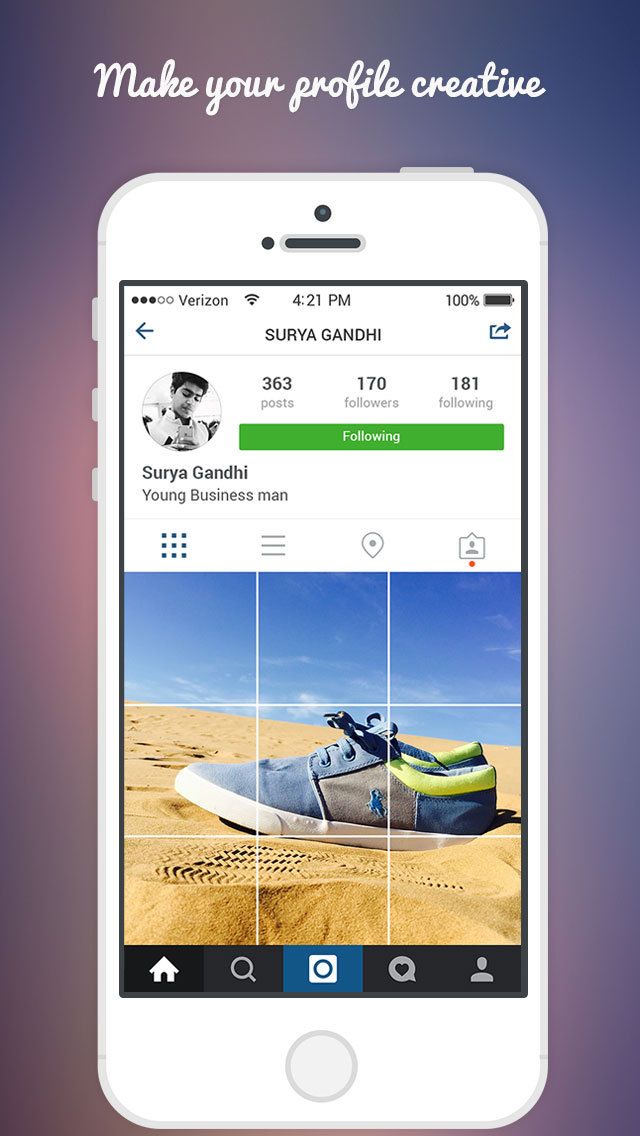 And 16:9 pictures, like from a computer, look narrow and visually stand out from the tape.
Step 1. Go to the application. If you are on the home page, click on the avatar thumbnail with a plus sign in the upper left corner. If on your profile page, then on the avatar. nine0003
Step 2. Creative. You have already opened the story editor. Take a photo or select an image from your mobile device's gallery.
Step 3. Bring the story to life. Attach the desired stickers, text, mark the profiles of friends or a place ... well, that's all, you can publish.
It is convenient to use delayed posting if it is important to constantly maintain activity in the profile, and you are ready to create content only by raids. Or if you go on vacation, but good statistics in instagram * should not go there. nine0003
You can use automatic posting in many applications, but it is safer to do this using the official social network service - Facebook Creator Studio. To set up delayed posting:
In instagram*, you can publish posts and stories not only in the application, but also through a mobile browser. It can also be enabled on PC. And this is still the only way to use the full functionality of the application by logging into Instagram* from a computer.
To make it work, just follow the instructions: