The bigger Instagram gets, the more complicated its app becomes. Indeed, it’s easy to miss some of Instagram’s most clever shortcuts, such as the quickest way to “heart” a photo or preview a snapshot in your feed.
There’s also a way to see your geo-tagged photos on a map—or wipe them off the map, for that matter. You can set your account to private, block unwanted followers, and erase tags of yourself that others have added to their photos. You can even get alerts when your favorite Instagrammers posts new photos—an important feature now that Instagram wants to change the way it arranges recent images in your photo feed.
Read on for nine must-know tips for Instagram newbies, starting with…
One of the biggest surprises awaiting an Instagram newcomer is the first time a complete stranger “likes” one of their snapshots. It’s a jarring reminder that by default, all the snapshots you post on Instagram are public.
Once you set your account to “private,” only your followers will be able to view your Instagram snapshots.
If you don’t want the entire world flipping through your Instagram photos, you can set your account to “private.” Doing so puts all your Instagram photos behind a privacy wall, meaning only your existing followers will be able to see them. Also, once you set your account to private, no one else on Instagram will be able to follow you without your approval.
Just tap the Profile button in the bottom corner of the main Instagram interface, tap the gear icon (on iOS) or the three-dot “overflow” button (on Android) in the top-right corner of the screen, then flip the Private Account switch.
So, you’ve set your account to private, but not before a few strangers or frenemies followed your account. You can give them the heave-ho in a few simple steps.
If you still have a few random followers after setting your account to “private,” you can block them in just a few taps.
Tap the Profile button in the bottom corner of the screen, tap Followers, then tap the name of someone you don’t want flipping through your photos. Now, tap the three-dot button in the top corner of the screen, then tap Block User.
Once that’s done, the blocked users won’t be able to view your snapshots anymore (and no, they won’t be notified that you blocked them).
One of the principle pleasures of Instagram is scrolling through your Home feed, gazing at the latest snapshots of the users you’re following.
Ben PattersonDouble-tapping an Instagram photo is the easiest—and coolest—way to like it.
Ben PattersonIf there’s a picture you particularly like, you can tap the little heart button just below the image.
Even better, though, you can like a photo the way Instagram experts do: Just give it a quick double-tap.
Liking snapshots on Instagram can get addicting—so addicting, in fact, that it’s easy to lose track of all the pictures you’ve liked.
Ben PattersonJust visit your profile screen to see every Instagram photo you’ve ever liked.
To take a look at your history of “hearted” photos, tap the Profile button, tap the gear icon (for iOS) or the three-dot button (Android) in the top corner of the screen, then tap Photos You’ve Liked option.
Bonus tip: You can always “unlike” a photo by tapping the heart button again. (No, double-tapping a liked snapshot won’t unlike it)
If you tap the Search tab at the bottom of the Instagram interface, you’ll land on the Explore page—a grid of dozens of Instagram photos liked by your friends and followers as well as by all your fellow Instagrammers.
While viewing an Instagram photo preview on an Android device, slide your thumb down to “like” a photo, see its creator’s photo page, or share the image with other Instagram users.
You can tap any photo on the Explore screen to see a full-screen version, but there’s also a way to quickly preview a photo: Just tap and hold it. When you do, a larger version of the image will appear on the screen, and it’ll stay there until you release the image.
If you’re an iOS user, you can push a photo preview up a bit to lock it in place and reveal three options: Like, Comment, and Send as Message (to another Instagram user).
On Android, the process is slightly different: Instead of nudging up a preview image, just slide your fingertip down to one of three options—Like, View Profile, or Share—then release.
Just like on Facebook, you can tag people in Instagram photos; indeed, you’ll be prompted to do so whenever you post a new picture on your Instagram profile.
Just tap an image to reveal any people tags, then tap a tag to visit that person’s Instagram profile.
While viewing other photos, you might see a little circle with a blank silhouette in the bottom corner of the image. If you do, it means that the image has been tagged. Just tap the image to reveal the tags, then tap a tag to jump to that user’s Instagram profile.
Curious to see whether you’ve been tagged in someone else’s Instagram photo? There’s an easy way to find out.
Ben PattersonIf you don’t like a tag of yourself in an Instagram photo, tap the tag to hide it from your profile or (by tapping “More Options”) removing the tag altogether.
Tap the Profile button in the bottom corner of the screen, then tap the “photos of you” button (it’s the one that looks like a tag with a silhouette inside) near the top-right corner of the screen.
Now, let’s say you find you’ve been tagged in a photo you don’t want to be tagged in, or that a stranger has tagged you in a picture by mistake.
In that case, tap your tag to reveal your two options: Either hide the photo from your profile, or remove the tag altogether. On Android, simple tap the Remove Tag option to nix the tag; on iOS, you’ll first need to tap More Options, then tap Remove Me from Photo.
Ever since Instagram first launched, your main photos feed has always showed the most recent photos posted by your Instagram pals first, in strict chronological order.
Ben PattersonYou’ll never miss a post from your favorite Instagrammer once you turn on post notifications.
Recently, though, Instagram said it would start testing a new, Facebook-style algorithm that would favor the posts that it thinks you’ll want to see the most. Of course, that means the most recent pictures from your Instagram friends might not necessarily appear first in your Instagram feed.
Instagram swears that it’s taking baby steps with its nascent feed algorithm, with Instagram cofounder Kevin Systrom promising (to the New York Times) that “it’s not like people will wake up tomorrow and have a different Instagram.”
That said, the advice of some panicked Instagram users—to turn on alerts for new posts from specific users—isn’t a bad one.
When you’re looking at the Instagram feed of someone you’re following, you can tap the three-dot menu button in the top corner of the screen, then tap Turn on Post Notifications.
Once that’s done, you’ll get an alert whenever that particular Instagram friend posts a photo, whether Instagram’s percolating feed algorithm thinks that user is important or not.
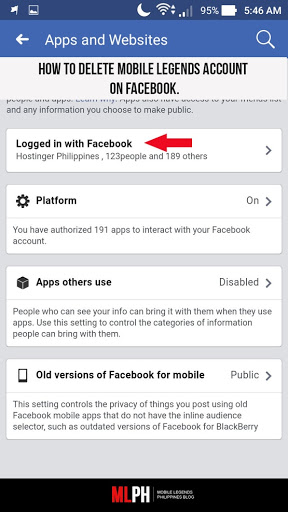
If you tag your posted photos with a location, anyone on Instagram (or just your approved followers, in the case of private accounts) can tap the location tab on your profile screen to see your geotagged snapshots on a world map.![]()
You can wipe photos off your Instagram photo map by tapping Edit, then tapping the snapshots you want removed.
Don’t like that idea? Then go to the location tab on your profile, tap the Edit button in the top-right corner of the screen, tap a photo to remove its location tag, then tap Done.
You can also click the grid button near the bottom of the screen to see all your visible geotagged snapshots at once; you can then tap Edit and select any photos you want to wipe off the map.
Instagram, like many other social media platforms, allows users to interact in a private messaging setting in addition to the features that make up the majority of its use.
Users can send direct messages to other users, including text, images, and even other Instagram posts. Similar to its public posts, users can "like" direct messages as well.
Here's how to like messages on Instagram.
1. Open your Instagram app. From your main Instagram feed, tap on the icon in the upper right corner of the screen that resembles an arrow or a paper airplane. If you have unread messages, a red badge with a number will appear on top of the icon.
Tap to open up your direct message box. Chrissy Montelli/Business Insider2. Tap on the conversation you want to view.
3. To like one of the messages this person has sent you, simply double-tap on the message you wish to "like." Once you've liked a message, you can double-tap it again to undo the "like."
Double tap to like the message. Chrissy Montelli/Business InsiderKeep in mind that liking a message is distinct from liking a comment or post on Instagram. Instagram posts and comments will have a small heart icon that you can tap in order to like that post or comment.
Liking a message requires having a direct messaging conversation with another user, and doesn't include a visible heart icon until after you've already liked the message.
Chrissy Montelli
Chrissy Montelli is a writer and content creator originally from Long Island, NY. She is the author of two poetry chapbooks, Heart Float (Bottlecap Press) and Going to Ithaca (Ghost City Press), as well as various online publications. Read more from her at chrissymontelli.wordpress.com.
Read moreRead less
Insider Inc. receives a commission when you buy through our links.
There are 3 main ways to add a photo to Instagram* from your phone: upload via the Instagram* mobile app, from your phone gallery, or via third-party apps. We will analyze separately how to publish a photo in a post and a story.
Download the Instagram app* from the AppStore or Google Play. After registering or logging into your account, you will see the [+] icon in the upper right corner, click on it, and then in the menu that appears, click on the "Publish" button. nine0003 Interface for adding a new post to the feed
Next, you will open the interface for adding a post, you need to go through several steps:
Let's take a closer look at how to post photos on Instagram* from your phone.
Select media files. After pressing the "Publish" button, you will be taken to the gallery on your phone. Select the photos or videos you want to post. At this stage, you can also change the resolution or select multiple files for one post. nine0003 Basic buttons for setting up a future publication
Editing files. After selecting all the settings, click the "Next" button in the upper right corner and go to the editing interface - here you can apply filters, adjust contrast, add sharpness, level the horizon, and so on.
Photo and video editing tools Add text and labels. Once you've finished editing your media, click the Next button again and the last settings will open: select other social networks for publication, add text, geotag, user tags. Read more in our article “Instagram tags*: how and why to use”. nine0003 Final settings for posting to the feed
Big text cannot be posted on Instagram*, the limit is 2200 characters. But if you really need it, we have an article with recommendations for the design of such publications.
Publication . When you're done with the settings, click "Share" in the upper right corner and the post will appear in your account feed and in the news feed of your followers. Hooray!
The process of loading a post and its display in the news feed This is a quick way when you just need to post one file with a caption, because this way you can not customize the display format, add multiple files to one post, edit media files, add geotags and tag other users.
How to post photos on Instagram* from your phone using the gallery:
That's it - the publication has been uploaded to your profile!
Step-by-step process of publishing a photo in the feed through the phone galleryIf you do not know what, why, why to publish and how to design, I recommend our free course "7 Steps of Content Marketing". In the course, we tell you what content marketing is, how to create, design and promote content on the Internet. All this will help you understand how content works, why publish posts and how to make them beautiful and interesting. nine0003
You can upload photos to Instagram* from photo and video editing apps, feed maker, and so on. Almost all of these applications have the ability to automatically add media files to Instagram*.
For example, the Canva photo and video editor app has a Share button in the top right corner. In the additional menu, the Instagram icon appears *, when clicked, it transfers to the social network application with the option to select a placement: Stories or feed. After clicking on the "Feed" button, the standard Instagram interface * opens to add a post to the feed. nine0003 Algorithm for publishing a post in the feed from the Canva application
You can upload a photo to Instagram stories* from your phone both directly from the Instagram application* and through third-party applications.
There are 3 ways to post a Story via the Instagram app*:
After clicking, the interface for creating Stories will open. By default, the camera opens, and you can immediately take a picture or video for stories. If you want to add files from your phone's gallery, tap the button in the bottom left corner of the screen or swipe up from the bottom of the screen.
Stories interface when first opened with camera enabledThe story editing interface also has many useful features:
 nine0018
 Once you're done with your stories, select the publish option at the bottom of the screen:
 An additional menu will open, which has the function of sending stories in a private message. nine0018
 Stories, like posts, can be posted from other applications, only when choosing a placement, you need to click "Stories".
Check out the Instagram Stories* section of our blog for inspiration on how to use Stories on both your personal blog and brand account.
If you feel uncomfortable publishing posts and stories from your phone, use services for publishing from your computer, such as SMMplanner. With it, you can design and post posts and stories from your computer and specify the time at which they will be automatically published. nine0003 Scheduling a new post on Instagram* from a computer via SMMplanner
What is the convenience of delayed posting and how to post on Instagram* from SMMplanner, read in our article "Delayed posting services on Instagram*: why they are needed and how they work".
Universal algorithm of actions for posting photos on Instagram* from the phone:
Done! Your first story or post is already in the feed.
Home » FAQ
Instagram is a social network with a great opportunity to distinguish yourself as a creative person, if you have the skills of a photographer, or you have a good appearance, and there is nowhere to show it, then you have a direct road to the vastness of Instagram. The application is popular with people of different audiences who post their creations every day around the world in the form of photos and videos of masterpieces, while gaining fans around the world. Instagram currently has over 500 million users. nine0003
It is not even necessary to own special photo editing programs, since Instagram has an editor with various filters and tools. For some, this is enough to process a photo, and for some it is not. Therefore, there are people who do not care about the quality and type of photos, they usually post them in tons of no matter what quality, but there are real photo artists who take pictures on good cameras and before adding photos to Instagram, they process them on a computer through Photoshop. They form the basis of photographic art and professional photography. It is very pleasant to look at unusual pictures, to be inspired by touching moments even from your photo albums. So let's get creative. nine0003
How to upload photos to Instagram, if you just started using this mobile application, let's try to figure it out.