Home »
Misc »
How do i create a reel on instagram
How do i create a reel on instagram
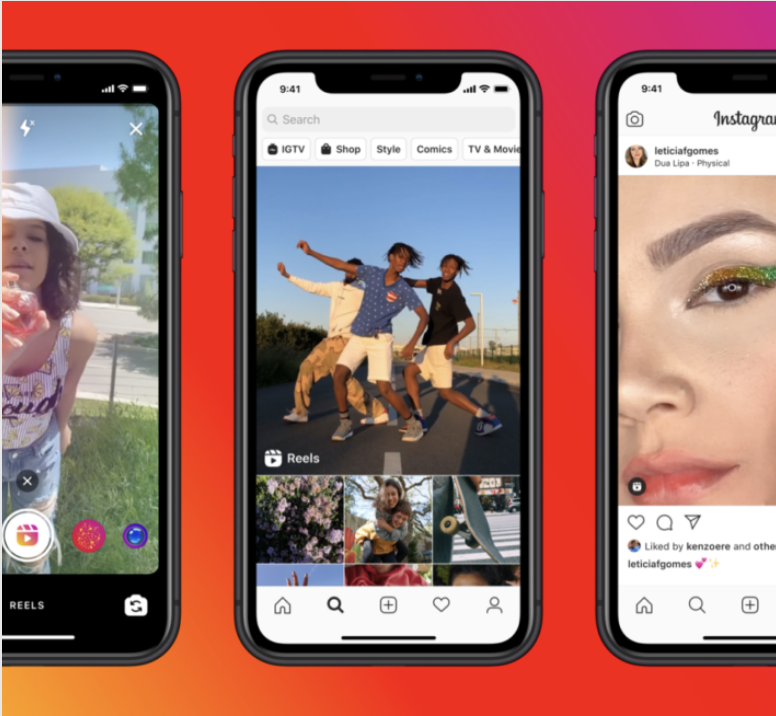
Introducing Instagram Reels
Posted on August 5, 2020
Today we’re announcing Instagram Reels: a new way to create and discover short, entertaining videos on Instagram.
Reels invites you to create fun videos to share with your friends or anyone on Instagram. Record and edit 15-second multi-clip videos with audio, effects, and new creative tools. You can share reels with your followers on Feed, and, if you have a public account, make them available to the wider Instagram community through a new space in Explore. Reels in Explore offers anyone the chance to become a creator on Instagram and reach new audiences on a global stage.
How it Works
Creating Reels
Select Reels at the bottom of the Instagram camera. You’ll see a variety of creative editing tools on the left side of your screen to help create your reel, including:
Audio: Search for a song from the Instagram music library. You can also use your own original audio by simply recording a reel with it.![]() When you share a reel with original audio, your audio will be attributed to you, and if you have a public account, people can create reels with your audio by selecting “Use Audio” from your reel.
When you share a reel with original audio, your audio will be attributed to you, and if you have a public account, people can create reels with your audio by selecting “Use Audio” from your reel.
AR Effects: Select one of the many effects in our effect gallery, created both by Instagram and creators all over the world, to record multiple clips with different effects.
Timer and Countdown: Set the timer to record any of your clips hands-free. Once you press record, you’ll see a 3-2-1 countdown, before recording begins for the amount of time you selected.
Align: Line up objects from your previous clip before recording your next to help create seamless transitions for moments like outfit changes or adding new friends into your reel.
Speed: Choose to speed up or slow down part of the video or audio you selected. This can help you stay on a beat or make slow motion videos.
Reels can be recorded in a series of clips (one at a time), all at once, or using video uploads from your gallery. Record the first clip by pressing and holding the capture button. You’ll see a progress indicator at the top of the screen as you record. Stop recording to end each clip.
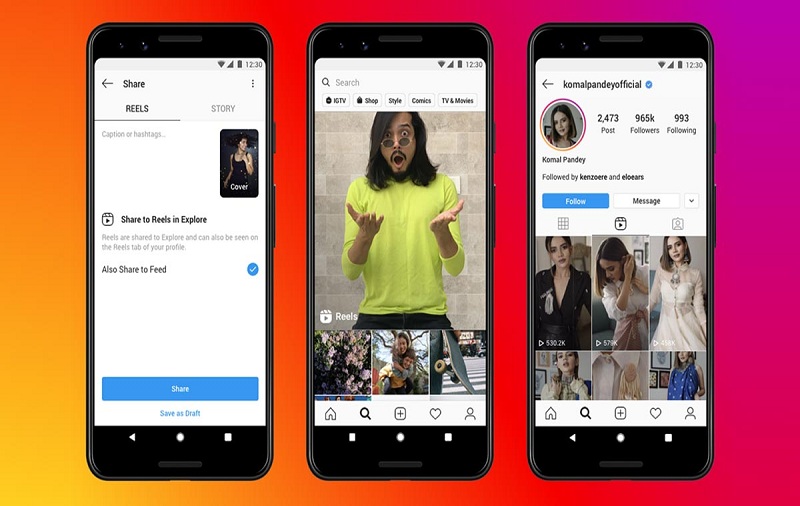
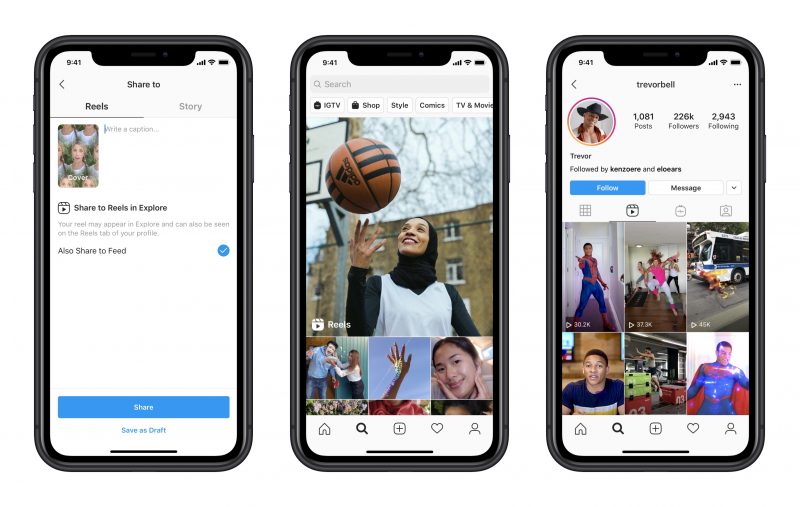
Sharing Reels
With Reels, you can share with your followers and can be discovered by the huge, diverse Instagram community on Explore.
If you have a Public Account: You can share your reel to a dedicated space in Explore, where it has the chance to be seen and discovered by the wider Instagram community. You can also share your reel with your followers by posting it to your Feed. When you share reels featuring certain songs, hashtags, or effects, your reel may also appear on dedicated pages when someone clicks on that song, hashtag, or effect.
If you have a Private Account: Reels follows your privacy settings on Instagram. You can share to Feed so only your followers can see your reel. People will not be able to use original audio from your reels, and people cannot share your reels with others who don’t follow you.
Once your reel is ready, move to the share screen, where you can save a draft of your reel, change the cover image, add a caption and hashtags, and tag your friends. After you share your reel, it will live on a separate Reels tab on your profile, where people can find the reels you’ve shared. If you also share to your Feed, your reel will appear on your main profile grid, though you have the option to remove it.
Whether you have a public or private account, you can share your reel to your Story, close friends, or in a direct message. If you do so, your reel will behave like a regular Story — it will not be shared to Reels in Explore, it will not appear on your profile, and it will disappear after 24 hours.
Watching Reels
Reels in Explore showcases the best of trending culture on Instagram. Discover an entertaining selection of reels made by anyone on Instagram, in a vertical feed customized for you. If you love a reel, you can easily like, comment or share it with your friends.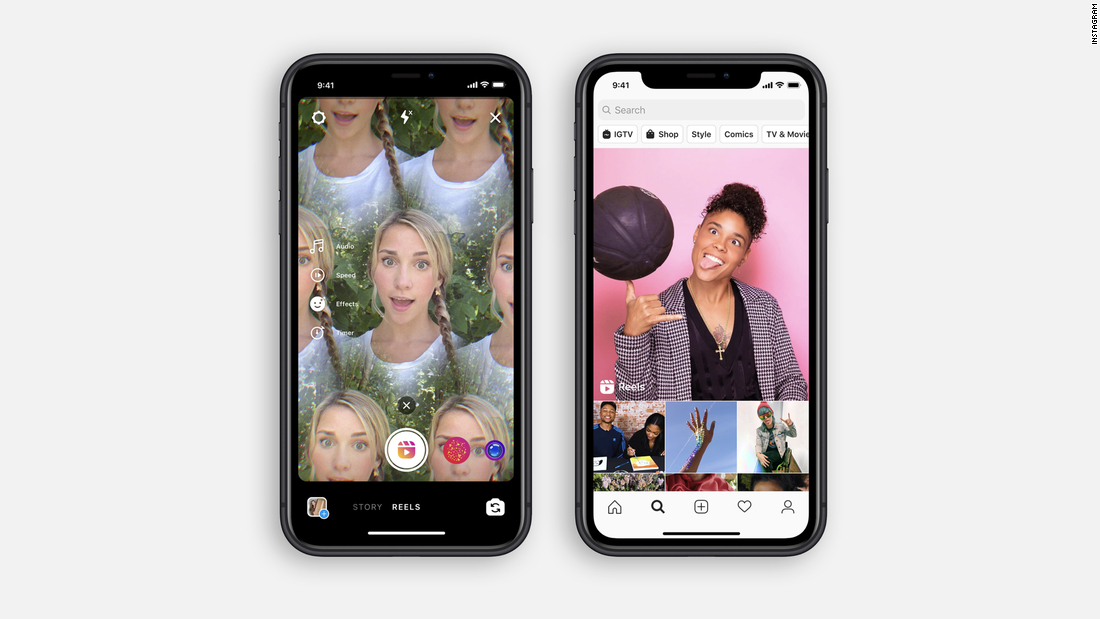
You’ll also see some reels with a “Featured” label. If your reel is featured in Explore, you’ll receive a notification. Featured reels are a selection of public reels chosen by Instagram to help you discover original content we hope will entertain and inspire you.
Reels gives people new ways to express themselves, discover more of what they love on Instagram, and help anyone with the ambition of becoming a creator take center stage.
For more information on Reels, visit our Help Center.
RELATED ARTICLES
Check out more announcements about product
How to Make a Reel on Instagram
By now, you may have noticed a lot more videos in your Instagram feed. Instagram has doubled down on video—and Reels are the platform’s fastest-growing format. If you want to know how to make a Reel on Instagram but you don’t know where to start, we’ve got you covered.
With over two billion monthly users, Instagram’s popularity cannot be denied. The rise of Reels—bite-sized video posts—is the platform’s response to TikTok’s mega-popular micro videos. In fact, 66% of consumers say short-form video is the most engaging type of social content. And Reels are one of the main Instagram content formats marketers want to use to collaborate with creators.
With Reels reportedly receiving around 22% more engagement than other video posts, it’s time to strike the iron while it’s hot. Whether you’ve never made a Reel or you just want some fresh tips, we’re going to show you how to make an Instagram Reel, step by step.
What are Instagram Reels, and why should you use them?
Instagram Reels are short, multi-clip vertical videos that range from a few seconds to 1.5 minutes. Like TikTok, Instagram offers editing tools that allow you to easily create your Reel, and add entertaining features like music and captions.
Why use Reels? In short, they’re the best way to increase your audience, reach and can make it easier to strike viral gold. As Sprout’s Social Media Strategist Olivia Jepson tells us, “Our top videos on Instagram over the last year have been Reels. Specifically, Reels that inspire and offer immediate value for viewers.”
While they haven’t outright said the Instagram algorithm prioritizes Reels, the platform has made it clear that video is their priority—a recent test by Instagram turns all Instagram videos into Reels. And accounts that haven’t adopted this type of content are feeling the crunch. What’s more, the platform has made Reels the most discoverable content format, able to be shared and featured in four places: Stories, a Reels-only tab, the Explore page and the regular feed.
This presents a major opportunity—using Reels gives audiences more ways to find your content, and gives you more ways to grow. Ride the popularity wave while this format is still fresh.
How to make a Reel on Instagram
Producing a new type of content can feel daunting, but it doesn’t have to be. With Reels, the reward is worth the learning curve.
Let’s walk through making an Instagram Reel, and tips on how to make it stand out.
Step 1: Set a strategy
The secret sauce behind successful Reels is the same as any other content: Let your brand’s voice and values guide you.
To create your strategy, consider the following:
- Set your goals: Think about how Reels fit into your larger social media goals. What do you want to accomplish with them? Increasing engagement? Reach? Knowing this ahead of time will help guide the types of Reels you make.
- Know your audience: Your audience should inspire all of your content. Consider what topics, styles and sounds appeal to them.
- Form your content topics and buckets: Reels should be entertaining, but they don’t need to involve dance trends. They can be educational, funny, dramatic or inspiring. Start by looking at your top-performing content to identify topics and themes that work.

- Do your research: How do your competitors use Reels, and what gaps can you fill?
Once you start posting, check your analytics to see which Reels perform the best. This will help you refine your content strategy. Using a reporting tool like Sprout Social, you can even see how your Reels perform against all of your content—on Instagram and beyond—to prove their impact.
Step 2. Gather your footage
This is where the fun begins—grab your phone and open Instagram. Tap the “+” in the upper right corner. Then, you’re ready to get started.
There are two ways you can gather footage for your Reel: filming or using existing footage.
Filming new footage
Lights, phone, action! Start filming by holding down the round white recording button. Use the double arrow icon to flip the camera toward yourself, or to film what’s in front of you.
While you film, a pink border will appear around the white button. This shows you how much you’ve filmed so far.
Use the tools on the side of the screen to spice up your content. Here’s what they do, from top to bottom:
- Music notes: Add music or sounds while you’re filming.
- Set the length: Limit your Reel to 15, 30, 60 or 90 seconds.
- Speed adjustment: Speed up clips you film, or film in slow motion.
- Layout mode: Feature multiple videos or photos on screen at once.
- Self timer: This tool is helpful for hands-off filming, and will give you a countdown before filming begins.
- Dual feature: Film yourself, as well as whatever is in front of you at the same time.
- The align tool: Use this to see a translucent version of your previous clip to align it with the next clip you film. This is helpful for creating seamless transitions, like when an outfit “magically” changes while the person wears it and more—see this tool in action below.
- Filters and AR effects (sparkle icon): Search for filters including ones you’ve saved. This is where you can use popular effects, like greenscreen.
How to make an Instagram Reel with existing photos or videos
Repurpose videos and even photos you already have. Transform previously posted TikTok or Instagram content. Or break up existing YouTube videos into short, snackable Reels.
To select existing visuals from your phone’s library, tap the square image and plus sign icon in the bottom left corner.
If a lot of your videos are horizontal, upload them to your Reel and tap the “scale” icon. Alternatively, upload your footage as if you’re creating an Instagram Story. Once in the Story editing window, use your thumb and forefinger to stretch your footage into vertical, full screen content. Then, hit the three dots in the upper right corner and tap “save.”
Level up: Create your first Reel by piggybacking off of someone else’s. Remix allows you to post your own reaction or commentary to an existing Reel—just open the Reel you want to use and tap the three dots in the bottom right.
Step 3. Editing your Instagram Reel
Time to put your video editor hat on. Once you have your footage, hit “Next” to start editing.
Edit the length and order of your clips
Tap “Edit clips” in the bottom left corner. You’ll then see all of your clips lined up at the bottom.
- To make clips shorter: Tap a clip. Drag the left and right ends of the progress bar at the bottom of the screen to shorten your clip.
- To move clips: Hold your finger down on a clip you want to move. When it enlarges, drag it back and forth.
- To delete one clip: Tap the clip you want to delete. A delete button will appear at the bottom of the screen. Or, hold your finger down on one clip and tap on the minus signs that appear.
Add music or sounds
Music adds immediate entertainment value—in fact, it’s one of Instagram’s main tips for getting discovered.
While editing, tap on the music notes icon. This will take you to an audio editing screen. Adjust your video volume and the volume of added audio, like songs, by dragging your finger down the columns that appear.
On this screen, you can add three kinds of audio:
- Music: Find songs in Instagram’s music library, select sounds and music you’ve saved or import your own. This is also where you can add sounds from other Reels. Be aware: music selections are limited for business accounts.
- Voiceover: Record a voiceover to speak directly to your audience.
- Sound effects: Choose from a variety of engaging sound effects.
You can use all of these together, or pick and choose.
When you add music, the name of the song will appear on your Reel. If you don’t, when people watch your Reel, your Reel’s sound will be marked as “original audio”—if your account is public, other people will be able to create Reels using that audio.
Level up: Find trending sounds and songs on Reels. When you open a Reel, a little arrow will appear next to the name of the audio if it’s trending. Tap on it to save it for later.
Add closed captions
Video closed captions are key for social media accessibility. They also keep people watching—even when their phone is muted.
To add closed captions, tap the square smiley face icon at the top of your screen. From here, you can add GIFs, stickers, polls and more to your Reel. For now, select “CC CAPTIONS”.
Once Instagram has transcribed your audio, customize the style of your captions at the bottom of the screen, and change the text color at the top of the screen.
Level up: Auto-captions aren’t perfect. Edit them by tapping the text as it appears. Then, tap the words you want to correct, and hit done.
Customize your video with text
If you’ve ever created an Instagram Story, this process will look very familiar.
Tap the “Aa” icon in the top right corner of the screen. Then, type in your text and customize the look and color. To add more, tap the “Aa” icon again.
Adjust where your text appears by tapping and dragging it to where you want it to be on the screen. And set when it will appear and disappear in the video by tapping the corresponding text at the bottom of the screen. Then drag the left and right bars to choose when the text’s duration starts and ends.
Delete text by tapping and dragging it to a trash icon that appears at the bottom of the screen.
Add filters and AR effects
Whether you want to add aesthetic filters or a crown of cartoon hearts, tap the sparkles icon at the top of the screen to search for and add new filters and effects, or ones you’ve saved.
Step 4. Preparing and sharing your Reel
When you’re done editing, tap “Next”—this is where you’ll prep your Reel before you publish. Here are the three most important preparation steps to complete every time:
- Edit your cover: Tap “Edit cover” on your Reel to choose how it will display on your profile.
 You can use a moment from your Reel, or upload an image—just make sure it’s relevant.
 - Write a caption: Keep it short and sweet.
- Choose whether or not to share your Reel to your Feed: In my experience, sharing to the Feed increases your reach.
Once your Reel is prepped, you have three sharing options: Publish immediately, save a draft or schedule it.
Option 1: Publish your Reel immediately
Publishing quickly is crucial for jumping on trends. Once you’ve prepared your Reel, simply hit “Share” to send your Reel out to the world. Then, share it to your Story for extra amplification.
If you don’t want anyone to be able to remix your Reels, head to your Settings and Privacy section to restrict this.
Option 2: Save your Reel as a draft
If you’re not ready to publish your Reel, you can save it as a draft. Once you’re in the window where you can prep your post, tap “Save Draft” at the bottom of the screen. Then, find your Reels drafts later by going to your profile and tapping the Reels icon under your bio.
Option 3: Schedule your Reel, or set a reminder
Scheduling Reels ahead of time with a tool keeps your content flow consistent, and takes one more thing off your plate.
Using Sprout Social, you can easily schedule your Reels. When your Reel is ready, download it from Instagram by tapping the download arrow.
Then, upload it into Sprout where you can prep it in many of the same ways as on Instagram.
Keep in mind: you can’t use Sprout for Reels with sounds from Instagram’s music library—but we’re still here to help. Use the Sprout Mobile Workflow to get a reminder on your mobile device on the day and time you want to publish your Reel.
Start making Reels to grow your channel
The only constant in life is change, and that adage could not ring more true for social media. Reels may require a little practice. But it only takes making one Reel to unlock your video editing abilities and start connecting with your audience in a new way.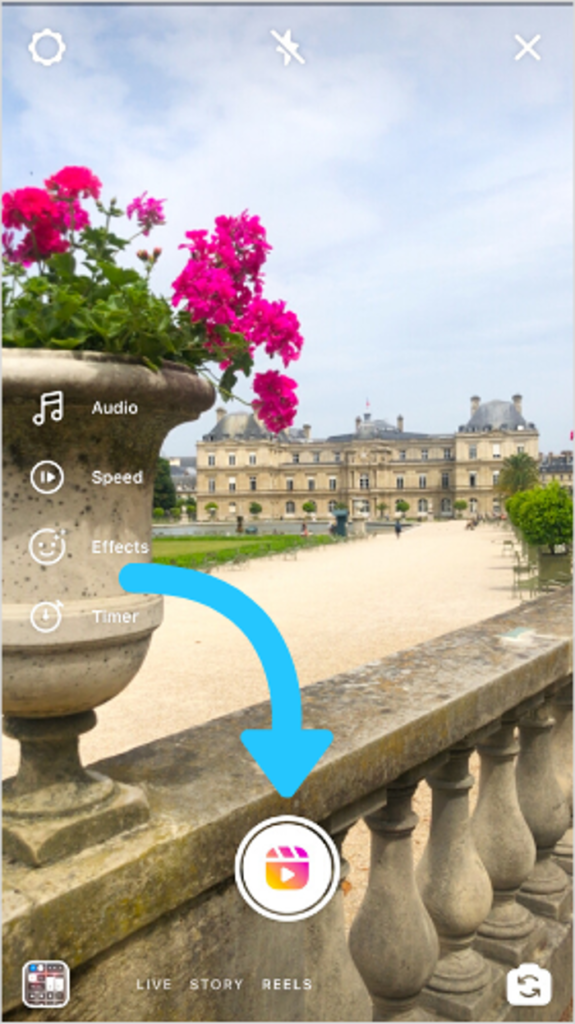 You might even find that you love the process.
Use this guide to make creating Reels reel-y easy. Before you know it, it will feel as simple as one, two, post. Now that you know everything about how to make a Reel on Instagram, check out our article about creating an Instagram marketing strategy to elevate your channel.
Create video for Instagram | Supa
How to create an Instagram video without budgets and effort SUPA
Modern marketers have no idea how it is possible to manage their marketing strategies without Instagram videos. Today, this tool is spreading at a tremendous speed. Such an increasing popularity of video as a format for delivering information is largely justified by the fact that video marketing has become very accessible. You do not need to have video editing skills, you do not need to hire a team of designers, but you can use various video editors and create a great professional video.
With SUPA Video Maker, you can create your own unique video in minutes. All you need for this is a little time and desire. Intuitive interface and detailed video instructions will help you quickly figure out how to use our video maker. Plus, a collection of ready-made templates will help you choose a direction, navigate what suits you and your business. In SUPA, you simply choose the template you like, modify it to suit your style, add text, animated elements or stickers, emoji, choose brand colors and fonts. With this step-by-step algorithm, the perfect video for presenting your business on Instagram will be ready in 10-15 minutes. Easy fun creation process and professional result is the best solution for your brand. In addition, with SUPA you can create videos for Instagram online right in your browser without overloading your computer with heavy programs. Don't worry about the correct video size or format - we've already taken care of that.
And all this without big budgets and with minimal time and resources. In 2020, over 85% of businesses plan to use video marketing as a marketing tool.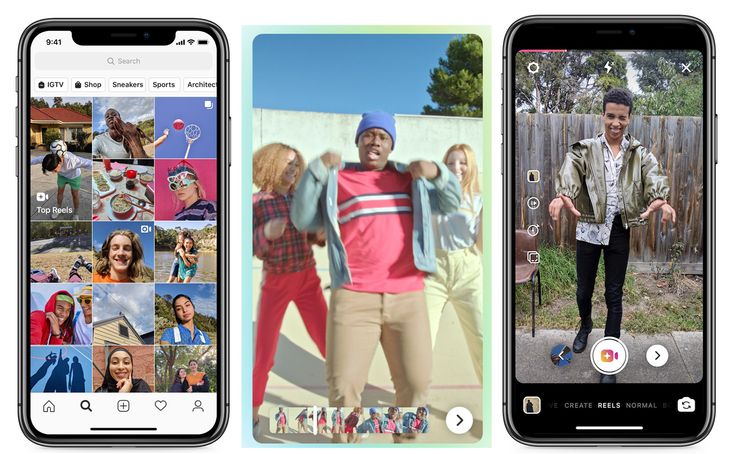 Instagram videos are a great way for a brand or person to make themselves known, present a product, tell their story, and attract followers. Video can be both free and paid promotion method. We wrote about how to make an advertising video for Instagram here.
73% of US teens say that the best platform for brands to tell them about new products or promotions is Instagram. Only 12% of teens will respond to Facebook, and 37% to email
Source: eMarketer
Why Instagram video is the future of promotion
Video can help you build brand awareness, share your ideas, promote products, gather feedback, learn about customer preferences, or educate your audience.
Video on Instagram can be posted in several formats - video in the feed, video Stories, IGTV (read more about IGTV updates here) and Instagram Live, which gives any business to show creativity and space for imagination and experimentation. You can run ads in any of these formats. Advertising in stories has already proven to be particularly effective.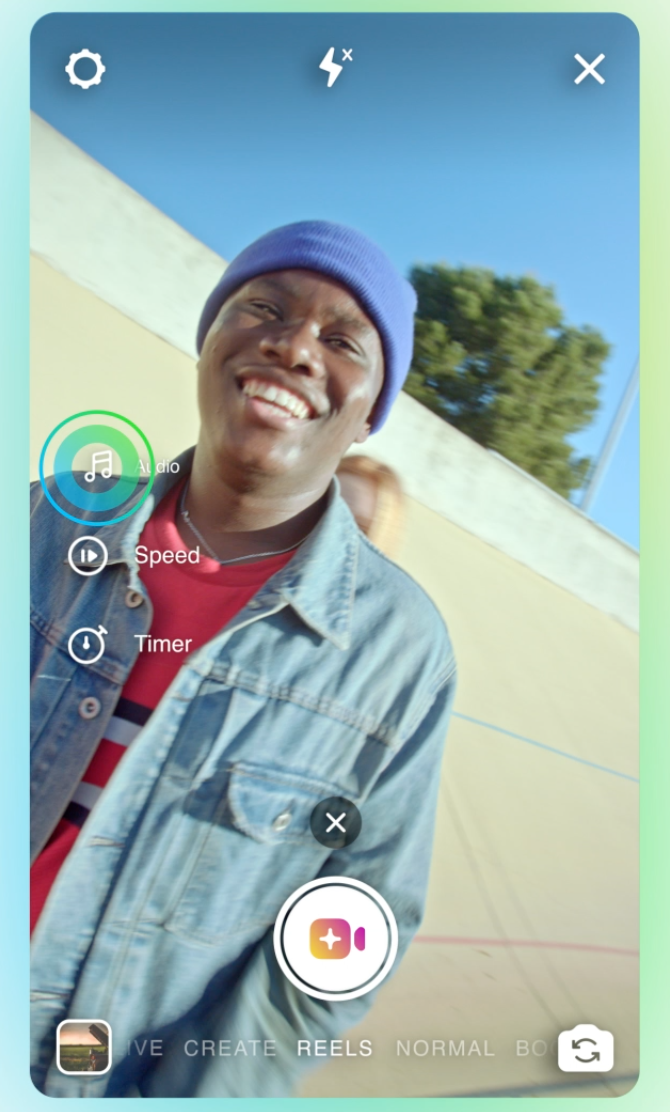 We wrote about how to create advertising stories correctly here.
More than five million businesses use Instagram to interact with their customers. It's time to join them. The most popular video is the one that engages your followers and gives them the opportunity to feel connected to your brand or your life. At SUPA, we have made sure that the video is engaging. To do this, we have created a unique database of templates, many different elements, emoji, stickers. For more dynamism, you can create an animated video or animated text. Rearrange slides, add brand colors, add text and pop-ups. You can add music to an Instagram video in our SUPA video maker. Music will help your story and plot unfold fully.
But it is important to remember that the video in the Instagram feed does not automatically play the sound, the user himself needs to click on the video for the sound to appear. Therefore, make your video as clear as possible and without sound. To do this, it is good to use titles, logically build shots and plot.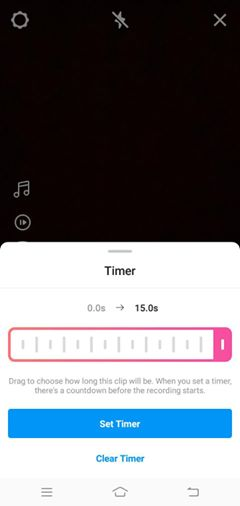 The visual component plus good quality become more important than ever before. Tell a story in your video, lure the user with a scale or an unfolding plot so that he can clearly see the benefits of your product or service.
Video has already become a necessary element of any well-thought-out content strategy, so use it to the maximum. According to research, Instagram users interact with posts 20 times more often than Facebook users.
Try to keep the balance of text and video, there should not be too much text, no more than 20%. Promote your logo and brand colors: this way you will form clear associations with subscribers, and they will recognize you by your characteristic video style or storytelling style, color style.
Another reason to create and post videos is viral content. Videos go viral much faster than photos. In addition, videos are more readily shared than photos. According to eMarketer research, user engagement with video content is growing at a faster rate.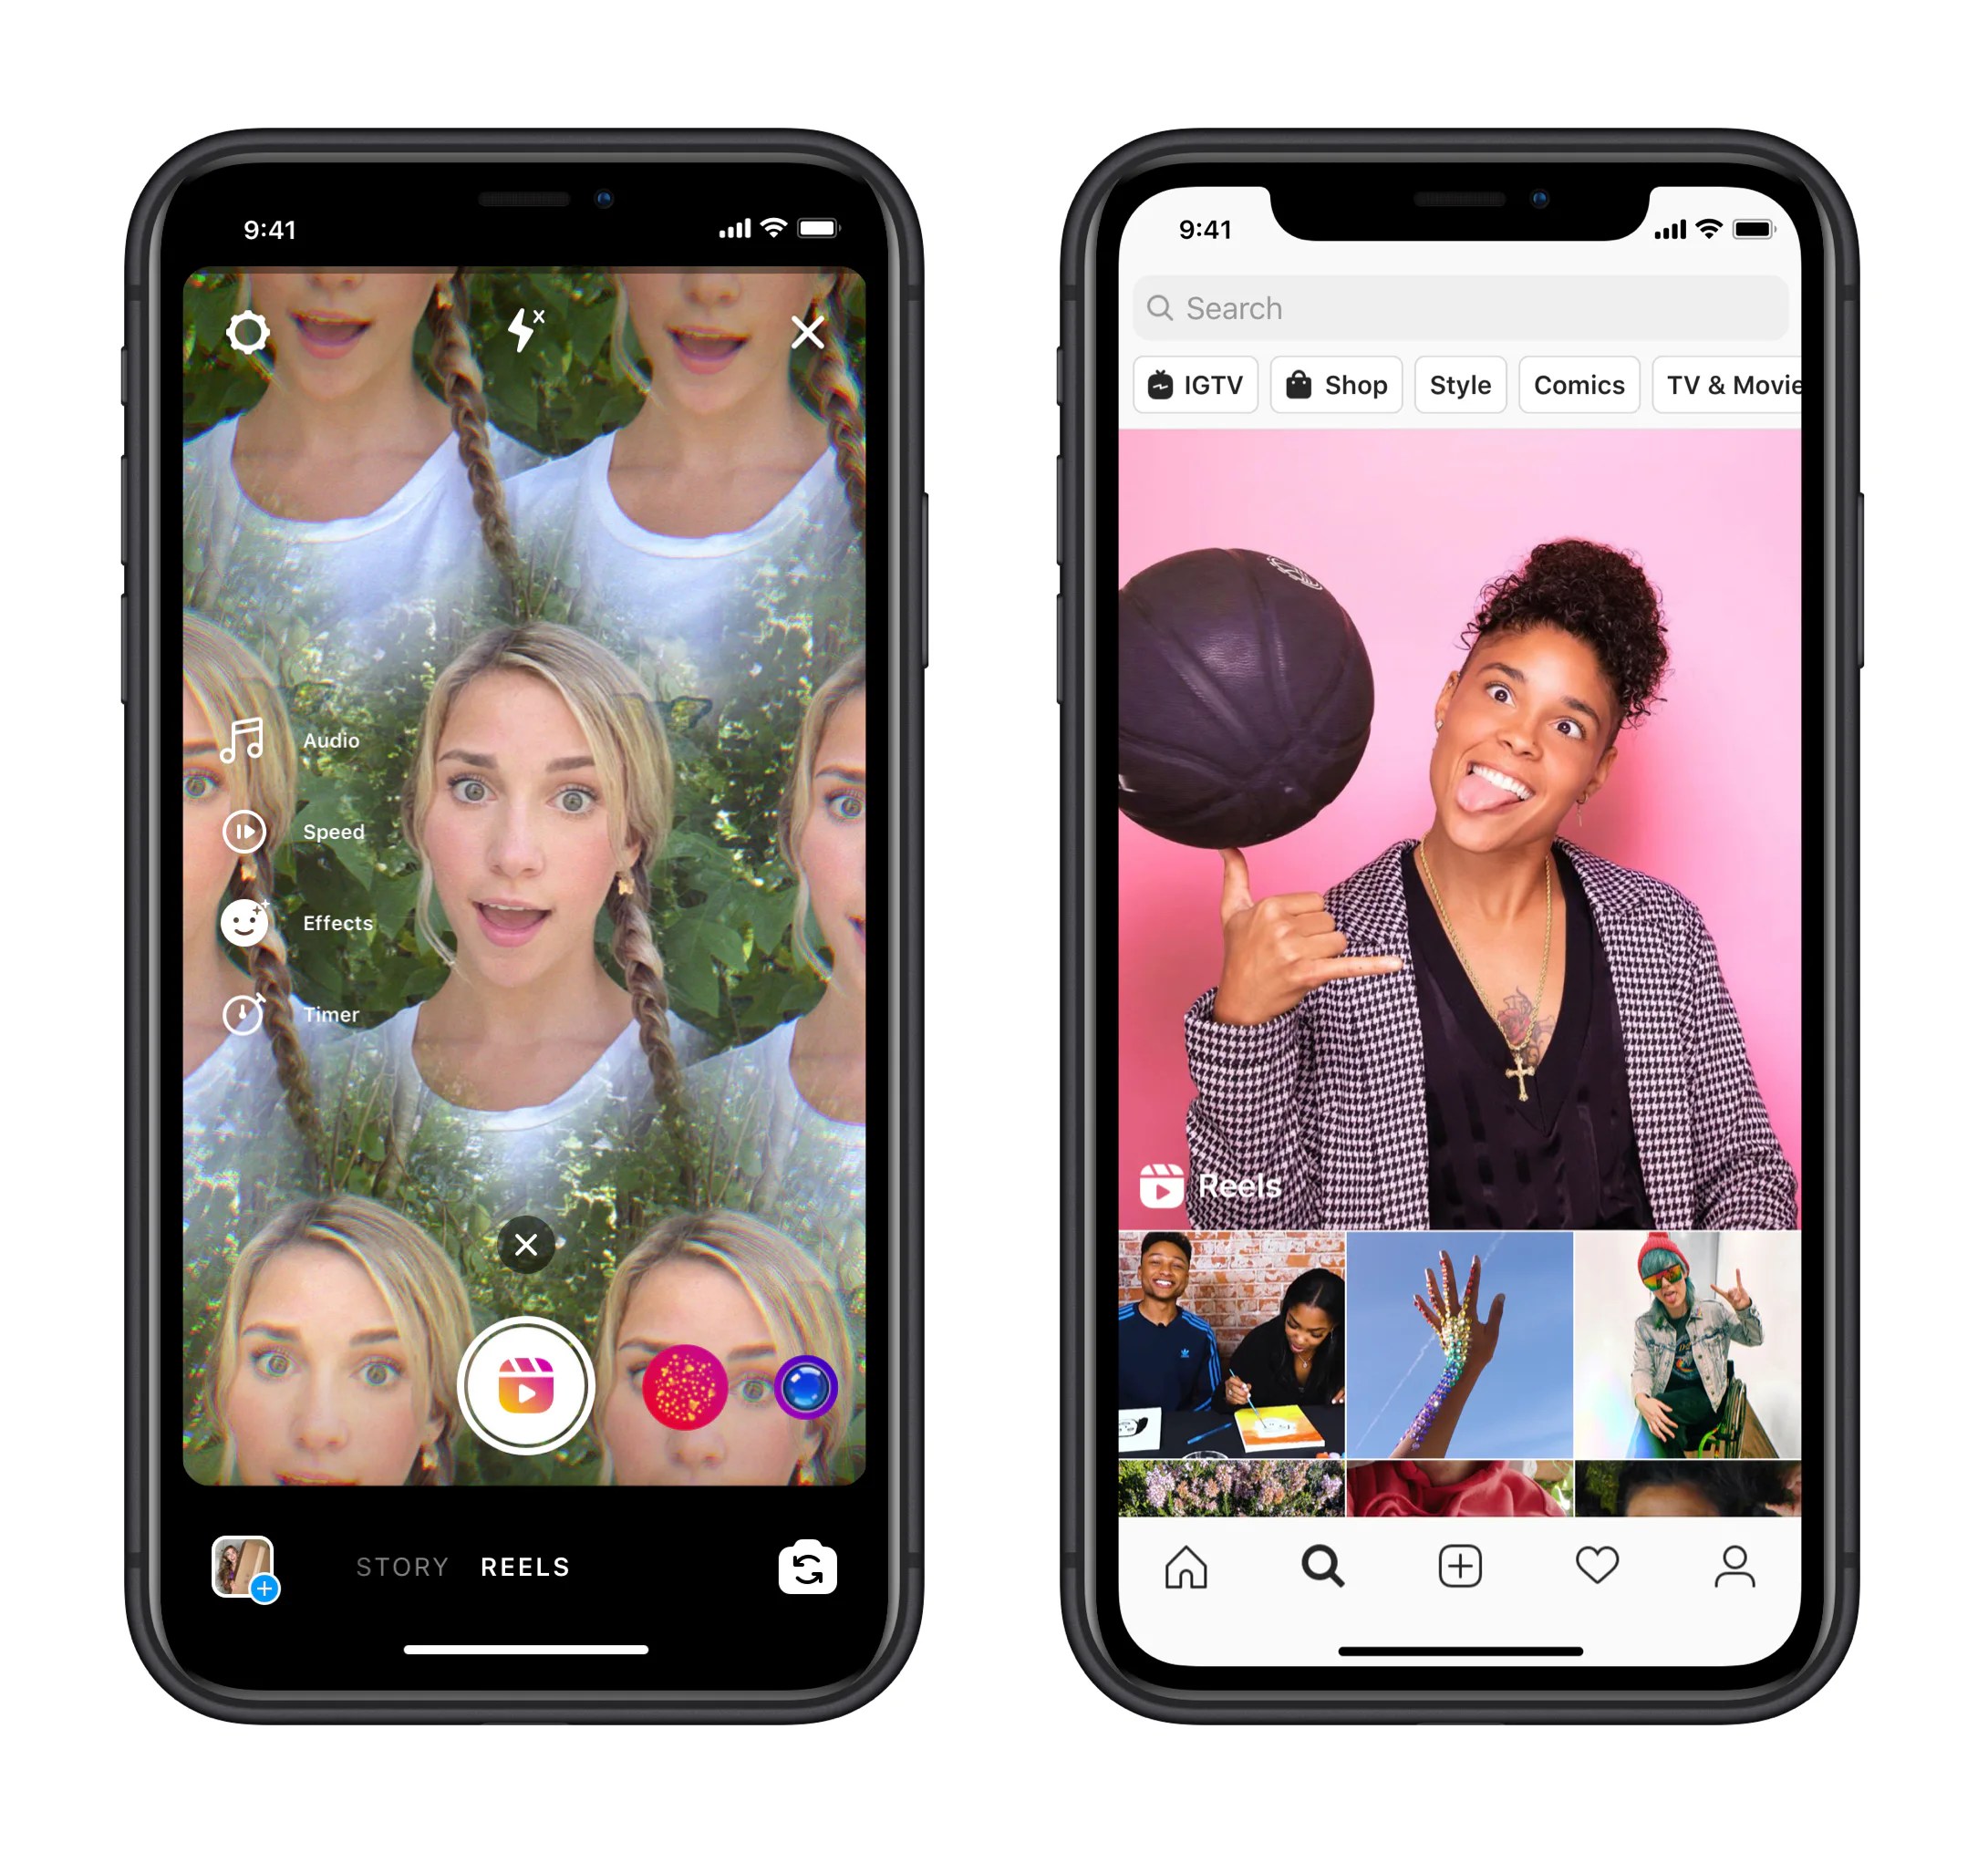 People choose stories, plots and details that cannot be fit into one picture.
11 secrets of the perfect video for Instagram
Creating a video for Instagram in our video maker is very easy. Especially if you know the main features of a successful video.
- Use titles. Even if the user is watching without sound, you will be able to convey the necessary information. Users prefer interactivity and dynamism. Therefore, use animated text and video.
- Add your logo to your video so users can easily identify you. The logo should not be too big or hang on the video for a long time.
- Remember your style and stick to it. The corporate identity of the brand should be easy to read. And your video should organically fit into the format and color palette of your feed. Use repetitive elements or images, corporate fonts.
- You only have the first 3-5 seconds to interest the user. Start your video with an interactive, question, provocation.

- Add Call to action or product links. This always works and focuses the attention of subscribers on things that are important to you.
- Make it quick and easy to buy a product or service after watching a video. Do not complicate the customer journey with unnecessary details and time costs.
- Create a "video for Instagram" - that is, immediately imagine how it will be displayed in your feed, how it will look from the smartphone screen. Try to create video content that you yourself would be comfortable and interesting to consume. Immediately think over your video for a mobile format.
- How to shoot video on instagram? A great option for tape is to use video loops. A looped video creates the effect of a complete story, completeness. You can add the same elements at the end and beginning of the video, or use the same picture, music, background.
- Do not use the same video for different social networks. In SUPA, you can easily create dozens of different videos tailored for different social networks.
- If your video leads to a landing page, then optimize it, make sure it is adapted for mobile devices. Make the page beautiful, understandable and easy to use.
- Stand out from your competitors, offer them creativity, novelties. Create custom videos to keep their attention. Create a new experience for them with a video, brand or product.
How to post a video on Instagram
Posting a video on Instagram is pretty easy. Save the video created in SUPA to your mobile phone and go to the Instagram application, click on the "+" button for adding a new publication, add the finished video saved previously to the gallery, and click "next". Since the video has already been edited, all you have to do is post the video.
Remember that you need to choose an interesting video cover. Think about it in advance so that your video has exactly the frame you need. The cover is the first impression that can both attract and repel the user. Even with the coolest video, a subscriber can simply pass by due to an unsuccessful cover.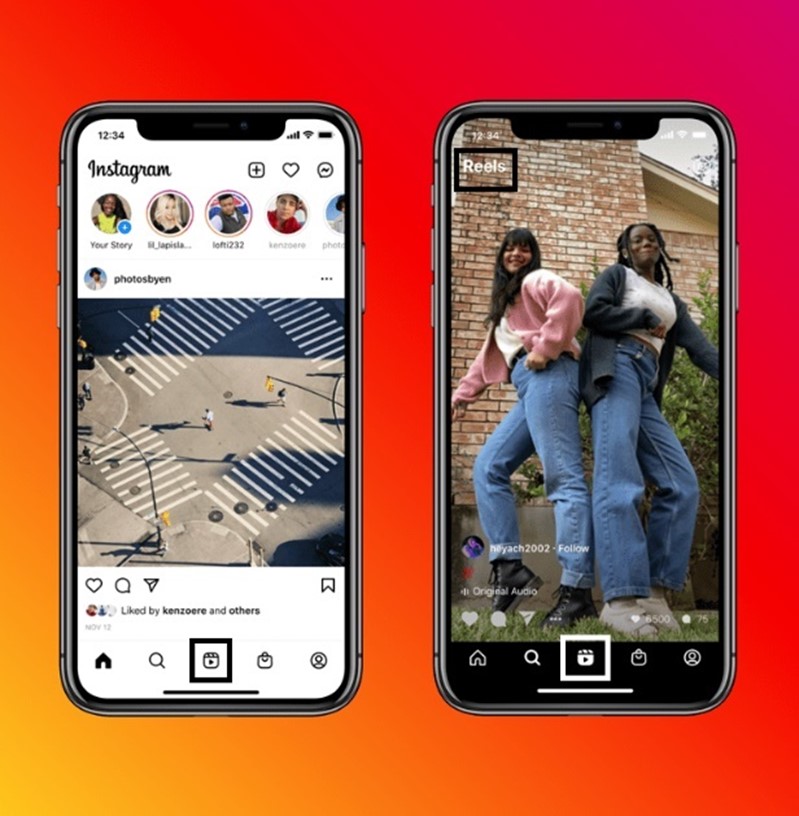
How to add a video to Instagram in such a way that it will definitely catch the eye of the user? Study the hours of activity of your audience, choose the right video for posting. Experiment with video length and find the optimal length for your audience. Analyze statistics. Read about average Instagram performance indicators here.
Instagram video size requirements
Instagram video format is an important part of the video creation process. If you follow the given parameters, then your video will be more acceptable for viewing.
- Video format: MP4 and MOV.
- Duration: 3 to 60 seconds.
- Size: up to 4 GB.
- Orientation: square, horizontal and vertical.
- Aspect ratio: 1.91 : 1 minimum and 4 : 5 maximum
- Maximum resolution: 1080 pixels.
What to show in Instagram videos
How-to and DIY videos
How-to videos are the most popular on Instagram. So be sure to include them in your content plan. Explaining something in a video is much easier than describing it in words. Users love simple clear instructions on how to use your product / service, how to wear this or that thing. In such a training video, you can also show your expertise in your topic, invite subscribers to follow your guide.
Promo product
Announce a new product or updates to existing products in a video. Show the product from all sides in the video so that the user has a complete impression of it. Make your subscribers look forward to this product. Run a paid promotion promo to show your product to as many people as possible. 64% of users are more likely to buy a product after watching a video about it. In 2019, more than 823 thousand advertising publications were published in the Russian-language segment of Instagram.
Brand history
Tell the story of the brand in the video, how the idea to create a business or become a blogger came about. Create a separate video clip in which you can demonstrate the brand values and convey them to the user in an accessible form.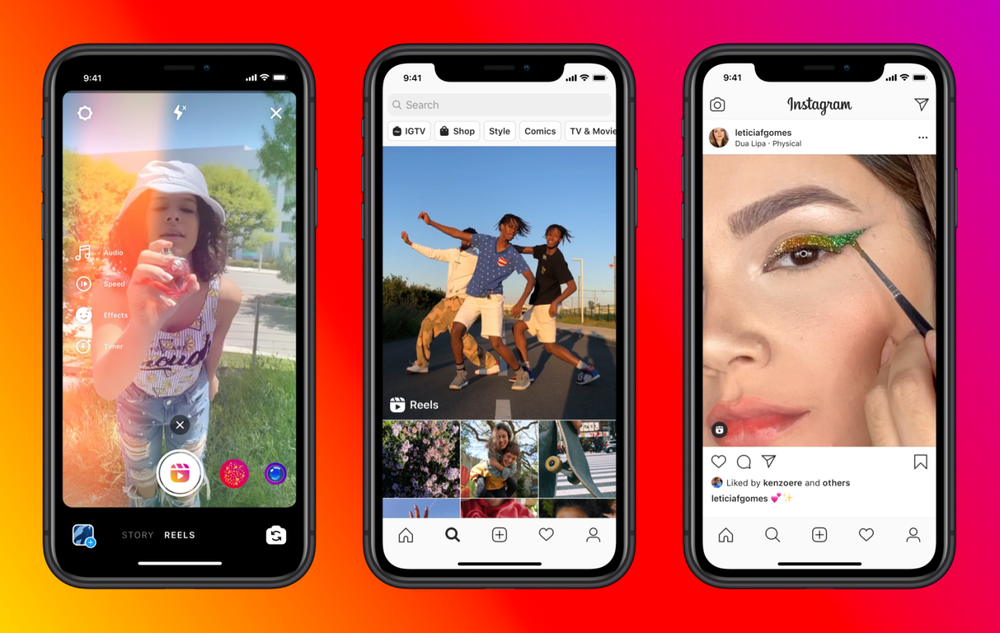
Inner kitchen
Show how your business works from the inside. Tell about the standard day of your company, introduce subscribers in the video to those who create / sell products for them. People love to watch the underside of interesting processes. This gives the effect of involvement and presence, makes the person even more related to the brand.
Topic
Perhaps you would like to discuss a topic related directly or indirectly to your field. Select a format for this video. Do this for a variety of content and your own entertainment.
Funny video
Create a funny and funny video for your subscribers, play up your failures or mistakes in the production of goods, for example.
Testimonials
Show testimonials from existing customers in a video. You can take both text reviews and design them in the video constructor using cool emoticons or elements, or combine individual video reviews into one video. Sincere live reviews will make sales for you.
Frequently Asked Questions
- What are the most popular videos on Instagram?
According to research, the most popular videos on this social network are instructional videos. We have analyzed the algorithm for creating an educational video in detail here.
- Is the process for creating an Instagram feed video different from an Instagram Stories video?
Yes, we described how to create a video for Stories correctly here.
- What aspect ratio should the video have for the Instagram feed?
Minimum aspect ratio of 1.91:1 and maximum aspect ratio of 4:5.
- How do I set up ads for Instagram videos?
Details about how to work in the advertising account, we wrote here.
- How to edit text in SUPA?
SUPA offers a wide range of text settings. You can change the size, position, make animation, add corporate fonts - video instruction on text settings.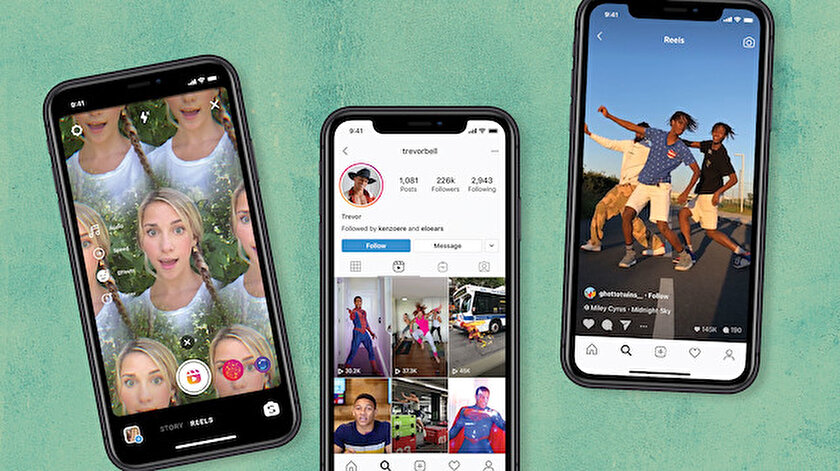
- What is the maximum video length for an Instagram feed?
The minimum video length for a tape starts from 3 seconds, and the maximum video length can be 60 seconds.
- How to create a video from scratch in the video maker?
We have made detailed instructional videos on how to work with SUPA.
Blog content on
InstaVideo: How to quickly create a beautiful video for Instagram* on iOS
Have you ever wondered what you use Instagram* for? Everyone has their own goal: someone boasts about what a great shot with protruding lips turned out in the mirror of the toilet, someone - a photo of food from a restaurant, but someone just shares interesting photos taken during the trip with friends. With the advent of the ability to add videos, as in Vine, short videos of various quality and performance began to appear on the popular social network, however, the photo-oriented service still prevails over video content. The InstaVideo application is designed to correct this situation, which allows you to create a video from a set of your photos.
How the app works is very simple: you select a few photos, add music, text and effects, and then save the video to add to Instagram*. Sounds promising, right? Let's also try to make our own little video.
After opening the application, we are given a choice of several options for preparing a video: creating a slide show, video collage and a new recording from the camera. Editing and splitting videos - for processing ready-made videos.
To create an effective slide show, select the appropriate menu item. From the iOS gallery, add several photos (up to 15 pieces) that will be displayed in it. After that, a preview of your video will be available to you. Now we need to add music to our video. To do this, there are three buttons with which you can select a musical composition from your library, set the playback start time, or ask InstaVideo to select a random track.
In the advanced settings, you can specify what video you want to make for Instagram*, then it will be optimized to 15 seconds. In addition, you can set "Photo Zoom" so that each photo in the slideshow has a slight zoom effect - this will make your video more "alive" than a simple series of photos following one another. It is also possible to adjust the effects, the transition from one photo to another. There are 10 different transitions available, including a random transition from frame to frame. The set itself does not stand out with anything special, but leaving the default "random" - the end result will be more interesting in any case.
After all the preparations and settings, the final touch remains: adding text to your video. You can choose not to write anything or choose one of eleven text templates that will be displayed at the beginning of the video. The templates themselves are quite common, but overall not bad.
That's it, the video is ready and now we can either save it on our device for later adding to Instagram*, or share it via iMessage, AirDrop or email.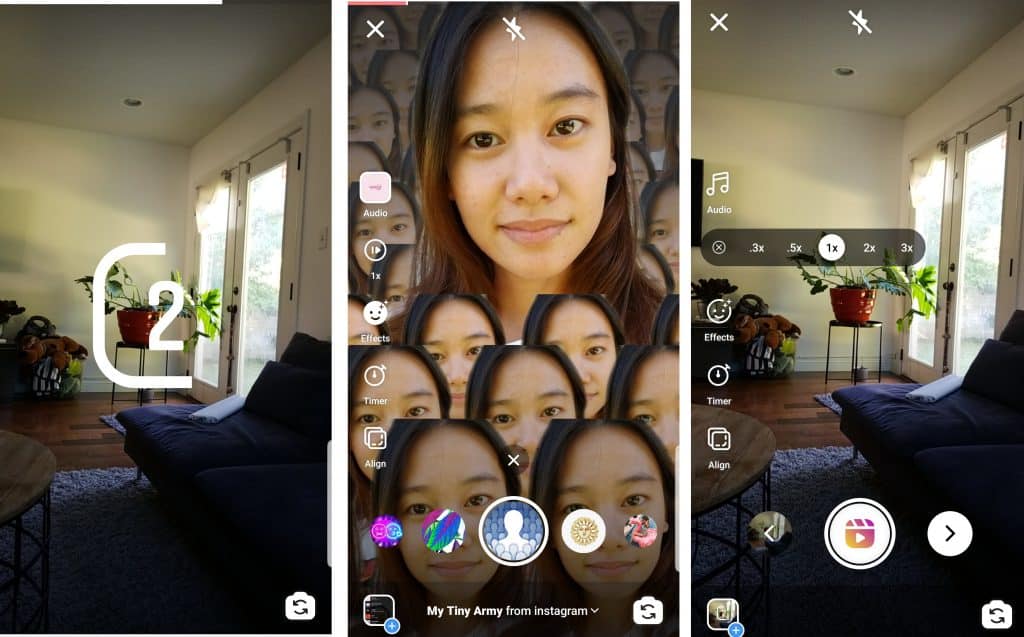
Creating a video collage works in the same way: select photos or videos (up to 8 pieces), adjust their location on the screen, add music if desired and save. Everything is extremely simple and fast.
Given that the application is absolutely free, it will definitely find its fans. Together with ease of use and fairly fast video processing, it can become a kind of simplified analogue of iMove for iOS for those who do not want to get into the intricacies of video processing, but simply share with friends a nice video made in a few minutes right on their smartphone.
Here's what I came up with from a few photos, a music track and InstaVideo:
Do you think that in the future, video processing software for mobile devices will be able to replace full-fledged products used on desktop operating systems? Share your opinion in the comments!
appbox fallback https://apps.apple.com/en/app/id715257165
*Meta Platforms Inc.