How to make my photo fit instagram
How to Fit the Whole Picture on Instagram
BorderJulia Enthoven
4 min
This article shows you how to fit the whole picture on Instagram. If you have a full portrait (9:16) image or video or a landscape (16:9) image or video, you can fit the whole picture in your Instagram post by following this tutorial.
Instagram has a maximum aspect ratio of 4:5 on portrait posts (four pixels wide for every five pixels tall). Instagram’s restriction reduces the number of very tall images that take up a lot of vertical space in the feed. Although it’s nice that Instagram keeps users from publishing massive, obtrusive posts, the 4:5 limit makes it difficult to post a whole vertical picture or video that you shot on your phone.
Here's what your tall photos will look like on Instagram without added borders.If you want to fit your whole picture on Instagram but it is taller than the 4:5 aspect ratio, you need to modify your image before posting. Otherwise, Instagram will automatically crop your image to a maximum of 4:5. I recommend the Kapwing resizer as it allows you to add white space on either side to bring your image to the required aspect ratio. In this article, I’ll explain how to fit the whole picture on Instagram in three simple steps:
- Upload picture
- Resize to 4:5
- Download and Post to Instagram
Step 1: Upload Picture
Start by opening the Kapwing’s Resizer tool on your phone or computer. Upload your image file from camera roll or import it from a URL. Kapwing supports images, videos, and GIFs, so you can use it to resize for any kind of media.
The video resizer tool in KapwingOnce your picture loads into the editor, you’ll be taken into the Kapwing Studio Editor where you'll see a preview of your image in the center of the screen.
Step 2: Resize to 4:5
In the Output Size section, select the 4:5 option. This allows your photo to take up maximum vertical space in the Instagram feed without getting sized down. There is a resizing option for Instagram, 1:1, but this shrinks your image to fit in the default square shape.
Resize the image to 4:5 using the button in the Output Size listOnce you have selected the size option, Kapwing adds white padding to either side of your image to make it fit the 4:5 aspect ratio. You can change this white background to any color you want so that it stands out in the Instagram feed.
Step 3: Download and Post
Click the red Export Image button at the top of the screen. After a few moments of processing, Kapwing makes your resized 4:5 picture or video available for download. Whether you're using a desktop computer, iPhone, Android, or tablet you'll be able to instantly download the image to your photo gallery once published.
If you're not signed into a Kapwing account, sign in or sign up using your Google or Facebook account – once you've signed into a Kapwing account, the watermark in the lower right corner will be removed from your final image.
Open the Instagram app and upload your picture. You’ll notice that Instagram crops the picture to square by default, but you can click the expand arrows or pinch the image in the lower left to fit the whole picture on Instagram. When you publish it, Instagram will resize to image width to fit the screen, the white image background will blend in with Instagram’s white background, and your whole picture will appear on Instagram with no cropping.
Note: You can also choose a black background, if you and your followers use Instagram in Dark Mode.
Conclusion
This tutorial shows you a workaround for posting full portrait pictures and videos on Instagram. You can use Kapwing’s Resizer to post multiple images with different sizes on Instagram, add a thin white border around your media, and publish TikTok and Snap videos. I hope that it helps speed up your social media workflow and enables you to post your beautiful and fun candid moments to Instagram.
For more information on how to resize a video for Instagram, check out this video tutorial (we give you the best sizes for each type of video too!):
Check back in at the Kapwing Resources page or our YouTube channel for other content creation tips and tutorials! And remember to tag us @KapwingApp whenever you share your content on social media– we love to see what our creators are passionate about!
Related Articles:
- How to Post a TikTok on Instagram
- How to Post a Portrait Photo or Video on Instagram
- Resize an Animated GIF
How to Make Pictures Fit On Instagram without Cropping
Instagram is a great app for sharing the daily highlights of your life and experiences – and the platform being highly-visual makes that even more appealing. Everybody wants their photos to look good on Instagram and once you finally have that perfect photo it can be annoying to see it get cropped by Instagram.
Instagram uses different image aspect ratios, specifically 4:5 for portraits, 1:1 for squares, and 1.91:1 for landscape pictures. If your image does not align with image guidelines for Instagram your image would get cropped to fit.
However, there are multiple ways you can add your pictures on Instagram without them getting cropped which involve resizing, adding borders, and using third-party apps to make your image fit within Instagram’s given frame. Read on to find out how to fit your images for a cleaner and more consistent look.
1. Resize Your Images with Instagram’s Crop Feature
When Instagram first started out it only had the option to upload square images with a ratio of 1:1 however an update back in 2015 changed this as Instagram started to allow uploading portraits and landscape images as well.
It’s very easy to resize your images using Instagram’s crop feature. When adding a new post you will see a light grey icon with a white frame inside on the bottom left of your post screen. Click on it and it will automatically resize your images to fit the frame. You can also pinch your fingers together to shrink your image so it fits in the post.
The main downside to this method is that it is limited and might not fully cover the excess or might awkwardly resize them. You want your images to look good, natural, and neat but the zoom feature can only do so much.
If this method does not work on your image then a much better way to resize your images is to do it manually using a photo editing tool or third-party apps.
2. Manually Resize Your Image
The best way to make your images fit on Instagram without cropping them is to manually resize them. Resizing your pictures this way would allow you to have full control over the image.
It’s important to know that when you do resize your image you will have some empty space around your image. The thing cool thing is that if you are manually resizing your images you can have a custom background for your images.
A great tool you can use is BunnyPic – a free online photoshop editor. You don’t have to sign up, install it or be worried to have a watermark on your images. It is totally free to use and beginner-friendly.
To resize your images using BunnyPic follow the below steps:
- Go to the BunnyPic Editor.
- Click on Open from Computer and select the image you want to resize.
- Go to Image > Canvas Size and scale the canvas to 1080 x 1080 pixels or a 1:1 aspect ratio.
- Create a New Layer and place it below the picture layer.
- Fill the new layer with a white color or black if you and your followers use dark mode.

- Once you’re happy with the results go to File > Export As and export it as a PNG or JPG.
You can see how the image now fits perfectly inside the frame compared to the cropped image from before without losing any of its original value.
3. Using Third-Party Apps
The above method should work for all your photos but if you want to keep the whole process on your phone without having to switch around your photos from your computer you can try third-party apps.
There are numerous third-party apps on Google Play Store and Apple App Store that you can download which would automatically resize your photos to fit into your canvas.
The best free apps to make pictures fit on Instagram without cropping are No Crop & Square, Whitagram, and PicsArt.
No Crop & Square
No Crop & Square for Instagram is an app that gives you different options to edit your photos for Instagram. It has a number of resizing options such as rotation, shrink, and enlarge. You can also add text and stickers to your images; making it a great app to meet all your needs.
No Crop & Square is only available on Android and can be downloaded for free from the Google Play Store here.
Whitagram
Whitagram is an IOS app that allows you to add white borders and resize your images for Instagram. It is quite similar to the above app and will get the job done to make your images look cleaner without going through a complicated editing process.
Download Whitagram from the Apple Store here.
PicsArt
PicsArt is a popular editing app that is available for both IOS and Android and has a better and unique way of resizing your photos for Instagram. It has a blur effect which can be added to the image borders which is far more attractive than the white or black borders from the previous apps.
To edit your Instagram pictures without cropping using PicsArt follow the below steps:
- Open your photo from your camera roll/gallery.

- Click on the share icon.
- Select PicsArt. This will open your image on PicsArt.
- On the bottom of the screen, select Effects.
- Select Square fit and add a 50% blur with the slider.
The effect works best for landscape photos. This is the kind of result you would get.
Download PicsArt on the Play Store or App Store.
Conclusion
Instagram is a great app for sharing your pictures online but it can be annoying when Instagram crops your image to make it fit in the post. This cropping is poorly done, making it look awkward and not as you intended.
To make your images fit better on Instagram you can use their crop feature, our BunnyPic editor, or third-party apps on your phone to resize your images and make them fit the way you want them to.
10 Tips for Creating a Catchy Instagram Avatar
10 Tips for Creating a Catchy Instagram Avatar - Cool Content Home page » Blog » 10 tips for creating a catchy Instagram profile picture According to statistics, more than 80% of Instagram users follow at least one brand account. Therefore, today few people doubt the value of this platform for business.
At the same time, companies have long begun to pay attention to the creation of a single brand image: this includes a profile header, color schemes, composition, and a single style of photo processing. But many people forget that the avatar is just as important an account component as everything else. nine0003
Why? An Instagram profile photo is the calling card of a brand. In fact, this is the first thing users see when they get to your page.
Imagine that you walk into a bakery where there is a large cake stand. They usually sit behind a glass case so you can't smell them. What cake will you buy? Most likely what looks most appetizing.
The same thing happens with your avatar. Therefore, an Instagram profile photo is more important than it might seem at first glance. nine0003
In this article, you will learn how to make a catchy Instagram profile picture to make your account stand out from others and draw attention to your personal or commercial brand.
How big should your Instagram profile picture be?
The Instagram profile photo is displayed at a resolution of 320×320 pixels and an aspect ratio of 1:1. On the screens of smartphones and in the desktop version, it is displayed as a small circle, so make sure that it displays all the most important things. nine0003
For a high-quality avatar, it is better to upload an image with a higher resolution - 1000×1000 pixels or higher.
It would seem, why even bother with such small pictures? Do they affect anything? And how. Although the Instagram profile photo is indeed very modest in size, it is an integral part of the brand and its positioning.
One of the important aspects here is recognition. An Instagram profile photo is something like a McDonald's logo. Behind the avatar there is always a specific image of the brand or person, so it is worth taking a little time to make it suitable for you. nine0003
Tips for choosing and styling your Instagram profile picture
These profile photo guidelines work for any social network. It will be even better if you use the same avatar for all brand channels. This way people can easily find you on different platforms and recognize you among hundreds and thousands of other photos at a glance.
Decide which is more appropriate: a personal photo or a brand logo
First, think about what will be on your profile picture: a personal photo or a brand logo. nine0003
Putting a photo of a specific person makes sense for a personal brand: sole proprietors, authors, bloggers, influencers, freelancers, experts, consultants, etc.
Setting up a personal brand accountThe logo is more suitable for business accounts with several owners and a large team. For example, from retail, media, professional services, etc.
Setting up a retail brand accountCenter everything important
Creative shots are more suitable for the feed, but for the profile picture they can be a problem. To make your profile photo catchy, make sure that the focus (be it a portrait shot or a logo) is in the center.
Also try experimenting with poses and angles. In most cases, a slight tilt of the head or camera angle while shooting will make the photo more authentic and intimate to the audience.
Another tip - beware of low angles. After all, you hardly want potential subscribers to look at your chin or nose. nine0003
Choose a photo with good lighting and contrast
An Instagram profile photo should be easily recognizable, even if it looks like a very small icon. Muted, barely distinguishable shades on the avatar can simply merge into one spot on the miniature. Therefore, it is important that there is a clear boundary between the background and the object.
A good example of choosing a photo by colors and shades If you want to put your own personal photo on your profile picture, then natural lighting is the best way to make a picture professional even on your phone. For example, you can find good light on the street or at home opposite the window. As a background, it is best to use something neutral and muted. The simpler the better. nine0003 An example of a logo with color contrast applied
If we talk about the logo as an avatar, then color contrast will help here too. Keep the background simple and make sure the text or logo has a strong contrast to it.
Retouch the picture
There's nothing wrong with adding some retouching and filters to your photo. The main thing here is not to overdo it with processing and make it as invisible as possible. Remember that the secret to good retouching is to make the image look better, but at the same time keep it as natural as possible. nine0003
Consider your aesthetics and occupation
Your profile photo is your calling card for new and potential followers. Therefore, make sure that the profile picture fully or partially conveys the meaning of your posts and stories, stating what you are doing, that is, it is an integral part of your positioning on Instagram.
How does it work? For example, photographers can use a camera as a prop on their avatar, a food blogger can use a tray of desserts, a cooking cap or a whisk, a makeup artist can use makeup brushes, a construction contractor can use some kind of tool, etc. nine0003 An example of a successful avatar for a photographer's account
If you want people to perceive you as an expert or a business person, it is better to refuse home selfies as an avatar. Hire a professional to take good portrait shots, or find a friend with a professional camera.
Another important point is that the colors on the avatar must match the overall brand color palette that appears most often in the feed.
Do not use full length photos
The profile photo is a 110x110 pixel circle on mobile and 180x180 pixels on desktop. And when the avatar is displayed in the feed, its size is completely reduced to 40x40 pixels.
There is not much space left, so full-length shots and from a long distance are almost impossible to see. Therefore, when you choose an avatar, it is better to take a portrait photo.
The same principle applies to companies. If the brand name is very long, it is better to shorten it to initials or put a logo on the avatar as the most recognizable detail. nine0003
Clothing also influences perception
Despite the fact that most of your image is unlikely to get into the frame, it is still worth thinking about what clothes will be on the avatar. For example, if you're a lifestyle blogger and freelancer who lives and works in Bali, then your profile picture might have an appropriately light beach look. And if you're advising entrepreneurs, the clothes should indicate that you're ready to come to a meeting right now and talk to the CEO. nine0003
Emotion
Even if you are an expert or a businessman who wants to look as businesslike as possible, it is unlikely that you will benefit from an indifferent and emotionless expression on your profile picture.
Emotional avatar always attracts attentionPeople enjoy doing business with people. With those they know and trust. The first step to this close relationship can be a simple smile and a direct look at the camera, which help to establish eye contact.
nine0028 Make sure your profile photo matches your feed The best profile photo on Instagram is what is part of a single corporate identity. Whether it's bright hues or discreet black and white colors, subscribers should read only one profile picture that you are you.
It's good if the avatar matches the overall aesthetic of your profile. So think of it as an addition to the page with the same accents as in the feed. nine0003
Don't change your photo too often
It might seem like updating your profile picture for the holidays or a new season of the year is a great idea. But it's not. Think about how a profile photo affects brand awareness.
It's best to stick with timeless images or logos that will only need to be updated from time to time.
Imagine how strange it will look if you forget to change your profile picture, and in the middle of summer in the photo you will still be sitting under the tree. A potential subscriber will go to your profile and decide that you have long ceased to maintain your page. nine0003
So instead of opting for a seasonal photo like Christmas tree decorations, a Halloween costume, or a graduation degree, it's better to stick with something neutral. So you can use the avatar longer, and it will be easier for subscribers to find you among other accounts.
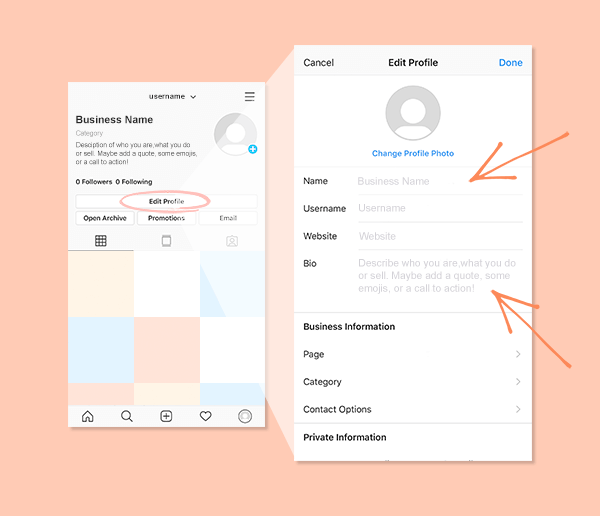
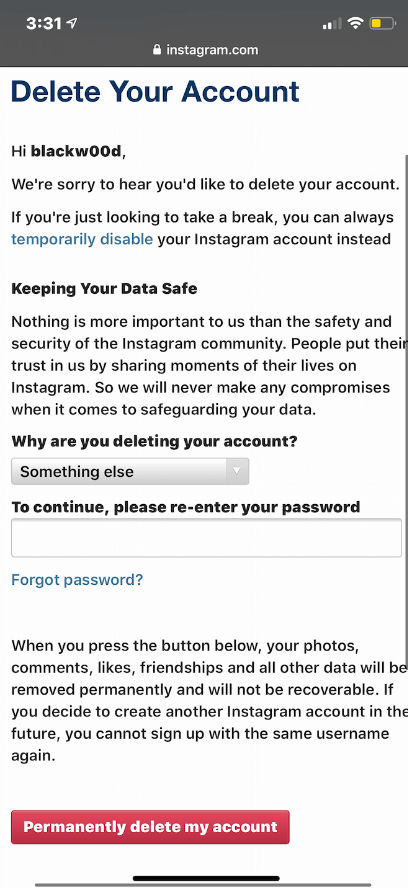
How to change your Instagram profile picture
- Open Instagram;
- Go to your profile;
- Click "Edit Profile" and "Edit Profile Photo";
- You will see several options for what you can do with your avatar: delete your current profile photo, import a photo from Facebook, take a picture with your phone camera or select a photo from your camera roll;
- Select the desired photo;
- A window will appear on the screen to crop the photo in circle format - try changing the scale and moving the image so that everything you need is in the center;
- Click Finish.
Conclusion
An Instagram profile photo may seem like such a small detail, but it is part of a larger mechanism called Positioning. Your occupation, what your goals are, whether your aesthetics and view of the world are close to a potential subscriber - all this information can be obtained from one small picture. nine0003
That's why a profile photo should represent you or your business well, be easily recognizable and stand out from the crowd. Don't forget to use colors, contrasts and space effectively as well.
Subscribe
We send to Email only the most interesting promotion on Facebook and Instagram
I agree with the terms of personal data processing
I agree with the terms of personal data processing
nine0000 Secrets of successful Instagram photosFirst, decide what your account will be about
Photo posted by Simone Bramante (@brahmino) on
“Before you sign up, think about what your page will be about. What do you want to share with users and subscribers? To get started, select content.
Don't get hung up on likes
Photo posted by Jussi Ulkuniemi (@skwii)
“Be calm about everything. Find what suits you personally. Don't get hung up on what's trending in the Instagram community right now and what gets the most likes. Otherwise, in the end, you will start shooting cute, but banal pictures, while your talent may be in completely different areas - story photography, humorous sketches, artistic portraits.
At the moment, the three main motives in my pictures are appeasement, surrealism and frankness.” nine0003
Use natural light
Photo posted by Margaret Zhang 章凝 (@margaret__zhang)
“Lighting is the key to any photograph. No filters and photo editors can fix a picture taken in bad light. Natural light is always better than artificial light. So it’s better to shoot outdoors in the early morning, at dusk or on cloudy days.”
Use eyes before lens
Photo posted by Niv Rozenberg (@nivroz)
“My first photography teacher liked to say that the eye is the same muscle that needs to be constantly trained. Unfortunately, most people don't look at an object before taking a picture of it with their phone. Instead of taking a hundred shots and then choosing the best one, give yourself time to look closely. Take a look at the frames of the future photo. If you look at what you are going to shoot for a couple of minutes, you can see everything in a new light. And soon you will learn how to build the perfect composition. nine0003
Use the grid function to center the composition
Photo posted by Dan Cole (@dankhole) on
“I like the way symmetrical architectural compositions look. And when I shoot such a building, I try to follow this symmetry as accurately as possible. If I have an iPhone or a Nikon camera in my hands, I make sure to turn on the grid. It helps to build the correct composition of the frame. I can also move left and right for a long time until I find a suitable shooting point. nine0003
Identify the main element in the photo
Photo posted by Sam Horine (@samhorine) on
“A good photo is always built around one key element, be it a person in front of something or a landscape with dominant lines that immediately grab the viewer's attention. The perfect photo can have a few key elements that don't clutter up the picture at the same time. Try to take pictures that tell the story of a person or place.” nine0003
Look forward to interesting moments
Photo posted by Joshua Lott (@joshualott) on
“Create photos that focus on your subject or subjects at their most interesting moments. Calm and extreme, emotional and tense - such moments reflect the natural course of time and are at the heart of every good shot. At the same time, do not allow extraneous things in the frame that can distract attention. nine0003
The shot should be concise so that the viewer's attention is completely riveted on the story you are telling.”
Look for strong colors, shapes and lines
Photo posted by Ira Block (@irablockphoto)
“A good photo should be built on strong colors, clear lines and shapes. Sometimes you need to get quite close to objects in order to capture as much detail as possible into the lens. This will give the effect of presence. Learn to create emotion with photography. nine0003
Don't be afraid to use third-party applications to create the effects you want
Photo posted by Dan Rubin (@danrubin)
“If you want a long exposure effect, use an app that simulates a shutter release delay. This way you can blur waves or other moving media. It looks especially impressive if you shoot large water surfaces or waterfalls. This way you can emphasize the contrast between the blurry surface of the water and the clear outlines of the surrounding landscape. nine0003
If you have iOS, then the CortexCam app can create this effect even when shooting handheld. Other apps like Slow Shutter Cam and AverageCam Pro require the use of a tripod or any other hard stand (there are similar apps for Android). In addition to the effect of long exposure, these applications allow you to shoot in low light, reduce noise and the effect of the light trail.”
Experiment with light
Photo posted by Matilde Gattoni (@matildegattoni)
“The phone's camera lens absorbs light differently than traditional cameras. This opens up great opportunities for experimentation with backlight or with light coming from above. If you move around the subject, looking at it through the viewfinder, you can see how the angle of illumination changes up to the point that the light rays fall directly on the lens. Notice how the halo immediately flashes around the subject.”
Use burst mode
Photo posted by laura (@bythebrush) on
“To take a clear photo of a moving subject, shoot in good light or in daylight in short exposure mode. Tap the screen to focus the camera on the subject and adjust the shutter speed before moving. Burst mode is a great way to capture all the phases of a movement and then choose the best shot.”
Shoot from different angles
Photo posted by Mike Kus (@mikekus)
“Try to shoot from unusual angles. Even an ordinary view can be transformed by looking at it from a different, unexpected perspective. To begin with, try to shoot something from above or, conversely, from below, directly from the ground. This will give you an idea of the new angles."
Experiment with props
Photo posted by Kym Pham (@kympham)
“Enrich the composition with a variety of items that can help to complete the image and tell the story. It can be an off-road vehicle conquering a mountain road, or a pair of wooden fishing boats on the shores of a fjord. Such elements immediately enliven the picture, add beauty and meaning. nine0003
Shoot in bad weather
Photo posted by Pete Souza (@petesouza)
Pete Souza, official White House photographer: “Bad weather is the key to good photography. Shoot outdoors in rain, snow and fog.”
Look into the puddles after the rain
Photo posted by Los Angeles (@paolofortades)
“The most beautiful views can be reflected in puddles - don't miss them. I took this photo in the morning after a night of rain. nine0003
White color will add atmosphere to the picture
Photo published by DeanStreetSociety
“The white space in the photo looks great. Check out interior magazines or the latest J. Crew catalog. They are similar in that there is always a lot of white space in the photographs. Try to add white color to your pictures and you will see that they immediately become concise. In the same way, beautiful websites are created - concise and without unnecessary elements.
Try photographing your models against a plain white wall. Objects can be photographed against the background of a foam board or on a white window sill. You can also use one of the font apps like WordSwag to put a quote on a white background to style your account."
Use the new portrait format
Photo posted by Eric Rubens (@erubes1)
“Instagram recently added a portrait photo format. It allows you to take rectangular shots, which is better for portraits than square frames.” nine0003
Indicate the scale of the objects depicted
Photo posted by Pei Ketron (@pketron)
“To show the size and scale of the image, include a person in the picture. Shoot the model in different poses to emphasize the interaction with the subject or environment.”
Take layered photos
Photo posted by David Guttenfelder (@dguttenfelder)
nine0144“I love photos that combine multiple layers. For example, in this photo, I wanted to achieve the effect that the viewer is looking at the bay through the eyes of a ferry passenger. I adjusted the shutter speed so that the palette of the sky was reflected, and the person in the center remained in the form of a black silhouette. The sides of the ferry served to organize the entire composition. The result is a “frame within a frame” effect. The man's head is placed in the shadow under the canopy of the ferry, so that the viewer's eye follows his gaze - along an elongated triangle of footprints on the water to the top of a skyscraper on the horizon. nine0003
Of course, these are all technical and compositional aspects.
The main thing I wanted to achieve was to transfer the viewer to the moment that is depicted in the picture.
Turn the glare to your advantage
Photo posted by Paul Octavious (@pauloctavious) on
“I like to look for highlights from the sun or street lights and use them in photography. Interestingly, if you shoot sun glare, then the photos always turn out different, depending on the day and time of year. nine0003
Shoot outside after sunset
Photo posted by Shane Black (@shanemichaelblack)
“Even if the sun has set, it doesn't stop you from shooting outside. The human eye is unable to catch much of what happens in the dark after sunset. But modern cameras are much more sensitive to light.
And at night, the world outside lives its own life, which you can peep through the lens and take unusual pictures. nine0003
Get close to subjects
Photo posted by Ami Vitale (@amivitale) on
“Whether you are shooting people or animals, get closer. This will give the photo intimacy and emotion.”
Use optional accessories
Photo posted by Sam Graves (@thesamgraves) on
“Additional accessories, such as interchangeable phone camera lenses, can make a big difference in your photography. Using a wide angle will allow you to cover more space. When you get closer to the subject, use the maximum focal length. This will create a perspective effect, fill the space and present the object in an unusual way.
nine0003
For DSLR shooters, I suggest trying 16-35mm lenses. When I shoot with an iPhone, I use a Moment wide-angle lens to achieve this effect.”
Get a waterproof case
Photo posted by Cole Rise (@colerise)
“I prefer the Catalyst Waterproof cases because they cost less than Lifeproof and can shoot deeper. Always insure phones. There were a couple of cases where I lost my smartphone while filming in the water in Hawaii. Insurance helped me out both times - I was able to quickly and painlessly get a new phone from the Apple Store. nine0003
Also, make sure you secure the camera well to your wrist with the special strap during filming. If there is no fastening strap, you can use a regular lace or hair tie. After all, no one wants to then dive along the entire beach in search of his phone.

Edit to a minimum
Photo posted by Karan B. (@sendingstache) on
“Photos that are too retouched can look unattractive. When using filters, be as conservative as possible: strictly follow which filters and to what extent to apply. Do not change the original appearance of the picture. It's better to make subtle edits and keep the picture natural." nine0003
Practice and practice again
Photo posted by Sezgi Olgaç (@sezgiolgac)
“To take good photos for Instagram, you need to practice every day. Personally, I am always ready to shoot interesting places, scenes, moments, light. Practice composition, use different perspectives on the same thing to get the best shot.
Pay close attention to the editing process. All this will help you post crisp and vibrant photos with subtle hues and a natural palette.” nine0003
Strive for quality, not quantity
Photo posted by Kirsten Alana (@kirstenalana)
“The best way to improve the quality of your Instagram account is to post fewer, better quality photos. And for this you need to be well versed in composition and light.
Content must be thoughtful
Photo posted by @moniqua
“All photographs must be in the same style. For example, I still post only black and white photos. Each photo is designed in a common style and looks simple, so if you look through all the pictures, you get the overall impression.
My favorite black and white shots are those where the blacks are very deep and the whites are very bright. The best way to achieve this is to shoot in harsh lighting. Choose a location with bright lighting to shoot, and add contrast when editing.” nine0003
A good signature will attract attention
Daydream with me
“Subscribers will appreciate your texts if they are original and concise. My signatures are usually very short. I either put a line from some song, or write what I think about the image. Captions are important because they allow subscribers to feel the mood of the photo, to feel the emotion more fully.
10 things to learn from Instagram models Sometimes I put a question as a signature to provoke my subscribers into a dialogue. That way I get to know them better. In order to indicate which of my photos were taken with the iPhone, I put the hashtag #createdoniphone.