Home > Transfer WhatsApp
May 26, 2022 4 min read
Having a Google Voice Number at hand can be helpful for many. That's especially true if you're someone who receives many international calls. For more privacy, you might be tempted to use the number for WhatsApp. But the question stands: can you use Google Voice Number for WhatsApp? The answer is a resounding "Yes."
Here's everything you need to know to set up your WhatsApp using Google Voice Number.
Before we begin, you might be wondering what a Google Voice Number is. The basic version of this feature is that Google Voice uses your account to give you a permanent and free phone number. You can use this number to call, text, send voicemails, and more from your phone or computer. The number google gives you doesn't replace your actual number, but rather, it works like an alternative you can use.
Currently, this service is only available for Google users in the USA and Canada. Google voice number allows you to create two different accounts. Google Voice is a popular and well-recommended feature. You can have an account that handles all your calls while also having another for business use. The number is given to you for a lifetime. However, Google has the right to take action, such as banning your account and more, if you violate any terms of service. This includes using the number for scams, illegal activities, and more.
You May Want to Know: How to Fix WhatsApp Not Sending Voice Messages issues?
Using a google voice number for WhatsApp might sound complex but rest assured, it's pretty simple to do. All you have to do is to follow the guide below. You'll need an original number to begin that can be used to link your alternative Google Voice Number. After that, you're good to go.
Before proceeding further, download the google voice app on your phone. And if you don't have WhatsApp installed, install it as well. You can easily find both applications on the Google Play Store and Apple's App Store.
You obviously need to download both the applications before you begin in earnest.
You'll have to give Google vital information to verify your account to sign up.
1. Search Google Voice Number on Google, and It will be the first suggestion. Or you can visit its official link: https://voice.google.com.
2. First, select the type of account you want: "Personal" or "Business".
3. Select the number you want as per the location. You can select the number by the city or the area code. Then add your preferred number in the box.
You May Want to Know: How to Use WhatsApp without Phone Number?
Before you can really use the Google Voice Number, you need to verify it with your actual number first.
1. Google Voice will automatically ask you for your actual phone number to Verify. Type the number for a phone that you can access.
2. Select the option to Send code.
3. Finally enter the code you received to verify, and now your Google Voice Number can be used.
Now comes the primary step. Here's a comprehensive guide to setting up your WhatsApp with the Google Voice Number.
1. If you have the Whatsapp application set up already with your personal number, you'll need to reinstall it. Go to your phone's Settings and find WhatsApp in the application tab. Click Uninstall and download it again from your phone's app store.
2. Now, open WhatsApp. It will ask to verify your phone number.
3. Select the location that you choose for your Google Voice Number. Type in your Google Voice Number.
4. Now you can either have WhatsApp Send you SMS or You can select the Call me option.
5. It would be best if you opened your Google Voice dashboard. You'll get a notification for the text message or a voicemail.
6. Type the code you've received in the box.
Voila! You're done! You have successfully used your Google Voice Number for WhatsApp.
Despite the numerous features WhatsApp comes with, it can be complicated to handle and protect your data if you want to change new phones after having a Google Voice number. That's especially the case when you try to move WhatsApp from an Android phone to an iPhone. Luckily, with iTransor for WhatsApp, you can quickly transfer all your WhatsApp history from your previous phone to your new one directly, and you don't even need to download excessive tools or apps. Best of all, the software is designed to be easily operated.
 [iOS supported]
Free Download
Transfer WhatsApp using iTransor for WhatsApp:
Step 1.You'll have to start by connecting your phones to your computer via a cable. Open the app and adjust the source and the destination device right.
Note
If you're shifting to an iPhone, remember to turn the "Find my iPhone" option off. For Android, the program will install a customized WhatsApp on your phone where the program can access your data.
Step 2.Click Transfer and wait for the transfer process. You can also back up your data before starting the transfer if the target device is not brand new.
Step 3.The time it takes depends on the data you want to transfer. Keep devices well-connected before the program informs you the result.
Using your Google Voice Number for WhatsApp is easy. You have to sign in and set up your Google Voice Account. After that, you can use your new number and set up WhatsApp with it just as you would do for your personal number. Suppose you're confused about transferring your data from one device or another. In that case, you can use iTransor for WhatsApp to make the process easier. With the program, you don't have to worry about data loss, nor do you have to execute a complicated procedure to get your data. All you have to do is perform a few simple steps.
(Click to rate this post)
Generally rated 4.6 (256 participated)
Rated successfully!
You have already rated this article, please do not repeat scoring!
Please enable JavaScript to view the comments powered by Disqus.
WhatsApp has been around for years and is still as popular now as it was when it first launched. Even though it is owned by Facebook, it has managed to maintain its independence and has not fallen into the same data harvesting habits as its owner.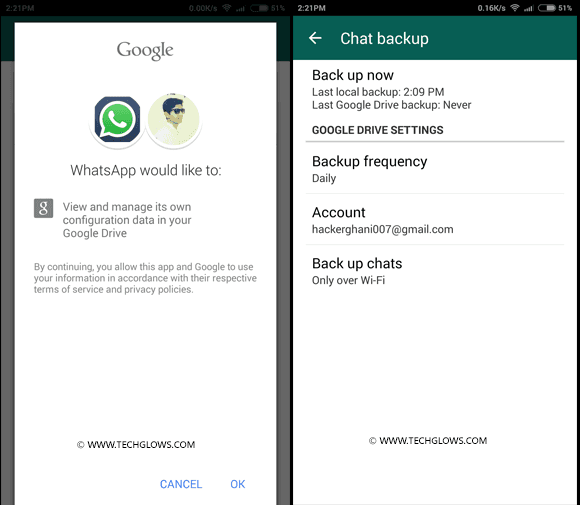
One thing that is a cause for concern with new users is the requirement to use your phone number. It seems that WhatsApp uses your phone number only for verification. If for some reason, you cannot use your phone number, there are still ways you can verify the app. This tutorial will show you how to verify WhatsApp without that phone number.
When you first install WhatsApp, you are greeted with a phone verification screen. This screen requests both your phone number and country. WhatsApp will then send a code to your phone. If you are registering on the device with the phone number being used for verification, WhatsApp will pick it up automatically and verify your phone.
If it doesn’t automatically pick up the SMS, you can simply enter the code into the app, and you’ll be registered. It’s a simple system that works well, although sometimes it can be inconvenient.
There are four easy ways to register WhatsApp without using your phone number; you can use an online SMS service, a landline, Google Voice or Skype, or a payphone or someone else’s number.
There are hundreds of SMS websites on the internet today. It’s easy to find an SMS provider online and use that number to verify WhatsApp. If you have a Skype number and Skype credit, you could use that too. Texport is a great example and provides a reliable service that allows you to send up to three texts and receive unlimited texts during each free session. Just add the number provided to the WhatsApp verification screen and keep an eye on the website. The WhatsApp verification code should arrive within a minute or two. Once it does, enter the code, and the app should verify.
If you have a landline and you don’t mind giving out that number, that should work too. Depending on where you live, your telephone provider should have a system that will read out an SMS on your normal landline phone. This method will obviously depend on your carrier, but most will have it as it is an accessibility feature.
Select the country within WhatsApp and make sure to remove the leading “0” from your phone number. WhatsApp will automatically add your country code, and you’re good to go. You should receive a call that speaks the code. Enter that code into the app, and you’re registered.
Alternatively, you can use WhatsApp’s fallback verification, which involves a phone call. This is a good option if you have a landline that does not have the aforementioned accessibility features. Have the app send the verification to your landline number and wait a while. Then select the option to receive a call. An automated system will call you and speak a code. Enter the code into the app and verify. WhatsApp should accept the code, and then you are good to go!
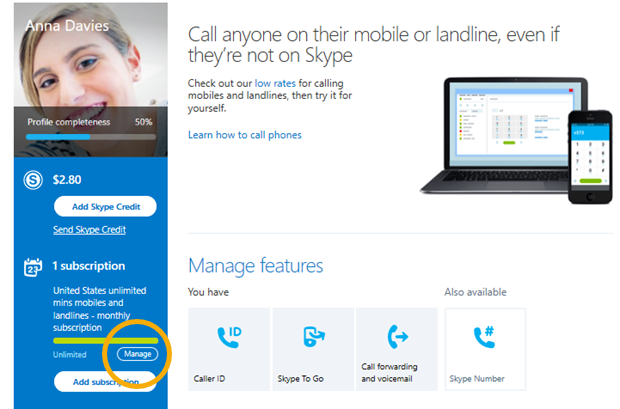
Both Google Voice and Skype provide virtual numbers you can use online to call within the respective networks and break out of them to call a mobile or landline. If you have this already, it’s a quick and easy way to register WhatsApp without your phone number.
The process is the same as for landlines above.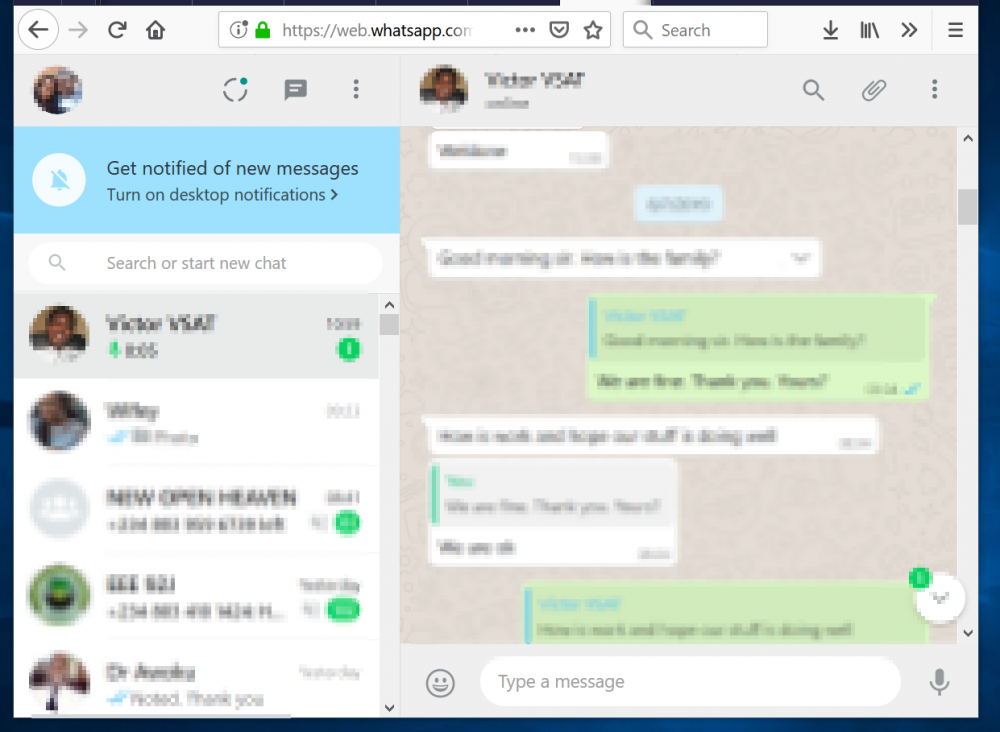 Set your country code within WhatsApp and remove the leading “0” from your Google Voice or Skype number. Open the respective phone app and wait for the SMS to arrive. Enter the code into WhatsApp, and you’re verified.
I registered my copy of WhatsApp many years ago with a Skype number, and it worked perfectly. Be patient, as it took a minute or two for the number to arrive, but when it did, verification happened almost immediately.
If you still have payphones where you are, you can use the number from there to register WhatsApp. Using the same fallback option you would use with a landline, you can enter the number of the payphone, wait for the SMS verification to fail, and then elect to receive a call.
It would be no good doing this somewhere busy as you may need to wait up to ten minutes for the SMS verification to fail and for the call me option to appear in WhatsApp. Once it does, enter the payphone number, accept the call, use the six-digit code and verify. If there isn’t a payphone, you could use any phone number you have access to with the same result.
Those are the ways I know of to verify WhatsApp without using your cell phone number. Know of any others that work? Tell us about them below if you do!
Sustainability
Environment
Overview
Climate protection
Environmental
Saving resources
Sustainable production
Environmental data
nine0004 Social responsibilityOverview
Advanced Solutions
Innovation Center
Smart school
Social projects in Russia
SRR Research Center
Digital Responsibility nine0003
Overview
Ethics of artificial intelligence
Digital Wellbeing
Privacy and data protection
Overview
Data Protection
Privacy
Special abilities nine0003
Overview
Vision
Rumor
Mobility
Cognitive abilities
Inclusive website
Diversity and Inclusion
Supply chain stability
Environment nine0003
Overview
Climate protection
Environmental
Saving resources
Sustainable production
Environmental data
Social responsibility
Overview
Advanced Solutions
nine0002 Innovation CenterSmart school
Social projects in Russia
SRR Research Center
Digital Responsibility
Overview
Ethics of artificial intelligence
Digital Wellbeing
Privacy and data protection nine0003
Overview
Data Protection
Privacy
Accessibility
Overview
Vision
Rumor
Mobility
Cognitive abilities
Inclusive website
Diversity and Inclusion
Supply chain stability
Samsung and Google are working closely together to provide a unique, accessible and unified
interface for all Android devices.
Samsung's voice assistant and Google's TalkBack are now merged into a single screen reader. With unique Voice Assistant and TalkBack IDs, you now have a much more convenient and efficient screen reader across all of your Android devices. nine0130 Try the new TalkBack in One UI 3.0
TalkBack reads the selected item aloud. Focus can be controlled by tapping or moving around the screen.
• Listen to what is written on the screen
Touch the screen with one finger or explore the screen by moving freely on the screen by touching.
• Run the selected element
Double-tap with one finger.
• Move focus to another item
Swipe left/right with one finger.
You can learn basic usage methods by going to 'Settings > Accessibility > TalkBack > Settings > TalkBack Tutorial'
Multi-finger gestures
Voice assistant gestures multi-finger gestures are now available in addition to TalkBack's one-finger gestures. Instantly launch various TalkBack features with multi-finger gestures without going into settings. If you don't like the gesture, you can always change it however you like, whenever you want. nine0003
Go to Accessibility > TalkBack > Settings > Customize Gestures to learn more and change how each gesture works. You can test and test different gestures in the gesture bar. To execute the gesture pad, tap the screen once with four fingers.
How to use the reading menu
The voice assistant quick menu is also available in the new TalkBack. Swipe three fingers in any direction - up, down, left, right - to access the available reading menu. A three-finger continuous swipe will allow you to select the desired reading menu, such as the level of detail, speech speed, and spoken language. nine0003
Customize your own reading menu in Special. Features > TalkBack > Settings > Customize Menu".
Activate TalkBack in the setup wizard
Now you can activate TalkBack and use it from the very first screen that appears when you unpack your phone.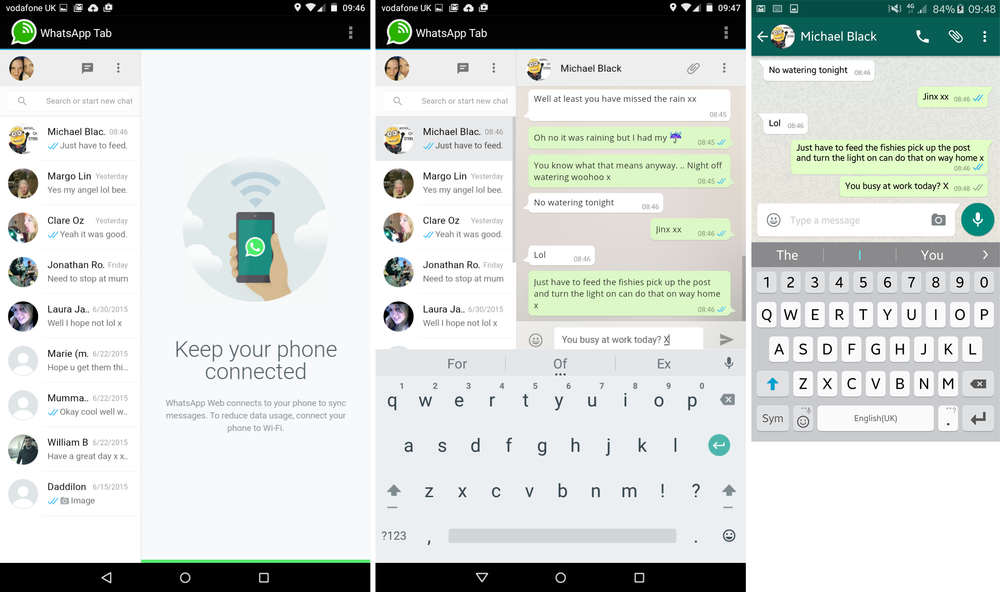 This method is available throughout the installation wizard process.
• Press and hold with two fingers
• Quickly press the side key and volume up key
• Press and hold the volume up and down keys
Other useful TalkBack features, such as text editing and keyboard shortcuts, help you manage your device faster and easier. For more information, see the TalkBack settings and guide.
Editing functions such as select, select all, copy, cut and paste can be performed using gestures. nine0003
To learn more about gestures, go to 'Settings > Accessibility > TalkBack > Settings > Customize gestures'.
You can control TalkBack using keyboard shortcuts when a Bluetooth or USB keyboard is connected.
To learn more about customizing keyboard shortcuts, go to 'Settings > Accessibility > TalkBack > Settings > Customize hotkeys'. nine0003
The voice assistant can act as your eyes when using your phone. Its features give you maximum control over your phone, even if you can't see it. When the Voice Assistant feature is enabled, your phone offers visually impaired users voice assistance in using and managing their phone. For example, it describes everything you do: touch the screen, select and activate. You can also edit text or change settings like volume or speech speed with familiar swipe and tap gestures. nine0003
When you interact with an element on the screen, a rectangular box appears around it, indicating that it has focus. You can control focus with tap and swipe gestures. When you move it around the screen, Voice Assistant tells you what it's on.
· To hear what is directly under your finger,
tap and swipe the screen. nine0003
· To activate an item,
double-tap it with one finger.
· To move the focus frame to another item on the screen,
swipe left or right with one finger.
· To go to the next or previous page,
swipe left or right with two fingers.
· To scroll up or down the list,
swipe up or down with two fingers.
To scroll the contents of the screen up or down,
Swipe side to side with one finger (left then right to scroll up or right then left to scroll down).
· To move the focus frame to the first or last item on the screen,
swipe up and then down with one finger to go to the first item, or down and then up to go to the last item.
Voice Assistant provides keyboard shortcuts for frequently used functions. You can change settings and stop voice feedback with simple gestures. nine0003
· To change the Voice Assistant settings,
swipe left or right with three fingers to select the setting you want to change (settings are listed below), and then swipe up or down with one finger to change.
- Speech rate: increase or decrease the speech rate
- Punctuation: pronounce or omit punctuation in voice feedback
- Dark screen: turn the screen on or off
- Thick border: turn on or off a thick frame around the element in focus
- Focus indicator color: select the color of the frame around the element in focus
- Notification: open and close the notification panel
- Audible feedback: enable or disable audio feedback
- Vibration feedback: enable or disable vibration feedback
- Speed Dial : Use the Samsung keyboard or optional keyboard by pressing the keys once
- Speech Audio Focus: Lower the volume of other audio while reading Voice Assistant
· To adjust the Voice Assistant's reading granularity,
swipe up or down with three fingers to select one of the several granularity options below, then swipe up or down with one finger to apply the selected granularity.
- Character granularity: read each character.
- Word granularity: reading each word.
- Line granularity: read one line at a time.
- Paragraph granularity: read one paragraph at a time. nine0003
Simply swipe to copy and paste into Voice Assistant.
· To turn selection mode on or off,
double-tap and hold the screen with two fingers.
· To select characters,
swipe up or down with one finger when selection mode is on.
· To cut the selected characters,
swipe left with two fingers. nine0003
· To insert characters,
swipe right with two fingers.
· To select all characters,
swipe down with two fingers.
· To copy the selected characters,
swipe up with two fingers.
· To move the cursor to the text input field,
press the volume up and down keys.
To move the input cursor to the first or last position,
Swipe up and then down with one finger, or down and then up.
Voice Assistant allows you to access information in a variety of ways.
· To have Voice Assistant read the information displayed in the status bar,
triple-tap the screen with two fingers. You can also choose the specific information you want to hear: time, date, battery charge, signal strength, Bluetooth status. nine0003
· To have Voice Assistant read the screen items from first to last,
tap the screen with three fingers.
· To listen to items on the screen in order after the currently selected item,
double-tap the screen with three fingers.
· To hear and copy the last voice spoken by Voice Assistant,
triple-tap the screen with three fingers.
To return, cancel or close the pop-up window,
Tap the screen with four fingers, or swipe up and then down with three fingers.
· To go to the home screen,
double-tap the screen with four fingers, or swipe down and then up with three fingers.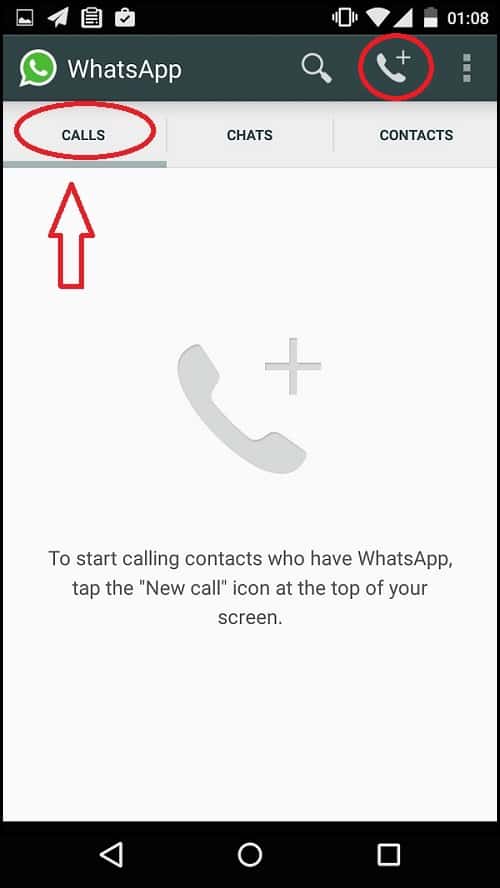
· To view the list of recent applications,
tap the screen three times with four fingers.
· To silence voice feedback,
double-tap the screen with two fingers. nine0003
· To access the full step-by-step tutorial,
go to Settings > Accessibility > Screen Reader > Tutorial.
· To practice using the gestures you have learned
, go to “Settings” > “Accessibility” > “Screen Reader” > “Tutorial” -> “1. Using this tutorial”
The available keyboard shortcuts are described below.
last element
Alt + Ctrl + right arrow
Go to next window
Alt + Ctrl + down arrow
Alt + Delete
Go to home screen
Alt + Ctrl + H
Go to recent apps
Alt + Ctrl + R
Open notification panel
Alt + Ctrl + N
Start or stop voice feedback
Alt + spacebar
Perform special actions
Alt + Shift + spacebar
Scroll1 quick menu Shift1 + arrow 9016 left or right
Change quick menu setting
Ctrl + up or down arrow
Select next or previous granularity
Shift + Ctrl + up or down arrow
on screen
Alt + Ctrl + forward slash
Read status bar information
Alt + Shift + S
Web navigation
Move to next button
Alt + B
Move to previous button
Alt + Shift + B
Move to next control
Alt + C
Move to previous element
controls Move to next ARIA landmark
Alt + D
Move to previous ARIA landmark
Alt + Shift + D
Go to the next input field
Alt + E
Go to the previous input field
Alt + Shift + E
Go to the next element
Alt3
element
Alt + Shift + F
Go to next image
Alt + G
Go to previous image
Alt + Shift + G
Go to next heading
Alt + H
Move to the previous heading
Alt + Shift + H
Move to the next heading at level/b>
Alt + [number]
Move to the previous heading level
Alt + Shift + [number]
Go to next list item
Alt + I
Go to previous list item
Alt + Shift + I
Go to next link
Alt + L
· Transition to the previous link
Alt + Shift + L
Move to next table
Alt + T
Move to previous table
Alt + Shift + T
Move to next combo box
Alt + Z
Move to previous field list
Alt + Shift + Z
Move to next checkbox
Alt + X
Move to previous checkbox
Alt + Shift + X
* Device illustrations are simulated for illustrative purposes.
The Signal app is one of the best messaging apps when it comes to private conversations. However, in some cases, you may be able to send a message to someone but do not want to reveal your identity. In such a case, you need to use the Signal app without a phone number. This is now possible using several different methods. nine0003
The signal app gained attention after WhatsApp made changes to its privacy policy along with Elon Musk's tweet. However, encrypted chat platforms such as WhatsApp, Viber, We Chat, and Signal use your mobile number as the primary identifier and username. This means that if someone wants to talk to someone on these encrypted apps, they must provide their mobile number.
Meanwhile, many users do not feel safe giving their personal number. So here we are with our latest article that will show you how you can use the Signal app without a phone number. nine0003
Windows apps, mobile apps, games - EVERYTHING is FREE, in our private telegram channel - Subscribe :)
Speaking of Signal, it allows you to use something in the application other than your phone number as the main identifier that we pass others. But the question arises in our head: is it safe or not, because this process does not have strong encryption.
However, the Signal app has not officially made any statement about whether you use the app without a phone number or not. So let's see if you can use the Signal app without a phone number or not. nine0003
To use the Signal app, each user must create their own account, which is only possible with phone verification. To verify your phone number, Signal sends a verification code that you can use to create an account on the Signal app.
But there is no formal process by which you can use the Signal app without linking your phone number. But don't worry! We are here to help you. Read this article to learn how you will use the Signal app without a phone number. nine0003
If you don't want to share your personal number, the best option is to get a new number or an additional number and use that number to register with Signal Messenger. The benefit of using this trick is to help you use a mobile number that you have access to.
But be aware that if someone else also uses this number to re-register a Signal, you will lose access to the Signal. So, first make sure no one is using the Signal re-registration number. nine0003
You can also use the Google Voice number in Signal. To get a number from Google Voice, you need to follow the following procedure:
Visit Google Voice
Now you can easily use this number in Signal or any other end-to-end encrypted messaging apps. However, if you use this number, you will receive a verification code in Google Voice and in your Gmail inbox to complete the verification process. nine0003
There are several online services that provide free one-time password (OTP) services. With these free OTP services, you can get a verification code to sign up with the Signal app and then send any message you want to send without revealing your identity.
These temporary numbers or OTP services are open source, which means that anyone can use the numbers to receive verification messages. Thus, there is always a chance that any other person can unregister from your device and register themselves. So it's better to use method 1 or 2.
Technically, you need to enter your number in order to create an account in the Signal app and then send or receive any messages. If you want to send a message but do not want to reveal your identity, you need to provide any alternate number where you can receive a verification code to register with Signal.