For engaging conversations, the automated chatbot is really beneficial. On platforms such as Facebook, Google, and others, we can develop chatbots. In this tutorial, we will learn about how we can create a Telegram chatbot and use it to prepare text messages with rich responses.
Here we learn how we can get different types of responses from the bot such as:
Follow the below instructions to make a Telegram chatbot.
Step 1: Open your telegram account and in the search bar type “BotFather”.
Step 2: Click on the “BotFather” and Click on the “Start” button.
Step 3: Type “/newbot”.
Step 4: Type your unique bot name.
Step 5: Now type a unique username for your bot.
Remember: username must end in ‘bot’. E.g. ‘Tetris_bot’ or ‘Tetrisbot’.
Step 6: After giving a unique username you will get a message like the below. it contains a token to access the HTTP API. Keep your token secure and store it safely.
Step 7: Creating a flask app for the webhook response.
First of all, you will need to install python and flask on your computer.
$ pip install Flask
from flask import Flask app = Flask(__name__) @app.route('/') def index(): return "<h2>Welcome!</h2>" if __name__ == '__main__': app.run(threaded=True)Run this code to check whether the flask app is running correctly or not. When you run the code you will get the link for the server like “http://127.0.0.1:5000/” click on that link you will be redirected to the webpage where you will see the response “Welcome!”
Step 8: NGROK setup.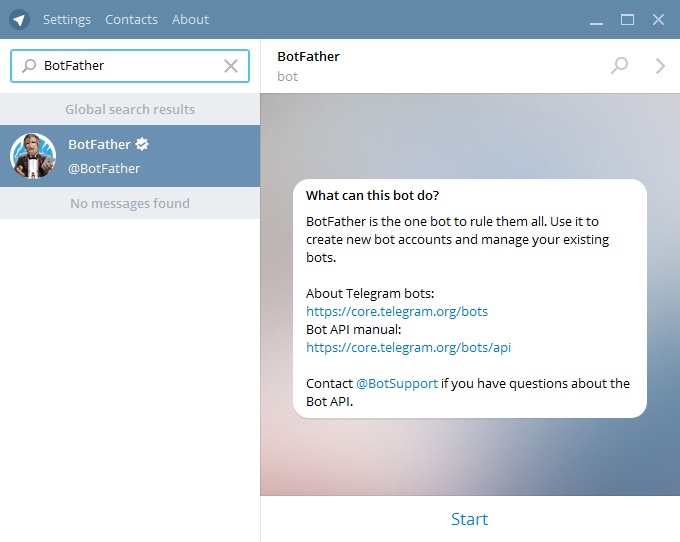
Go to the Ngrok and type the command “ngrok http 5000” after running this command you will get the links.
From that Ngrok links copy the HTTPS link and paste it to your browser. You will see the response “Welcome!” same as the previous step.
Step 9: Setup webhook.
Now you will need to set the webhook for the telegram bot.
You can do it by running the link in your browser.
https://api.telegram.org/bot<Your Bot Token>/setWebhook?url=<URL that you got from Ngrok>
After running the link in your web browser you will get the response shown in the bellow image.
Step 10: Get JSON response.
Now we will need to get the JSON response from the telegram bot for any text that we write to the bot.
Now open VS Code and add the following code and run it on the same Ngrok link on which you had run the previous code.
from flask import Flask from flask import request from flask import Response import requests app = Flask(__name__) @app.route('/', methods=['GET', 'POST']) def index(): if request.method == 'POST': msg = request.get_json() print(msg) return Response('ok', status=200) else: return "<h2>Welcome!</h2>" if __name__ == '__main__': app.run(debug=True)
In BotFather where you get the token for your Telegram chatbot, you can also file the URL to redirect to your Telegram bot.
After that click on the Start Bot to start the chat with the bot. Then type any message that you want such as “test bot” or anything you want.
After writing “test bot” to your bot now go to the Vscode you will file the following JSON in your terminal.
Here we can see that the message that we have written to the telegram bot we can get at the backend in text.
Step 11: send the text message from the bot.
We will write the code to get the response for the “hi” message from the user and if anything other than “hi” is imputed then response with “from webhook”.
You can also add an extra parameter in send message for that you can follow the Documentation.
from flask import Flask from flask import request from flask import Response import requests TOKEN = "<Your Bot Token>" app = Flask(__name__) def parse_message(message): print("message-->",message) chat_id = message['message']['chat']['id'] txt = message['message']['text'] print("chat_id-->", chat_id) print("txt-->", txt) return chat_id,txt def tel_send_message(chat_id, text): url = f'https://api.telegram.org/bot{TOKEN}/sendMessage' payload = { 'chat_id': chat_id, 'text': text } r = requests.post(url,json=payload) return r @app.route('/', methods=['GET', 'POST']) def index(): if request.method == 'POST': msg = request.get_json() chat_id,txt = parse_message(msg) if txt == "hi": tel_send_message(chat_id,"Hello!!") else: tel_send_message(chat_id,'from webhook') return Response('ok', status=200) else: return "<h2>Welcome!</h2>" if __name__ == '__main__': app. run(debug=True)
We will get the below response in the Telegram Bot.
Step 12: Get the Image.
Now we can also get the image from the telegram bot.
By adding the function for sending images in the code.
For more parameters, you can follow the Documentation.
from flask import Flask from flask import request from flask import Response import requests TOKEN = "<Your Bot Token>" app = Flask(__name__) def tel_parse_message(message): print("message-->",message) try: chat_id = message['message']['chat']['id'] txt = message['message']['text'] print("chat_id-->", chat_id) print("txt-->", txt) return chat_id,txt except: print("NO text found-->>") def tel_send_message(chat_id, text): url = f'https://api.telegram.org/bot{TOKEN}/sendMessage' payload = { 'chat_id': chat_id, 'text': text } r = requests. post(url,json=payload) return r def tel_send_image(chat_id): url = f'https://api.telegram.org/bot{TOKEN}/sendPhoto' payload = { 'chat_id': chat_id, 'photo': "https://raw.githubusercontent.com/fbsamples/original-coast-clothing/main/public/styles/male-work.jpg", 'caption': "This is a sample image" } r = requests.post(url, json=payload) return r @ app.route('/', methods=['GET', 'POST']) def index(): if request.method == 'POST': msg = request.get_json() try: chat_id, txt = tel_parse_message(msg) if txt == "hi": tel_send_message(chat_id,"Hello, world!") elif txt == "image": tel_send_image(chat_id) else: tel_send_message(chat_id, 'from webhook') except: print("from index-->") return Response('ok', status=200) else: return "<h2>Welcome!</h2>" if __name__ == '__main__': app.
 run(threaded=True)
Here is the response that you will get from the telegram.
Step 13: Get Audio.
Similar way you can send audio to the telegram. For more parameters, you can follow the Documentation.
def tel_send_audio(chat_id): url = f'https://api.telegram.org/bot{TOKEN}/sendAudio' payload = { 'chat_id': chat_id, "audio": "http://www.largesound.com/ashborytour/sound/brobob.mp3", } r = requests.post(url, json=payload) return rAdd this code to your index function.
elif txt == "audio": tel_send_audio(chat_id)
Step 14: Get Video.
Add the code to get the video to the telegram. To add more parameters you can follow the Documentation.
def tel_send_video(chat_id): url = f'https://api.telegram.org/bot{TOKEN}/sendVideo' payload = { 'chat_id': chat_id, "video": "https://www.appsloveworld.com/wp-content/uploads/2018/10/640.mp4", } r = requests. post(url, json=payload) return r
Add this code to your index function.
elif txt == "video": tel_send_video(chat_id)
You will get the following response in your telegram like this.
Step 15: Get the File.
Add the code to get the File to the telegram. To add more parameters you can follow the Documentation.
def tel_send_document(chat_id): url = f'https://api.telegram.org/bot{TOKEN}/sendDocument' payload = { 'chat_id': chat_id, "document": "http://www.africau.edu/images/default/sample.pdf", } r = requests.post(url, json=payload) return rAdd this code to your index function.
elif txt == "file": tel_send_document(chat_id)
You will get the following response in your telegram like this.
Step 16: Get a Poll.
Add the code to get the Poll to the telegram. To add more parameters you can follow the Documentation.
def tel_send_poll(chat_id): url = f'https://api.telegram.org/bot{TOKEN}/sendPoll' payload = { 'chat_id': chat_id, "question": "In which direction does the sun rise?", "options": json.dumps(["North", "South", "East", "West"]), "is_anonymous": False, "type": "quiz", "correct_option_id": 2 } r = requests.post(url, json=payload) return r
Add this code to your index function.
elif txt == "poll": tel_send_poll(chat_id)
You will get the following response in your telegram like this.
Step 17: Get Button.
Add the code to get the Button to the telegram bot.
def tel_send_button(chat_id): url = f'https://api.telegram.org/bot{TOKEN}/sendMessage' payload = { 'chat_id': chat_id, 'text': "What is this?", 'reply_markup': {'keyboard': [[{'text': 'supa'}, {'text': 'mario'}]]} } r = requests.post(url, json=payload) return rAdd this code to your index function.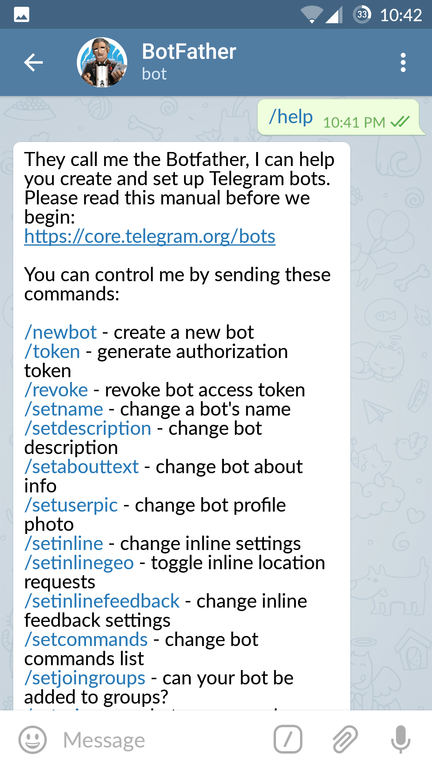
elif txt == "button": tel_send_button(chat_id)
You will get the following response in your telegram like this.
Step 18: Get the Inline Button.
Add the code to get the Inline Button to the telegram.
def tel_send_inlinebutton(chat_id): url = f'https://api.telegram.org/bot{TOKEN}/sendMessage' payload = { 'chat_id': chat_id, 'text': "What is this?", 'reply_markup': { "inline_keyboard": [[ { "text": "A", "callback_data": "ic_A" }, { "text": "B", "callback_data": "ic_B" }] ] } } r = requests.post(url, json=payload) return rAdd this code to your index function.
elif txt == "inline": tel_send_inlinebutton(chat_id)
You will get the following response in your telegram.
Step 19: Get the Inline Button URL.
Add the code to get the Inline Button to the telegram.
def tel_send_inlineurl(chat_id): url = f'https://api.telegram.org/bot{TOKEN}/sendMessage' payload = { 'chat_id': chat_id, 'text': "Which link would you like to visit?", 'reply_markup': { "inline_keyboard": [ [ {"text": "google", "url": "http://www.google.com/"}, {"text": "youtube", "url": "http://www.youtube.com/"} ] ] } } r = requests.post(url, json=payload) return rAdd this code to your index function.
elif txt == "inlineurl": tel_send_inlineurl(chat_id)
You will get the following response in your telegram like this.
For more information, you can follow the Telegram Bot Api Documentation.
Step 20: Share the image with the bot and get it on the server-side.
First of all, we will share the image to the bot and see what type of JSON we are receiving on our server-side.
As we can see that we are receiving a file id for the file which we are sending to the telegram bot. Now, we will get that file id for the image.
def tel_parse_get_message(message): print("message-->",message) try: g_chat_id = message['message']['chat']['id'] g_file_id = message['message']['photo'][0]['file_id'] print("g_chat_id-->", g_chat_id) print("g_image_id-->", g_file_id) return g_file_id except: print("NO file found found-->>")Now by calling the given function in the index function, we can get the chat id and file id printed.
file_id = tel_parse_get_message(msg)
We will receive the response below.
Now we will use the file id which we get for the image to get the file path for the image which is stored on the telegram server.
For that we will have to redirect to another URL and pass our file id to it for that we had created a function.
def tel_upload_file(file_id): url = f'https://api.telegram.org/bot{TOKEN}/getFile?file_id={file_id}' a = requests.post(url) json_resp = json.loads(a.content) print("a-->",a) print("json_resp-->",json_resp) file_pathh = json_resp['result']['file_path'] print("file_path-->", file_pathh) url_1 = f'https://api.telegram.org/file/bot{TOKEN}/{file_pathh}' b = requests.get(url_1) file_content = b.content with open(file_pathh, "wb") as f: f.write(file_content)
We also need to call the function which we have created.
file_id = tel_parse_get_message(msg) tel_upload_file(file_id)
Here in the function first we are trying to get our file path for the image that we had shared from a JSON.
After getting the file path we are trying to get the file from the telegram server by redirecting the file path to the “url_1”.
From “url_1” we are trying to save the file to our computer.
On the server-side, you will see the print and JSON like this.
Here is the directory where we are writing our code. We need to create a folder named “photos” so that we can get the image that we send to the bot directly in our system.
Step 21: Now we will try to add a video to the telegram bot.
When we send the video to the bot then we are receiving different types of JSON. So we need to extract the file id from it.
It can be done with the help of the following code.
def tel_parse_get_message(message): print("message-->",message) print("1") try: g_chat_id = message['message']['chat']['id'] g_file_id = message['message']['photo'][0]['file_id'] print("g_chat_id-->", g_chat_id) print("g_image_id-->", g_file_id) return g_file_id except: try: g_chat_id = message['message']['chat']['id'] g_file_id = message['message']['video']['file_id'] print("g_chat_id-->", g_chat_id) print("g_video_id-->", g_file_id) return g_file_id except: print("NO file found found-->>")Now here also in a similar way, we will extract the file id and pass it to the function and get the file path and store the video on our server-side.
To store the video, we will need to create the folder name “videos” in which we can store the video.
Step 22: Now in a similar way we can do it for audio and files.
For storing the audio we need to create a folder named “music”.
For storing the documents we need to create a folder named “documents”.
Here in a similar way, we need to extract the file id and pass it to the file_upload function.
def tel_parse_get_message(message): print("message-->",message) try: g_chat_id = message['message']['chat']['id'] g_file_id = message['message']['photo'][0]['file_id'] print("g_chat_id-->", g_chat_id) print("g_image_id-->", g_file_id) return g_file_id except: try: g_chat_id = message['message']['chat']['id'] g_file_id = message['message']['video']['file_id'] print("g_chat_id-->", g_chat_id) print("g_video_id-->", g_file_id) return g_file_id except: try: g_chat_id = message['message']['chat']['id'] g_file_id = message['message']['audio']['file_id'] print("g_chat_id-->", g_chat_id) print("g_audio_id-->", g_file_id) return g_file_id except: try: g_chat_id = message['message']['chat']['id'] g_file_id = message['message']['document']['file_id'] print("g_chat_id-->", g_chat_id) print("g_file_id-->", g_file_id) return g_file_id except: print("NO file found found-->>")Step 23: As we have tried to store the image, video, audio, and file at our server-side and also done the code to get the different types of responses through the telegram bot.
You can also refer to the full code on our Github repository and test it to get the various responses through the telegram bot and send files to the server-side.
We have learned how we can get the text response from the bot and also the different types of files. After that, we have also seen how we can get the files that we send to the bot on our server-side.
Now you can have your bot work the way you want—go ahead and create the next big thing!
Hope you had fun building your first Telegram bot. If you face any difficulty then do let us know in the comment.
|
Telegram is used by more than five hundred million people around the world. Companies with its help simplify the order of goods or services, give advice. To do this, use bots - automatic programs. They are written in different programming languages. Consider how to create a bot in the most popular language in February 2022 - Python.
Install a Python interpreter
Create project and virtual environment folders
Activate the environment, select and install libraries
Bot examples
🤖 Echobot
🤖 Cryptobot
Code of all files
The main thing about the telegram bot in Python
Python is a dynamically typed, interpreted language. Programs written in it are not compiled into executable files. Therefore, to run Python programs, install its interpreter.
🖥️ Windows
Select the latest version of Python
Select 64-bit
Check the box before installing Add Python to PATH
pip install virtualenv
❗ Calling the interpreter on the Windows command line is different from other operating systems. Use command py instead of python3.
🖥️ Linux
If you're using Linux, you probably already have Python installed. To check, open a terminal with the command:
python3 --version
If you see something like Python 3. x.x , then Python is there. Otherwise, use the installed package manager. Basically it's apt. Enter command:
sudo apt install python3
Install the virtual environment with the command:
sudo apt install python3-venv
Open a terminal and check with the command:
python3 --version
The Python 3.x.x response, not an error, also confirms that Python is installed. If not, use the brew package manager. Enter the command:
brew install python3
Install the package to create the virtual environment:
pip install virtualenv
Open a Linux or MacOS terminal, Windows command prompt. Navigate to the directory where you want to create the bot project. Sequentially
enter the commands:
 mkdir myBot
 cd myBot
 python3 -m venv env
 #
or, if you are using Windows:
py -m venv env #
These commands will create inside the current project directory mytBot . And in it - a folder with a virtual environment.
To activate the virtual environment on MacOS or Linux, use the command
source ./env/bin/activate
AND the command
source.\env\bin\activate.bat
for Windows.
Different libraries are used to create bots. Most popular: python-telegram-bot with synchronous approach, aiogram with asynchronous.
Asynchrony allows you to be distracted from tasks and not wait for input from the user, so we will use the aiogram library. Documentation on it is on docs.aiogram.
Use the Python package manager (pip). To install the aiogram library, enter the command:
pip install aiogram
Register the bot and get the API key
Open telegram and find the @BotFather bot. It is needed to create and manage other bots.
Click Run.
Enter the command /newbot and the display name of the bot
Now enter the nickname of the bot. It must be unique, with the word bot at the end. When the username passes validation, you will receive a message with an API key.
Don't share the received token with anyone
First, create some files in the project folder.
Handlers.py will store functions - message and command handlers, main.py is needed to run
Write code in main.py:
from aiogram import Bot, Dispatcher, executorimport handlers
API_TOKEN = 'insert your token here'
# instantiate bot and dispatcher
bot = Bot(token=API_TOKEN)
dp = Dispatcher(bot)
# run program
if __name__ == '__main__':
# indication skip_updates=True
# will skip commands,
# who sent
# before bot start
executor.start_polling(dp, skip_updates=True)
Line by line:
from aiogram import Bot, Dispatcher, executorimport handlers
Here, from the aiogram library, we import the Bot classes, Dispatcher is a class that registers which commands/messages and which function to respond to.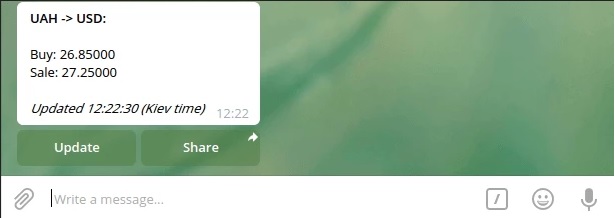 And executor - it starts the bot and executes the functions registered in the dispatcher. On the second line, we import the handlers.py module - handlers are stored in it.
Then declare a variable in which to insert the token from @BotFather. Create an instance of the bot class, pass the token to it. And an instance of the dispatcher, pass the newly created bot to it.
Next, open the handlers.py file and write a couple of commands in it that will process requests:
from aiogram import types
# function that handles the /start command
async def start(message: types.Message):
await message.answer("Hi!\nWrite me something!")# a function that responds to a message
# with text
async def echo(message: types.Message):
await message.answer("Yourself: " + message.text)
Here we import types from the aiogram module, with the help of which we convert the message text or files into a data structure. It can be Message - message, Audio - audio recording, Animation - animation.
Next, define asynchronous functions to process /start commands and respond to messages.
Register these functions in the manager. To do this, in the main.py file, add before starting the program:
 # register functions
 dp.register_message_handler(h.start, commands=["start"])
 dp.register_message_handler(h.echo)
As a result, the main. py looks like this:
from aiogram import Bot, Dispatcher, executor
import handlersAPI_TOKEN = 'insert your token here'
# create a bot and dispatcher
bot = Bot(token=API_TOKEN)
dp = Dispatcher(bot)# register functions
dp.register_message_handler(handlers.start, commands=["start"])
dp.register_message_handler(handlers.echo)# run the program
if __name__ == '__main__':
# skip_updates=True
# skip commands that sent
# before the bot starts
executor.start_polling(dp, skip_updates=True)
work, type in terminal python3 main. py or py main.py on Windows. Open a bot in telegram and run it
To write a cryptobot that will report the current price of BTC, LTC and DASH, use the free SoChain API service. You will also need an additional library to create asynchronous aiohttp requests, but it is installed along with aiogram.
Create a new utils.py module. Add the URL of the API service to it. To get the price, use the Get Prices method. It returns a json object with price data from multiple sources. So write a function that calculates the mean:
BASE_URL = "https://sochain.com/api/v2/" # API URL# function to calculate price
def calculate_price(data):
prices = [float(entity["price"]) for entity in data["data"]["prices"]]
return f"{(sum( prices) / len(prices)):.2f} USD"
Next, open the handlers.py file and write the code:
from aiogram import types# import aiohttp library
import aiohttp# import all data from utils
from utils import *# /start command handler
async def start(message: types.Message):
await message.answer("Hello!\nMessage me the acronym for the current price")# /help command handler
async def help(message: types.Message):
await message.answer("Available networks:\n" + "\n".join(networks))# price request handler
async def get_price(message: types.Message):
session = aiohttp.ClientSession()# create a GET request for the url assigned to the get_price method
async with session.get(BASE_URL + f"get_price/{message.text}/USD") as resp:# get response in json format
data = await resp.json()# if request status is successful
if data["status"] == "success":# calculate the price and send it to the user
price = calculate_price(data)
await message.answer(price)
else:
# report that an error has occurred
await message.answer("An error has occurred")
Now change main.py file: register functions. Then test the bot:
from aiogram import Bot, Dispatcher, executor
import handlersAPI_TOKEN = 'insert your token here'
bot = Bot(token=API_TOKEN)
dp = Dispatcher(bot)dp.
register_message_handler(handlers.start, commands=["start"])
dp.register_message_handler(handlers.help, commands=["help"])
dp.register_message_handler(handlers.get_price)if __name__ == '__main__':
executor.start_polling(dp, skip_updates=True)
When the user specifies an unsupported ETH network, the bot will return the bitcoin price because that's how the API is designed. If it doesn't recognize the network, it uses BTC
To fix the error, create a keyboard that returns the desired values. Write a special Middleware class: it describes checks before and after request processing. Or check the occurrence inside the function. The last option is simpler and easier.
If a user submits an unsupported cryptonet acronym, you'll let them know. To do this, define the list of supported networks in the utils.py file:
networks = ["BTC", "LTC", "DASH"] # <-- supported networks
BASE_URL = "https://sochain.com/api/v2 /" # API URLdef calculate_price(data):
prices = [float(entity["price"]) for entity in data["data"]["prices"]]
return f"{(sum(prices) / len(prices) ):.2f} USD"
Now edit the cryptocurrency price calculation function in the handlers.py file. To do this, add a network entry check to the list of supported:
async def get_price(message: types.Message):
network = message.text.upper() # uppercase message# perform an occurrence check
if network not in networks:
await message.answer("You specified an unsupported cryptocurrency")
returnsession = aiohttp.ClientSession()
async with session.get(BASE_URL + f"get_price/{message.text}/USD") as resp:
data = await resp.json()
if data["status"] == "success":
price = calculate_price(data)
await message.answer(price)
else:
await message.answer("An error occurred")
When the user specifies an unsupported ETH network, the bot will report it
utils.py
networks = ["BTC", "LTC", "DASH"] # supported networks com/api/v2/" # API URL
 def calculate_price(data):
prices = [float(entity["price"]) for entity in data["data"]["prices"]]
return f"{(sum(prices) / len(prices) ):.2f} USD"
handlers.py
import aiohttp
from aiogram import types
from utils import *async def start(message: types.Message):
await message.answer("Hi!\nTell me the acronym for the current price")async def help(message: types.Message):
await message.answer("Available networks:\n" + "\n".join(networks))async def get_price(message: types.Message):
network = message.text.upper()if network not in networks:
await message.answer("You specified an unsupported cryptocurrency")
returnsession = aiohttp.ClientSession()
async with session.get(BASE_URL + f"get_price/{message.text}/USD") as resp:
data = await resp.json()
if data["status"] == "success":
price = calculate_price(data)
await message.answer(price)
else:
await message.answer("An error occurred")
main.py
from aiogram import Bot, Dispatcher, executor
import handlersAPI_TOKEN = 'insert your token here'
bot = Bot(token=API_TOKEN)
dp = Dispatcher(bot)dp.register_message_handler(handlers.start, commands=["start"])
dp.register_message_handler(handlers.help, commands=["help"])
dp.register_message_handler(handlers.get_price)if __name__ == '__main__':
executor.start_polling(dp, skip_updates=True)
At the Skypro online university, we train the profession of a Python developer in 10 months. You will learn how to write clean code, servers for a store, application, service or game, develop a complex service architecture. Complete practical tasks with real tools and make four portfolio projects. We develop only the necessary skills necessary to start in the profession.
Original author: Pythonista.
With the popularity of instant messaging platforms and advances in AI, Chatbots have experienced explosive growth at a rate of 80% of businesses wanting to use Chatbots by 2020. This has created a great opportunity for freelance Python developers as there is a great need to develop both simple and complex chat bots.
One of the more popular messaging platforms is telegram, with a record of 200 million monthly users. Telegram provides an excellent API for chat bots, allowing the user to not only communicate via text messages, but also multimedia content with images and videos and rich content with HTML and JavaScript. The API can even be used to manage purchases directly in telegram.
Python is great for building Telegram bots, and the hugely popular Python Telegram Bot Framework makes this much easier by allowing you to create bots that pass asynchronously by default, so you can easily code bots that can communicate with many users at the same time.
Let's get started with creating our first telegram bot in Python, the first thing we will need to do is download the telegram, create an account and chat with "BotFather". Botfather is a chat bot created by Telegram through which we can get our Telegram Bot API Token.
To download the telegram head to Telegram.org And download and install the appropriate version for your OS, install and create an account.
Now add Botfather as a contact, do so by clicking on the menu icon, selecting contacts, searching for "BotFather" and selecting the user @botfather.
The conversation will pop up with the "Start" button at the bottom, click the "Start" button and you will get a list of commands.
Command to create a new bot/Newbot type "/newbot" and answer the prompts for naming your bot and you will get a Telegram Bot API token. You can name the bot whatever you like, but the bot username will need to be unique on the telegram.
Store the access token somewhere as we will need it to authorize our bot.
To create the bot, we will use Python version 3.7. The Python Telegram Bot is compatible with Python 2.7 and above.
Before we get to the actual coding we will need to install the Python Telegram Bot the easiest way to do this is with:
$ pip install python-telegram-bot
If you prefer to use the source code you can find the project on Github Rejection
Now with the Bot Bot Python Telegram library installed.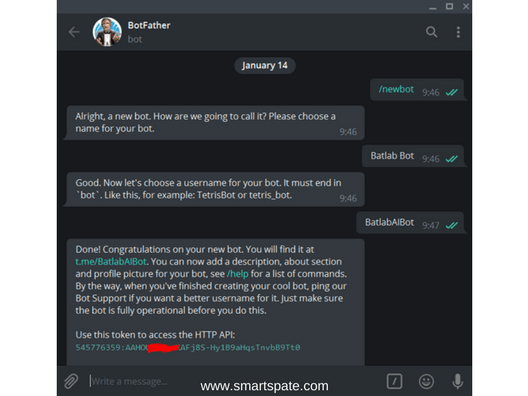
The first thing you will need to have is that it will connect to the bot and authenticate with the Telegram API.
We are importing the Python logger library to use the Logged Python Telegram bot frameworks so we can see in real time what is happening with the bot and if there are any errors.
Place the following code in a Python file and place the Bot Telegram key where indicated in the update statement:
from telegram.ext import Updater, CommandHandler, MessageHandler, Filters, Dispatcher import logging logging.basicConfig(format='%(levelname)s - %(message)s', level=logging.DEBUG) logger = logging.getLogger(__name__) updater=none def start_bot(): global updater updater = updater( '### YOUR TELEGRAM BOT AUTHENTICATION KEY HERE ###', use_context=True) updater.start_polling() updater.idle() start_bot()
If you just want to try it in your online shell use this refl.it I created for you. It's already set up and all dependencies are installed!
Exercise : Get your API token by downloading telegram and following the simple instructions above. It will take you 10 minutes or less! 🙂 Then run that with your own API token and talk to yourself!
Now looking at the top of the code, you can see that we have imported a number of libraries in the Telegram bot module, and set the logger to display any messages of debug priority or higher.
We have created an Updater variable and this will keep our telegram bot updated, which is placed in a global variable so we can easily access it later from the UI. 9The 0003
UPDATER provides an easy front end to work with the bot and run our new bot using the Updater, we just need to pass in the authentication key and we will also pass in to avoid announcement errors as context callbacks are now the default for the Python Telegram Bot.
UPDATATER.START_POLLING() actually starts the bot and after that will be skipped in the bot will start start telegram polling for any telegram chat updates. The bot will start polling in its own separate threads so that it doesn't stop your Python script.
We use the UPDATER.IDLE() command here to block the script until the user sends a command to break out of the Python script, such as Ctrl-C on Windows.
When you run this script, you will be able to see the messages that started the bot and updates, and a number of threads are running. The bot will not do anything noticeable like in a telegram.
Let's update the script and make our start_bot function look like this:
def start_bot(): global updater updater = updater( '### YOUR TELEGRAM BOT AUTHENTICATION KEY HERE ###', use_context=True) dispatcher = updater.dispatcher dispatcher.add_handler(CommandHandler('start', start)) updater.start_polling() updater.idle()
We have added a dispatcher variable for clearer access to the dispatcher for our bot, we will use dispatchers to add commands.
With line Dispatcher.add_handler(Commenthandler("Start", Start)) We've added a command handler that will execute when the user types/runs and a run callback function will be executed. This command automatically executes when you add the bot as a new contact and click the "Start" button in Telegram. Now add a function for our start command:
def start(update, context): s = "Welcome I Am The Finxter Chat Bot! Your life has now changed forever." update.message.reply_text(s)
Command handlers require both an update and a CallbackContext parameter. Through update we send updates to the chat, here using Update.message.reply_text automatically adds a reply only to the specific chat where the /start/start command was sent.
Now when typing in chat with the bot or typing command/begin, you should get this response:
Well, for this we use another type of handler called MessageHandler.
Add the following line to the start_bot function below the previous add_handler statement:
dispatcher.add_handler(MessageHandler(Filters.text, repeater))
This will add a MessageHandler to the bot, we also use a filter here so that this message handler filters everything but text because the user can post something other than text in their posts (such as images or videos). For this handler, we will create a callback function called Repeater with code:
def repeater(update, context): update.message.reply_text(update.message.text)
In our relay, we use the Reply_Text method, responding with update.message.text, which sends a Text Chat message back to the user.
General bot ability to enable or disable certain commands, but the problem that comes up is that we can't just remove the handler for functionality as this will remove it for all bot users.
Fortunately, the Python Telegram BOT allows us to store specific user data using a context that is passed to our callback functions. Let's add another handler below the repeater handler:
dispatcher.add_handler(CommandHandler('echo', echo)) Now we first change the repeater handler to check if the user's text should be repeated:
def repeater(update, context): if context.user_data[echo]: update.message.reply_text(update.message.text)
Here we have added a statement if context.user_data [echo]: before getting the bot's response to the user. The Python Telegram Bot has a user_data dictionary that can be accessed using the context.
This is user specific and using this we can ensure that if there are multiple bot users they are not affected.
Now we'll add in another function so that the user can set the ECHO dictionary using the echo command in chat:
def echo(update, context): command = context.args[0].lower() if("on" == command): context.user_data[echo] = True update. message.reply_text("Repeater Started") elif("off" == command): context.user_data[echo] = False update.message.reply_text("Repeater Stopped")
 In this callback function, we collect parameters for additional user commands from the context. The user options are contained with CONTEXT.ARGS which provide an array based on spaces from the user, in this function we check the first parameter passed by the user, look for enable or disable, and change the user_data [echo] variable.
The Python Telegram Bot makes it easy to reply with files from a website such as photos, videos and documents, you just need to give a URL to the specified content type.
We will use the USCUBICK API to collect a free image based on the users provided by the terms and post it in the chat, and we will also use a filter so that this command only works for your username.
Add the following code to the start_bot() function:
dispatcher.add_handler(CommandHandler('get_image', get_image, filters=Filters.user(username="@YOUR_USERNAME")))
Replace your_username with your username.
This code will execute the get_image function, but only if the username matches your own. With this filter, we only pass in 1 username, but you can also pass in the list of users.
Now let's create the Get_Image function:
def get_image(update, context): terms = ",".join(context.args).lower() update.message.reply_text(f"Getting Image For Terms: {terms}") command = context.args[0].lower() if("on" == command): context.user_data[echo] = True update.message. reply_text("Repeater Started") elif("off" == command): context.user_data[echo] = False update.message.reply_text("Repeater Stopped")
 As in the previous example, we get the terms using the args variable from the context, but in this case we concatenate the terms together with A and convert to lowercase because that's what the API dilution requires.
You can then get the image in the chat using /get_image and some keywords like this:
Now we've learned about how the bot is run and manageable commands. Thanks to the multi-threaded nature of the Python Telegram Bot, this bot can handle many users from all over the world.
In many projects on freelance sites like UPSCORK, the client doesn't care what language is used to build the bot. However, they often want an interface to control the bot, so let's create a simple interface that allows the bot owner to start and stop the bot.
To build our user interface We will use the Pysimplegui library. With Pysimplegui you can create a cross platform GUI that runs on Windows, Mac and Linux without any source code with easy to read syntax and minimal boiler code.
To start adding the GUI code Let's first remove the UPDATER_IDLE() line from our start_bot function, so the start_bot function reads like this:
def start_bot(): global updater updater = updater( '### YOUR TELEGRAM BOT AUTHENTICATION KEY HERE ###', use_context=True) dispatcher = updater.dispatcher dispatcher.add_handler(CommandHandler('start', start)) dispatcher.add_handler(MessageHandler(Filters.text, repeater)) dispatcher.add_handler(CommandHandler('echo', echo)) dispatcher.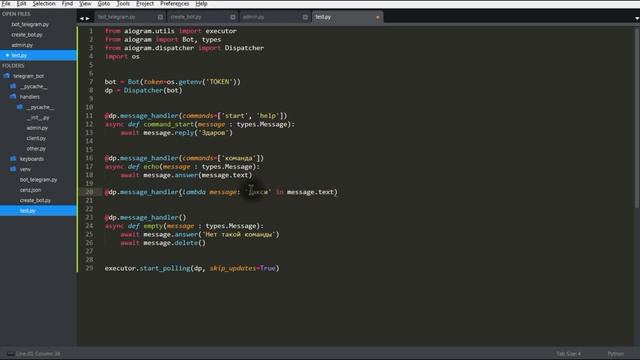 add_handler(CommandHandler('get_image', get_image, filters=Filters.user(username="@YOUR_USERNAME"))) updater.start_polling()
 By removing the Updater.idle() line, the bot no longer pauses the script after starting and running in a separate thread until the decision is made to stop the bot or to be stopped by the main thread.
We will now create a GUI, this GUI consists of a status bar to show if the bot is currently running along with a start and stop button and a title like this:
To create this GUI, add the following code:
def gui(): layout = [[sg.Text('Bot Status: '), sg.Text('Stopped', key='status')], [sg. Button('Start'), sg.Button('Stop'), sg.Exit()]] window = sg.Window('Finxter Bot Tutorial', layout) while True: event, _ = window.read() if event in(None, 'Exit'): break window.close()
 Now to run the GUI Remove the Start_bot() statement at the bottom of our script and replace with GUI():
In the layout variable you can see that we have defined some text and button elements and each item in the list is displayed as a string in our UI. Our first row has 2 elements to show the state (we've given the second element a key so we can easily refer to it later) and our second row has 3 buttons.
The SG.Window function is where we provide our title and layout.
While True: Loop is Pysimplegui's standard event loop.
The Window.read() function returns any GUI events along with any values passed along with the event (such as user input text), we won't use any values in our loop so we pass them into a variable, you can pass Time to wait for the Windows read function in milliseconds without passing anything as we will do, makes the function wait until the event is fired.
IF INTER IN (NOTE, "EXIT"): The statement executes if the user hits the exit button or the user closes the window in some other way (such as the close button in the corner of the window), in which case we'll just break the loop.
Now if you start the script the start and stop buttons won't actually do anything, so we'll add in the code to start and stop the script and update the state, creating our function GUI:
def gui(): layout = [[sg.Text('Bot Status: '), sg.Text('Stopped', key='status')], [sg.Button('Start'), sg.Button('Stop'), sg.Exit()]] window = sg.Window('Finxter Bot Tutorial', layout) while True: event, _ = window. read() if event == 'Start': if updater is None: start_bot() else: updater.start_polling() window.FindElement('status').Update('Running') if event == 'Stop': updater.stop() window.FindElement('status').Update('Stopped') if event in(None, 'Exit'): break if updater is not None and updater.running: updater.stop() window.close()
 Looking at this code, you can see that we have added two different event conditions, start and stop share the same names as our buttons, and when the button is clicked in Pysimplegui, the event fires based on the button name.
In our start event, we start the bot using start_bot if there are no updates yet, otherwise we execute our Updater's start_polling method as a re-run of the updates in a way much faster than using start_bot to initialize the bot.
We also use the Find_Element window function on the window to access the status text using the key generated by "State" and change that to display the running bot.
Now if we run our script we get the UI and clicking the start button will start the bot and clicking the stop button will stop the bot but getting an error when we click buttons out of order.
We will restore this situation by changing our event loop to disable the start and stop buttons so that the user can only do one or the other at the appropriate times.
if event == 'Start': if updater is None: start_bot() else: updater.start_polling() window.FindElement('Start').Update(disabled=True) window.FindElement('Stop'). Update(disabled=False) window.FindElement('status').Update('Running') if event == 'Stop': updater.stop() window.FindElement('Start').Update(disabled=False) window.FindElement('Stop').Update(disabled=True) window.FindElement('status').Update('Stopped')
 You can see we used the findelement method on the buttons here and then using the update method changed the variable to disabled variable which allows you to disable the buttons.
If you start now, you will see that at first both buttons are enabled, so we have to make a slight modification to the layout. Change the layout variable to the following:
layout = [[sg.
 ext.callbackcontext
  message.reply_text(
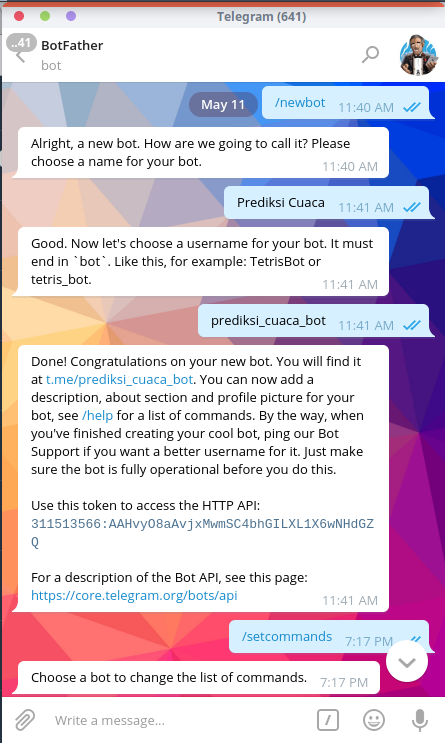 message.reply_text(
 message.reply_text(
 message.reply_text(
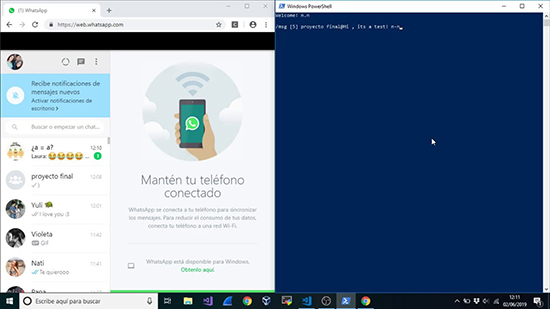 dispatcher.add_handler(CommandHandler(
 text, unknown_text))