Over the past few years, Instagram has seen exponential growth — from one million users at its inception to over one billion in 2022.
If you're interested in getting an Instagram account, or just created one but aren't sure how to use it, you're in luck. Here, we're going to cover all the basics, so you can learn why Instagram is the top social media platform for engagement today.
Instagram is a social media platform that emphasizes photo and video sharing via its mobile app. You can take, edit, and publish visual content for both followers and non-followers, as long as your account is public. Users can interact with your content via likes, comments, shares, and saves.
It's hard to remember a time before Instagram. At one time, "Do it for the 'gram" was a common saying, which meant, essentially, "Do something so we can take a picture and post it to Instagram."
Since then, Instagram has placed a larger and heavier emphasis on video. So you no longer hear the phrase “Do it for the ‘gram.” I bet, though, that a second version of the phrase will soon follow. (Maybe “Do it for reel?”)
If you're not part of the one billion users on Instagram, you might want to reconsider. The app is a great chance to engage with top brands and stay a part of friends' lives. When I want to see how my college friends are doing, I don't check Facebook, I check Instagram. Plus, you can follow your favorite celebrities or political figures to see candid photos of their everyday lives.
Additionally, it's a phenomenal platform for investigating what other brands are doing — for instance, Nike uses the Instagram Stories' feature to promote inspirational athlete stories you won't find anywhere else.
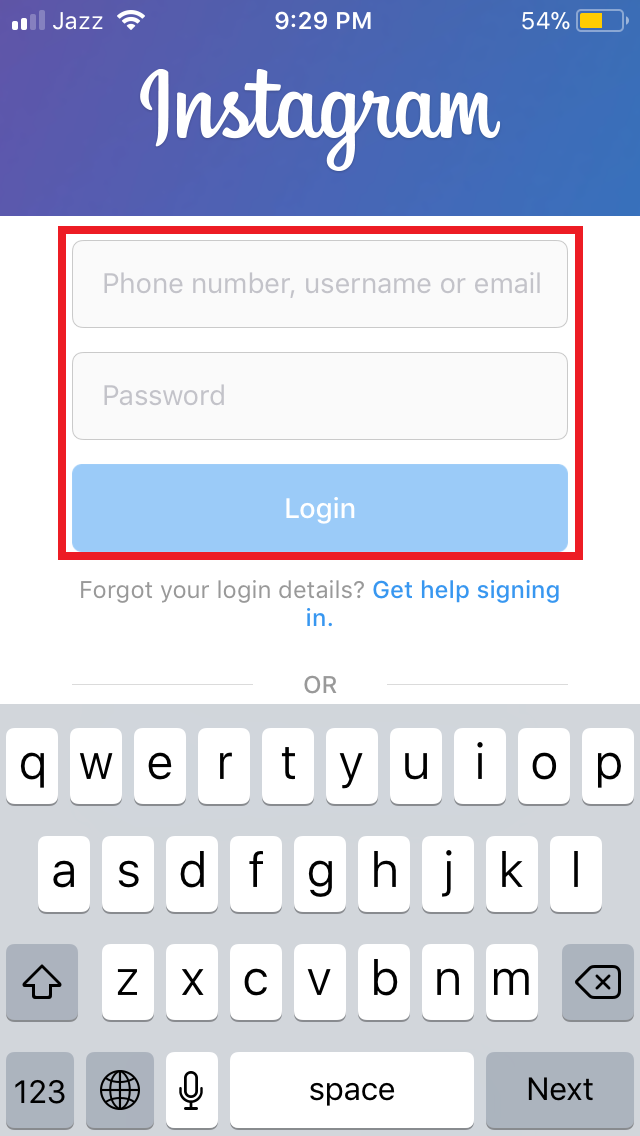
To sign up for Instagram, all you need to do is download the Instagram app on your phone and click the 'Sign up' button. You can choose to sign up through Facebook or use your email or phone number. After you choose a username and password, you’re ready to build your profile.
If you're ready to sign up for Instagram, follow these steps below:

When your account is created, you'll want to adjust your notifications so you only receive the information you want. For instance, you can choose to receive notifications when you get likes from everyone — but, alternatively, you might decide to only receive notifications when you get a like from someone you follow. Or, you might turn off notifications for likes altogether.
You can adjust notifications to "Off", "From People I Follow", or "From Everyone", for the following categories — Comments, Comment Likes, Likes and Comments on Photos of You, Follower Requests, Accepted Follow Requests, Friends on Instagram, Instagram Direct, Photos of You, Reminders, First Posts and Stories, Product Announcements, View Counts, Support Requests, Live Videos, Mentions in Bio, IGTV Video Updates, and Video Chats.
If you're overwhelmed by that list, I get it — I am, too. If you're unsure what notifications you want to receive, you might start with your notifications on "From Everyone", and if certain notifications begin to annoy you, you can turn them off later.
Free Resource
To customize which notifications you receive, follow these steps:
First up, open up the Instagram app on your mobile device. You can also access Instagram on desktop if you prefer. Then, head to your profile by clicking the image of your profile picture on the bottom right.
After you arrive at your profile, click the hamburger menu on the top right-hand corner.
A popup menu will appear. Tap “Settings.”
On the next screen, click "Notifications."
There, you’ll be able to change the notification settings depending on category. These categories include:
You also have the ability to pause all notifications by toggling the Pause All option up top.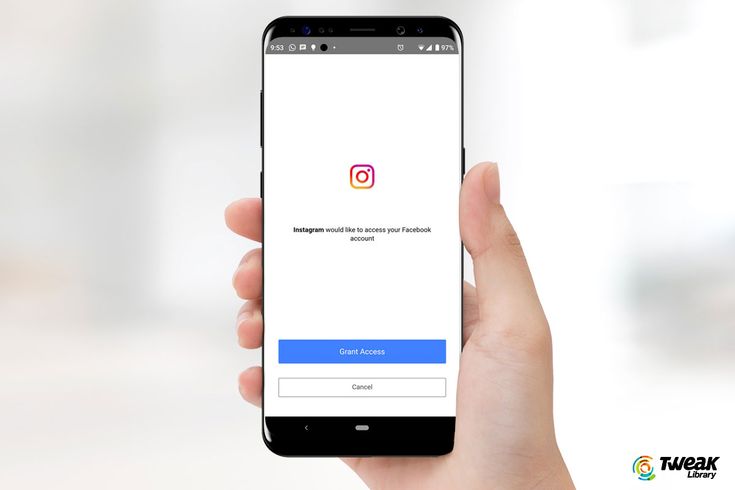
Access each category individually and choose the notifications you want to receive. Here are the options, for example, for “Posts, Stories, and Comments”:
The options will vary depending on category.
And that's it! Next, let's explore how to connect your other social media accounts to your Instagram, so when you post an image to Instagram, you can share it with your other online audiences, as well.
Yes, you can connect Instagram to Twitter, Tumblr, and Facebook, but it’s no longer done through Settings, as it used to be.
Now, you do it on a per-post basis.
If you want to share a post to other platforms, you navigate to the actual post you want to cross-publish on Facebook, Tumblr, and Twitter, and then manually share it that way.
Here’s how:
1. Open up the Instagram app.
2. Navigate to your profile.
3. Tap on the post you’d like to cross-post.
4. Click the three dots on the top right-hand corner of the post.
5. On the pop-up menu, click “Share.”
Note: Don’t click “Share to,” which will give you an option to AirDrop or share the post to your contacts.
6. Toggle the accounts you’d like to share the post to. If you’re not already signed in, you’ll need to do so right within the Instagram app.
Once you’ve connected your accounts for one post, you can then toggle the sharing options for any new posts without needing to sign in again.
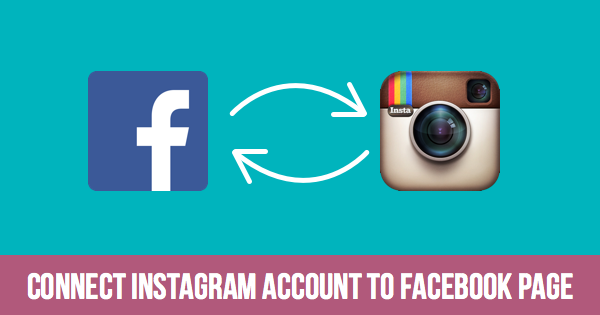
If you connect Instagram to Facebook, you can share your Stories across both accounts. We talk more about how to do that below.
Since Instagram and Facebook are owned by the same company, Meta, you can connect the two accounts for a more seamless experience. Connecting your Instagram and Facebook accounts allows you to:
If you’re a frequent Facebook user, then connecting your account to your new Instagram profile is highly recommended. Here’s how:
1. Open up your Instagram app.
2. Click on your profile picture on the bottom right-hand corner.
3. Click the hamburger menu on the top right-hand corner.
4. Tap “Settings.”
5. Under the Meta logo, tap “Accounts Center.”
6. Tap “Set up Accounts Center.”
7. Follow the prompts to log in into Facebook.
Done! Your two accounts are now connected. Here's how it'll look like once you're finished:
In the next section, I'll show you when a linked account comes in handy.
Now, for the most important part of Instagram — how to upload and post an image.
Instagram is an entirely visual platform. Unlike Facebook, which relies on both text and pictures, or Twitter, which relies on text alone, Instagram's sole purpose is to enable users to share images or videos with their audience.
On Facebook, you might choose to post 100 photos on an album. On Instagram, you need to be choosier about which photos you post. There are a few reasons for this — first, you don't want to post more than once a day (typically). And you don't want to post too many similar photos.
For instance, it would be odd for you to post fifty photos from the same beach vacation on your Instagram profile. Instead, you might choose five or six, and place them all within the same post.
(These are called carousel posts, and they allow you to share multiple photos in one post only. Carousel posts are awesome for posting similar pictures in one package while keeping your overall profile aesthetic diverse.)
Curious about creating an aesthetic? To learn more about Instagram account themes and get inspiration, take a look at these Instagram themes. Additionally, if you want to embark on a deep-dive, you can take HubSpot's Instagram Marketing Course.
Now that we've covered that, let's explore how to upload, edit, and post an image.
When you tap the “+” icon, you’ll be prompted to choose the type of post you want to share. Since we want to publish a post directly on our profile feed, tap “Post.”
Here, you have three options. You can look through your Photos library on your phone, you can take a new picture from right within Instagram, or you can take a new video. For our purposes, I looked through my Photos library and found a picture of Boston I wanted to use. Then, I clicked "Next" in the top right.
There are two categories you can use to edit your image — "Filter" and "Edit". Instagram automatically shows you filters first. You can scroll through the carousel and click any of the filters to apply it to your image.
Additionally, if you want to use a filter but you want to tone it down, double tap the filter and move the cursor to the left to lessen the intensity of the filter.
Next, click "Edit". Here, you can adjust contrast, brightness, structure, warmth, and more. When you're happy with your edited image, or if you don't want to edit it at all, click "Next" in the top right.
Now, you can add a caption, tag people (you can only tag someone if they also have an Instagram account), and add a location.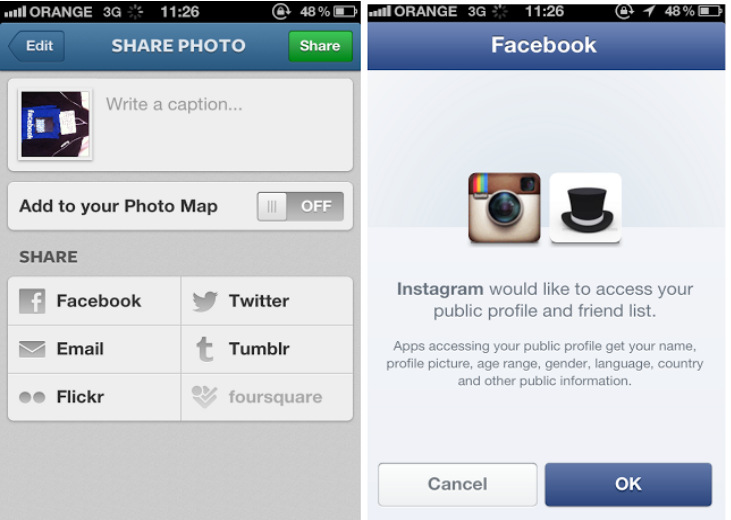 Additionally, click the button beside Facebook or another linked social media account to share your image on that platform, as well. When you're ready to publish, click "Share" in the top right.
If you don’t want to use your app to post on Instagram, you can also do so from your computer. Learn how to post to Instagram from a Mac or PC here.
Instagram Stories is a feature that allows you to post videos or images that disappear after 24-hours. Instagram's Stories feature is similar to Snapchat in terms of content — users often post more casual and candid videos and images, offering glimpses into their every day lives.
For instance, on your normal feed, you might post a heavily-edited picture of yourself and friends at a baseball game. But you might post a more candid video to your Story of the stadium singing "Sweet Caroline".
To learn how to upload an image or video to your Stories, follow these steps:
 Tap your profile picture in the upper left-hand corner.
Alternatively, swipe right on your feed or tap the “+” button in the top navigation bar.
Once you're within the Stories feature, you can take a picture or video right from within the app. Alternatively, if you have an image saved to your phone that you'd like to use, you can choose it from your media library.
On the left-hand side, you have a few different editing features.
The “Create” button lets you add a location, hashtag, time, date, and other fun images or emojis to your picture.
The “Boomerang” option allows you to create a looping video. And the "Aa" icon is your text button. Once you click "Aa", you have the option to change your font.
If you click the smiley face icon, you'll see the following screen. Simply click on one of the icons to add them to your image. If you don't like it, drag it to the bottom, and a trash can will appear so you can delete it.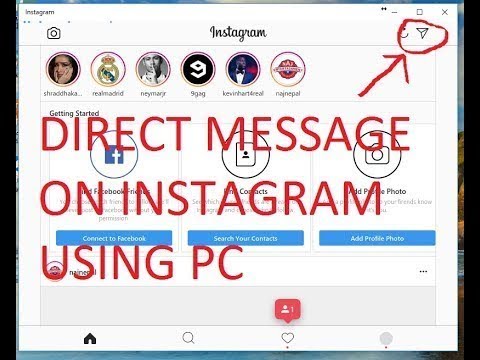
For instance, I clicked the smiley face icon to add a poll to my image. You can also swipe to the left or right to add filters to your photo or video.
Once you're happy with your content, you can either click the white arrow icon in the bottom right, which allows you to share your Story with everyone who follows you, or select “Close Friends” first, so that only your close friends see it.
Then you’re done! Your Story is immediately live.
It's incredibly easy to find and follow users. Using Instagram's search feature, you can find celebrities, brands, and friends. Additionally, you can search "Tags" or "Places". "Tags" is particularly useful if you know what type of content you want to find, but you're not sure who posts about it.
For instance, you might search "#familyrecipes" under tags — your results will include any images with that hashtag. As you peruse, you might find someone who posts content you really like, and you can choose to follow them so their content appears on your feed.
To follow someone, follow these three easy steps.
It looks like a magnifying glass and will be right next to the “Home” button.
For this example, I searched "architecture.”
Instagram allows you to either search all posts that contain the word “architecture,” or “See all results” and see tags and places.
Once you're on someone else's account, you'll see a blue "Follow" button at the top. For public profiles, you can click and immediately begin following that account. However, if the profile is private, you may need to wait for them to accept you first.
And that's it! You're on your way to becoming a pro. To take your account to the next level, plan out your next posts using an array of content ideas and templates.
If you want to grow both professionally and personally, then using Instagram is more important than ever.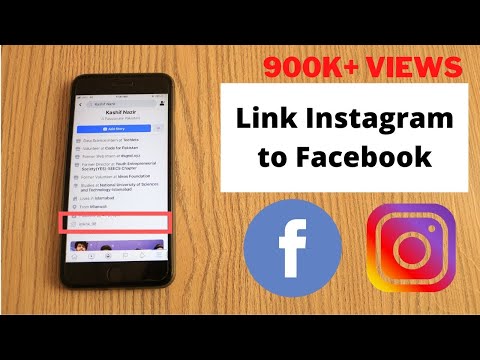 You can start by observing first, then begin posting as you learn your way around the user interface. With over one billion users, Instagram is an extremely worthwhile social media platform to join — and it’s only set to keep growing as time goes on.
Editor's note: This post was originally published in November 2018 and has been updated for comprehensiveness.
Topics: Instagram Marketing

Have you ever wondered how people share their Instagram posts to Facebook?
The secret is cross-linking your accounts — that way, when you create posts (or edit them), you can direct Instagram to share your photo or video to that other platform.
Plus, linking your accounts may send a notification to your Facebook friends to the effect that you're now on Instagram. That makes it easier to gain followers from that network without having to send out a "follow-me" message.
Here's how to link Facebook and Instagram accounts on your iPhone or Android.
Check out the products mentioned in this article:This is a quick and easy process, just make sure you have your Facebook login information on hand.
1. Open Instagram and toggle over to your account profile (located in the bottom toolbar).
2. Tap the three bars and select "Settings."
Tap settings to link your accounts. Devon Delfino/Business Insider3. Tap "Account" and then select "Linked Accounts."
View your Linked Accounts. Devon Delfino/Business Insider4. Tap "Facebook" and log into your Facebook account to confirm that you want to link your Facebook account to Instagram.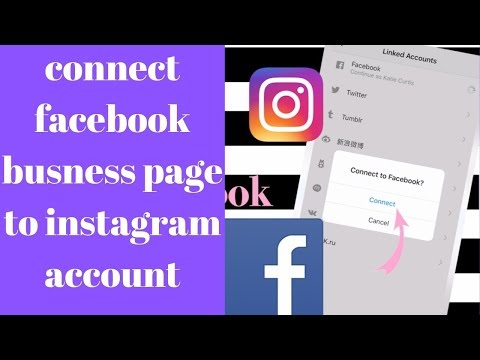
Before sharing any posts, be aware that if you have a private Instagram, anything you share to other social networks, like Facebook, will become public.
If you want to unlink your Facebook account from your Instagram, you'd go through the same general process. The only difference would come at the final step — instead of logging into Facebook, you'd tap "Unlink Account" (for iPhone) or "Unlink" (for Android.)
Devon Delfino
Devon Delfino is a Brooklyn-based freelance journalist specializing in personal finance, culture, politics, and identity. Her work has been featured in publications such as The Los Angeles Times, Teen Vogue, Business Insider, and CNBC. Follow her on Twitter at @devondelfino.
Read moreRead less
Since March 14, 2022, Roskomnadzor has blocked Instagram, and since March 21, the social network has been officially banned in the Russian Federation.
This decision was made due to the fact that the management of Meta, which owns Instagram, has lifted the ban on incitement to violence against the Russian military. Naturally, the Russian supervisory authorities promptly responded to such a not-so-good "attack" on the part of the corporation, and immediately turned to the Prosecutor General's Office with a request to recognize the Meta company as extremist. So, the careless and ill-conceived decision of the Meta management overnight deprived millions of users from Russia of access to one of the most beloved social networks. nine0005
Now you can't log into your account from the territory of the Russian Federation if you don't use a VPN for Instagram.
Contents
Blocking Instagram has become a real problem for many people. After all, this is not just a social network, but also a platform for promoting and selling products. Thousands of small businesses have lost the ability to communicate with their customers, and ordinary users are now unable to view friends pages. People had to quickly decide how to restore lost connections and data. nine0005
But no matter how tragic everything that happens, users have a way out, because there are ways to enter Instagram. For example, you can do this using a VPN.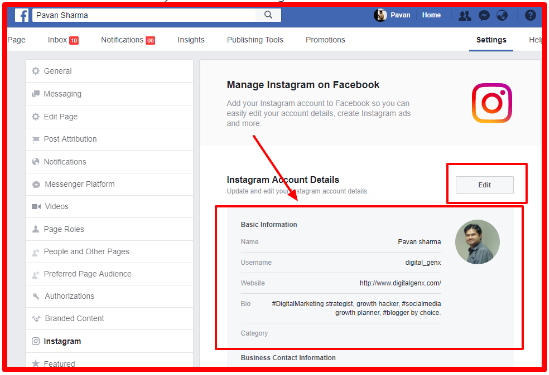 It should be noted right away that at the moment there is no punishment for this, which means you can continue to go to Instagram and use it for work or entertainment.
How do people log into a blocked social network? If we talk about working methods, we can distinguish the following:
To understand how to use these tools, you first need to familiarize yourself with the very concept of VPN.
Virtual Private Network allows you to hide your geolocation and encrypt device traffic using an intermediate server. Thus, VPN creates the illusion that the user is located in another part of the world. Thanks to this, the user gets access to services and sites that are subject to bans, blocking and other restrictions in his country. nine0005
To access Instagram via VPN, you need to:

This way you can enter the application and use it fully.
Different VPN programs are available to users. And to understand which VPN for Instagram is right for you, you need to understand their types. nine0005
By device, the following types of VPN anonymizers can be distinguished:
Thus, choosing a VPN for Instagram should be based on which device you will use to access the social network. nine0005
In addition, VPN for Instagram can be:
 Such an application is provided to the user on a completely free basis. Financial savings attract customers to use such services. However, it should be borne in mind that free programs may not be safe. In addition, they often work intermittently, as they have traffic restrictions and do not support the Russian language, which can be a problem. In the event of problems with such a program, it is likely that the service support team will not help customers. nine0016
 We have done our own testing of popular VPNs.
We selected 33 most downloaded services from Google Play, App Store and extension directories. We tried to connect to Instagram through them, we managed to do it using 14 out of 33 VPNs. We then tested the download speed through each of the 14 VPNs. And we selected the top 10 VPN services in terms of speed (shown in the table). The initial connection is 100 Mbps. The table shows the value of the download speed through each VPN. The data is current as of 07/12/22 (the number of working VPNs decreases every week). nine0005
| 1. HideMy.Name
| Speed: Google Play (Android) App Store (iPhone) Site |
| 2. Surfshark
| Speed: Google Play (Android) App Store (iPhone) Google Chrome Site |
| nine0002 3 CyberGhost
| Speed: Google Play (Android) App Store (iPhone) Google Chrome Site *links to download mobile applications are at the bottom of the site |
| 4.
| Speed: Google Play (Android) App Store (iPhone) Site |
| 5. ExpressVPN
| Speed: Google Play (Android) App Store (iPhone) Google Chrome Site *links to download mobile applications are at the bottom of the site |
| 5. TouchVPN
| Speed: Google Play (Android) nine0002 App Store (iPhone)Google Chrome Site |
| 6. ProtonVPN
| Speed: BLOCKED RKN |
| 8. Browsec
| Speed: Google Play (Android) App Store (iPhone) Google Chrome Site |
| 9.IPVanish
| Speed: Google Play (Android) App Store (iPhone) Site |
| 10.
| Speed: BLOCKED RKN |
The user must enable and configure VPN on their own. First you need to download and install VPN on your mobile phone. After that, carry out the standard startup procedure. Now you need to set up VPN on Android. For this you need:
Now any sites will be open for you. This is how you can use Instagram on Android.
iOS offers customers the ability to connect VPN through the App Store. For this you need:

Since in this case you will use a free server, it may slow down the download of data from Instagram, and sometimes the server will not work, and you will have to start the whole procedure again. To do this, you need to re-open the service (application) with a list of countries through a proxy and try to replace it with another one. nine0005
If this way of connecting VPN does not suit you, then it is better to download another suitable VPN program on your phone. After that, carry out the standard procedure for installing the application. When everything is ready, it remains to run the application. Sometimes the program starts working immediately after the user presses the connect button.
To enable VPN in the browser, you only need to download and install any extension of your choice.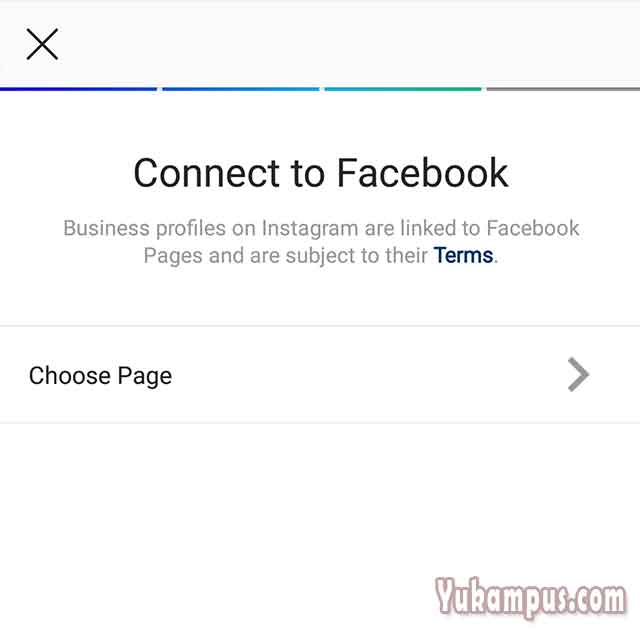 The server will only function in the browser in which it is installed and will not affect third-party applications in any way. nine0005
For example, let's consider how to run the extension in the Opera browser:
When the process is completed, an icon will appear on the screen, by clicking on which you can select a country from the list and enable VPN.
Now you can go to Instagram and use it as usual. nine0005
*Instagram (Instagram, Instagram) is an extremist organization banned in Russia.
*Meta is an extremist organization banned in Russia.
Open in a new window at link
Video tutorial:
To connect Intagram* to BotHelp, you must have an Instagram account* and a company page on Facebook*.
If you do not have a business page on Facebook*, then you need to create one (instruction), below is a video instruction:
*Owned by Meta, recognized as extremist and banned in Russia
If you already have a professional account, you can skip this step.
the browser does not have some of the necessary functions.
Go to your profile and press the menu button
Choose "Settings"
Further section "Account"
Smell down and click “Switch to a professional account”
Choose a category, POSTICIAL POSTORITION
At this stage be sure to select " Business "
Enter your contacts
Log in your Facebook profile*
Tie accounts
Press "Add account . .."
.."
Go back to "Menu" - "Settings" - "Privacy"
Better below and go to the "Messages" section
Activate the setting "Allow access to messages"
Go to "Settings - Channels" and press the button " Add new channel "
Select channel type Instagram* , then click " Continue with Facebook* ", log in if required.
*belong to META, recognized as extremist and banned in Russia
Press " Change the
Settings, Mark the Instagram*account, which you will connect if you connect additional channels, do not remove the gallery from the gallery from previously connected
Here you will also select the company's page in FB * - the one associated with the Instagram account *, you also do not need to uncheck the old checkboxes
All items must be checked Click " Done "
If you see this message, it means that the account is linked successfully.
 Turbo VPN
  NordVPN