If you know anything about Instagram, you know that it lets you put all sorts of filters on your photos. But filters aren't the only photo-editing tools that Instagram offers.
Here's a quick guide on how to add both filters and effects to your Instagram posts.
How to use filters on InstagramFilters are basic overlays that change the colors and shading of your photos. Some might make the picture brighter, while others might strengthen the shadows. Some remove all the color completely, giving your photo a grayscale makeover.
You can use filters when you're posting a photo or video to your feed, or when you're adding to your Instagram Story.
To use filters on a post, tap the plus sign icon at the top of your homepage or profile, then tap Post. Select the photo or video you want to upload and tap Next in the top-right.
You'll be brought to a page where you can add all sorts of preset filters to your photo. Tap any of the filters to overlay them on the post, and then tap the filter again to manage how strong it is. And if you don't like any of the available filters, you can tap Edit in the bottom-right to make your own.
When you're done, tap Next in the top-right to save your filtered post.
The same photo, with (right) and without (left) a filter. Instagram; William Antonelli/Insider
 Adding filters to your Story is simpler, but doesn't give you as much control. First, make a Story, either by taking a new picture/video or by uploading something from your phone's camera roll. When you're on the preview page that lets you add stickers and text, swipe left or right to switch between about a dozen different filters.
How to use effects on InstagramEffects are very different from filters. While filters just change the colors, effects add entirely new aspects, from stickers to animations. If you've ever used effects on TikTok, these are the same thing.
Also unlike filters, you can only use effects when you're making a Story, a Reels video, or when you're using Instagram Live.
To do it, open Instagram and swipe right to turn on the camera. At the bottom of the screen, next to the record button, you should see some circular icons with designs inside. These are all effects, and you can tap any of them to put them on your post.
Two recommended effects on Instagram. Instagram; William Antonelli/InsiderIf you don't like the effects you're offered, scroll to the far-right of the list and tap the Browse effects bubble. You'll get a full library of all the effects on Instagram, which you can scroll through or search from.
Quick tip: Some augmented reality (AR) effects that scan your surroundings aren't available if you're living in Illinois or Texas, due to local laws about AR on social media.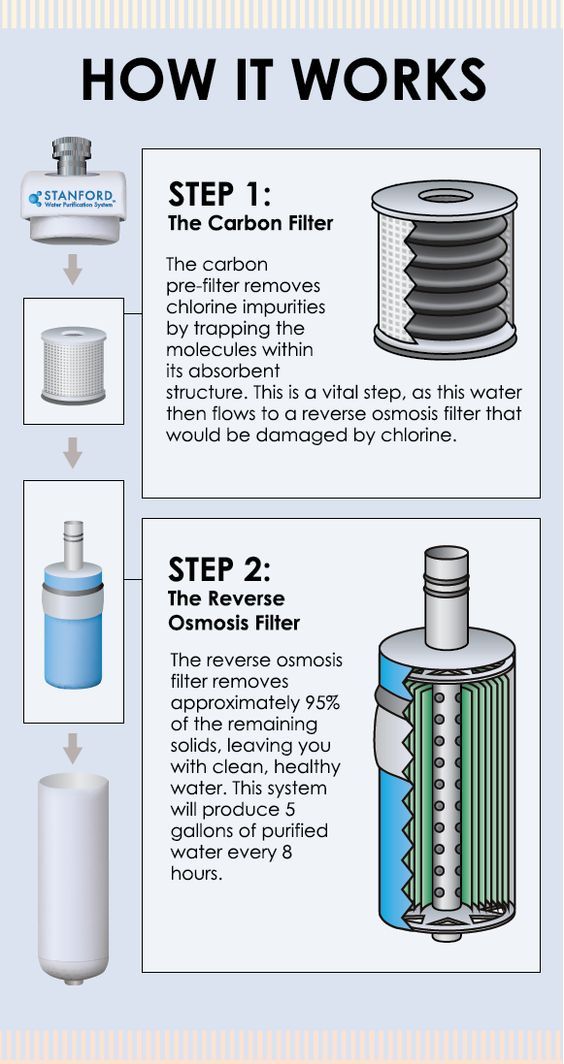
You can only use one effect at a time, and you can't combine them with filters.
William Antonelli
Tech Reporter for Insider Reviews
William Antonelli (he/she/they) is a writer, editor, and organizer based in New York City. As a founding member of the Reference team, he helped grow Tech Reference (now part of Insider Reviews) from humble beginnings into a juggernaut that attracts over 20 million visits a month. Outside of Insider, his writing has appeared in publications like Polygon, The Outline, Kotaku, and more. He's also a go-to source for tech analysis on channels like Newsy, Cheddar, and NewsNation. You can find him on Twitter @DubsRewatcher, or reach him by email at [email protected].
Read moreRead less
There is something I find so soothing about taking a “mind break” to scroll through my Instagram feed of beautiful, high-quality images. And many of these professional-like photos are taken by your average iPhone owner who has simply become a master of Instagram filters.
Whether you’re just starting to dip your feet in the world of filtering your photographs or trying to up your game in 2020, you have come to the right place! In this guide we’re going to get you up to speed on everything you thought you already knew about Instagram filters, plus so much more. You’ll learn:
But first, let’s review the basics …
An Instagram filter is a feature within the social platform that allows you to edit your photo with one click, by simply applying pre-set edits to the image that Instagram has created for you.
The good old Instagram filter was first launched in 2011 with some simple options to filter your photograph with a higher resolution, an optional border, or some nice tilt-shift effects. While these options may seem basic now, it was a whole new world for individuals lacking photo-editing chops.
Nowadays, Instagram allows you to choose from a whopping 25 filters! Here’s an example of a cake I made but photographed in pretty terrible lighting. The first un-filtered photograph is on the left. The middle is filtered with Instagram’s “Gingham” filter, and the right provides a vintage black-and-white feel with the “Inkwell” filter.
As you can see, simply clicking a button and applying a filter allows you to drastically change the look and feel of the original photograph, which brings me to my next point.
While Instagram filtering may seem easy and fun, it is important to not get carried away with it, especially for marketers using their feed to convert followers into customers. To ensure your filter game stays in check with your business goals, keep the below three guidelines top of mind.
Your feed needs to feel consistent so users are not put-off by mixed messages from your business. Consistency has also statistically proven to be successful for marketers. In fact, 60% of the top brands use the same filter for every post!
Okay, here it goes: Please, please, please do not over-filter your photographs! While exploring the filter world, you will notice that Instagram gives you more editing options even after applying a filter, like increasing the saturation or adding a “tilt shift” (essentially some blur to certain areas of the image). These features are really cool, fun to play with, and can lead to some beautiful results. Unless you get carried away—which is easy to do!
Take this example below of the middle image of my cake with a bunch more edits make to it.
While it might not look awful upon first glance, once you look at it more you will notice how harsh the colors became due to over-saturating the image. You will also notice so much of the detail was lost in the white rosettes with too much exposure. There are many other issues with these edits, but the takeaway is do not get carried away, and always do your best to enhance the beauty of your original image rather than dampen it.
Lastly, make sure the filters you chose stay “on brand.” This is not just with your feeds look, but with your entire company brand. For example, if you are selling party supplies and your filters are all black and white and grim, this does not give off your brand’s bright and celebratory vibe. Make sure to observe your other marketing images and ensure new ones take on a similar look so leads do not feel confused when seeing you outside of Instagram.
Now perhaps you are not feeling risky enough to choose your own filter, and hope for the best. Luckily, Canva recently analyzed filter popularity over one million Instagram photographs around the globe and ranked them according to popularity. Here are the top three most popular:
While it is always safe to go with popular filters, every photo is unique so make sure to choose the filter that gives your photograph the best possible makeover and aligns with your brands vibe.
Need further inspiration? Here are some brands who filter like pros.
The pricey fitness line is known not just for its higher end yoga wear but also for its effective marketing and brand campaigns. Lululemon’s Instagram presence is no exception. Scrolling through lulu’s feed it is easy to see that their filter game is top notch. Every photo has a consistently clean, crisp, and motivational feel to it.
As you can see below, the filters are basically the same in all of these photographs, providing sharp visuals focusing in on the shine of each photograph. This type of filtering consistency works really well, and lululemon is one successful clothing brand that proves this to be true.
West Elm is known for its modern furniture that focuses on clean and calming colors like greens, blues, natural woods, and whites. The Instagram filters they use on their beautiful rooms reflect the look of their furniture and brand.
As you can see below, the photographs all have a very clean, bright, and natural filter applied to them giving a very desirable and consistent look to all of their photos.
Doesn’t it just make you want to go furniture shopping? (Which, I’m sure, means that West Elm is accomplishing its goal!).
Another brand that has a great Instagram is JetBlue, and filtering is a big part of that. I love how JetBlue has taken its name and applied it to the way the team filters their photographs: These Instagram filters focus on enhancing the blue tones in each and every image. Just take a look at the consistency of their feed.
Even this photograph below that captures the inside of a JetBlue plane is shining blue across my feed. Having such a consistent filter game that ties so closely to your brand is a huge takeaway from JetBlue’s Instagram strategy.
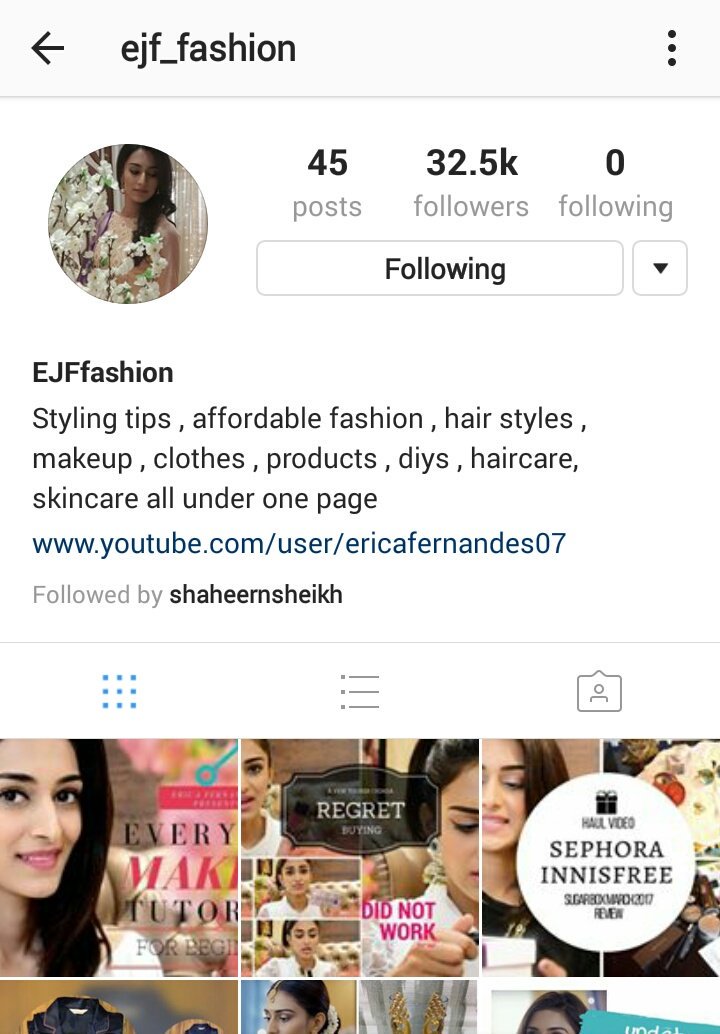
Okay, Sephora, I see you! And I am not a big makeup person, but Sephora has the Instagram filtering game down. The makeup store’s Instagram photos all feel fierce, bright, and energizing, leaving the audience wanting more. Yes, Sephora is another big brand name that can afford a very talented social media marketer, and it definitely shows!
But that doesn’t mean you can’t do something similar if you’re working with a smaller marketing budget. So go ahead and scroll through their feed for some filtering inspo.
5. HubSpotLast, but certainly not least, I wanted to give a shout out to a non-glam brand for being on top of its Instagram filtering game. HubSpot is a marketing software company that clearly knows a thing or two about its audience. HubSpot’s Instagram posts feel informative and educational, without being overwhelming. Most importantly, they are filtered in a consistent way that makes them super readable and aligns with the HubSpot brand.
The biggest takeaway here is that Instagram filtering should definitely not be put on the backburner. While it might seem like one of the easier components of your job, it is also one that needs to be thought through to ensure your posts are beautifully on-brand and grab the attention of your target audience.
PS: If you’re looking for more filter facts, check out our post How to Create Your Own Snapchat Filters.
Today, Instagram occupies a worthy place among the most popular social networks. This service is used by hundreds of millions of people around the world. Instagram is loved for visual profiles, which contain many photos and videos, for a convenient system of user interactions with the help of likes and subscriptions. Of particular interest and some innovativeness are masks based on augmented reality technologies. Many have heard of their existence, but they do not know where to get them. nine0003
| Apple in Telegram and YouTube. Subscribe! |
To make your Instagram Stories even more colorful, use virtual filters (masks) to process faces. You can only post edited photos to your Instagram Story, or you can also save them and then post them to Instagram, Vkontakte, or Facebook.
Instagram animated masks work on both iPhone and Android. nine0003
BY TOPIC: Instagram secrets: 20 tricks that every user of the service should know.
Chances are you already know how to work with selfie filters. The MSQRD app (and many others) offer a similar feature that many users love. Instagram Face Filters work in a very similar way, but are activated a little differently. So, how to use filters. nine0003
1. Open Instagram on your mobile device.
2. Open the Instagram camera (tap the camera icon in the top left corner or swipe the screen from left to right).
3. Click on the smiley icon in the lower right corner.
4. Touch one of the patterns at the bottom of the screen.
5. Swipe left and right on the screen to view all faces.
6. Raise your eyebrows or open your mouth to activate some masks. nine0003
7. Press the shutter button to take a photo, or long press to take a video.
8. You can use the buttons in the upper right corner to add stickers, pictures or text.
9. Click the " Save " button or the plus sign to add the photo to your story.
The filters work with both the front and back cameras of your mobile device. You do not need to touch the display to brighten a face or activate a function. After saving the photo in the gallery, you can add it to Instagram like any other photo. nine0003
In addition to the templates suggested by the Instagram developers, there are many great masks and filters created by users.
To go to the gallery of custom effects, scroll all available masks to the right to the button More effects .
The same can be done by clicking on any mask and in the menu that appears, select the option View effects .
The effects gallery is divided into many thematic categories that will help you easily find the desired option.
Here you can also view the effect of each effect and, if you wish, try it out by pressing the corresponding button. To save the effect in the camera (in the menu where the default masks are located), press the button with the down arrow in the square.
The masks we are talking about are also offered by users completely free of charge on their pages. If a user's profile page has an emoji section, they are an Instagram effects designer. nine0003
Go to the effects section on the user page and select the suggested mask.
If you liked someone's work, we recommend that you subscribe to the account you like, so you will receive new masks immediately after they are published.
Popular filter developers for Instagram
In the assortment of each of them you can find more than a dozen rather interesting AR masks.
In addition, you can try to find masks manually by searching for some specific hashtags. You may find the following useful:
See also:
Please rate the article
Average rating / 5. Number of ratings:
No ratings yet. Rate first. nine0003
We decided to divide this post about computer vision technologies into two parts: in the first part, we talk about how graphic filters work and what you can do with an image with their help. In the second, we explain how the useful properties of filters help neural networks process images.
We are used to the fact that on VK, Facebook or Instagram, you can apply a filter to an image in a couple of seconds: blur it, correct color, brightness, contrast, add some spots. It sounds amazing, but at its core, the Instagram blur filter and the convolutional neural network work in the same way. How? nine0003
Short: multiply the pixel values in the picture by the special numbers
When a picture consists of pixels, each pixel has coordinates and a number that uniquely encodes its color. This means that this number can be added to something or multiplied by something.
Let's imagine that this is our picture: each table cell is one pixel, and the numbers represent their colors.
Now let's blur the picture. To do this, let's take nine pixels in the red frame in the upper left corner, in the middle it will be 81. Like this:
Remember that we were going to multiply pixel values by special numbers? The time has come. Our numbers are still simple. Let's take a "frame" of nine units and multiply each pixel in the red box by units from the corresponding cells, as in the GIF.
Numbers will not change from multiplication by one, but we do not need this yet. Any filter first multiplies pixels from a large picture by values from a small "frame", and then finds the arithmetic mean of all products and writes the result instead of the pixel that was in the middle of the frame, in our case, instead of 81, we will write 43. It is the pixel that is in the middle of the small frames is the most important, this value will eventually change, and for the sake of it we created a small frame. In fact, since there were only ones in the frame, we simply found the arithmetic average of the colors of all the pixels in the frame. nine0003
Ok, we've selected some pixel and recolored it to the "average color" of the pixels around it. What's next?
Short: do the same for all other pixels.
This is how a small "frame" "runs" through all the pixels of a large picture in turn, changing the value of only one point in the middle at a time. By the way, the new pixel value in the center of the frame is written to a new picture so as not to confuse the algorithm with changing numbers. If the frame needs to process a pixel at the edge of the image, then the developers themselves decide whether to draw new points around it or manage by analyzing only those that are already “available”. nine0003
In order not to write every time that “you need to multiply the numbers from the table by the numbers from the frame”, mathematicians came up with the idea of calling these tables matrices, they can be added and multiplied. The little red box that multiplies a few pixels by special numbers and then sums the results is actually a matrix, and it's called the convolution kernel. The process of "running" the convolution kernel over image pixels is the essence of the convolution operation . The convolutional neural network performs this operation on each of its convolutional layers , hence the name.
If there are only ones in the convolution kernel, then such a kernel recolors the central pixel literally into the arithmetic mean of the colors of its neighbors. That is, a point that stands out from the environment will fade and “repaint” to match its color. This can be useful when you need to remove noise from a photo, and we "run" around the picture with a 3x3 pixel frame, choosing only the necessary, too bright points.
But if you apply averaging to a large area of a color photograph, then each of the pixels inside the frame will have an equal effect on the final color, and all colors will mix. nine0203
Here is an example: this is how the image looks before applying the filter:
Ask the computer to average the pixel values:
Here's what happens:
The illustrations show that such a radical blur completely “broke” the texture of the picture. So, you need to come up with a way to blur it so that some pixels have more influence on the result than others, which preserves a non-uniform texture (and allows you to really remove noise, and not repaint everything with the same color). How to do it? nine0003
Now we will think of what else, besides units, we can multiply pixel values.
The multipliers in the convolution kernel can be perceived as the weight, the significance of the signal transmitted by a particular pixel. After all, if you multiply the value of a pixel by 4, it will have more effect on the sum of the products than if it were multiplied by one. The kernel, by the way, does not have to be so small, its size is not limited. And it would be logical if, when blurring the picture, the color of the pixel that we are now repainting would have a greater influence on the color of its neighbors, and not more distant points. nine0003
For example, if you distribute the weights (multipliers) in the convolution kernel as shown in the figure, you get a Gaussian blur - an operation familiar to many from Photoshop. It is Gaussian because the multipliers are arranged as on the graph - the "bell" of the Gaussian function: large values in the middle, small ones along the edges.
This frame will also teach the computer to determine where the flower ends in the picture and the background begins, the main thing is to set the coefficients correctly.
Such a convolution kernel, for example, can find the vertical edges of an object. If you need to find horizontal or diagonal edge lines, we will rotate the table with multipliers so that the zeros are placed horizontally or diagonally. Now the table essentially subtracts the pixel values on the left from the pixel values on the right, ignoring those in the middle. If the difference turns out to be far from zero (in a positive or negative direction), then there are different colors on the left and right: the rose petal has ended, the green background has begun. A pixel that is between two colors can be painted over with a dark color, and the rest with a lighter one, then you will get such a beautiful filter:0003
The convolution kernel is a very powerful tool.