How can i post a picture on facebook
Detailed Instructions on How to Put a Picture on Facebook | Small Business
By David Weedmark Updated June 10, 2019
Whether you are adding pictures to your personal Facebook account or a business page, Facebook gives you an assortment of options and features. This can be a bit overwhelming if you have not used Facebook in a while. You can edit the pictures, tag people, add text and apply stickers. You can also control the quality and size of your pictures so that Facebook does not automatically edit them for you.
Upload Photos to Your News Feed
Adding photos to your news feed is quick and easy. The process for adding them to your personal news feed is similar to adding them to a business page.
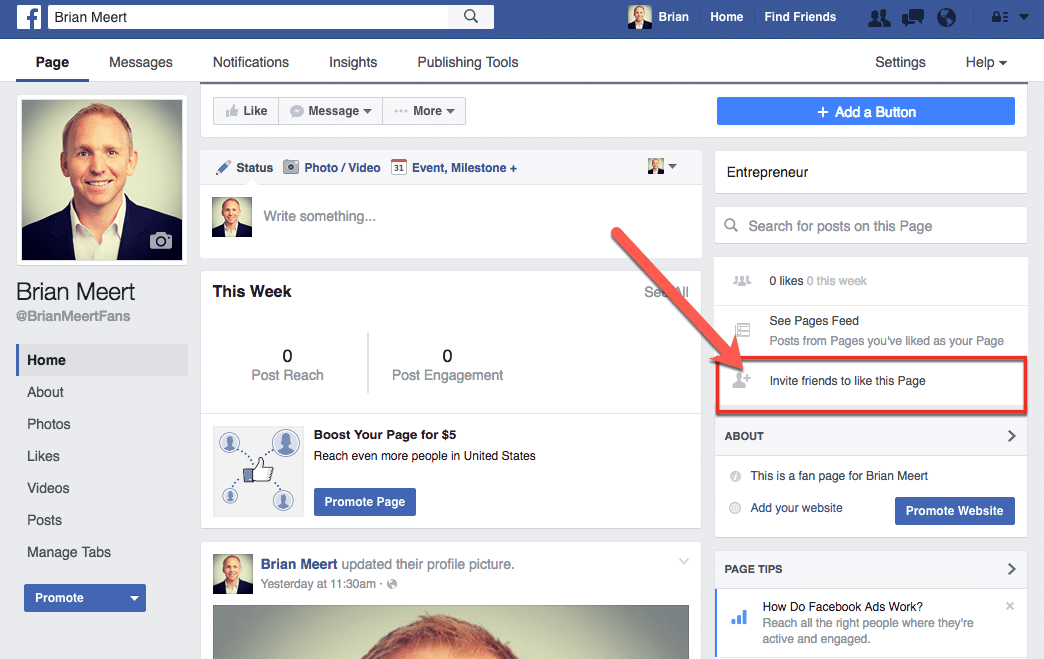
- At the top of your Facebook news feed or profile page, click the Photo/Video option below "Create Post". If you are on your business page, click the Upload Photos/Video option.
- Select the photos you want to upload and click Open.
- Tag people, if desired, by hovering over the photo, selecting Tag and then typing their names. The photo appears on their news feed and appears to their friends or only your mutual friends, depending on the privacy preferences you each selected.
- Edit the photo, if desired, by hovering over the photo and clicking the Edit button.
- Click the Story option if you want to check in at a specific location.
- Choose your audience and click Share. Select Public if you want anyone to see the photo. Otherwise, you can select Friends or specific people to see the photo or select people who cannot see the photo. Note that whatever audience you choose, it becomes the default setting for the next time you upload a photo.
If you have the Facebook app on your smartphone, you can also add photos directly from the phone's photo gallery.
Editing Photos on Facebook
Before uploading a photo, Facebook gives you the option to edit it. You can do this by hovering over the photo and selecting Edit before you click the Share button. When the Edit window opens, you have several options:
- Filters: These change the mood of your photo. The Vintage filter, for example, fades the color, while the Winter filter cools the image with a blue hue.
- Tag: By clicking on faces in the photo, you can add names. To tag someone, they must have a Facebook account. People can disable being tagged by changing their personal security settings.
- Crop: Crop the photo, either in its original aspect ratio or in a square. You can also rotate the photo.
- Text: Add text to appear on top of your photo. You can select the color and font, as well as specify if it is centered or left-justified.

- Alt Text: Add text to describe the photo for people with visual impairments. The default alt text is also displayed here.
- Stickers: Place an assortment of stickers on the photo. You can also move and re-size the stickers.
Creating and Using Facebook Albums
Facebook albums are the best way to organize photos, particularly if you want to restrict who can see sets of photos. Both photos and videos can be added to albums.
- Go to your Facebook profile, click Photos and then click Create Album.
- Select at least one photo or video to begin the album and select Open.
- Enter a title for the album and, if desired, add a description or location. If you want to allow others to post images in the album, select Add Contributors. You can also tag friends in the album.
- Select your Privacy preference and click Post.

Whenever you want to add a new picture to the album or edit its contents, go to your Photos and select the album.
Controlling Photo Quality
At its default settings, Facebook automatically resizes and reduces the quality of photos when you upload them. You can keep this from happening if you upload pictures that are already optimized for Facebook.
All photos should be saved as JPEG files, using an sRGB color profile. Cover photos should be 851 pixels wide and 315 pixels tall, with a file size less than 100KB. All other photos should be 720 pixels, 960 pixels or 2048 pixels wide.
References
- Facebook Help Center: How Do I Share Photos on Facebook?
- Facebook Help Center: Manage Albums
- Facebook Help Center: How Can I Make Sure That My Photos Display in the Highest Possible Quality?
Warnings
- You need a Facebook account to upload pictures to Facebook.

Writer Bio
A published author and professional speaker, David Weedmark has advised businesses on technology, media and marketing for more than 20 years. He has taught computer science at Algonquin College, has started three successful businesses, and has written hundreds of articles for newspapers and magazines and online publications including About.com, Re/Max and American Express.
Key Steps to Post Pictures on Facebook
Key Steps to Post Pictures on Facebook - INKIn this article, we’ve put together some easy-to-follow steps on how to post a picture on Facebook. Facebook has made sharing photos from your mobile device, computer, or camera easier and faster.
As with all things on the Internet, there are numerous ways to accomplish Facebook-related tasks. That includes the various methods you could use to upload pictures for Facebook fame or fun.
Let’s dive into the specifics of posting pictures on Facebook from your browser or mobile app.
How to Post a Picture on Facebook?
Whether it is a photo, drawing, or video, there are two ways to post something on Facebook. You could use your computer browser or mobile phone to upload your photos with friends and family on Facebook.
Whether you want to add photos from your phone, tablet, or computer, here’s how to post a picture on Facebook.
Upload Photos on Facebook Using the Mobile App
- Open the Facebook App on your phone. If you’re already logged into your Facebook account, then it will take you to the Facebook News Feed.
- Go to the page or profile where you want to post the picture(s). Stay on the newsfeed if you want to post a picture in your own profile. To post a photo on a friend’s timeline, look for their name on the search bar.
- Tap Photo on iPhone and Photo/Video on Android. First, tap on the ‘What’s on your mind?‘ status box, then hit Photo/Video.
 To add a photo to your Facebook profile, just tap Photo below the Status box. If you want to post to a friend’s profile, you’ll have to tap Share Photo.
 - Choose pictures to upload. Tap every image you want to upload to pick them all at once.
- Tap Done on the upper right-hand corner. A draft for your attached photos will be created.
- Then, edit your post draft. The “Say something about this photo” box allows you to add text to the post. You may also upload more photos by tapping the green landscape icon, then selecting Photo/Video.
- Tap Post in the upper right corner. It will create a Facebook post along with the attached photos.
Upload Photos on Facebook Using a Computer
- Go to Facebook’s official website fromyour browser’s URL bar. If you’re not already logged into your account, then enter your email and password to sign in.

- Then select Photo/Video. This option is directly beneath the ‘What’s on your mind’ status box at the top of the page. It will then open a pop-up window to upload photos.
- Choose pictures to upload. Hold Ctrl(or Command on a Mac) and click on each of the pictures to select multiple images at once.
- Click Open or Hit Enter. It will create a draft of your post with the uploaded photos.
- Then, edit your post. Click on Add More Photos to upload more photos or write something on the ‘Say something about this photo’ box.
- Click Post in the bottom right corner of the post window. It will then upload your photos to your selected profile or page.
Conclusion
Uploading a photo on Facebook is fairly easy, and the steps are not exhaustive.
Whether you want to post a picture on Facebook from your computer or mobile, the steps outlined in this article will guide you through. Once you try out the steps yourself, the whole process won’t even take more than a few minutes to complete.
Abir is a data analyst and researcher. Among her interests are artificial intelligence, machine learning, and natural language processing. As a humanitarian and educator, she actively supports women in tech and promotes diversity.
Page 1 of 2712345...101520...»Last »
How to add photos to Facebook without posting them
Home » Guides
How to add photos to Facebook without publishing them November 15, 2021 June 3, 2021 by Alex
Over the years, sharing photos on Facebook has become almost like adding to a digital photo album for many. When you post a new photo on Facebook, it's usually posted to your timeline, so what if you want to add photos without posting them? nine0003
Fortunately, Facebook allows you to post photos that only you can see. you. You can even create a personal photo album for your personal photos.
Content
- How to add photos to Facebook without posting them
- Computer
- Desktop
- Creating a personal Facebook album
- Mobile phone
- How to add photos to Facebook
0027
To add photos to Facebook without posting them, you just need to change the audience to Me Only when posting them.
If the audience is set to Just Me , the images will be uploaded to your profile but will not appear on any of your friend's timelines. In addition, no one who views the photos on your profile can see them.
Mobile devices
- Open the Facebook mobile app and sign in to your account. nine0002li >
- Tap the "Photo" icon to the right of "What are you thinking about?". status bar.
- Select the photo or photos you want to upload and click Next.
- Click the Audience drop-down menu (with the globe to the left of it) under the name and change it to Just me.
 Touch the back arrow after changing the setting. Make sure it's saved!
 - Optionally, use the Album drop-down list to select the album to which you want to add the photo. nine0014
- Click "Publish" in the top right corner.
Desktop
- Open Facebook.com in any web browser and sign in to your account.
- Click the Photo/Video button below the What's on your mind status bar.
- Select the photo or photos you want to upload.
- Click on the Audience dropdown (with a globe to the left of it) under your name and change it to Just me.
- Click the Publish button.
You can move a photo to an album on the Photos tab of your Facebook profile. Just find the photo you want to move, click the pencil icon in the top right corner of the photo, and choose Move to Another Album.
Create a private Facebook album
If you find yourself adding photos that you don't want to share often, you might consider creating a private Facebook album.
 In a private photo album, anything you add to the album will always be visible only to you. nine0003
 Mobile phone
- Open the Facebook mobile app and log in to your account.
- Go to your profile and click Photos below the status bar. Now click on the "Albums" tab and then on the "Create Album" button.
- Name your album and click "Create" in the top right corner.
Computer
- Open Facebook.com in a web browser and sign in to your account. nine0013 Go to your Facebook profile and click on the "Photos" tab. Now in your photos, click on "Albums" and then click on the "Create Album" button on the far left.
- Click the "Audience" button in the top left corner (with a globe to the left of it) and change it to Only me.
- Name your album, then click the Publish button at the bottom.
0 545 views nine0003
Did you like the article? Share with friends:
How to upload multiple photos to your Facebook feed at the same time
Useful apps » Facebook
Updated: 05/28/2020, author - Ilya
Ilya is the editor-in-chief of the site softdroid. net. He is the author of several hundred guides and articles on Android setup. For about 15 years he has been repairing equipment and solving technical problems for iOS and Android. I dealt with almost all more or less popular brands of mobile smartphones and tablets Samsung, HTC, Xiaomi, etc. I use iPhone 12 and Samsung Galaxy S21 with the latest firmware version for testing. nine0003
Information about the author
It seems like a simple task to upload a few photos to Facebook. But if this needs to be done for a single status update, things get more complicated. This can be done, and in two ways - through the creation of a photo album or without it. We will look at how to do this through a browser on a PC or through the Facebook mobile application.
Using the Chrome web browser to post photos to Facebook
Any modern browser installed on your system will work, be it Chrome, Opera or Firefox (if Facebook opens correctly, then this browser can be used for posting). nine0003
- Click on the "Photo / Video" button in the "Create Post" field before or after entering the status, but before clicking on the "Publish" button.
- Navigate to the correct folder on your computer.
- Select images / photos. To select multiple files, hold down the "Shift" or "Ctrl" key on the PC. Make sure all required images are selected.
- Click on the “Open” button.
- After you click on the Open button, a Facebook status update window will appear with thumbnails of the selected images. nine0014
- If necessary, write a message in the "Create Post" window if you want to comment on the published photos in some way.
- To add more photos to the message, click on the square k with a plus sign.
- Hover your mouse over the thumbnail to delete or edit the photo before posting.
- Other options are also available: tag friends, add stickers, and more. Use them as needed
- When the publication is ready, click the Submit button.
 nine0014
Note . Only 5 images will be displayed in your friends' newsfeed. Users will see a number with a plus sign indicating that there are additional photos to view.
Creating an album with images
There is another way to publish a series of images in the Facebook feed - through the creation of albums. In short, you create an empty album, add photos to it, then a link to the album appears on your public timeline. Through it, your subscribers will be able to access the content of the album - all published photos. nine0003
So, in order to create an album in Facrbook and publish a link to it:
- Go to the main page in your account by clicking on the Facebook logo.
- Go to the Photos section at the top of the page.
- Click on the "Create Album" button.
- A file selection dialog opens. Using the Ctrl or Shift keys, select the images you want to place in the photo album.
- Make sure all items are selected.
 Click on the "Open" button. nine0014
 - On the screen with image thumbnails, you can use additional options - specify geotags and fill in a description.
- If necessary, you can upload a few more photos to the album by clicking on the square icon with a plus sign.
- Publish the album by clicking the Publish button.
- A link to your photo album will appear on your profile timeline.
- If you want to hide a post, use the Hide from timeline option in the album menu by clicking on the button with three dots. nine0070
Sharing a photo album on Facebook via mobile application
If you use mobile applications to browse social networks, you can share a series of photos with your friends via Facebook. This method is no less convenient than those described above. And for iOS and Android, the method is no different.
To post some photos to Facebook:
- Open the Facebook mobile app on your device
- Go to the main profile page and click on the Photo link.
 nine0070
 - Click the Create New Album button.
- In the dialog that opens, select the photos you want to publish.
- After that, click on the Done button and check out the thumbnails in the preview window.
- If necessary, add a description and geotags to the photo.
- Name the album, add a + sign if you want to add more images.
- Check the data and click the Publish button. nine0070
- A link to the photos will appear on your profile timeline and, accordingly, your followers and friends on the update page.
Please rate the article:
Ilya is the editor-in-chief of the site softdroid.net. He is the author of several hundred guides and articles on Android setup. For about 15 years he has been repairing equipment and solving technical problems for iOS and Android. I dealt with almost all more or less popular brands of mobile smartphones and tablets Samsung, HTC, Xiaomi, etc. I use iPhone 12 and Samsung Galaxy S21 with the latest firmware version for testing.