When you click a link on Instagram, it opens inside the app’s built-in web browser. It is a convenient feature that allows you to check out links without having to open your main browser.
The downside is this session is not stored in your main browser’s history. If you needed to revisit the link or share it with others, you wouldn’t find it on your regular browser.
Thankfully, Instagram’s in-built browser stores your browsing history, and you can view all the links you’ve opened.
Here is a step-by-step guide on how to view Instagram browser history on Android and iOS devices.
Note: This solution does not work on the Instagram web app.
Also Read: Top Marketers To Follow On Instagram
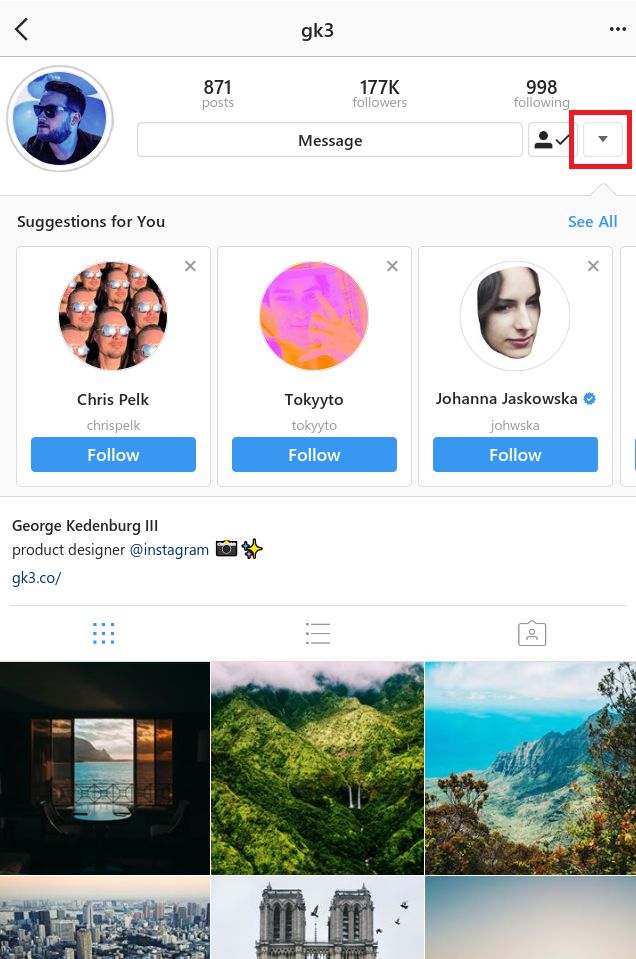
Open the Instagram app on your iPhone or Android device and tap the display profile picture in the bottom-right corner.
Next, tap the hamburger menu icon (three-line button) in the top-right corner. You should see a list of options that include Archive, Your Activity, and QR Code.
Tap “Your Activity.”
STEP 2 – View the Links You’ve OpenedTapping Your Activity takes you directly to the “Links” tab.
Here, you will find every single link you’ve clicked on Instagram. It is in reverse chronological order, i.e., the most recent link first.
Each entry contains the website’s name, the URL, and the last time you opened it.
The link tab should contain every link you’ve ever opened on Instagram.
Unfortunately, there is no search button here. To find a specific link, you have to scroll down the list until you find it.
However, there is no concrete information on how far back the history goes. Instagram stores the data for a similar feature for six months, but there are no specifics for saved links.
To revisit any link, tab the link to reopen the web page in Instagram’s in-app browser.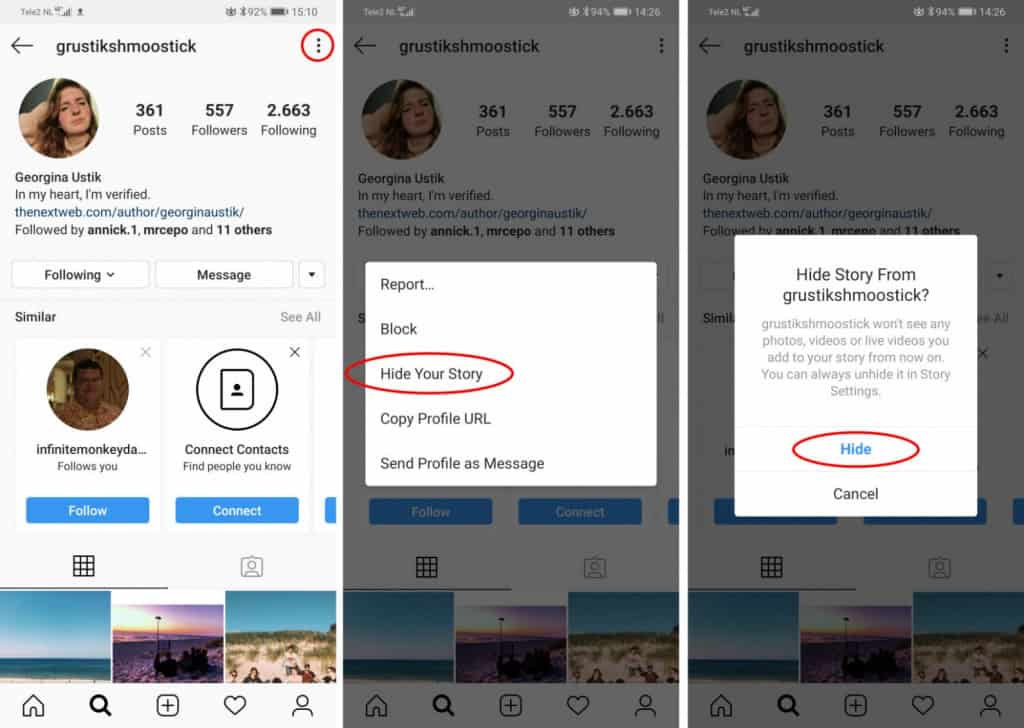 When you do, the link becomes the most recent and goes to the top of your links list.
If you wish to open the link in your main browser, you must first open the link, then tap the kebab menu (three-dots icon) and select “Copy Link.”
Explore: Best Artist Bio Examples For Instagram
The second tab is the “Time” tab. It tells you how much time you’ve spent mindlessly scrolling Instagram. I strongly advise you not to open this. The result might shock you.
That’s it. You now know how to view your Instagram browser history.
Having found it, what if you wanted to clear it?
Technically, you can’t.
Yes, you can hide it from your profile and keep your browsing history hidden from snooping eyes, but Instagram still keeps it on their servers.
Instagram and Meta’s group of social apps (Facebook, WhatsApp) can still use your history to show you personalized ads and relevant content.
Now that you understand how it works, this is how to “delete” your Instagram browser history.
Check Out: Best Instadp Alternatives
To ‘Delete’ Individual Links – Long Press on Each Link and Select HideOn Android, long-press on the link you want to delete. You will get a pop-up message explaining how the hide feature works.
Select “Hide.”
For iOS users, swipe left on the link and tap “Hide.” The message will show up. Then tap Hide again.
Remember, the link will permanently disappear from this list. Make sure that’s what you want because you won’t see it again unless you visit the same link from another part of Instagram.
To ‘Delete’ Entire Link History – Tap’ Hide History’Want everything gone? Again, don’t forget that you can’t unhide the links. Once you do this, only Instagram can see the data, and it is permanently hidden from your view.
If you’re sure it is what you want, tap the ‘Hide History’ option at the top of the list.
Then, tap ‘Hide’ again in the pop-up message that appears.
This will clear the entire list, and your entire Instagram browser history will be removed. A fresh list will start when you visit another webpage within Instagram.
As mentioned earlier, hiding your browsing history doesn’t erase your browsing data from Instagram. Thus, you will still see posts from web pages you visited on the ‘Your Activity’ page.
This is because of something called cache. Every device temporarily stores some data. This data increases how quickly an app or website opens on your phone.
Plus, it helps reduce the amount of data consumed when using your device. In other words, Instagram stores cache to ensure you get served relevant content based on your previous searches.
But this is not always a good thing. Asides from wanting to keep your secrets, the bigger the cache, the slower the app. So it can be beneficial to your phone’s performance to delete it.
To enjoy either benefit, you have to delete the cookies and cache from the Instagram browser.![]() Here’s how.
Here’s how.
Also Read: Finsta Meaning & How Do You Use One?
How to Clear Instagram CacheTap the hamburger menu again on your profile page and choose ‘Settings.’
Then select ‘Account’ and tap ‘Browser Settings’
Finally, tap the blue ‘Clear’ button besides Browsing Data to remove cookies and cache from the websites you’ve visited via Instagram.
That said, while this action is irreversible within this page, you can still find the hidden links by downloading a copy of your Instagram data.
Here’s a quick breakdown of how to access it.
How to Download a Copy of your Instagram Browsing DataWhether you are cleaning house because you are leaving Instagram for good or finding links you mistakenly deleted, downloading your data is always a useful move.
Plus, the more you use Instagram, or any social network for that matter, the more information they collect on you.
Not only can you see your browsing data, but you can also see additional information like: bio text history, login and logout history, hashtags you follow, your ad interests, and many more.
You can download this data via the mobile app or through the website. Since we’ve been talking about the mobile app, let’s start with that.
To do the same thing through the website, visit the Instagram website and log in to your account. Then:
 Then click ‘Next’
That’s it. You should receive an email with your Instagram data within 48 hours.
So far, we’ve discussed how to view and delete your Instagram browser history. But much of the snooping you don’t want people to see occurs in your search history.
Even if you delete your browsing history, without clearing your search history, someone could still check your phone and see the profiles you’ve been stalking in the search bar.
The absolute horror.
Thankfully, there is a way to hide your shame and destroy the evidence.
Here’s how to view and clear your Instagram search history in a few steps via the app and website.
Also Read: Best StoriesIG Alternatives
Just like viewing your browser history, everything starts on your profile page.
First, hit your profile icon, then tap the hamburger menu (three clustered dashes) in the right-hand corner.
STEP 2 – Find Settings and open the Security tabTapping that menu button will open a list with options like Archive, Your Activity, Close Friends, and Settings.
Tap’ Settings.’
Another list of options will appear. Find and tap ‘Security.’
STEP 3 – Clear your Instagram search historyUnder ‘Security,’ there are multiple options under two categories: Login Security and Data and History.
Under Data and History, tap ‘Clear Search History.’
This will open all your recent searches. You can scroll through the entire list to see every profile you’ve searched for in the past.
Also Read: Best LinkTree Alternatives
To clear the entire list, tap ‘Clear All’ in the right-hand corner.
If the idea of an empty search history feels a bit suspicious, Instagram allows you to remove individual profiles.
That way, you can remove the searches you do not want others to see.
To do this, scroll to the profile you want to remove and tap the ‘x’ next to their Instagram handle.
You’re done. This process works for iOS and Android devices.
The above method is straightforward, but the Search tool on the app is shorter if the account data route is too long for you.
All you have to do is press the Explore button (magnifying glass icon) at the bottom of the app to open the search page.
There is a’ Recent’ section at the bottom of the search tool with all your latest searches.
Hit the ‘x’ button next to each handle to remove individual profiles.
If your search history is long and you want to remove the entire history, tap the ‘See All’ button.
Then select ‘Clear All’ in the main search history page to remove all your searches.
Also Read: Best Free Social Media Analytics Templates To Download
This feature is especially handy when you have a few seconds to delete the profiles before someone can see your search history.
Maybe you occasionally use an official account for your Instagram sleuthing. Or you prefer using Instagram on a computer, clearing your Instagram search history is not that different from the app.
First, click your profile icon in the upper-right corner, and select ‘Settings.’
Then, click Privacy and Security in the left sidebar and scroll to Account Data. Next, click ‘View Account Data.’
Inside Account Data and under ‘Account Activity,’ click ‘View All’ under Search history.
Voila! You will find all searches for accounts, locations, and hashtags.
You should note that you can’t delete individual searches via desktop, but you can remove them all at once.
Simply click the blue ‘Clear Search History’ at the top of the page, then ‘Clear All’ on the pop-up message to complete the process.
Also Read: Best TikTok Alternatives
That’s how to clear your Instagram search history on a desktop.
You should also know clearing your search history is not a one-and-done. Suppose you search for the same accounts, hashtags, or locations again. In that case, they will reappear in your history, and you will have to go over the same process to delete them again.
Deleting browser and search history are only two of several ways you can make your Instagram use private.
There are additional ways, such as making your entire account private, hiding your online status, and stopping specific people from viewing your stories.
Sound like something you are interested in? Here is how to implement each of them.
How to Make Your Instagram Account PrivateNot everyone wants the social part of social networks. Some people prefer to keep to themselves and only want interaction from people they want.
Or, if you want to lurk but don’t want others to do the same to you, turning your account private will keep your posts secret.
To make your Instagram account private, go to your profile page and select the three-centered lines icon (hamburger menu).
Next, select ‘Settings’ and tap ‘Privacy.’
Finally, toggle on ‘Private Account’ and tap ‘Switch to Private’ in the pop-up message.
Once it’s on, users have to request to follow you, and only those you approve of can see your posts.
Plus, you can review your followers and remove followers whom you don’t want to see your posts.
Also Read: Best TweetDeck Alternatives
How to Hide Your Activity Status on InstagramSuppose you want to browse Instagram without alerting anyone to your activities or want to browse without being disturbed. In that case, you can hide your online status.
It essentially works as an incognito mode for Instagram, keeping you hidden while doing what you need to do.
To set it up, open Instagram and go to your profile page. Then select the menu icon at the upper-right corner and tap Settings.
Under ‘Settings,’ choose ‘Privacy from the options and select ‘Activity Status. ’
’
The Show Activity Status is on by default. Toggle it off by pressing the blue button.
Your activity status doesn’t just hide your activities; you also won’t see the activity status of other users.
There is also no timer. If you want to view others’ status or want to show up online again, toggle the Activity Status back on.
Check Out: Best Twitter Alternatives
How to Stop Specific People from Viewing your StoriesSay you don’t want to go private but want to keep certain people from seeing your Stories. You can also filter them out.
You don’t have to unfollow them, stop them from following you, or block them. By applying a filter within Stories, you can control who gets to see your posts.
To do this, tap your profile icon and hit the menu button.
Then tap on ‘Settings’ and select Privacy from the options. Next, choose ‘Story’ under Interactions.
Look for ‘Hide Story’ and tap ‘People’, then select the accounts you want to hide your Stories from.
That seals it. The selected accounts will no longer be able to see your Stories.
You can replicate the same thing with comments on your posts. Within Privacy, tap Comments.
Then search for the accounts you want to block from commenting and select ‘Block.’
Alternatively, you could block users from your account entirely. They won’t see your Stories or comment on your posts.
You can use this option to prevent someone from accessing your account without going private. Or keep out uncomfortable interactions.
To do this, within Privacy, tap ‘Blocked accounts’ and hit ‘Block’ in front of the usernames you want to block.
Explore: Best Facebook Alternatives
Their interactions before the block will still be on your page unless you manually delete them. But after the block, they can no longer comment or view future posts.
Can you delete Instagram browser history on desktop?Unfortunately, you can’t delete your Instagram browser history via a computer. You can only do it via the mobile app.
Instagram hasn’t given an official reason why. Still, a good guess is that the Instagram web version does not have an in-built browser.
Can I see a history of the profiles I’ve clicked on Instagram?No, you can’t. While Instagram might have access to the data, there is no public-facing feature that allows you to see recent accounts you’ve viewed.
The only thing you can do so far is to view your search history via the Explore page or Account Data in Settings.
Also Read: Best Sites Like Behance
Your Instagram account is yours, and your secrets should only be between you and Instagram.
Now that you know how to view and delete your Instagram browser and search history, you can control who sees what and maintain your dignity.
If you want tighter control over who has access to your activities and account, use any of the Comment, Stories Block, and Account Privacy features.
I know setting this up for the first time might seem confusing and exhausting, but once you figure it out, you will become the master over your Instagram.
Cassie Riley
Cassie Riley has a passion for all things marketing and social media. She is a wife, mother, and entrepreneur. In her spare time, she enjoys traveling, language, music, writing, and unicorns. Cassie is a lifetime learner, and loves to spend time attending classes, webinars, and summits.
Whenever you click a link on Instagram, it opens it using the app’s built-in browser. This might appear to be a convenient feature that permits you to visit other websites without leaving the app environment.
The drawback to this present feature is that anytime you need to revisit the link, you cannot find it on your regular browser, which may turn out to be frustrating for new and inexperienced users.
This article will cover steps and procedures for how you can locate your Instagram’s in-built browsing history, ways you can manage them, and guide you on how you can download your data if required.
Table of Contents
Follow these steps to view your Instagram browsing history:

To revisit any of the sites, tap on the link, and the in-built browser should take you to the respective website. If perhaps you decide to open up the link using your default browser, you can do so by tapping on the three-dot icon and selecting the “Open in browser” option.
Here are a few procedures you can follow to clear your browsing history on Instagram’s built-in browser:
 Go ahead and select “Hide.”
You should always remember that whenever you delete a link, it permanently removes it from your in-built browser’s history, although Instagram can always view and use your data. Technically, the link only becomes hidden from you, so be sure that’s what you want before deleting it.
How To Download Your Instagram HistoryWhether you decide it’s time to say bye to Instagram or feel you should have a backup of your account, downloading your Instagram data can always prove to be helpful.
The more time you spend on Instagram, the more information they collect and accumulate on you. You can view things like your browsing history in the downloaded data. You can also see other helpful information like your login history, bio-history, shared photos, videos, etc.

If you change your mind, you can always go back to cancel the request before it gets delivered to your email by clicking the cancel download button. Within the next 48 hours, you should receive a message entitled “Your Instagram information” on your email. Open the message and press the “Download information” button to begin your download.
On PC ”
”Conclusion
Your Instagram account is yours; therefore, your secrets should only be between you and Instagram. You can control the information people see about you and maintain your dignity.
Now that you know how to manage your history on Instagram, you have ultimate control over your account.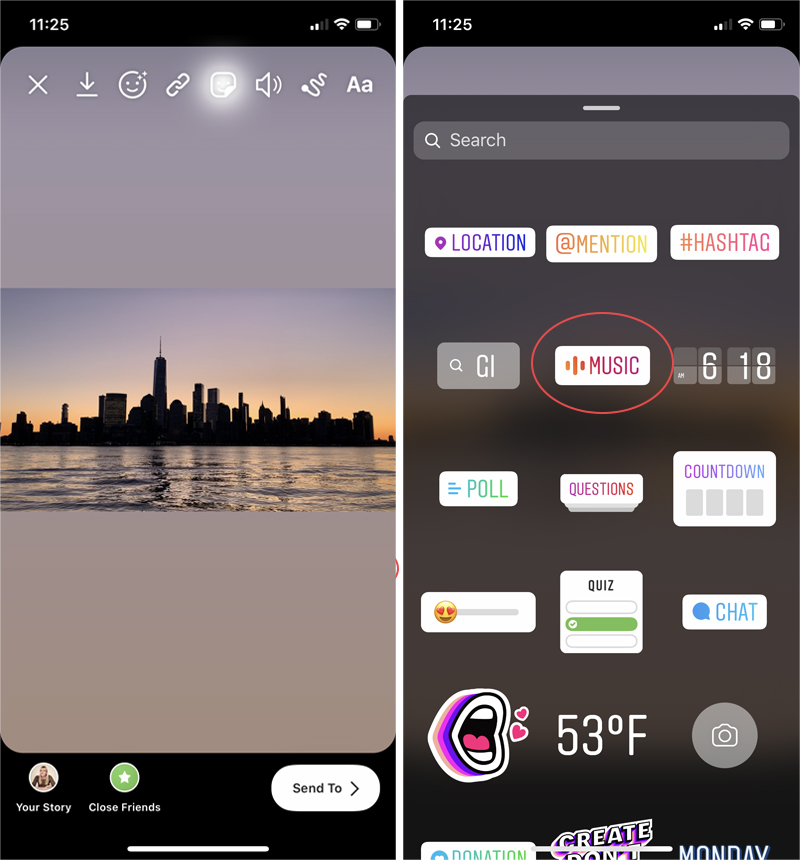 Go ahead to review comments and post likes, view recently deleted photos and videos, see how much time you spend on Instagram daily, and so much more.
Unless they have access to your password, no one can view your history on Instagram or watch what you do and who you chat with.
Unfortunately, you can’t delete your Instagram browser history from a Desktop browser. It can only be done using the mobile app. Instagram hasn’t given an official reason why. A good guess should be the fact that the Instagram web version does not have an in-built browser.
Yes, it is possible to recover deleted photos, videos, and stories. Simply navigate to your activity in the menu and select recently deleted. You can now view and manage your deleted files.
Instagram account search history is located in the profile settings. Let's look at how you can view your Instagram search history after updating the app. And where is the function that displays the history of the instagram account now.
Few people know, but you can easily see your search history by yourself in the search for your account . As if, a tautology and trite, but it's true. Your entire history by words, tags, key queries - is saved directly in the search for the application .
Let's see what it looks like visually. Given that? that you were definitely looking for options - how to view your search history on Instagram.
Opposite the inscription - recent , you can find active field (link) " all ". If you click on this field, you will see application page - " recent searches" , and next to there will be an inscription , " Clear all ". This is deleting your history , we told her detailed instructions - “ How to clear (delete) your search history on instagram ”.
This is a longer and more complicated method, but yes! You can view your search history in the delete search history tab on Instagram. At the same time, you can immediately clean it, if necessary.
On the page clear search history » you will be able to see all searches that have been searched recently. This page is called at the top of the screen - " recent searches " next to it there will be an active field " clear history" .
Thus, you can view your search history on Instagram, and optionally clear it or go back.
Stories are publications that have a limited broadcast period of only 24 hours in the feed, after which they are not deleted, but sent to the Instagram stories archive. In the article we will tell you how the service works, where to find and how to view the archive. nine0003
Publications in the stories feed have a limited broadcast period, after a day they do not disappear from view, but are moved to the archive list, provided that automatic saving of stories is activated.
The archive stores all the stories you published from the moment you registered on the social network. This important feature will prevent you from losing colorful content that is very dear to you. It will be very unpleasant if a high-quality and beautiful photo or video is deleted forever. nine0003
Keep in mind that the vault will contain only those publications that have been in the main feed for more than 24 hours. If you erased the content before the end of this period, then the history will not be saved.
Where is the archive list? Backup files can be found at any time, they are in the public domain, but only for the owner of the page in the service. Unauthorized persons will not be able to view stories. To go to the archive you will need:

Please note that on different operating systems and smartphones, the location of the main elements may differ.
Each story after the end of 24 hours and the end of the broadcast in the feed will be automatically saved to the storage.
As for all other publications, photos and videos that are not placed in the story feed, you will have to add them to storage yourself. After all, the automatic archiving function only applies to short recordings. Let's take a quick look at how to add history to the archive list:
A similar algorithm must be performed with each publication that you want to save.
If you want to archive material on Instagram through a computer, you will have to face a number of difficulties. In the web version of the social network, there is no such function and it is impossible to access the vault. The official application for Windows solves the problem, starting from version 8 of the operating system, but in this case, only publications are displayed in the archive, but no stories. To add stories to the archive from a PC, you need:

Note. To have access to all the functionality on a PC, you can use the mobile version of Instagram by downloading an Android emulator or installing additional browser extensions. nine0003
In the archive, you can set up the desired publication at any time, edit it and re-place it in the news feed. In this case, the entry will be displayed with a memory mark, which can be erased using standard social network tools. If you decide to delete Instagram stories from storage, then follow these steps:

The procedure is the same for the PC application. Thus, you can erase from the archive not only stories from the tape, but also all saved photos and videos. It should be remembered that after this it will no longer be possible to restore the content, so think carefully before proceeding with actions. nine0003
It's important to remember that your mobile device and app may have the automatic storage feature disabled. In this case, you need to activate it: