You’ve got to give Instagram credit for staying the course. They have always been dedicated to being an app exclusively for mobile devices. Photographers who shoot with cameras have always been at a disadvantage — having to use an array of workarounds to edit photos on their computers before sharing them to a mobile device.
One of those workarounds involves sharing your photos to Instagram from your Mac. Unfortunately, it’s not as straightforward as using the mobile app, but once you get the steps down, it almost becomes second nature.
There is not an Instagram app for posting photos to Instagram from your Mac. You can, however, go to Instagram.com on any computer and log in to your account to view and comment on photos. Uploading photos is another story altogether.
Depending on which browser you use on your Mac, the technique for uploading photos to Instagram will be slightly different. In this article, we’ll provide instructions for using the two most popular Mac browsers: Safari and Google Chrome.
If Safari is your browser of choice, you can use it to upload a photo to Instagram using developer tools, which will allow you to view Instagram exactly as if you were using the mobile app on your phone:
If you’re using the Chrome browser with your Mac, there’s an equally easy way to upload your photos to Instagram on your computer:
Using Developer Tools in Chrome and the Develop menu in Safari is relatively straightforward, but it does require a few extra steps. If you want to set something up that you can use over and over again without any hassle, consider using a third-party app for Instagram.
Two Instagram posting apps stand out for their ease of use and beautiful interface — Flume and PhotoDesk. Here’s how to post to Instagram using both of them.
Flume makes it possible to navigate Instagram from your Mac and includes the ability to like and comment on photos, follow and unfollow accounts, and direct message accounts. In order to use the upload feature, you will have to purchase the premium version of the app.
Here’s how to use Flume to upload a post to Instagram from your Mac:

PhotoDesk is another feature-packed app that is perfect for doing all of your Instagram tasks from the comfort of your Mac. It even provides detailed statistics so you can see how your posts are doing within the app. You can start by accessing a free trial, but after that, you’ll have to purchase the premium version.
Here’s how to upload to Instagram using PhotoDesk.
Whether you choose to upload photos to Instagram using your browser or a third-party app will depend on the features you want to use. If you’re using a browser, you will have limited functionality and won’t be able to post videos or gallery posts. Using one of the apps mentioned above will give you more features, but, of course, you’ll have to pay for them. While neither method is perfect, they’ll have to do until Instagram adds the ability to upload from its web browser or develops an app just for Mac users.
Travel writer. Photographer. Lover of dogs and the outdoors.
Tired of posting on Instagram from your phone? Wondering how to post on Instagram from your PC or Mac instead?
You’ve come to the right place. Posting on Instagram from your desktop can save you time and offer more flexibility in what you can upload (such as edited videos and images).
And you can do it without having to upload them onto your phone first.
Below we’ve outlined three different ways to post on Instagram from your computer.
How to post on Instagram from your computer
Method 1: How to post on Instagram from your computer using Hootsuite
Method 2: How to post on Instagram from a PC or Mac
Method 3: How to post on Instagram from your computer using Creator Studio
How to post an Instagram Story from desktop
How to post an Instagram carousel post from desktop
How to edit an Instagram post from desktop
Bonus: Download a free checklist that reveals the exact steps a fitness influencer used to grow from 0 to 600,000+ followers on Instagram with no budget and no expensive gear.
Below, you’ll find ways to post on Instagram from your PC or Mac. We’ll also show you how to post via Hootsuite which works on either operating system.
If you’re more of a visual learner, watch this video from our pals at Hootsuite Labs to see how easy it can be:
You can schedule feed posts, Stories, carousel posts, and Instagram ads with Hootsuite.
The instructions below will walk you through the process of posting to your Instagram feed. We cover Instagram Stories and carousels a little further down in this article.
To post on Instagram from a PC or Mac using Hootsuite, follow these steps:
 Alternatively, you can also Schedule for later if you want it to post at a different time.
 For a quick summary of how to post on Instagram from Hootsuite, watch this video:
Voila! Posting photos and videos to Instagram from PC or Mac is that easy.
Method 2: How to post on Instagram from a PC or MacAs of October 2021, all Instagram users can create and publish feed posts from the browser version of the app.
To post on Instagram from your desktop computer (PC or Mac), follow these simple steps:
 A Create new post window will pop up.
And that’s it!
At the moment, only feed posts can be created and published directly from Instagram on desktop. Keep reading to find out how to post Instagram Stories from a PC or Mac computer.
If Instagram is your social network of choice and you don’t mind not having all your social networks in one dashboard, Creator Studio could be a good option for you.
Note that when using Creator Studio, you can post and schedule all types of posts other than Instagram Stories.
How to post on Instagram using Creator Studio:

You can post an Instagram Story from your computer using a third-party social media management tool like Hootsuite. Just follow the steps outlined in this short video:
Or, read our step-by-step article on how to post an Instagram Story from your computer.
If you don’t have Hootsuite, you can post an Instagram Story from your PC or Mac through the following steps:
You’re done! It’s practically the same steps as if you were using the Instagram app on a mobile device.
#1 Social Media Tool
Create. Schedule. Publish. Engage. Measure. Win.
Start free 30-day trial
With Hootsuite, you can also create and easily publish carousel posts (with up to 10 images or videos) directly to Instagram. Here’s how.
1. Go to Planner and tap New post to launch Compose.
2. Select the Instagram account you want to publish to.
3. Include your caption in the Text box.
4. Go to Media and tap Select files to upload. Select all the images you want to include in your carousel. All selected images should appear under Media.
5. Use the yellow Schedule button to select a date and time to publish your post.
6. Tap Schedule. The post will show up in your Planner at the time you have scheduled it for.
That’s it! Your post will go live on the date and time you selected.
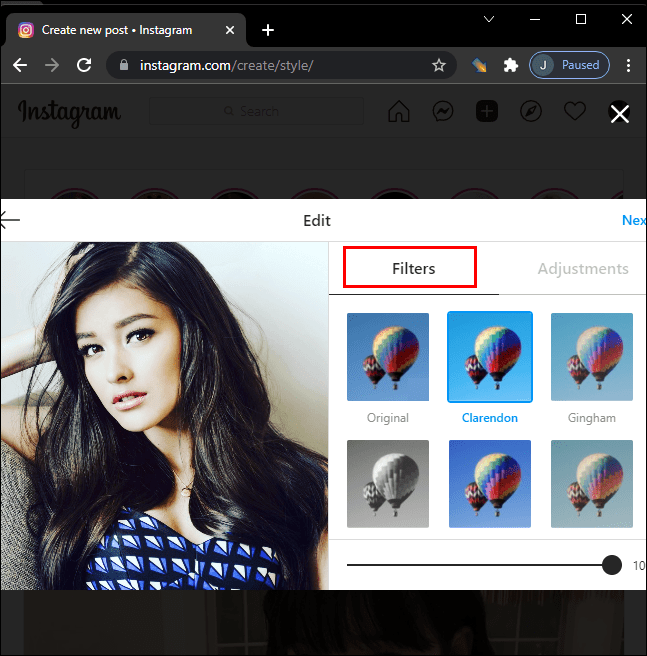
How to edit an Instagram post from desktopHootsuite Compose allows you to edit any image directly on your dashboard before you post it. Unfortunately, you won’t be able to edit the image once it’s posted.
Follow these steps to edit:
 This brings up Hootsuite Composer’s edit tool. It allows you to customize the aspect ratio of your image to fit practically any social media platform’s image metrics. From the sidebar, you also have the ability to add filters, adjust lighting and focus, add text and stickers, and use the brush too.
Voila! You just edited your image from your desktop.
Post to Instagram from your PC or Mac using Hootsuite. Save time, grow your audience, and measure your performance alongside all your other social channels. Try it free today.
Get Started
Easily publish and schedule Instagram posts from your computer with Hootsuite. Save time and get results.
Try it for Free
Now Instagram can no longer be called just a platform for uploading photos and you can see it. Instagram is a whole ecosystem with great functionality and various business tools. In this regard, one big question is brewing: is it possible to use Instagram on a computer? Upload all your photos through your Mac, share different content, all from the comfort of your desk. Today we will try to figure out whether Instagram on a computer can replace your familiar application on the iPhone. Looking ahead, I want to say that everything is very good.
Using Instagram on Mac is more convenient than you might think.
I must say right away that I use Instagram from my computer as often as I use the app on my iPhone. Can't say I have any problems with it. Everything works smoothly, podlagivanie minimum. If earlier, when I went to Instagram on Mac , I experienced pain and suffering, now everything is more than fine.
Did you know? Top 5 questions about Instagram
Years of using Instagram has shown that the most convenient way to use Instagram on a computer is through Safari. Yes, this is not the only way, but the most working one. What’s more, you don’t need to download anything.
To open Instagram on a Mac , follow the simple instructions:
Interestingly, Instagram offers to download the app from the App Store, but there is no official app for Mac.
This is what the Instagram feed looks like if you go here through a browser.
Done. Now you can use Instagram directly from your computer. I think that you will understand the interface without problems. It almost completely copies the application familiar to all of us on the iPhone.
Out of features available on Instagram on Mac , I will note the following:

There are two shortcomings that I managed to find here. The first is that in the web version of Instagram cannot post Stories. This will hardly seem like a minus to you, especially considering that stories are usually filmed at a fast pace.
Second, photos may not look as beautiful as you are used to seeing them on a smartphone. This is due to the low resolution of the photo. If it seems to you that SLR cameras have long outlived their usefulness, then here is proof that this is not so.
Literally at the end of 2021, a new feature appeared on Instagram that allows you to post photos directly from your computer. Users for some reason did not appreciate the innovation. I've been using it happily for a few months now.
To post a photo to Instagram from a Mac, you need:
This is what the video editing tools look like on the desktop version of Instagram.
In terms of functionality, there is also a complete order here. I posted a few photos on my profile and there were no problems. Use boldly.
You may ask me: why upload photos from a computer? I have a simple answer to this: after any photo session, the photographer usually uploads pictures to the cloud. From an iPhone, digging into the cloud is such a thing, which is why the desktop version is usually used for these purposes. Although many of my colleagues do not think so. Author AppleInsider.ru Alexander Bogdanov, for example, is an excellent user of Yandex.Disk and knows no grief.
Subscribe to us in Yandex.Zen, where you will find a lot of useful and interesting information from the world of Apple.
Another way to use Instagram on Mac is the Grids app. I tested it back on macOS Big Sur. It was paid in the App Store, so I downloaded it in a not the most honest way. I remember then it seemed to me very laguchy and I had to leave it until better times.
My experience with Grids has been extremely negative.
Download Grids
I recently decided to go to Grids on Monterey. Congratulations, now the application has become shareware. Anyone can download it. But I immediately warn you: the interface here is not at all the one you are used to in a smartphone.
Plus, a huge number of features are available only in the paid version:
If you are going to use the software, you should immediately buy the paid version. Otherwise, you simply won't be able to use it properly. In the comments, users note the almost complete functionality of the application on the iPhone and a lot of lags.
Instagram introduces a paid subscription for users. What does it mean?
It is difficult to recommend something from other applications. In my personal experience, they are all about the same and repeat each other. Previously If you have something in mind, be sure to write to our Telegram chat or in the comments below, I will update the post.
macOS MontereyApp Reviews for iOS and MacApple Tips
So far, Instagram developers are ignoring the launch of the official multifunctional client for macOS and Windows, with which you could edit and upload your favorite photos and videos to a well-known network, third-party developers and enthusiasts will use every opportunity to create workarounds. Today we will talk about several ways to add photos to Instagram from any computer.
| Apple in Telegram and YouTube. Subscribe! |
♥ BY TOPIC: How to unfollow a person on Instagram so that they don’t find out (so as not to offend).
Unfortunately, at the moment there is no official Instagram client for computers, but this does not mean that the service cannot be used on Windows and Mac.
♥ BY TOPIC: The most followed people on Instagram are the 35 accounts with the most followers.
In May 2017, Instagram developers launched a web version of the service at instagram.com, which allows you to view photos and videos, stories (stories), profile information, leave comments, etc. on any computer.
♥ RELATED: How to see when a user is logged into Instagram and how to turn it off.
In the case of Apple's browser, everything is quite simple. Go to Safari → Settings → Add-ons and check the box next to “ Show menu “ Development ” in menu bar ”.
♥ RELATED: How to open the Develop (Developer Console) menu in Safari on Mac and what it's for.
Next, open a new window. Select Development → User agent → Safari – iPhone and go to Instagram. com.
com.
Log into your account and click on the " + " button at the bottom of the screen.
Now you can easily upload images to Instagram directly from your computer.
♥ RELATED: Masks and effects on Instagram photos and videos: how to enable and add new ones.
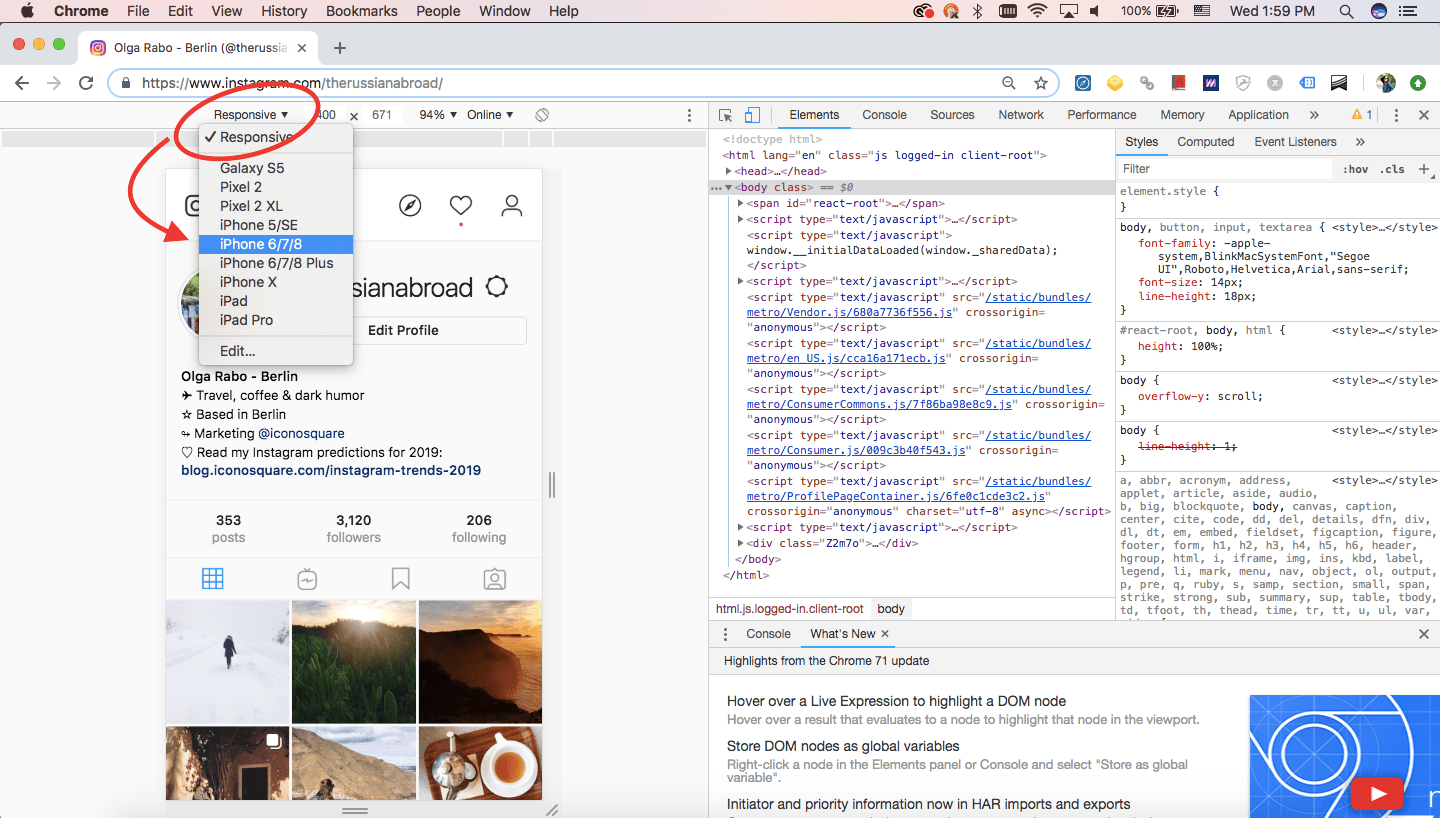
The method for Google Chrome, Yandex Browser, Opera or Firefox is identical to the above and is also based on using the mobile web version of the social network Instagram.
Click on the icon with three vertical dots in the upper right corner of Google Chrome and follow the path: Additional tools → Developer tools .
Click the icon to enable the display of web pages in the mobile version.
Reload the page and upload photos or videos to Instagram by clicking the "+" button in the bottom bar.
Click on the icon with three vertical lines in the upper right corner of Yandex Browser and follow the path: Advanced → Additional tools → Developer tools .
Click the icon to enable the display of web pages in the mobile version.
Reload the page and upload photos or videos to Instagram by clicking the "+" button in the bottom bar.
Open the menu Developer → Developer Tools.
Click the icon to enable the display of web pages in the mobile version.
Reload the page and upload photos or videos to Instagram by clicking the "+" button in the bottom bar.
Click on the icon with three vertical lines in the upper right corner of the Firefox browser and navigate to the path: Web development → Responsive design .
Select iPhone from the mobile selection menu. Reload the page and upload photos or videos to Instagram by clicking the "+" button in the bottom bar.
♥ RELATED: How to create albums from Instagram photos or videos.
♥ BY TOPIC: How to set up (enable / disable) any notifications on Instagram.
Once upon a time, a young photographer and developer found out that Instagram cannot upload photos from a computer. He got upset and decided to fix the problem. This is how the Windowed application was born, which is a web application disguised as a mobile browser that supports the interface of the mobile browser version of Instagram.
Windowed allows you to do everything on Instagram that you can do in the browser versions described earlier.
What about security? The developer assures that all important information from the user, including login and password, goes through Instagram, and he does not have access to them. Anyone who is willing (and able) can check his words at any time - the code is posted on GitHub.
Another useful feature of Windowed is support for up to five different Instagram accounts. Quick switching between them is carried out by pressing the button Profile at the top of the screen.
Helpful Hint: if your Mac does not open Windowed and says "The application cannot be opened because the developer could not be verified" or "The program cannot be opened because its author is an unidentified developer" .
follow the steps in this manual.
Free Download Windowed for Windows and Mac .
♥ RELATED: Instagram blue checkmark: how to get verified status on Instagram.
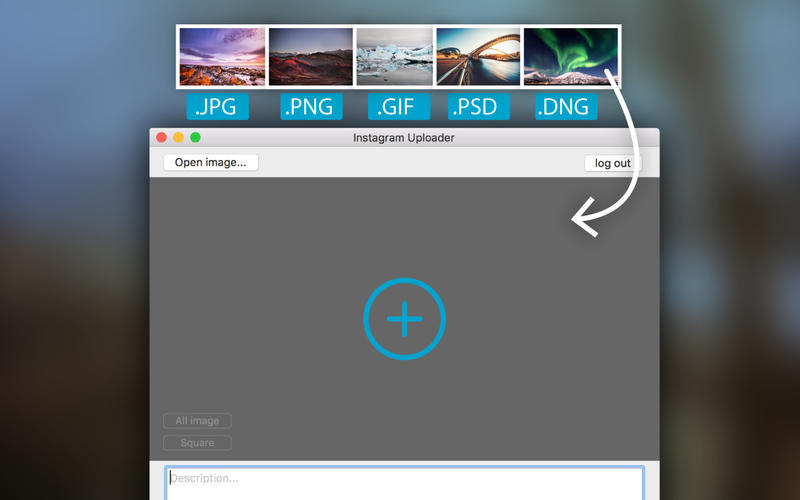
 By pressing the button " Send all ” you will immediately send the content to the network, but there is an opportunity to pre-perform several relevant actions available in the button “Add signature” . Here you can choose a square or leave the original size of the image (for all at the same time or for each separately). The photo can only be tiled over the entire width of the square, and then move the image left and right. But you can’t zoom in on the image and select a specific area (it would be relevant for high-resolution photos).
 Before sending, it remains to add comments, hashtags and emoticons (through the built-in tools of the operating system). After pressing " Share all ", we wait for the end of the publishing process and notification from Uplet. Uploading to the network takes some time, of course, not comparable in speed with the regular Instagram client for iOS.
Uplet is purely a tool for uploading images and videos. You cannot edit or delete images that have already been posted.